Introduction
Thank you for choosing the ROCAM Digital Projection Alarm Clock, Model CR1024. This device combines a digital alarm clock with a 270° rotatable projection feature, FM radio, dual alarm settings, and a USB charging port. Please read this manual carefully to ensure proper use and to fully enjoy all its features.

Image: The ROCAM Digital Projection Alarm Clock displaying time, date, temperature, and humidity, positioned on a bedside table next to a cup of coffee and a notebook.
Продукт өзгөчөлүктөрү
- 270° Rotatable Projection: Project time onto your wall or ceiling with adjustable angle and focus.
- 5-деңгээлди күңгөртүүчү LED дисплей: Adjust the brightness of the main display to your preference.
- FM Radio & Sleep Timer: Enjoy your favorite radio stations and set a sleep timer for automatic shutdown.
- Dual Alarm with Weekend/Weekday Mode: Set two independent alarms with customizable schedules (Mon-Sun, Mon-Fri, Sat-Sun, One-Time).
- USB-C Power Input & USB-A Charging Output: Power the clock via USB-C and charge external devices like smartphones via USB-A.
- Батареянын камдык көчүрмөсү: Электр энергиясы өчүрүлгөн учурда убакытты жана ойготкуч жөндөөлөрүн сактайтtages (batteries not included).
- Температура жана нымдуулук дисплей: Shows indoor temperature (°C/°F) and humidity.
- Түнкү жарык функциясы: Integrated night light for soft illumination.
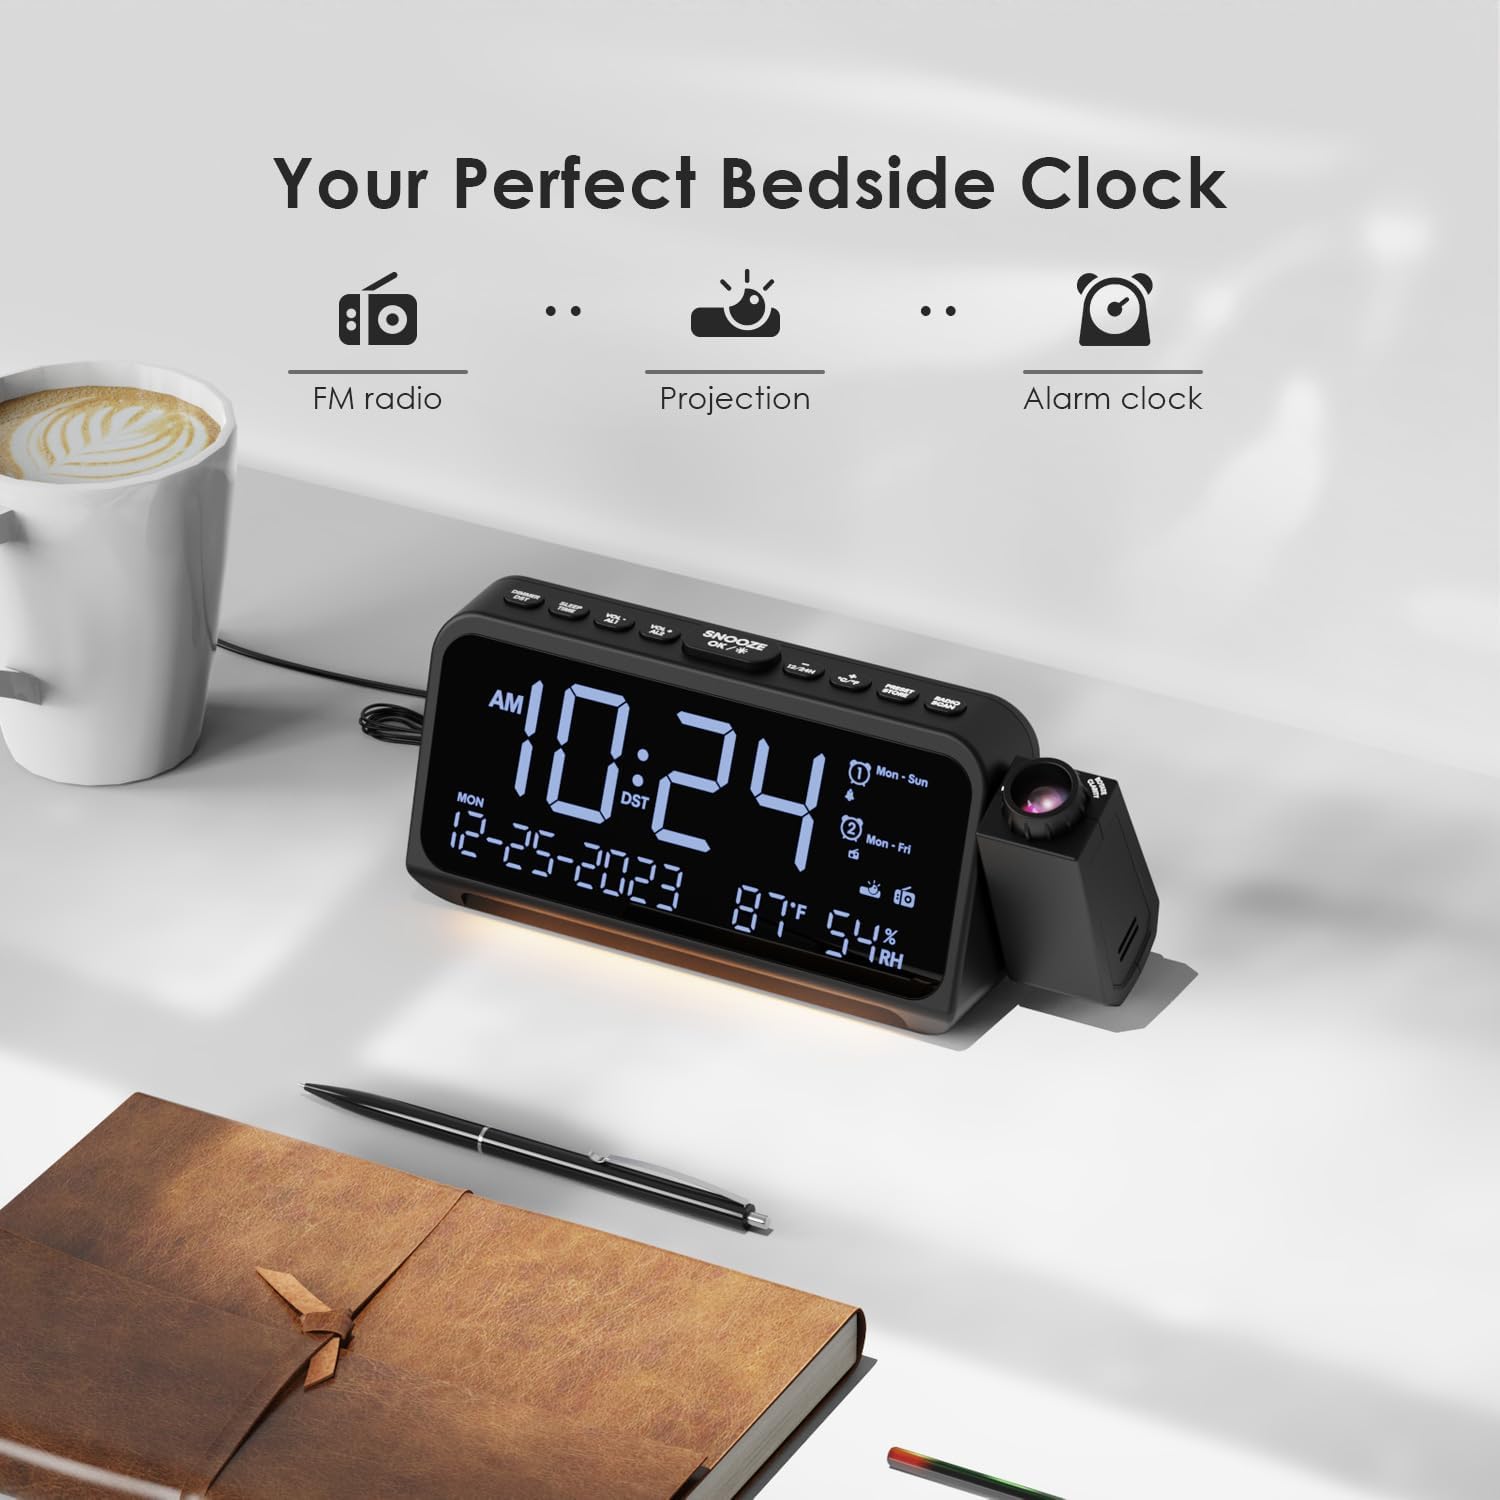
Image: Visual representation of the clock's main functions: FM radio, projection, and alarm clock.
Пакеттин мазмуну
Сураныч, пакетте төмөнкү нерселерди текшериңиз:
- ROCAM Digital Projection Alarm Clock (CR1024)
- USB Type-C Кубат кабели
- Кубаттуу адаптер
- User Manual
Note: 1 CR2 battery is required for backup functionality and is not included in the package.

Image: The alarm clock, USB-C cable, power adapter, and user manual laid out, with product dimensions (20cm x 8.7cm x 3.81cm) and weight (240g) indicated.
Продукт бүттүview
Жогорку панелдеги баскычтар:
- SNOOZE/OK/*: Snooze alarm, confirm settings, or activate night light.
- VOL-/AL1: Decrease volume, set Alarm 1.
- VOL+/AL2: Increase volume, set Alarm 2.
- 12/24H: 12 сааттан 24 сааттык убакыт форматына которулуңуз.
- °C/°F: Celsius жана Fahrenheit температура дисплейинин ортосунда которулуу.
- PRESET/STORE: Save FM radio presets.
- RADIO/SCAN: Turn FM radio on/off, scan for stations.
- УБАКЫТТЫ ОРНОТУУ: Enter time setting mode.
- Сигналды коюу: Сигнал орнотуу режимине кириңиз.
Side Panel & Rear:
- Проекциялык линза: Убакытты бетке проекциялайт.
- Фокус дөңгөлөк: Проекцияланган сүрөттүн ачыктыгын тууралайт.
- Проекциянын айлануусу: Allows 270° adjustment of the projection angle.
- DIM баскычы: Adjusts projection brightness.
- Кубат баскычы: Turns the projection on/off.
- Type-C Input (5V-2A): Негизги электр байланышы.
- USB-A Output (5V-1A): Тышкы түзмөктөрдү кубаттоо үчүн.
- FM антеннасы: Радиону жакшыраак кабыл алуу үчүн аны кеңейтиңиз.
- Батарея бөлүмү: For CR2 backup batteries.

Сүрөт: деталдуу view of the top control buttons and the projection unit, highlighting the dual alarm settings.

Image: The back of the alarm clock, illustrating the Type-C power input and the USB-A output port for charging other devices.
Жайгашуу
1. Кубат туташуу:
- Connect the provided USB Type-C cable to the Type-C input port on the back of the alarm clock.
- USB кабелинин экинчи учун кубат адаптерине сайыңыз, андан кийин адаптерди стандарттуу розеткага сайыңыз.
- Дисплей күйүп, сааттын күйүп турганын көрсөтөт.

Image: The alarm clock is shown connected to a wall outlet via its USB-C power cable and adapter.
2. Battery Backup Installation:
- Сааттын ылдый жагындагы батарея отсегин табыңыз.
- Бөлүмдүн капкагын ачыңыз.
- Insert 1 CR2 battery (not included) according to the polarity markings (+/-).
- Close the battery compartment cover. This battery will preserve time and alarm settings during a power outage.

Image: The bottom of the alarm clock with the battery compartment open, showing where to insert CR2 batteries.
Иштөө нускамалары
1. Убакытты жана датаны орнотуу:
- басып, кармап туруңуз УБАКЫТТЫ ОРНОТУУ button. The hour digits will start flashing.
- Колдонуу VOL+ or VOL- саатты тууралоо үчүн баскычтар. Басыңыз УБАКЫТТЫ ОРНОТУУ ырастоо үчүн дагы.
- Процессти мүнөт, жыл, ай жана күн үчүн кайталаңыз.
- Басыңыз 12/24H to switch between 12-hour and 24-hour format.
- Басыңыз ° C / ° F to switch between Celsius and Fahrenheit for temperature display.
2. Ойготкучтарды коюу (1-ойготкуч жана 2-ойготкуч):
- басып, кармап туруңуз Сигналды орнотуу button. The Alarm 1 icon and hour digits will flash.
- Колдонуу VOL+ or VOL- to set the desired alarm hour. Press Сигналды орнотуу ырастоо үчүн.
- мүнөткө кайталаъыз.
- Select alarm mode (Mon-Sun, Mon-Fri, Sat-Sun, One-Time) using VOL+ or VOL-. Басыңыз Сигналды орнотуу ырастоо үчүн.
- Choose alarm sound: buzzer or FM radio. Use VOL+ or VOL- тандоо үчүн. Басыңыз Сигналды орнотуу ырастоо үчүн.
- To set Alarm 2, briefly press Сигналды орнотуу again and repeat the steps.
- Ойготкучту жандыруу/өчүрүү үчүн кыскача басыңыз AL1 or AL2. The alarm icon will appear/disappear on the display.
Image: The clock display showing options for setting two alarms with different ringtone choices and day modes (Mon-Sun, Mon-Fri, Sat-Sun, One-Time).
3. Тындыруу функциясы:
Ойготкуч чыкканда, басыңыз ТЫНЧТЫК/ЖАРАЙТ/* button to temporarily silence it for 9 minutes. The alarm will sound again after the snooze period.
4. Дисплейдин жарыктыгы (күңүрттөө):
басыңыз ТЫНЧТЫК/ЖАРАЙТ/* button repeatedly to cycle through 5 levels of display brightness (L-1 to L-5) or turn the display off.

Image: The clock display showing five different brightness levels (L-1 to L-5) for the main LED screen.
5. Projection Settings:
- Күйгүзүү/өчүрүү: басыңыз Кубат баскычы on the side of the projection unit to turn the projection on or off.
- Жарыктыкты жөндөө: басыңыз DIM button on the side of the projection unit to cycle through 5 levels of projection brightness.
- Бурчту тууралоо: Rotate the projection unit up to 270° to direct the time onto your desired surface (wall or ceiling).
- Фокусту тууралоо: айлантыңыз Фокус дөңгөлөгү on the projection unit to sharpen the projected image.

Image: The digital time '10:24' projected in red onto a dark wall, demonstrating the projection feature.

Image: The projection unit rotating 270 degrees, showing how the projected time can be adjusted for optimal viewing.

Image: The projected time showing five distinct brightness levels, from level 1 (dimmest) to level 5 (brightest).
6. FM радиосунун иштеши:
- Жакшыраак кабыл алуу үчүн FM антеннасын узартыңыз.
- басыңыз RADIO/SCAN button to turn the FM radio on.
- Басып кармап туруңуз RADIO/SCAN to automatically scan and save available stations.
- Колдонуу VOL+ or VOL- to manually tune to a station or cycle through saved presets.
- Басыңыз PRESET/STORE to save the current station as a preset.
- Басыңыз RADIO/SCAN again to turn the FM radio off.

Image: The clock displaying an FM radio frequency (108.0 MHz) and options for a sleep timer (OFF, 15, 30, 60, 90 minutes).
7. Уйку таймери:
When the FM radio is on, press the ТЫНЧТЫК/ЖАРАЙТ/* button repeatedly to set a sleep timer (15, 30, 60, 90 minutes, or OFF). The radio will automatically turn off after the selected duration.

Image: A hand pressing a button on the clock, with sleep timer options (P01, P06, P12, P15, P20) displayed, indicating timed radio playback.
8. USB Charging Output:
Connect your smartphone or other USB-powered device to the USB-A output port (5V-1A) on the back of the clock to charge it. Ensure the alarm clock is powered via its USB-C input.
Техникалык тейлөө
- Тазалоо: Саатты жумшак, кургак чүпүрөк менен сүртүңүз. Абразивдүү тазалагычтарды же эриткичтерди колдонбоңуз.
- Батареяны алмаштыруу: Эгерде электр энергиясын өчүрүү учурунда саат убакытты жоготсоtage, replace the CR2 backup battery.
- Жайгашкан жери: Avoid placing the clock in direct sunlight, high temperatures, or high humidity.
Проблемаларды чечүү
| Көйгөй | Чечим |
|---|---|
| Сааттын дисплейи бош. | Ensure the USB-C power cable is securely connected to both the clock and a working power outlet. Check if the display brightness is set to OFF. |
| Ойготкуч угулбайт. | Verify that the alarm is activated (alarm icon visible). Check the alarm volume. Ensure the alarm mode (Mon-Sun, Mon-Fri, etc.) is correctly set for the current day. |
| Проекция бүдөмүк. | айлантыңыз Фокус дөңгөлөгү on the projection unit until the image is clear. Ensure the projection surface is within optimal range. |
| FM радиосун кабыл алуу начар. | Fully extend the FM antenna. Try repositioning the clock to improve signal. Perform an auto-scan to find stronger stations. |
| USB заряддоо порту иштебей жатат. | Ensure the alarm clock is powered by the USB-C input. Check the charging cable and the device being charged. |
Техникалык шарттар
- Модель номери: CR1024
- Өлчөмдөрү: 20 x 3.81 x 8.7 см (L x W x Y)
- Салмагы: 240 г
- Кубат киргизүү: USB Type-C, 5V-2A
- USB чыгышы: USB Type-A, 5V-1A
- Батареянын камдык көчүрмөсү: 1 x CR2 батарейкасы (кошулмада жок)
- FM Frequency колому: 87.5 - 108 МГц
Кепилдик жана колдоо
ROCAM products are designed for reliability and performance. This product comes with a standard manufacturer's warranty. For specific warranty details, please refer to the warranty card included in your package or contact ROCAM customer support.
If you encounter any issues or have questions regarding your ROCAM Digital Projection Alarm Clock, please contact our customer support team. Contact information can typically be found on our official webсайтында же продуктунун таңгагында.