
1. Киришүү
This manual provides detailed instructions for the safe and efficient operation of your Jesverty SPS-3005H DC Power Supply. Please read this manual thoroughly before using the device to ensure proper functionality and to prevent damage.
2. Продукт бүтүп калдыview
2.1 Негизги өзгөчөлүктөрү
- High Precision Encoder Knobs: Digital adjustment for voltage and current with 0.01V and 0.001A resolution.
- Чыгарууну күйгүзүү/өчүрүү баскычы: Conveniently control power output without disconnecting loads.
- 4 орундуу LED дисплей: Real-time display of Voltage (V), Current (A), and Power (W) with adjustable brightness.
- 5V/2A USB Charging Port: Integrated USB port for charging external devices.
- Бир нече коргоо функциялары: Includes Over-Current Protection (OCP, settable), Over-Voltage Protection (OVP, fixed), and a temperature-regulated cooling fan.
- OPN Output Status Setting: Allows the unit to output voltage and current automatically upon power-on.
- Компакт жана жеңил дизайн: Space-saving for various applications.
2.2 Пакеттин мазмуну
- 1 x Jesverty SPS-3005H DC Power Supply Unit
- 1 х Кубат кабели
- 1 set of Test Leads (banana plug to alligator clip)
- 1 x Instruction Manual
2.3 Продукт диаграммасы
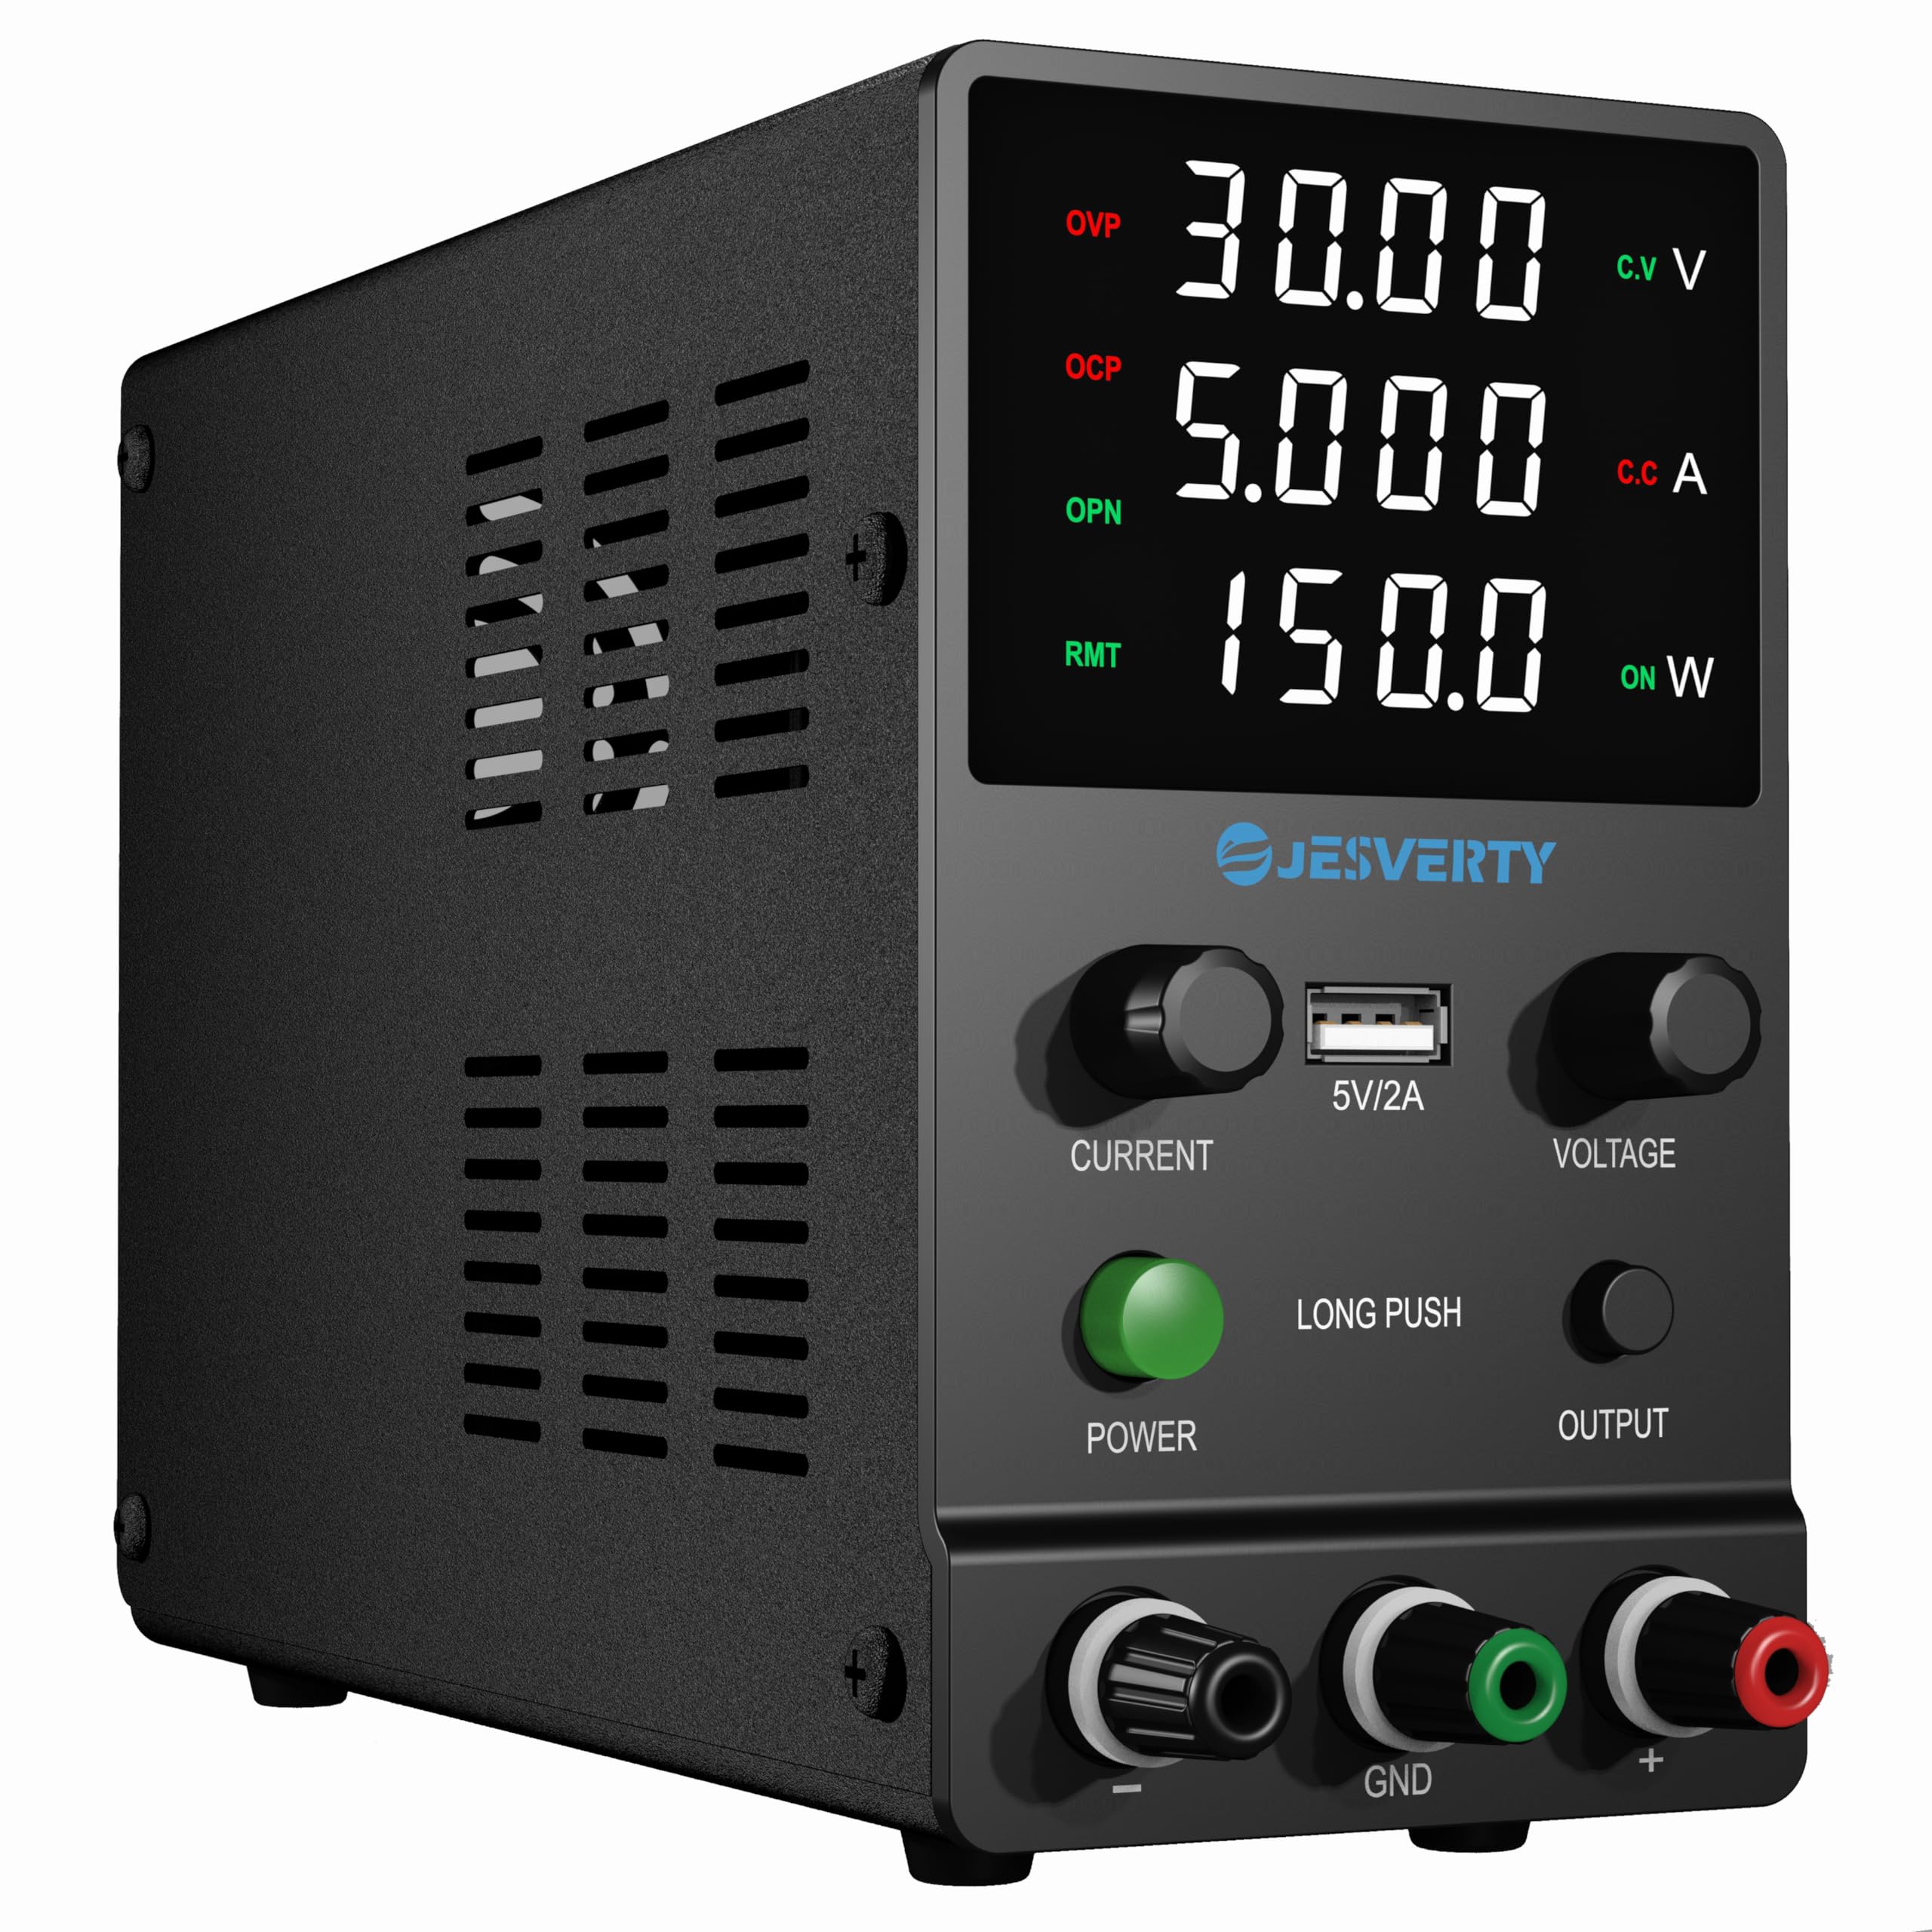
Фронт view of the Jesverty SPS-3005H DC Power Supply, showing the 4-digit LED display, encoder knobs for current and voltage, USB port, power button, output button, and output terminals.

Бүттүview diagram highlighting key features such as short circuit protection, overcurrent protection, overheating protection, low noise ripple, USB socket, overvoltage protection, encoder buttons, four-digit display, and output switch button.
3. Орнотуу
3.1 Баштапкы туташуу
- Электр кубаты өчүрүлгөнүн текшериңиз.
- Connect the provided power cord to the AC input on the rear of the unit and then to a suitable AC power outlet (240V AC).
- Connect the test leads to the output terminals on the front panel. The red lead connects to the positive (+) terminal, the black lead to the negative (-) terminal, and the green lead to the ground (GND) terminal.
- Улантуудан мурун бардык туташуулар коопсуз экенин текшериңиз.
4. Иштөө нускамалары
4.1 Күйгүзүү/өчүрүү
Жашыл баскычты басыңыз КҮЧ button on the front panel to turn the unit on or off. The LED display will illuminate when the unit is powered on.
4.2-томtage жана Учурдагы тууралоо

Illustration of the encoder knob operation for setting voltage and current values digit by digit.
- Томду тууралоо үчүнtage, басыңыз ТОМTAGE encoder knob. A digit on the voltage display will begin to flash, indicating it is selected for adjustment.
- бургула ТОМTAGE knob left or right to change the value of the flashing digit (0-9).
- басыңыз ТОМTAGE knob again to move to the next digit for adjustment. Repeat until the desired voltage коюлган.
- To adjust current, follow the same procedure using the УЧУРДА encoder knob.
- The setting resolution is 0.01V for voltage and 0.001A for current.
4.3 Output ON/OFF Function
The OUTPUT button allows you to enable or disable the power output to the terminals. Press this button to toggle the output state. This feature is useful for adjusting settings without disconnecting the load or powering down the unit.
4.4 Экран жарыктыгын жөндөө

Illustration demonstrating how to adjust the display brightness by simultaneously turning the CURRENT and VOLTAGE knobs.
To adjust the screen brightness, simultaneously turn both the УЧУРДА жана ТОМTAGE encoder knobs. Turning them to the right increases brightness, while turning them to the left decreases brightness.
4.5 OPN (Output Status Setting) Function

Instructions for activating and deactivating the OPN function, which enables automatic output upon power-on.
The OPN function allows the unit to automatically output the set voltage and current as soon as the power switch is turned on, without needing to press the OUTPUT баскычы.
- To Enable OPN: басыңыз OUTPUT button for 3 seconds to enter the OPN setting interface. The OPN light will turn on. Turn the OUTPUT button lightly to change the power bit display value from 0 to 1. Press the OUTPUT button for 3 seconds to save the setting and return to the main interface. The OPN light will remain on.
- To Disable OPN: Enter the OPN setting interface as described above. Turn the OUTPUT button lightly to change the power bit display value from 1 to 0. Press and hold the OUTPUT button for 3 seconds to save and exit. The OPN light will turn off.
4.6 OCP (Over-Current Protection) Setting

Instructions for activating and deactivating the OCP function, which protects against excessive current draw.
OCP protects the connected load by limiting the output current to a set maximum value. When OCP is triggered, the output will shut down.
- To Enable OCP: басып, кармап туруңуз УЧУРДА button for 3 seconds to enter the OCP setting interface. The OCP light will turn on. Turn the УЧУРДА button to the right to set the desired OCP value. Press the УЧУРДА button for 3 seconds to save and return to the main interface. The OCP short circuit protection alarm function is now active.
- To Disable OCP: Enter the OCP setting interface as described above. Turn the УЧУРДА button to the left until the power display value jumps from 1 to 0. Press and hold the УЧУРДА button for 3 seconds to save and exit. The OCP light will turn off.
4.7 OVP (Over-Voltage Коргоо)
The unit features fixed Over-Voltage Protection (OVP) to safeguard connected devices from excessive voltage. This protection is not user-adjustable.
4.8 USB кубаттоо порту
A 5V/2A USB charging port is located on the front panel, providing a convenient power source for compatible USB devices.
5. Коопсуздук маалыматы
- Электр менен камсыздоону нымдуу же ысык абалда иштетпеңизamp шарттар.
- Ensure proper ventilation to prevent overheating. Do not block the cooling fan vents.
- Жерге туташтыргычты ар дайым туура жерге туташтыргычка туташтырыңыз.
- Түзмөктү ачууга же өзгөртүүгө аракет кылбаңыз. Бардык тейлөө иштерин квалификациялуу адистерге тапшырыңыз.
- Ырды текшерүүtage and current settings before connecting to a load to prevent damage to the device or the power supply.
- Use only the provided power cord and test leads, or suitable replacements.
6. Техникалык тейлөө
- Түзмөктү таза жана чаңсыз кармаңыз. Тазалоо үчүн жумшак, кургак чүпүрөк колдонуңуз.
- Periodically check the cooling fan for obstructions. The fan operates based on internal temperature.
- Store the power supply in a dry, cool environment when not in use.
7. Кыйынчылыктарды
| Көйгөй | Мүмкүн себеп | Чечим |
|---|---|---|
| Кубат жок/дисплей өчүк | Электр зымы туташкан эмес; Электр өчүрүү; Күйгүзүүчү. | Check power cord connection; Press power switch; Replace fuse (if accessible and qualified). |
| Чыгаруунун көлөмү жокtage/Current | Output button off; OCP/OVP triggered; Incorrect settings. | Press OUTPUT button; Check OCP/OVP status and reset if necessary; Verify voltage/учурдагы орнотуулар. |
| Display is too dim/bright | Жарыктык жөндөөсүн тууралоо керек. | Adjust screen brightness using both encoder knobs simultaneously. |
| Бирдик ашыкча ысып жатат | Бөгөттөлгөн желдетүү; Ашыкча жүк. | Ensure vents are clear; Reduce load or operate within specified limits. |
8. Техникалык шарттар
| Параметр | Нарк |
|---|---|
| Бренд | Jesverty |
| Модел | SPS-3005H |
| Киргизүү көлөмүtage | 240V AC |
| Output Voltage Диапазон | 0-30В DC |
| Чыгуу токунун диапазону | 0-5А DC |
| USB чыгышы | 5V/2A |
| Дисплей түрү | 4-Digit LED (V, A, W) |
| Тtage Display Resolution | 0.01V |
| Current Display Resolution | 0.001A |
| Power дисплейинин чечилиши | 0.1 Вт |
| Өлчөмдөр (D x W x H) | 7.1 x 3.35 x 6.1 дюйм (болжол менен) |
| Салмагы | 2.5 фунт (болжол менен) |
| Коргоо өзгөчөлүктөрү | OCP (settable), OVP (fixed), Temperature-regulated cooling fan |
9. Кепилдик жана колдоо
Jesverty provides professional technical support for this product. If you encounter any problems or have questions regarding your order or the product's operation, please contact Jesverty Customer Service. Contact information is typically included with the product or can be found via the Amazon platform or official Jesverty email channels.