1. Киришүү
Thank you for choosing the Elprico Dash Cam. This device is designed to provide reliable video recording while driving, enhancing your safety and providing evidence in case of incidents. This manual will guide you through the installation, operation, and maintenance of your dash cam.
2. Коопсуздук маалыматы
- Ensure the dash cam is installed securely and does not obstruct the driver's view же транспорт каражаттарын башкарууга тоскоолдук кылуу.
- Айдап бара жатканда түзмөктү иштетпеңиз. Жөндөөлөрдү унаа коопсуз токтогондо гана тууралаңыз.
- Use only the provided power cable and accessories to prevent damage or fire.
- Аппаратты экстремалдык температурадан, түз күн нурунан жана нымдуулуктан алыс кармаңыз.
- Аппаратты өз алдынча бөлүүгө же оңдоого аракет кылбаңыз. Жардам алуу үчүн кардарларды колдоо бөлүмүнө кайрылыңыз.
- Regularly check that the dash cam is recording correctly.
3. Пакеттин мазмуну
Сураныч, пакетте төмөнкү нерселерди текшериңиз:
- Elprico Dash Cam Unit
- Car Charger (with USB cable)
- Mounting Bracket (with adhesive pad)
- Колдонуучунун Колдонмосу (бул документ)
- Note: A MicroSD card is required for recording and is typically sold separately.

Image: Elprico Dash Cam unit shown alongside its car charger and USB cable.
4. Продукт бүтүп калдыview
The Elprico Dash Cam features a compact design with a 140° wide-angle lens, HD video recording capabilities, and built-in Wi-Fi for app connectivity.

Сүрөт: алдыңкы view of the Elprico Dash Cam, showing the lens and "FULL HD HIGH DEFINITION" label.

Сүрөт: Жакын план view of the side of the dash cam, showing the USB port, MicroSD card slot, and ventilation holes.

Image: Close-up of the dash cam's wide-angle lens.
5. Орнотуу жана орнотуу
Follow these guidelines for proper installation of your Elprico Dash Cam:
- Choose Installation Location (A): Mount the dash cam unit on the upper edge of the front windshield. Ensure it does not obstruct your view. Route the connecting wire along the roof gap and through the A-pillar to the fuse box or cigarette lighter.
- Power Connection via Fuse Box (B): For 24-hour parking monitoring, connect the dash cam to the vehicle's fuse box using a special intelligent voltage reduction line. This ensures normal power supply and includes a low voltage automatic power-off feature to protect your car battery.
- Power Connection via Cigarette Lighter (C): Alternatively, power the dash cam using the car's cigarette lighter socket. Route the cable along the passenger side, hiding it through the storage compartment to the center console cigarette lighter.
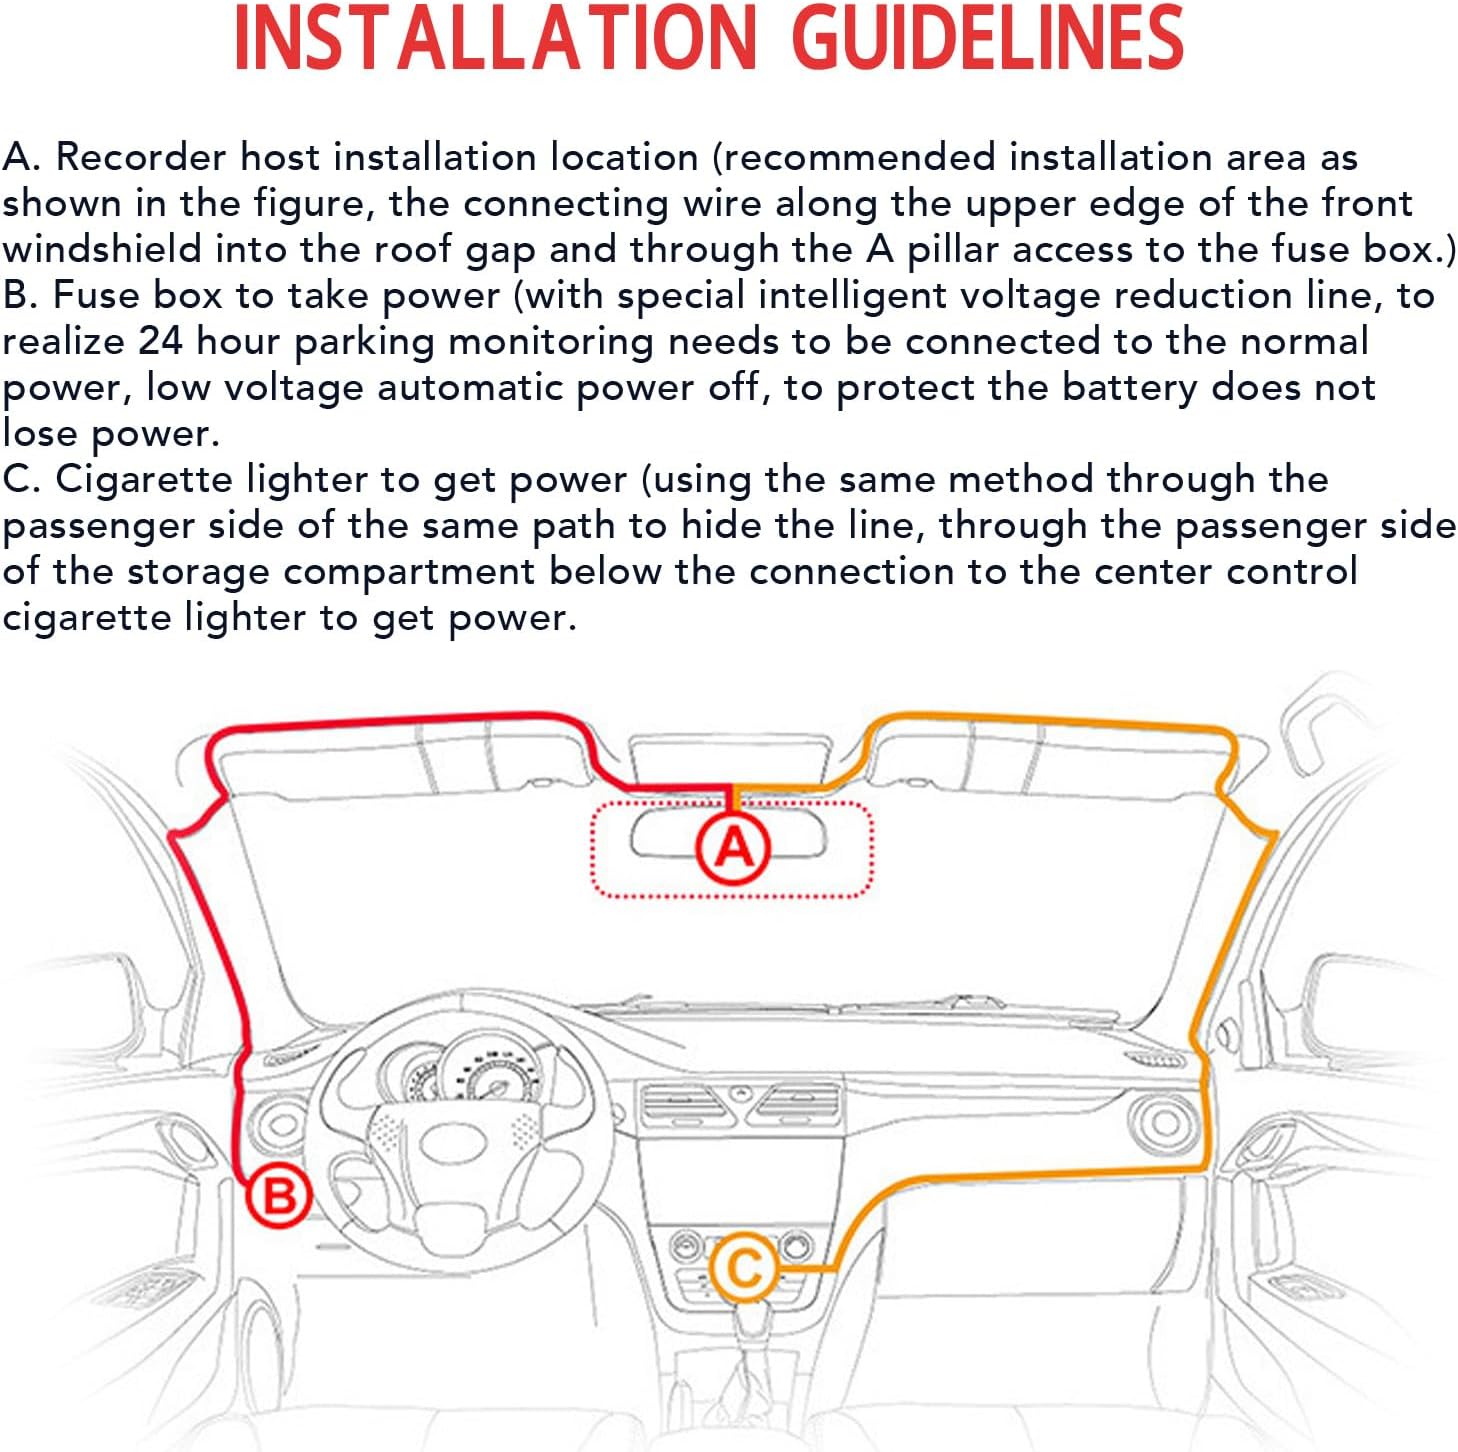
Image: Diagram illustrating recommended installation points (A, B, C) for the dash cam and cable routing within a car interior.
5.1 MicroSD картасын салуу
Insert a high-speed MicroSD card (Class 10 or higher, up to 32GB recommended) into the designated slot on the side of the dash cam. Ensure the card is inserted correctly until it clicks into place. Format the card within the dash cam settings before first use for optimal performance.
6. Иштөө нускамалары
6.1 Күйгүзүү/өчүрүү
The dash cam will automatically power on and begin recording when connected to a power source and the vehicle ignition is turned on. It will power off automatically when the ignition is turned off.
6.2 Жазуу режимдери
- Цикл жаздыруу: The dash cam continuously records video in short segments (e.g., 1, 3, or 5 minutes). When the storage limit of the MicroSD card is reached, the new video will automatically overwrite the oldest unlocked video.
- Өзгөчө кырдаалдарда жаздыруу (G-сенсор): In the event of a sudden shake or collision, the built-in G-sensor will detect the impact and automatically lock the current video segment, preventing it from being overwritten by loop recording. These files are saved in a separate folder.

Image: Diagram illustrating the loop recording function, where new video overwrites older, unlocked footage, while important events are saved.

Image: A visual representation of an emergency recording event, indicated by a lock icon, signifying that footage of an incident is protected.
6.3 Wi-Fi байланышы жана тиркемени колдонуу
The dash cam features built-in Wi-Fi for easy connectivity with a dedicated mobile application. This allows you to:
- View жаша фооtagсызык камерасынан e.
- Playback recorded videos directly on your smartphone.
- Жазылган видеолорду телефонуңузга жүктөп алыңыз.
- Видеорегистратордун жөндөөлөрүн тууралаңыз.
- Тамак-аш менен бөлүшүүtage to social media (via the app).
Refer to the app's instructions for detailed pairing and usage steps.
6.4 Инфракызыл түнкү көрүнүш
The dash cam is equipped with infrared night vision capabilities. It automatically increases exposure in low-light conditions to capture clear video footage, helping to record details such as license plates, drivers, and passengers even in dark environments.
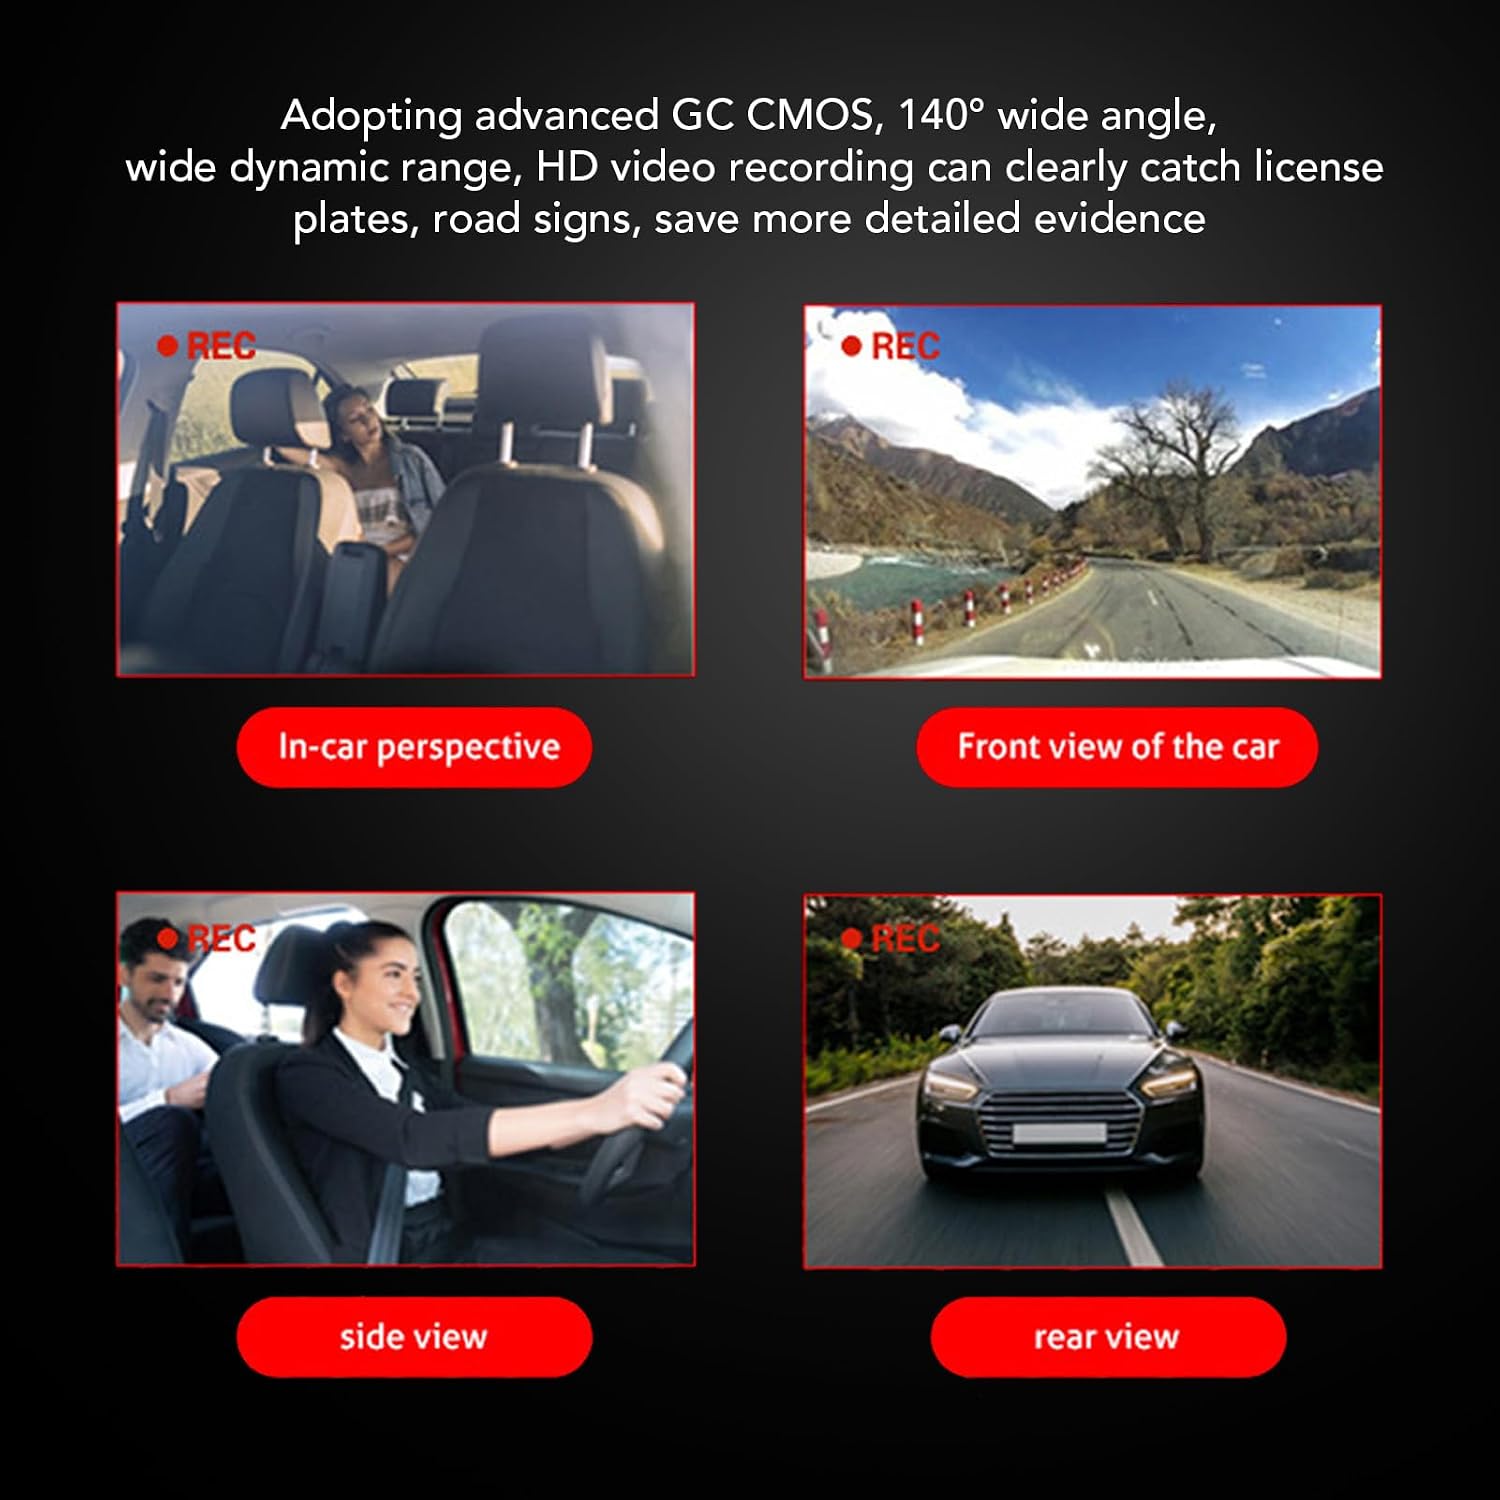
Image: Four panels showing different recording perspectives: in-car, front view of the car, side view, жана арткы view, demonstrating the camera's wide coverage.
7. Техникалык тейлөө
- Тазалоо: Use a soft, dry cloth to clean the lens and the device body. Do not use abrasive cleaners or solvents.
- MicroSD картасы: Format the MicroSD card regularly (e.g., once a month) to maintain optimal recording performance and prevent data corruption. Back up any important files форматтоодон мурун.
- Программалык камсыздоонун жаңыртуулары: Өндүрүүчүнү текшериңиз website or the mobile app for any available firmware updates to ensure your dash cam has the latest features and bug fixes.
8. Кыйынчылыктарды
- Видеорегистратор күйбөй жатат:
- Check the power connection to the car charger and the dash cam.
- Ensure the car's cigarette lighter socket or fuse box connection is working.
- Мүмкүн болсо, башка кубат булагын колдонуп көрүңүз.
- Жаздыруу маселелери (мисалы, жазууну токтотуп, бузулган fileс):
- Ensure a high-speed (Class 10 or higher) MicroSD card is used.
- MicroSD картасын үзгүлтүксүз форматтаңыз.
- Try a different MicroSD card.
- Check if the card is full (loop recording should prevent this, but emergency files can accumulate).
- Wi-Fi туташуу көйгөйлөрү:
- Видеорегистратордун Wi-Fi туташуусу күйгүзүлгөнүн текшериңиз.
- Камераны да, смартфонуңузду да өчүрүп күйгүзүңүз.
- Видеобайкоо камерасына жакын жерде экениңизди текшериңиз.
- Reinstall the mobile application.
- Сүрөттүн сапаты начар:
- Видеобайкоо камерасынын линзасын тазалаңыз.
- Линзадан коргоочу пленканын алынып салынганын текшериңиз.
- Check settings for video resolution.
9. Техникалык шарттар
| Бренд | Elprico |
| Модель аты | Elpricow3txqsc8gy |
| Байланыш технологиясы | Wi-Fi |
| Башкаруу ыкмасы | Touch (via app) |
| Шайкеш түзмөктөр | Машина |
| Унаа кызматынын түрү | Машина |
| Max Video Resolution | 1920x (HD) |
| Wide Angle | 140° |
| Сактагыч | MicroSD картасы (кошулбаган) |
10. Кепилдик жана колдоо
Specific warranty information is not provided in the product details. Please refer to the retailer or manufacturer's official webкепилдик шарттары жана эрежелери менен таанышуу үчүн сайтты караңыз.
For technical support or further inquiries, please contact Elprico customer service through their official channels.