
1. Киришүү
This manual provides essential instructions for setting up, operating, and maintaining your DORHEA ESP32-S3-DevKit C N16R8 development board. This board is designed for Internet of Things (IoT) applications, featuring Wi-Fi and Bluetooth Low Energy (LE) connectivity. Please read this manual thoroughly before use to ensure proper functionality and to maximize the potential of your development board.
Пакеттин мазмуну:
- 3 x ESP32-S3-DevKit C N16R8 Development Boards
- Pin Headers (unassembled)
2. Продукт бүтүп калдыview
2.1 Негизги өзгөчөлүктөрү
- Equipped with ESP32-S3-DevKitC-1-N16R8 module.
- Integrated Wi-Fi and Bluetooth LE functions.
- 16MB Flash and 8MB PSRAM for ample memory and storage.
- Multiple I/O pins broken out for easy interfacing.
- Dual Type-C ports: one for USB-to-UART communication and one for ESP32-S3 USB (OTG).
- 3.3V SPI voltage.
2.2 Board Layout and Components
The ESP32-S3-DevKit C N16R8 board features a compact design with clearly labeled components and pin headers for easy integration into your projects.

Сүрөт 2.2.1: Labeled diagram of the ESP32-S3-DevKit C N16R8 development board. This image highlights the USB to Serial Port (Type-C USB), ESP32-S3 Straight Type-C USB & OTG, USB to Serial Port Chip (CH343P), PWR Lamp, TX Lamp, RX Light, Boot Button, RST Key, Power Supply Chip, and the ESP32-S3 N8R2 / N8R8 / N16R8 Module.
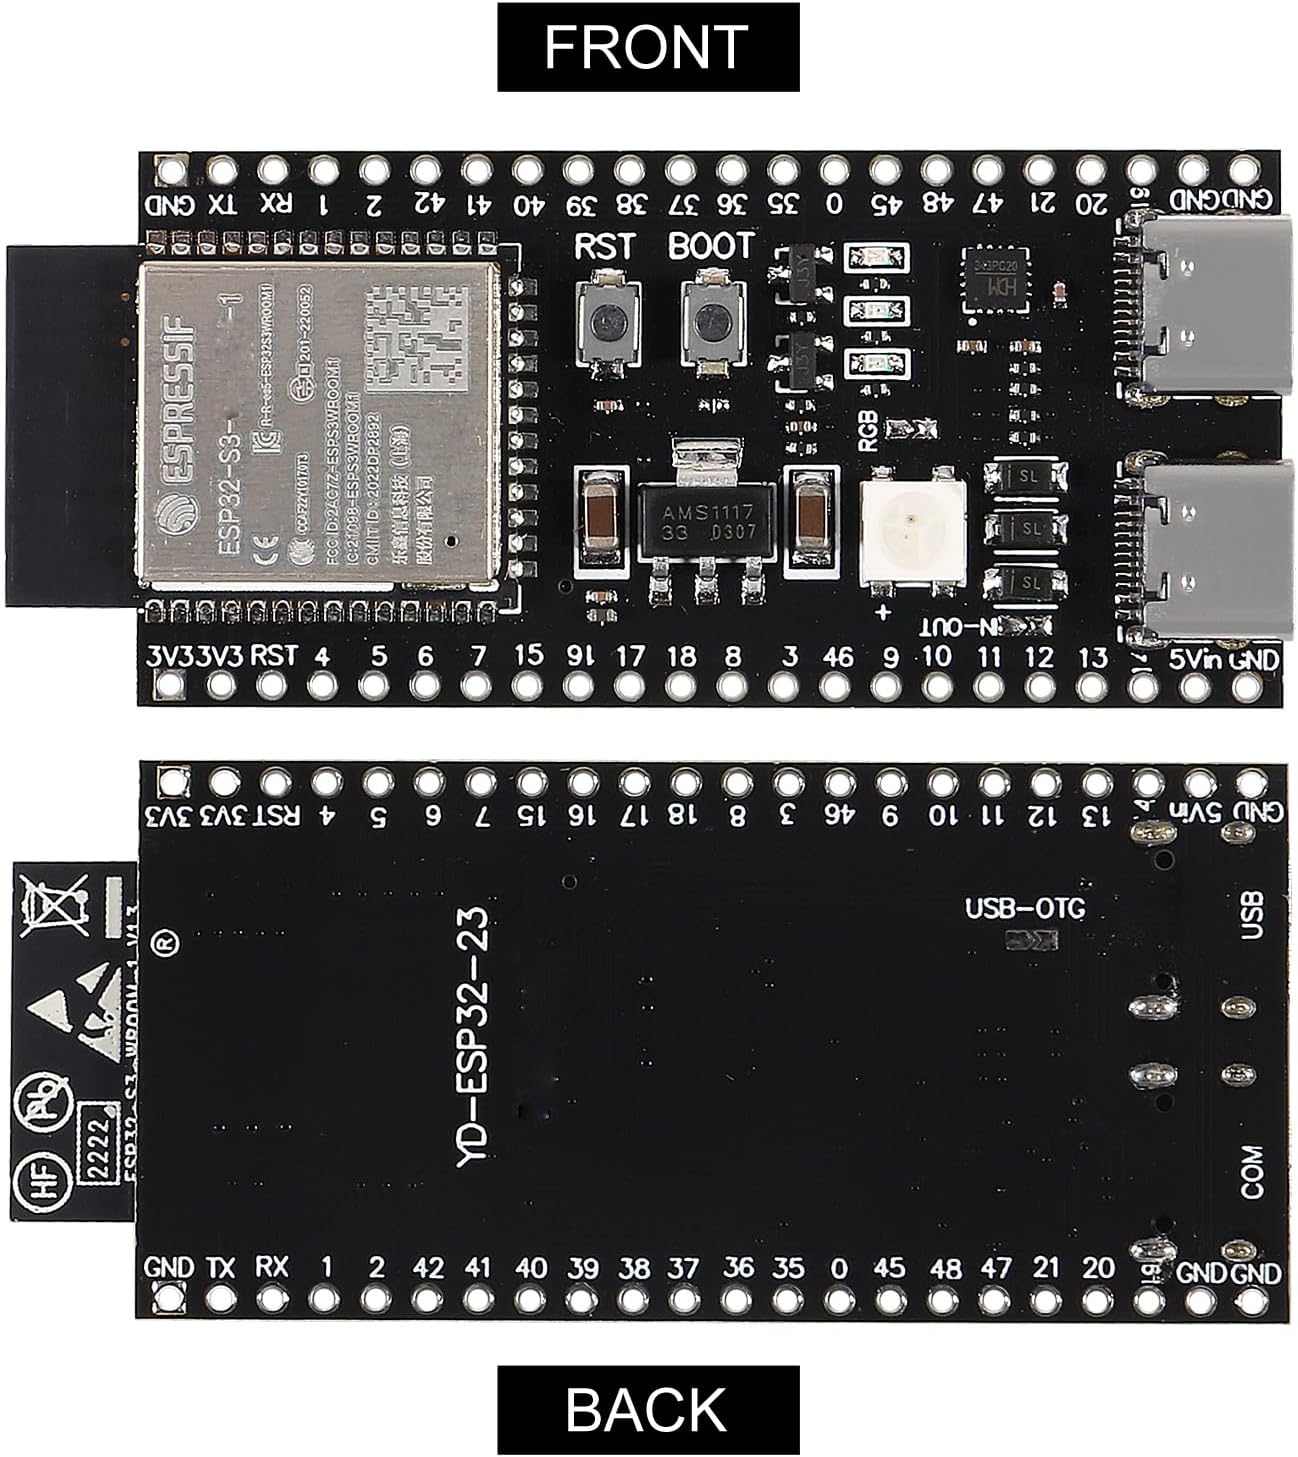
Сүрөт 2.2.2: Алдыңкы жана арткы view of the ESP32-S3-DevKit C N16R8 development board. The front view shows the main components and pin labels, while the back view shows the USB-OTG label and other markings.

Сүрөт 2.2.3: Detailed close-up views of the ESP32-S3-DevKit C N16R8 board. This image provides a closer look at the dual Type-C ports, the ESP32-S3 module, and various surface-mount components, illustrating the board's build quality.
3. Орнотуу
3.1 Электр менен жабдуунун параметрлери
The ESP32-S3-DevKit C N16R8 board can be powered using three mutually exclusive methods:
- USB-to-UART Port and ESP32-S3 USB Port: Connect either one or both Type-C ports to a computer or a 5V USB power source. This is the recommended power supply method.
- 5V and G (GND) Pins: Provide a 5V power supply directly to the 5V and GND pins on the board.
- 3V3 and G (GND) Pins: Provide a 3.3V power supply directly to the 3V3 and GND pins on the board.
3.2 Аппараттык туташуу
To begin, connect the development board to your computer. It is recommended to use the USB-to-UART Port for initial setup and programming.
- Ensure the pin headers are soldered to the board if not already pre-soldered.
- Connect a USB Type-A to Type-C cable from your computer to the USB-to-UART Port on the ESP32-S3-DevKit C N16R8 board. Ensure the cable supports data communication, not just charging.
- The power indicator LED on the board should illuminate, indicating successful power delivery.
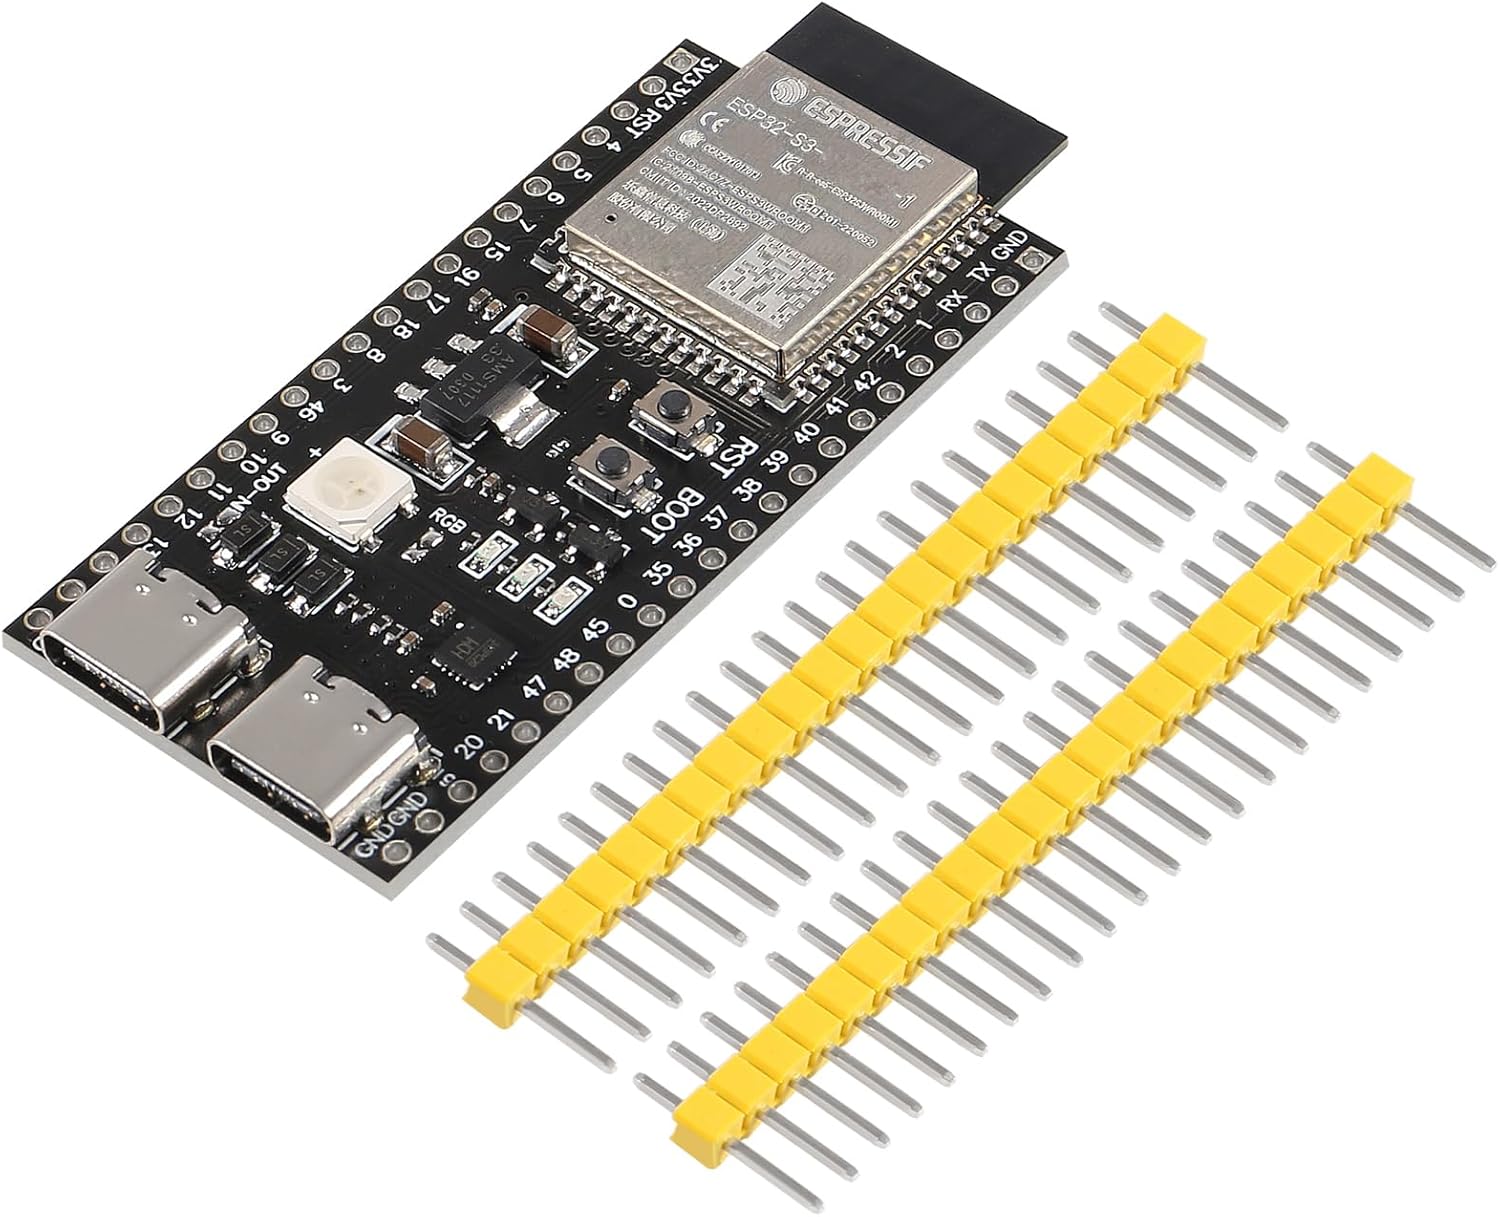
Сүрөт 3.2.1: The ESP32-S3-DevKit C N16R8 development board shown alongside the included pin headers. These headers need to be soldered to the board for breadboard compatibility and easy wiring.
3.3 Программалык камсыздоону орнотуу
To program the ESP32-S3-DevKit C N16R8, you will need to set up a development environment. Refer to the official Espressif documentation for detailed installation instructions.
- Install ESP-IDF: The Espressif IoT Development Framework (ESP-IDF) is the official development framework for the ESP32-S3. Follow the installation guide on the Espressif webсайт (docs.espressif.com) to set up the toolchain and environment.
- Alternative IDEs: You may also use other integrated development environments (IDEs) such as Arduino IDE with ESP32-S3 board support or PlatformIO. Ensure you select the correct board model (e.g.,
esp32-s3-devkitm-1or similar for ESP32-S3-DevKitC-1) and the appropriate ESP-IDF version for compatibility. - Flash an Exampле: Once your development environment is configured, you can flash an example application onto your board to verify the setup.
4. Иштөө нускамалары
The ESP32-S3-DevKit C N16R8 is a versatile development board for various IoT projects. After completing the software setup, you can upload your code to the board.
- Программалоо: Use your chosen IDE (ESP-IDF, Arduino IDE, PlatformIO) to write and compile your code.
- Uploading Code: Connect the board via the USB-to-UART Type-C port. Select the correct serial port in your IDE and upload the compiled firmware. The TX/RX indicator lights will flash during data transfer.
- Wi-Fi жана Bluetooth: Utilize the integrated Wi-Fi and Bluetooth LE capabilities for wireless communication in your applications. Refer to the ESP-IDF programming guides for specific API usage.
- GPIO колдонуу: The exposed GPIO pins can be used to interface with external sensors, actuators, and other peripherals. Consult the ESP32-S3 datasheet and pinout diagrams for detailed information on pin functions.
5. Техникалык тейлөө
To ensure the longevity and reliable operation of your ESP32-S3-DevKit C N16R8 development board, follow these maintenance guidelines:
- Колдонуу: Handle the board by its edges to avoid touching components, especially the ESP32-S3 module, which can be sensitive to electrostatic discharge (ESD).
- Сактагыч: Store the board in a dry, anti-static environment, away from direct sunlight, extreme temperatures, and humidity.
- Тазалоо: If necessary, gently clean the board with a soft, dry brush or compressed air. Avoid using liquids or abrasive materials.
- Электр камсыздоо: Always use a stable and appropriate power supply (5V or 3.3V) to prevent damage to the board.
6. Кыйынчылыктарды
If you encounter issues with your ESP32-S3-DevKit C N16R8 board, consider the following troubleshooting steps:
- Плата күйбөй жатат:
- Verify the USB cable is securely connected and functional.
- Ensure the power source (computer USB port or external adapter) is providing sufficient power.
- Башка USB кабелин же портту колдонуп көрүңүз.
- Unable to Upload Code:
- Check if the correct serial port is selected in your IDE.
- Ensure the necessary USB-to-UART drivers are installed on your computer.
- басып, кармап туруңуз BOOT баскычын басып, андан кийин баскычты коё бересиз RST баскычын басып, андан кийин бошотуңуз BOOT button to enter bootloader mode before uploading.
- Verify your IDE settings match the ESP32-S3-DevKitC-1 board and ESP-IDF version.
- Wi-Fi/Bluetooth туташуу маселелери:
- Confirm your code correctly initializes and configures the Wi-Fi or Bluetooth module.
- Башка зымсыз аппараттардын кийлигишүүсүн текшериңиз.
- Ensure your antenna (if external) is properly connected.
- Жалпы туруксуздук:
- Ensure your power supply is stable and free from voltagд термелүүлөр.
- Check for short circuits or incorrect wiring if external components are connected.
- Review your code for potential bugs or memory leaks.
For further assistance, consult the official Espressif documentation or relevant online developer communities.
7. Техникалык шарттар
Below are the technical specifications for the DORHEA ESP32-S3-DevKit C N16R8 development board:

Сүрөт 7.1: Dimensions of the ESP32-S3-DevKit C N16R8 development board. The board measures approximately 63mm (2.48 inches) in length and 28mm (1.10 inches) in width.
| Өзгөчөлүк | Спецификация |
|---|---|
| Модель аты | DORHEA ESP32-S3-DevKit C N16R8 |
| Процессор | ESP32-S3 (Dual-core Xtensa LX7) |
| Flash Memory | 16 MB |
| PSRAM | 8 MB (LPDDR4) |
| Зымсыз байланыш | Wi-Fi (802.11 b/g/n), Bluetooth LE (5.0) |
| USB порттору | 2 x Type-C (USB-to-UART, ESP32-S3 USB/OTG) |
| Operating Voltage | 3.3V (SPI voltage) |
| Power Supply Input | 5V via USB or 5V/3.3V via pins |
| Операциялык системаны колдоо | FreeRTOS (ESP-IDF), Arduino, PlatformIO |
| Өлчөмдөрү (болжол менен) | 63 мм x 28 мм (2.48 x 1.10 дюйм) |
| Элемент Салмагы (болжол менен) | 1.44 унция |
8. Кепилдик жана колдоо
Warranty information for the DORHEA ESP32-S3-DevKit C N16R8 development board is not provided within this manual. For details regarding warranty coverage, returns, or technical support, please refer to the seller's policies or contact DORHEA directly through their official channels or the platform where the product was purchased.