
1. Коопсуздук боюнча маанилүү маалымат
Please read all instructions carefully before using the EVTSCAN Projection Clock. Keep this manual for future reference.
- Аппаратты экстремалдык температурага, түз күндүн нуруна же жогорку нымдуулукка дуушар кылбаңыз.
- Саатты түшүрүп алуудан же катуу соккуга кабылтуудан алыс болуңуз.
- Аппаратты өз алдынча бөлүүгө же оңдоого аракет кылбаңыз. Квалификациялуу тейлөө кызматкерлерине кайрылыңыз.
- Use only the specified power adapter (DC 5.0V, 1.2A) or appropriate batteries (2xAAA, not included).
- Балдар жетпеген жерде сактаңыз.
2. Продукт бүтүп калдыview
The EVTSCAN Projection Clock is a versatile digital alarm clock featuring a 3-inch backlit LCD screen that displays time, date, day of the week, temperature, and humidity. It includes a projection function to display time and temperature on a wall or ceiling, dual alarms with snooze, and a USB port for charging mobile phones.
Негизги өзгөчөлүктөрү:
- 12/24-hour time format display.
- Date and day of the week display (7 languages for week).
- Temperature detection (-9℃ to +50℃) and humidity detection (20% to 95%).
- Projection function with 180-degree rotation for time and temperature.
- Dual alarm clocks with slowly increasinг көлөмү.
- 5 мүнөттүк тындыруу функциясы.
- Мобилдик түзмөктөр үчүн USB кубаттоо порту.
- Adjustable backlight with 4 levels (high, medium, low, off).

2.1-сүрөт: Фронт view of the EVTSCAN Projection Clock, showing the LCD display and projection lens.
3. Пакеттин мазмуну
Таңгактан чыгаргандан кийин, төмөндө көрсөтүлгөн нерселердин бардыгы бар экенин жана жакшы абалда экендигин текшериңиз:
- 1 x EVTSCAN Projection Clock
- 1 x USB кабели
- 1 x Англис колдонуучу колдонмо
Note: 2xAAA batteries are required for battery power and are not included in the package.
4. Орнотуу
4.1 Аппаратты кубаттоо
The EVTSCAN Projection Clock can be powered by either AAA batteries or via the included USB cable.
4.1.1 Батареяны орнотуу
- Сааттын артындагы батарея бөлүкчөсүнүн капкагын табыңыз.
- Slide open the cover.
- Туура полярдуулукту (+/-) камсыз кылып, эки (2) AAA батарейкасын салыңыз.
- Батарея уясынын капкагын бекем жабыңыз.
Note: When powered by batteries, the backlight will only light up for 8 seconds when activated to conserve power. The projection lamp will also light up for 8 seconds.
4.1.2 USB Power Connection
- Connect the small end of the provided USB cable to the DC 5.0V 1.2A input port on the back of the clock.
- USB кабелинин чоңураак учун шайкеш келген USB кубат адаптерине (кошулмада жок) же кубаттуу USB портуна туташтырыңыз.
Note: When powered by USB, the backlight and projection lamp can remain continuously on, with adjustable brightness for the backlight.
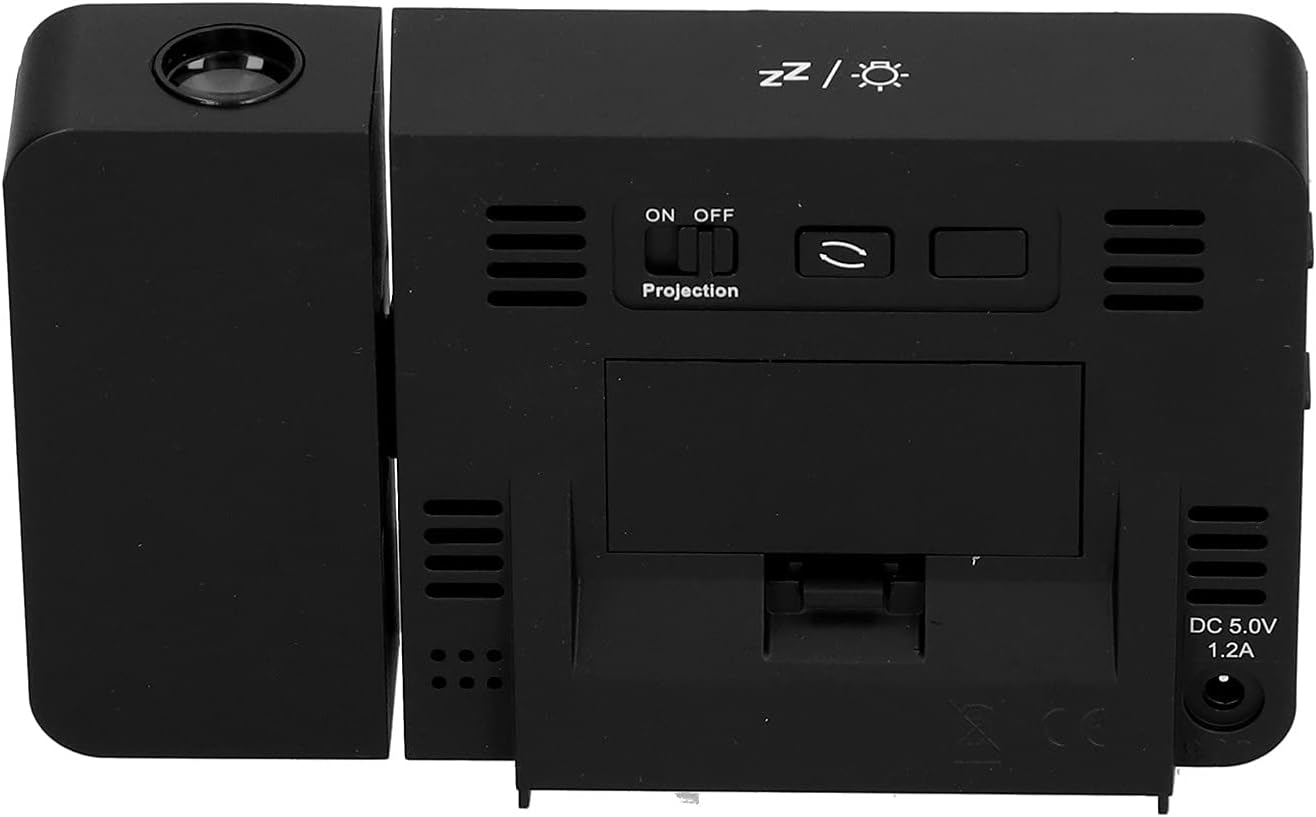
4.1-сүрөт: Арткы view of the clock, indicating the battery compartment and DC 5.0V 1.2A power input.
5. Иштөө нускамалары
5.1 Баскыч функциялары
Familiarize yourself with the control buttons located on the front and sides of the clock:
- TIME: Убакытты орнотуу режимине кирет.
- ЭСКЕРТҮҮ: Сигнал орнотуу режимине кирет.
- +: Increases values, switches 12/24HR format, adjusts backlight.
- -: Decreases values, switches temperature units (℃/℉).
- Projection ON/OFF Switch: Activates or deactivates the projection. (Located on the back/side)
- Alarm 1 ON/OFF Switch: Activates or deactivates Alarm 1. (Located on the side)
- Alarm 2 ON/OFF Switch: Activates or deactivates Alarm 2. (Located on the side)
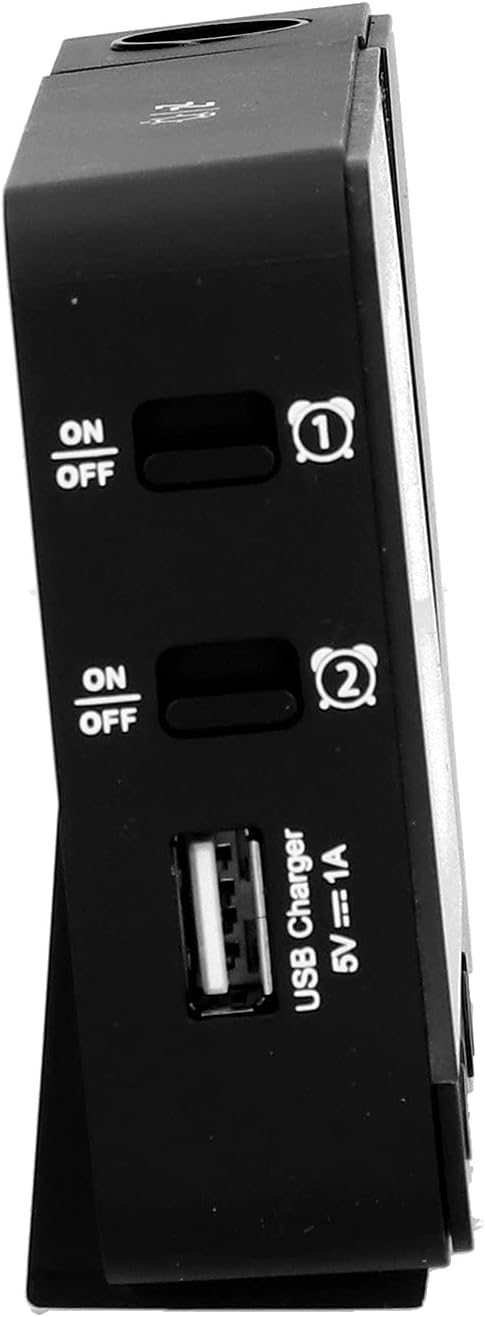
5.1-сүрөт: Side view showing Alarm 1 and Alarm 2 ON/OFF switches, and the USB charging port.
5.2 Убакытты жана датаны орнотуу
- басып, кармап туруңуз TIME button to enter time setting mode. The hour display will flash.
- колдонуу + or - саатты тууралоо үчүн баскычтар.
- Басыңыз TIME Саатты ырастоо жана мүнөт жөндөөсүнө өтүү үчүн кайрадан басыңыз. + or -.
- Басууну улантыңыз TIME to cycle through setting year, month, and day. Adjust each with + or -.
- Күндү койгондон кийин, баскычын басыңыз TIME орнотуу режиминен чыгуу үчүн акыркы жолу.
- 12 сааттык жана 24 сааттык форматтын ортосунда которулуу үчүн, басыңыз + Кадимки убакытты көрсөтүү учурунда баскычын басыңыз.
- To switch between Celsius (℃) and Fahrenheit (℉) for temperature, press the - Кадимки убакытты көрсөтүү учурунда баскычын басыңыз.
5.3 Ойготкучтарды орнотуу
The clock features two independent alarms (Alarm 1 and Alarm 2).
- басып, кармап туруңуз АЛАРМ button to enter Alarm 1 setting mode. The Alarm 1 hour display will flash.
- колдонуу + or - ойготкуч саатын тууралоо үчүн баскычтар.
- Басыңыз АЛАРМ again to confirm the hour and move to Alarm 1 minute setting. Adjust with + or -.
- Басыңыз АЛАРМ again to move to Alarm 2 hour setting, and repeat the process for Alarm 2.
- After setting Alarm 2 minutes, press АЛАРМ орнотуу режиминен чыгуу үчүн акыркы жолу.
- To activate or deactivate an alarm, use the corresponding Ойготкуч 1 ON/OFF or Ойготкуч 2 ON/OFF switch on the side of the clock. An alarm icon will appear on the display when active.
5.3.1 Тындыруу функциясы
When an alarm sounds, press any button (except the alarm ON/OFF switch) to activate the 5-minute snooze function. The alarm will sound again after 5 minutes. To turn off the alarm completely, slide the corresponding alarm ON/OFF switch to OFF.
5.4 Проекциялоо функциясы
The clock can project the time and temperature onto a wall or ceiling.
- табыңыз Проекция КҮЙГҮЗҮҮ/ӨЧҮРҮҮ switch on the back of the clock. Slide it to ON to activate the projection.
- Adjust the angle of the projection arm (the part with the lens) to direct the projection as desired. The arm can rotate nearly 180 degrees.
- The projection will display the current time and temperature in a soft red color.

5.2-сүрөт: Side view showing the projection arm extended and ready for use.

5.3-сүрөт: The clock projecting time and temperature onto a wall in a bedroom setting.
5.5 Арткы жарыкты тууралоо
When the clock is powered by USB, the backlight can be adjusted to four levels: high, medium, low, or off. Repeatedly press the + button during normal time display to cycle through the brightness levels.
When powered by batteries, the backlight will illuminate for 8 seconds when any button is pressed, then turn off to conserve power.
5.6 USB кубаттоо порту
The clock features a USB charging port (5V=1A) on its side. You can use this port to charge your mobile phone or other small electronic devices while the clock is connected to USB power.
Note: The USB charging port only functions when the clock is powered via the USB cable. It does not work when the clock is running on battery power.
6. Техникалык тейлөө
6.1 Тазалоо
- Сааттын бетин жумшак, кургак чүпүрөк менен сүртүңүз.
- Do not use abrasive cleaners, solvents, or chemical sprays, as these may damage the finish or electronic components.
- Keep the projection lens clean for clear projection. Use a soft, lint-free cloth.
6.2 Батареяны алмаштыруу
When the display becomes dim or the clock functions erratically while on battery power, it's time to replace the AAA batteries. Refer to Section 4.1.1 for battery installation instructions. Always replace both batteries at the same time with new ones.
7. Кыйынчылыктарды
| Көйгөй | Мүмкүн себеп | Чечим |
|---|---|---|
| Сааттын дисплейи бош же күңүрт. | No power, low batteries, or USB cable not connected. | Check battery installation and replace if necessary. Ensure USB cable is securely connected to a power source. |
| Projection is unclear or not visible. | Projection switch is OFF, lens is dirty, or projection distance is too far/close. | Ensure Projection switch is ON. Clean the projection lens. Adjust the clock's distance from the projection surface. |
| Ойготкуч угулбайт. | Ойготкуч коюлган эмес же өчүрүлгөн. | Verify alarm time is set correctly. Ensure the corresponding Alarm ON/OFF switch is in the ON position. |
| USB заряддоо порту иштебей жатат. | Clock is running on battery power, or USB cable is not connected to a power source. | Ensure the clock is powered via the USB cable and connected to a functional power adapter. |
| Туура эмес убакыт/дата. | Убакыт/дата туура эмес коюлган. | Убакытты жана датаны баштапкы абалга келтирүү үчүн 5.2-бөлүмдү караңыз. |
8. Техникалык шарттар
| Модел: | B0CLGDFCGX |
| Бренд: | EVTSCAN |
| Материал: | ABS (акрилонитрил бутадиен стирол) |
| Продукциянын өлчөмдөрү: | Болжол менен 13.5 x 8 x 2.5 см (5.3 x 3.1 x 1.0 дюйм) |
| Салмагы: | Болжол менен 242г (8.5 унция) |
| Дисплей түрү: | Арткы жарыгы бар санариптик LCD |
| Кубат булагы: | 2xAAA batteries (not included) or DC 5.0V 1.2A via USB cable |
| USB кубаттоо чыгаруу: | 5V=1A |
| Температураны аныктоо диапазону: | -9℃ to +50℃ (1℃ resolution) |
| Нымдуулукту аныктоо диапазону: | 20% to 95% (1% resolution) |
| Temperature/Humidity Calibration Time: | 30 секунд |
| Арткы жарыктын деңгээли: | 4 levels (High, Medium, Low, Off) when USB powered; 8s illumination when battery powered. |
| Проекция Л.amp: | Always on when USB powered; 8s illumination when battery powered. |

8.1-сүрөт: Product dimensions: 5.3 inches wide by 3.1 inches high.
9. Кепилдик жана колдоо
EVTSCAN products are manufactured to high quality standards. For specific warranty information, please refer to the warranty card included with your purchase or contact your retailer.
If you encounter any issues or have questions regarding your EVTSCAN Projection Clock, please contact the seller or EVTSCAN customer support for assistance. Please have your model number (B0CLGDFCGX) ready when contacting support.
Кошумча жардам алуу үчүн, сиз иш сапары менен болот EVTSCAN Store on Amazon.