1. Киришүү
Thank you for choosing the Brinyte HC01 Rechargeable HeadlampБул колдонмодо жаңы башыңызды коопсуз жана натыйжалуу иштетүү, техникалык тейлөө жана мүчүлүштүктөрдү оңдоо боюнча кеңири көрсөтмөлөр берилген.amp. Сураныч, бул колдонмону колдонуудан мурун кылдат окуп чыгыңыз жана аны келечекте маалымат үчүн сактап коюңуз.
Негизги өзгөчөлүктөрү:
- Triple Light System: 1000-lumen main white light, close-range white/red auxiliary lights.
- Жөнгө салынуучу жарыктык: Low, Medium, High, Turbo modes.
- Атайын режимдер: Strobe, SOS, Signal modes for various scenarios.
- Кош кубат параметрлери: Rechargeable via USB-C and compatible with AAA batteries for backup.
- Patented Anti-Tangle Headband: Breathable, easily adjustable with a side knob, and detachable for handheld use.
- Кызыл жарык режими: Ideal for night hunting, fishing, maintaining night vision, and emergency signaling.
- Туруктуу курулуш: IP66 waterproof rate and 1-meter drop-resistant.
- Жеңил дизайн: Weighs only 2.29 oz for comfortable use.
2. Пакеттин мазмуну
Пакетти ачкандан кийин, төмөнкү нерселердин бардыгы камтылганын текшериңиз:
- 1 x Brinyte HC01 Headlamp
- 1 x баш боо
- 1 х кашаа
- 1 x Type-C заряддоо кабели
- 1 x BR1200 Rechargeable Battery
- 1 х Колдонуучунун колдонмосу (бул документ)
- 1 x Value-added Card

Image: Contents of the Brinyte HC01 Headlamp package, showing the headlamp, head strap, USB-C charging cable, and rechargeable battery.
3. Орнотуу жана биринчи колдонуу
3.1 Баш боону тагуу
- Башты салыңызamp unit into the bracket on the head strap. Ensure it clicks securely into place.
- Adjust the head strap to fit comfortably around your head. The patented anti-tangle headband can be adjusted using the side knob:
- To extend the strap: Press the knob and pull the buckle.
- To retract the strap: Rotate the knob to draw back the head strap.

Image: Step-by-step guide on adjusting the patented anti-tangle headband of the HC01 headlamp.
3.2 Батареяны заряддоо
The Brinyte HC01 headlamp is equipped with a rechargeable BR1200 battery. For optimal performance, fully charge the battery before first use.
- Башындагы USB-C заряддоо портун табыңызamp.
- Берилген Type-C кубаттоочу кабелин баш жагына туташтырыңызamp and a compatible USB power source (e.g., laptop, power bank, AC adapter, car charger).
- The battery status indicator lights will illuminate during charging. A full charge typically takes approximately 1.5 hours.
- Толук заряддалгандан кийин, заряддоо кабелин ажыратыңыз.

Image: The Brinyte HC01 headlamp being charged via USB-C, with an illustration of the 1200mAh battery capacity, 1.5 hours full charge time, and 45 hours usage.
3.3 Installing AAA Batteries (Optional Backup)
In situations where recharging is not possible, the HC01 can be powered by AAA batteries.
- Open the battery compartment of the headlamp.
- Туура полярдуулукту (+/-) камсыз кылуу менен 3 AAA батарейкасын салыңыз.
- Батарея отсегин бекем жабыңыз.

Image: Illustration of the dual power options for the Brinyte HC01 headlamp, highlighting both USB-C charging and the use of AAA batteries as a backup.
4. Операция
The HC01 headlamp features two main buttons for control: one for white light and one for red light.
4.1 Ак жарыктын иштеши
- Күйгүзүү/өчүрүү: Press the white light button once to turn on the main white light. Press again to turn off.
- Жарыктыкты жөндөө: While the white light is on, press and hold the white light button to cycle through brightness modes: Low, Medium, High, Turbo. Release the button at your desired brightness.
- Special Modes (Strobe/SOS/Signal): Double-click the white light button to activate Strobe mode. Double-click again to cycle through SOS and Signal modes. Single-click to return to the previous brightness mode or turn off.
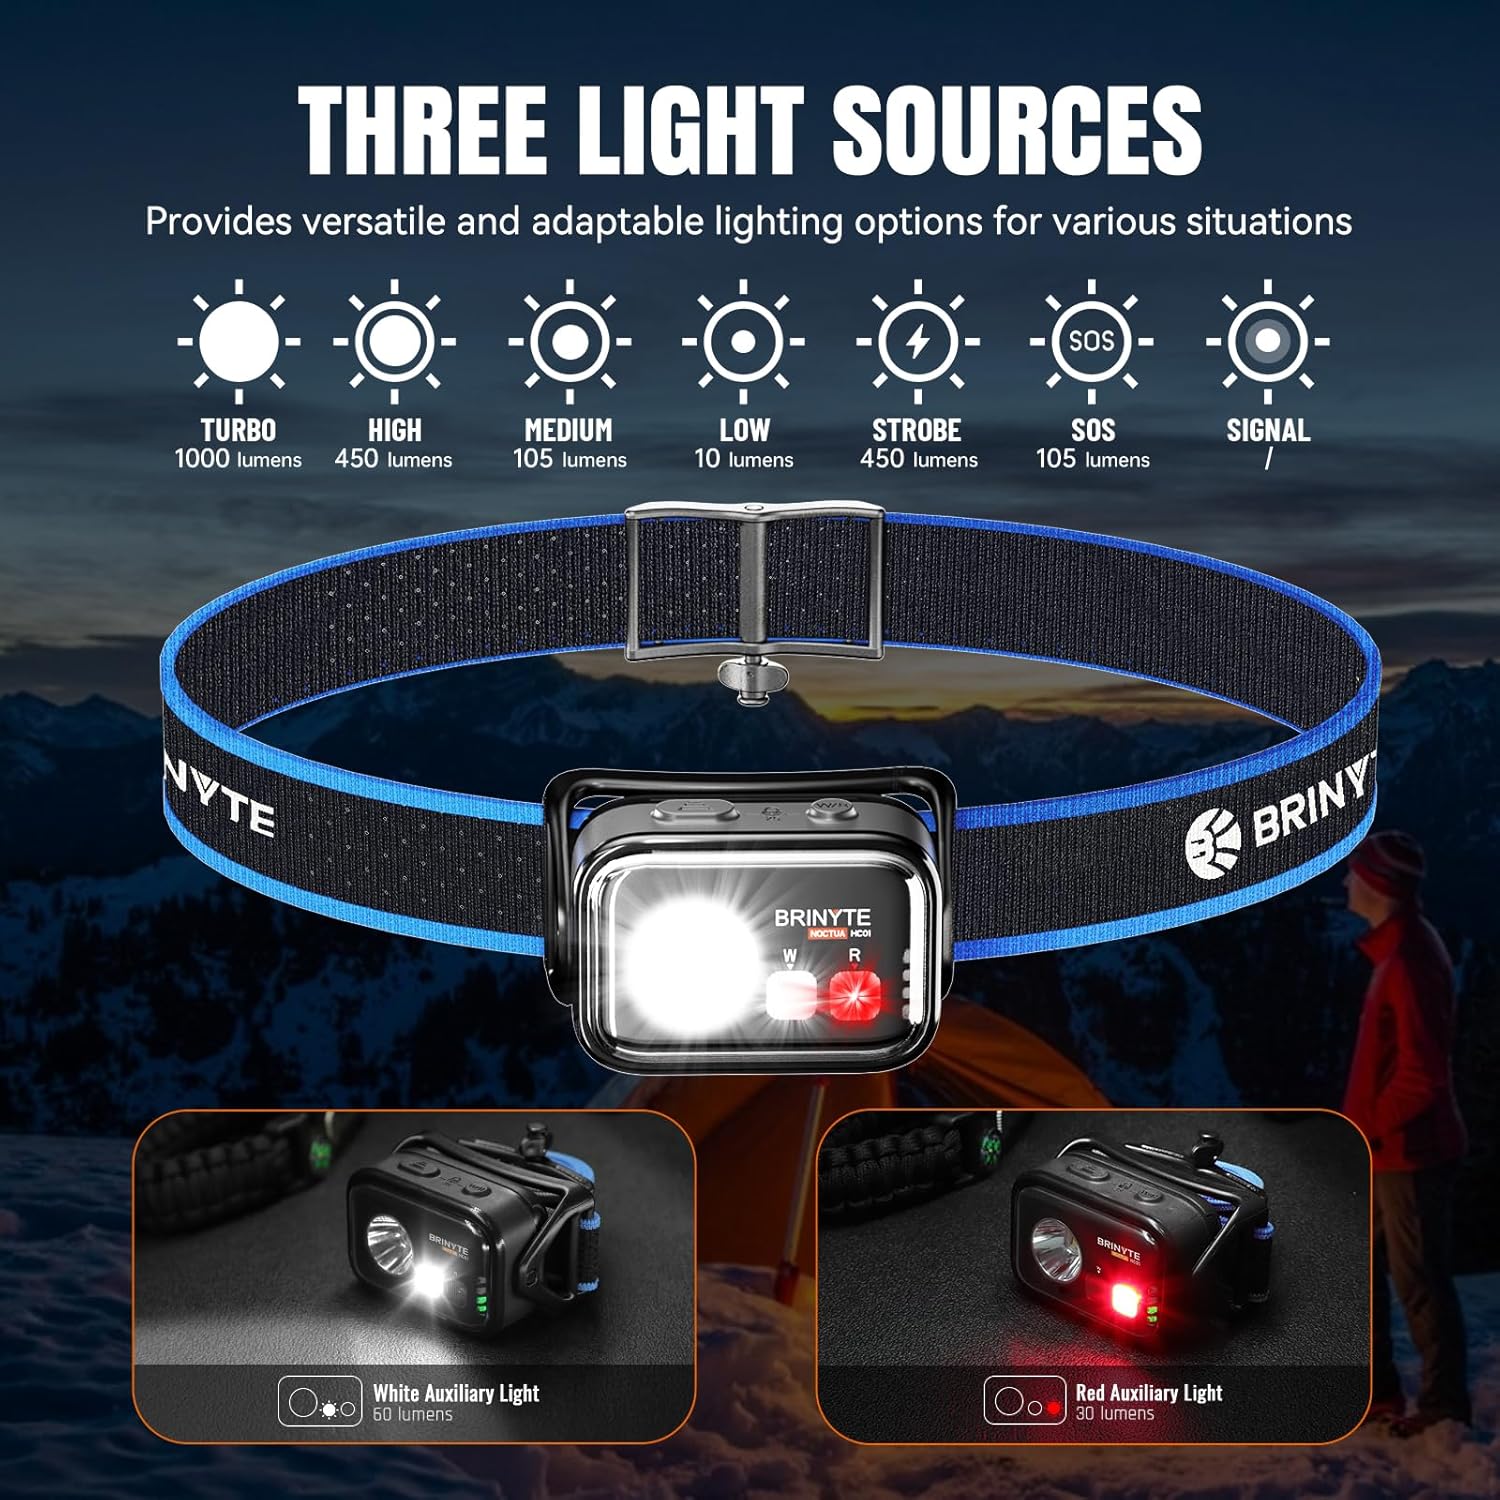
Image: The Brinyte HC01 headlamp showcasing its three light sources and various modes including Turbo, High, Medium, Low, Strobe, SOS, and Signal.
4.2 Red Light Operation
- Күйгүзүү/өчүрүү: Press the red light button once to turn on the red auxiliary light. Press again to turn off.
- Жарыктыкты жөндөө: While the red light is on, press and hold the red light button to cycle through brightness modes.
- Red Signal Mode: Double-click the red light button to activate the red signal mode.
The red light mode is particularly useful for preserving night vision during activities like hunting, fishing, or astronomical observation, and can also serve as an emergency warning signal.

Image: Practical applications of the red light mode, including hunting, camping, flashing safety light, astronomical observation, fishing, photography, and reading.
4.3 Simultaneous Light Use
The white and red lights can be operated simultaneously for combined illumination.
4.4 Lock/Unlock Function
Кокусунан активдешүүнүн алдын алуу үчүн, башamp features a lock function.
- Бекитүү: Simultaneously press both the main white light and red light switches for 3 seconds. The main light will flash twice to indicate successful locking.
- Кулпуну ачуу үчүн: Simultaneously press both switches for 3 seconds again. The main light will flash twice to indicate successful unlocking.

Image: Instructions for locking and unlocking the headlamp by pressing both the main and auxiliary light switches simultaneously for 3 seconds.
4.5 Adjustable Lighting Angle
Башчыamp unit can pivot 360 degrees, allowing you to direct the light precisely where needed.

Image: The Brinyte HC01 headlamp demonstrating its 360-degree pivotable head for adjustable lighting angle.
5. Техникалык тейлөө
5.1 Тазалоо
- Башын сүртүңүзamp денеси жумшак, гamp кездеме.
- Абразивдүү тазалагычтарды же эриткичтерди колдонбоңуз, алар финишке зыян келтириши мүмкүн.
- Clean the lens gently with a lens cloth to maintain optimal light output.
5.2 Батареяга кам көрүү
- Recharge the battery regularly, even if not in frequent use, to prolong its lifespan.
- If using AAA batteries, remove them if the headlamp агып кетүүнүн алдын алуу үчүн узак убакыт бою колдонулбайт.
5.3 Сактоо
- Башты сактаңызamp күн нурунан жана экстремалдык температурадан алыс салкын, кургак жерде.
- Башты камсыз кылыңызamp is locked before storing to prevent accidental activation and battery drain.
6. Кыйынчылыктарды
| Көйгөй | Мүмкүн себеп | Чечим |
|---|---|---|
| Headlamp күйбөйт. | Батареянын кубаты түгөнгөн же туура эмес орнотулган. Headlamp is in lock mode. | Recharge the battery or replace AAA batteries. Ensure correct polarity. Баштын кулпусун ачыңызamp by pressing both buttons simultaneously for 3 seconds. |
| Жарыктын чыгышы күңүрт. | Батарея аз. Линза кир. | Батареяны кайра заряддаңыз. Линзаны жумшак чүпүрөк менен тазалаңыз. |
| Headlamp бүлбүлдөгөн. | Батарея байланышы бош. Battery nearly depleted. | Батарейканын орнотулушун текшериңиз. Батареяны кайра заряддаңыз. |
| Headband feels uncomfortable or tangles. | Туура эмес тууралоо. | Adjust the headband using the side knob for a comfortable, secure fit. |
If the problem persists after attempting these solutions, please contact Brinyte customer service for assistance.
7. Техникалык шарттар
| Өзгөчөлүк | Деталь |
|---|---|
| Модель аты | HC01 |
| Main White Light Brightness | Up to 1000 Lumens (Turbo Mode) |
| Auxiliary White Light Brightness | 60 Lumens |
| Auxiliary Red Light Brightness | 30 Lumens |
| Max Runtime (Low Mode) | 45 саат (2700 мүнөт) |
| Макс нуру аралык | 126 метр |
| Power Source | Rechargeable BR1200 Battery (included) or 3x AAA Batteries (not included) |
| Заряддоо порту | USB Type-C |
| Заряддоо убактысы | Болжол менен 1.5 саат |
| Суу каршылык | IP66 (чаң өткөрбөйт, суу өткөрбөйт) |
| Таасирге каршылык | 1 метр |
| Салмагы | 2.29 Ounces (65g, battery included) |
| Өлчөмдөрү (LxWxH) | 2.37" x 1.66" x 1.12" (60.3 мм x 42.3 мм x 28.7 мм) |
| Материал | ABS, поликарбонат |

Image: Detailed technical specifications table for the Brinyte HC01 headlamp, including ANSI/NEMA FL1 standards for various light modes.
8. Кепилдик жана Кардарларды колдоо
8.1 Кепилдик маалыматы
Brinyte offers the following warranty for the HC01 Headlamp:
- 30 күндүк акысыз алмаштыруу: Сатып алынгандан кийин 30 күндүн ичинде өндүрүштөгү кемчиликтер үчүн.
- 2 жылдык акысыз оңдоо: For functional issues under normal use within 2 years of purchase.
- Чектелген Өмүр бою Кепилдик: For certain components beyond the 2-year repair period.
Кепилдик дооматтары үчүн сатып алганыңыздын далилин сактап коюңуз.
8.2 Кардарларды колдоо
If you have any questions, concerns, or require assistance with your Brinyte HC01 Headlamp, please do not hesitate to contact Brinyte customer service. We are committed to providing professional and friendly support, with responses typically within 24 hours.
For more information, visit the official Brinyte Store: Brinyte Store on Amazon

Image: Brinyte's commitment to customer service, highlighting 24-hour support, dedicated customer care, and a limited lifetime warranty.
9. Коопсуздук маалыматы
- Көрүүнүн убактылуу начарлашын болтурбоо үчүн жарыктын шоолуна түз карабаңыз.
- Балдар жетпеген жерде сактаңыз.
- Башты ажыратпаңызamp; this will void the warranty.
- Батареяларды жергиликтүү эрежелерге ылайык таштаңыз.