1. Киришүү
This user manual provides comprehensive instructions for the installation, operation, and maintenance of your Edtiske WiFi Range Extender. This device is designed to expand the coverage of your existing wireless network, eliminating Wi-Fi dead zones and providing a stronger, more reliable internet connection throughout your home or office. Please read this manual carefully before using the product to ensure optimal performance and safety.
2. Коопсуздук маалыматы
To ensure safe and proper operation, please observe the following safety guidelines:
- Түзмөктү сууга, нымдуулукка же жогорку нымдуулукка дуушар кылбаңыз.
- Avoid placing the device near heat sources such as radiators, heat registers, stoves, or other heat-producing appliances.
- Эгер бар болсо, түзмөк менен кошо берилген кубат адаптерин гана колдонуңуз.
- Аппаратты ачпаңыз casing. Тейлөөнү квалификациялуу персонал гана аткарышы керек.
- Ensure the device is plugged into a stable power outlet with proper grounding.
- Keep the device away from direct sunlight and corrosive chemicals.
3. Пакеттин мазмуну
Пакетиңизде бардык буюмдар бар экенин текшериңиз:
- 1 x Edtiske WiFi Range Extender (Model: LCX-ZJ1200-003-05)
- 1 x User Manual
4. Продукт бүтүп калдыview
Familiarize yourself with the components of your WiFi Range Extender.

Сүрөт 4.1: Алдыңкы view of the Edtiske WiFi Range Extender. The device is shown plugged into a standard wall outlet, with blue concentric circles indicating wireless signal propagation. Visible features include multiple LED indicators for power, Wi-Fi signal strength, and network activity, along with a WPS/Reset button at the bottom.
LED көрсөткүчтөрү:
- Power LED: Түзмөктүн күйүп турганын көрсөтөт.
- WLAN LED: Зымсыз байланыштын активдүүлүгүн көрсөтөт.
- Сигнал күчү LEDs: Show the strength of the signal received from your main router. More LEDs lit means a stronger signal.
Баскычтар жана порттор:
- WPS/Reset баскычы: Press briefly for WPS setup. Press and hold for 5-8 seconds to reset the device to factory defaults.
- Ethernet Port (if applicable): For wired connections to devices or for AP mode setup.
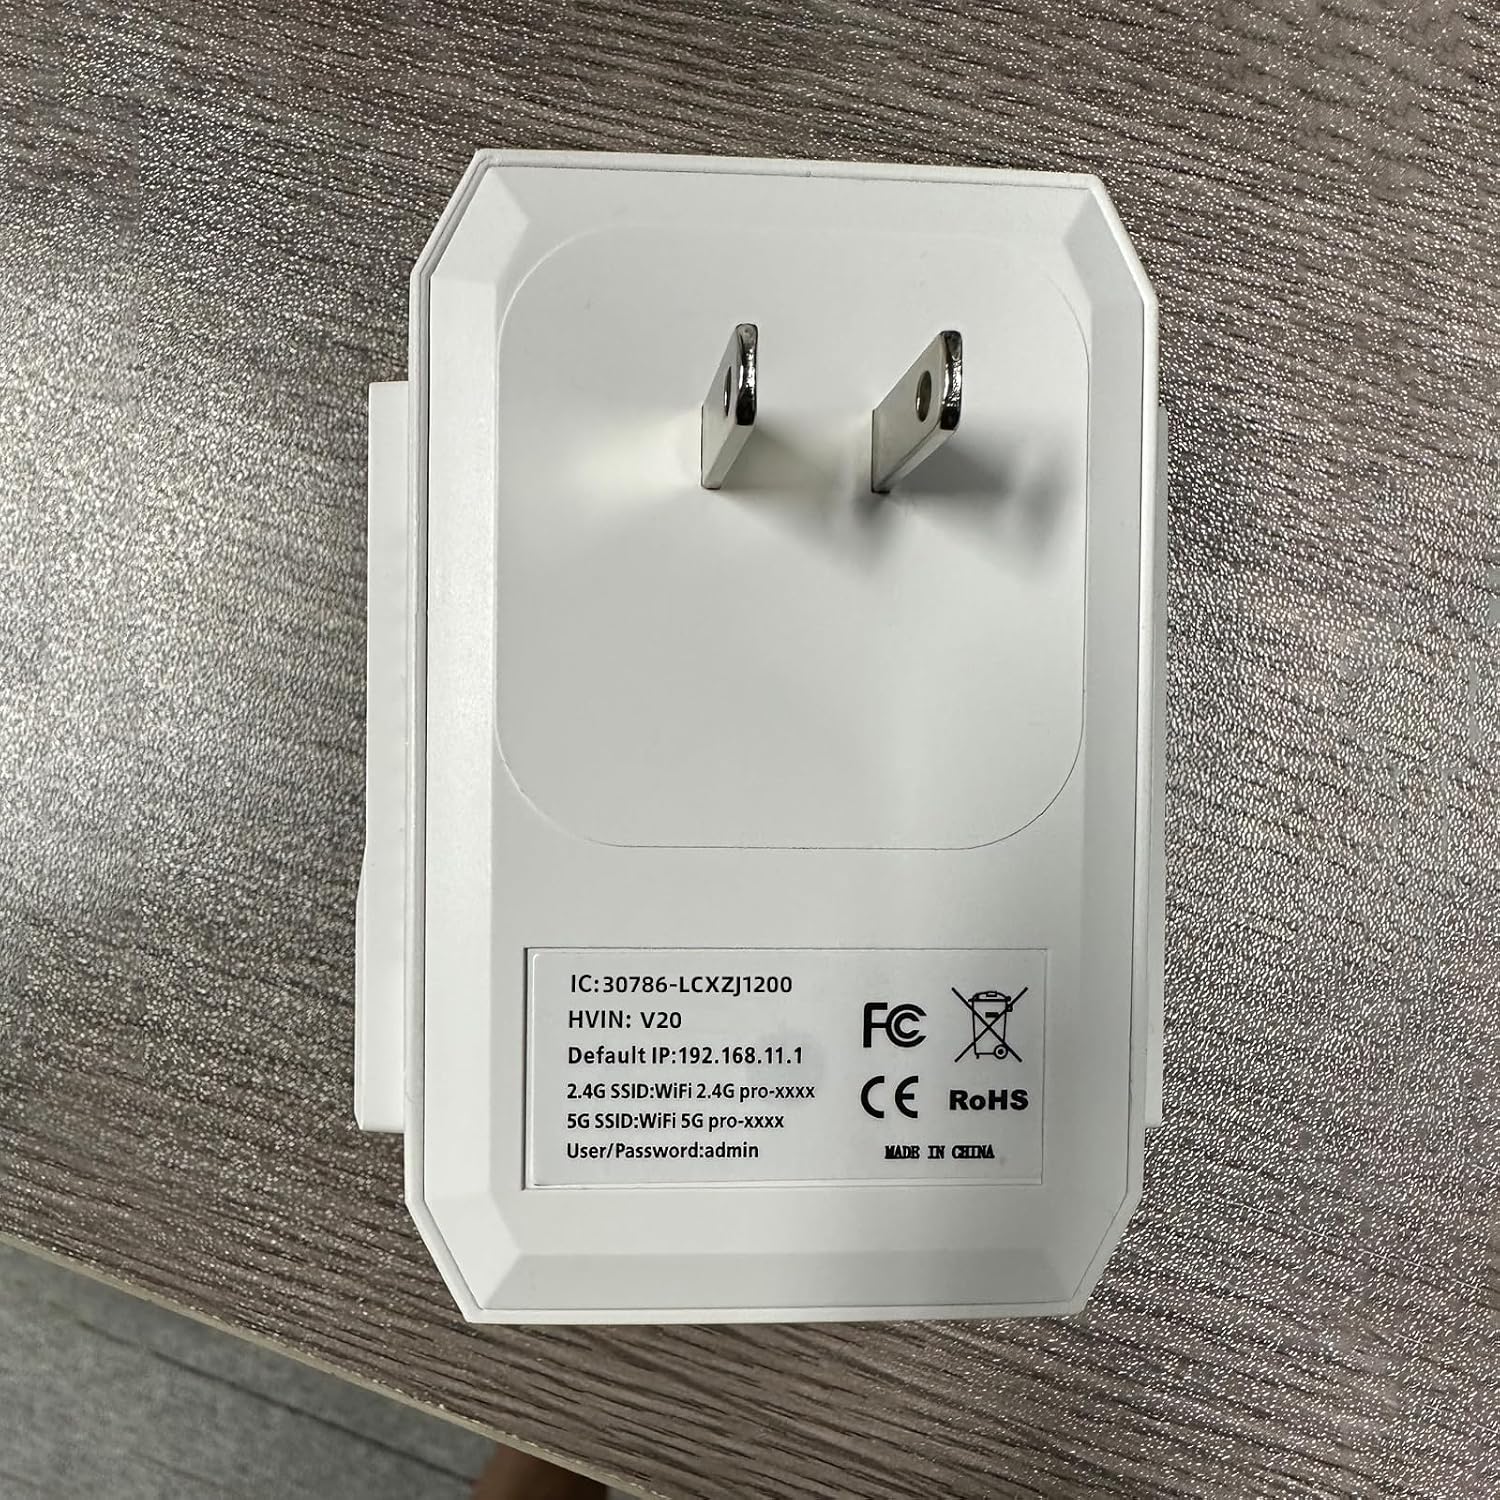
4.2-сүрөт: Арткы view of the Edtiske WiFi Range Extender, displaying the product label. The label provides important information such as the IC and HVIN numbers, default IP address (192.168.11.1), default SSIDs for 2.4G and 5G WiFi networks (e.g., WIFI 2.4G pro-xxxx, WIFI 5G pro-xxxx), and default user/password (admin).
5. Орнотуу
There are two primary methods to set up your WiFi Range Extender: via Web Browser or via WPS.
Method 1: Setup via Web Браузер (сунушталат)
- Күйгүзүү: Plug the extender into an electrical outlet near your main router. Wait for the Power LED to light up.
- Connect to Extender's Network: On your computer or mobile device, connect to the extender's default Wi-Fi network. Look for SSIDs like "WIFI 2.4G pro-xxxx" or "WIFI 5G pro-xxxx" (refer to the label on the back of the device). No password is required for the initial connection.
- Мүмкүнчүлүк Web Интерфейс: ачуу а web browser (e.g., Chrome, Firefox, Safari) and enter the default IP address: 192.168.11.1 (refer to the label on the back of the device).
- Кирүү: When prompted, enter the default username and password, which is админ for both (refer to the label on the back of the device).
- Режимди тандоо: Choose your desired operating mode (e.g., Repeater Mode to extend existing Wi-Fi, or AP Mode to create a new Wi-Fi access point from a wired connection).
- Тармакты конфигурациялоо:
- Кайталоо режими: Scan for available Wi-Fi networks, select your main router's network, enter its password, and optionally set a new SSID for the extended network.
- AP режими: Configure a new SSID and password for the access point.
- Орнотууларды колдонуу: Save your settings and wait for the extender to restart.
- Кеңейтүүчүнү көчүрүү: Once configured, unplug the extender and move it to a location halfway between your router and the Wi-Fi dead zone. Ensure the Signal Strength LEDs indicate a good connection to your main router.
- Түзмөктөрдү туташтыруу: Connect your devices to the newly configured extended network.
Method 2: Setup via WPS (Wi-Fi Protected Setup)
WPS allows for a quick setup without accessing the web interface, provided your main router supports WPS.
- Күйгүзүү: Plug the extender into an electrical outlet near your main router. Wait for the Power LED to light up.
- Extenderдеги WPSти басыңыз: Press the WPS/Reset button on the Edtiske WiFi Range Extender for 1-2 seconds. The WLAN LED should start blinking.
- Роутерде WPS баскычын басыңыз: 2 мүнөттүн ичинде негизги Wi-Fi роутериңиздеги WPS баскычын басыңыз.
- Байланышты күтүңүз: The extender will automatically connect to your router. The Signal Strength LEDs on the extender should light up, indicating a successful connection.
- Кеңейтүүчүнү көчүрүү: Once connected, unplug the extender and move it to an optimal location between your router and the area needing extended coverage.
6. Кеңейтүүчүнү иштетүү
After successful setup, the extender will operate automatically. Here are some operational considerations:
- Оптималдуу жайгаштыруу: For best performance, place the extender in a location where it receives a good signal from your main router (indicated by the Signal Strength LEDs) and can effectively broadcast to the desired area. Avoid placing it near large metal objects, microwave ovens, or other sources of interference.
- Түзмөктөрдү туташтыруу: Devices can connect to the extended network using the SSID and password configured during setup.
- Которуу режими: If you need to change the operating mode (e.g., from Repeater to AP), you will need to access the web interface (192.168.11.1) and reconfigure the device.
7. Техникалык тейлөө
Түзмөгүңүздүн узак мөөнөттүү иштешин жана оптималдуу иштешин камсыз кылуу үчүн үзгүлтүксүз техникалык тейлөө жүргүзүү керек.
- Тазалоо: Аппараттын сыртын тазалоо үчүн жумшак, кургак чүпүрөктү колдонуңуз. Суюк тазалагычтарды же аэрозолдорду колдонбоңуз.
- Программалык камсыздоонун жаңыртуулары: Мезгил-мезгили менен өндүрүүчүнүн текшерүү website for firmware updates. Updating firmware can improve performance, add new features, or fix bugs. Follow the instructions provided with the firmware update carefully.
- Кайра иштетилүүдө: Эгерде сизде туташуу жагынан анча чоң эмес көйгөйлөр жаралса, кеңейткичти розеткадан 10 секундга сууруп, андан кийин кайра сайып көрүңүз.
8. Кыйынчылыктарды
WiFi Range Extender менен көйгөйлөргө туш болсоңуз, төмөнкү жалпы көйгөйлөрдү жана чечимдерди караңыз:
| Көйгөй | Мүмкүн себеп | Чечим |
|---|---|---|
| Power LED жок | Device not plugged in or power outlet issue. | Кеңейткичтин иштеп жаткан электр розеткасына бекем сайылганын текшериңиз. Башка розетканы колдонуп көрүңүз. |
| Кирүү мүмкүн эмес web интерфейс (192.168.11.1) | Not connected to extender's default Wi-Fi, incorrect IP, or browser cache issue. |
|
| Weak or no signal from extender | Poor placement, interference, or incorrect configuration. |
|
| Internet connection drops frequently | Signal interference, IP conflict, or outdated firmware. |
|
9. Техникалык шарттар
| Өзгөчөлүк | Деталь |
|---|---|
| Модель номери | LCX-ZJ1200-003-05 |
| Бренд | Edtiske |
| Жыштык тилкесинин классы | Кош тилкелүү |
| Шайкеш түзмөктөр | Смартфон, Планшет |
| Болжолдуу диапазон | Up to 10,000 square feet (optimal conditions) |
| Элементтин өлчөмдөрү | 2.54 x 2.54 x 2.54 см (болжолдуу посылка өлчөмдөрү) |
| Элемент Салмагы | 28.35 g (approximate parcel weight) |
10. Кепилдик жана колдоо
For warranty information and technical support, please refer to the documentation included with your purchase or visit the official Edtiske webсайт. Кепилдик дооматтары үчүн сатып алуу дүмүрчөгүңүздү сактаңыз.
If you require further assistance, please contact Edtiske customer support through the channels provided on their official webсайт же сиз продуктуну сатып алган чекене сатуучунун колдоо барагы.