
1. Киришүү
The Vivolink USB-C 4K KVM Extender (Model W126974534) is designed to extend USB-C signals, including 4K video, USB data (for keyboard, mouse, and other peripherals), and control signals, over long distances using HDBaseT 3.0 technology. This system consists of a Transmitter (TX) unit and a Receiver (RX) unit, connected by a single Cat6a/7 Ethernet cable. It enables users to operate a computer or other USB-C source device from a remote location with a display, keyboard, and mouse, maintaining high-quality 4K resolution.
2. Коопсуздук маалыматы
- Аппаратты иштетүүдөн мурун бардык нускамаларды кылдат окуп чыгыңыз.
- Бул түзүлүштү жамгырдын, нымдуулуктун же ашыкча нымдуулуктун таасирине дуушар кылбаңыз.
- Ашыкча ысып кетүүнүн алдын алуу үчүн туура желдетүүнү камсыз кылыңыз. Вентиляция тешиктерин жаап албаңыз.
- Түзмөк менен кошо берилген кубат адаптерлерин гана колдонуңуз.
- Түзмөктү ачууга же өзгөртүүгө аракет кылбаңыз. Бардык тейлөө иштерин квалификациялуу адистерге тапшырыңыз.
- Аппаратты күчтүү электромагниттик талаалардан алыс кармаңыз.
- Чагылган бороондордо же көпкө колдонулбаганда электр энергиясын өчүрүңүз.
3. Пакеттин мазмуну
Пакеттин мазмунун кылдат текшериңиз. Эгерде кандайдыр бир буюмдар жок же бузулуп калса, дароо дилериңизге кайрылыңыз.
- 1x Vivolink USB-C 4K KVM Extender Transmitter (TX) Unit
- 1x Vivolink USB-C 4K KVM Extender Receiver (RX) Unit
- 2x кубат адаптерлери (DC 12V)
- 1x USB-C - USB-C кабели
- 1x Колдонуучунун колдонмосу
- Орнотуу аксессуарлары (эгер бар болсо)
4. Продукт бүтүп калдыview
The Vivolink USB-C 4K KVM Extender leverages HDBaseT 3.0 technology to provide uncompressed 4K video, audio, USB 2.0, and control signals over a single Cat6a/7 cable up to 100 meters. This solution is ideal for applications requiring remote access to a USB-C enabled computer, such as control rooms, medical imaging, digital signage, and educational facilities.
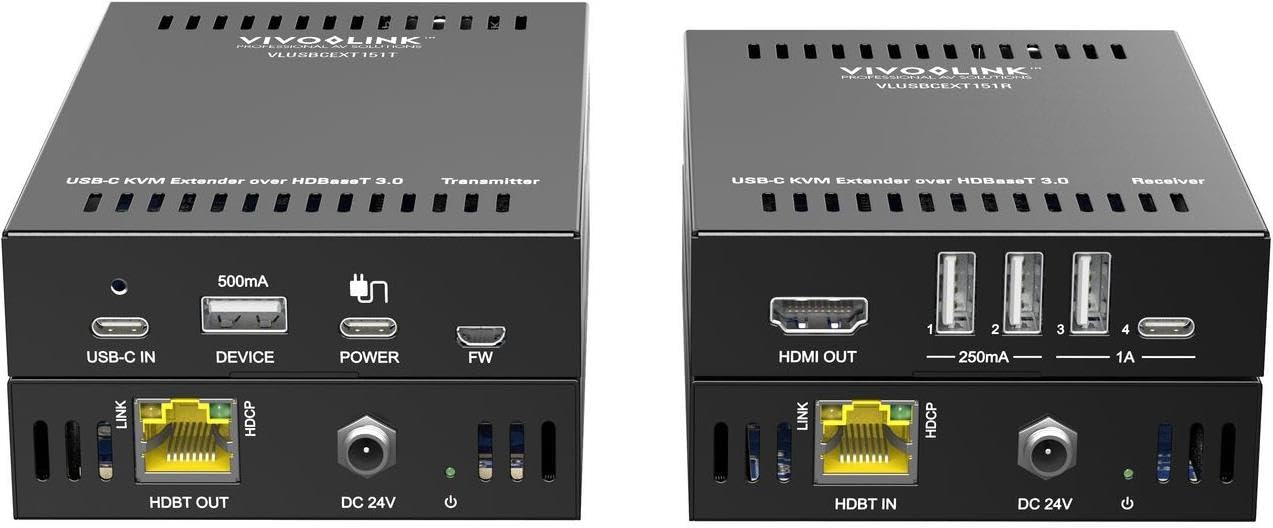
Сүрөт 1: Vivolink USB-C 4K KVM Extender units. This image displays the compact design of both the transmitter and receiver units, highlighting their various ports for connectivity.
The Transmitter unit connects to your USB-C source device (e.g., laptop, PC), while the Receiver unit connects to your display, keyboard, mouse, and other USB peripherals at the remote location. The HDBaseT 3.0 link ensures reliable and high-bandwidth transmission.
5. Орнотуу нускамалары
Follow these steps to set up your Vivolink USB-C 4K KVM Extender:
- Өчүрүү түзмөктөрү: Ensure all devices, including your source computer, display, and the KVM extender units, are powered off before making any connections.
- Connect Source to Transmitter: Connect your USB-C source device (e.g., PC, laptop) to the USB-C input port on the Transmitter (TX) unit using the provided USB-C cable.
- Дисплейди кабыл алгычка туташтырыңыз: Connect your display (monitor) to the HDMI output port on the Receiver (RX) unit using an HDMI cable.
- Connect Peripherals to Receiver: Connect your USB keyboard, mouse, and any other USB peripherals to the USB ports on the Receiver (RX) unit.
- Connect TX and RX Units: Connect the HDBaseT OUT port on the Transmitter (TX) unit to the HDBaseT IN port on the Receiver (RX) unit using a single, high-quality Cat6a or Cat7 Ethernet cable. Ensure the cable length does not exceed 100 meters for optimal performance.
- Күчтү колдонуу: Connect the provided 12V DC power adapters to both the Transmitter (TX) and Receiver (RX) units, then plug them into power outlets.
- Түзмөктөрдү күйгүзүү: Power on your display, then your source computer. The extender units will typically power on automatically when connected to power.
- Байланышты текшерүү: Check for signal on your remote display and test the functionality of your keyboard and mouse.
6. Иштөө нускамалары
Once the Vivolink USB-C 4K KVM Extender is set up correctly, operation is straightforward:
- Automatic Signal Detection: The extender units are designed to automatically detect and transmit the video, audio, and USB signals from your source device to the remote display and peripherals.
- Чечим: The system supports resolutions up to 4K (3840x2160) at 60Hz, depending on the capabilities of your source and display devices.
- USB функциясы: All connected USB devices (keyboard, mouse, USB drives, etc.) should function as if directly connected to the source computer.
- Power Cycling: If you encounter any issues, try power cycling both the Transmitter and Receiver units, as well as your source computer and display.
7. Техникалык тейлөө
To ensure the longevity and optimal performance of your Vivolink USB-C 4K KVM Extender, follow these maintenance guidelines:
- Тазалоо: Түзмөктөрдүн сыртын тазалоо үчүн жумшак, кургак чүпүрөктү колдонуңуз. Суюк же аэрозоль тазалагычтарды колдонбоңуз.
- Вентиляция: Ensure that the ventilation openings on both units are not obstructed to prevent overheating.
- Кабелдик башкаруу: Keep cables neatly organized and avoid sharp bends or excessive tension on connectors.
- Курчап турган чөйрө: Store and operate the device in a cool, dry environment, away from direct sunlight, heat sources, and extreme temperatures.
8. Кыйынчылыктарды
If you experience issues with your KVM extender, refer to the following troubleshooting steps:
| Көйгөй | Мүмкүн чечим |
|---|---|
| No video on remote display |
|
| Баскычтоп/чычкан жооп бербей жатат |
|
| Intermittent signal or flickering video |
|
9. Техникалык шарттар
- Бренд: Vivolink
- Модел: W126974534 (VLUSBCEXT150)
- Технология: HDBaseT 3.0
- Видеонун чечилиши: 60Гцде 4K (3840x2160) чейин
- Киргизүү: USB-C (on TX unit)
- Чыгуу: HDMI (on RX unit)
- USB: USB 2.0 (on RX unit for peripherals)
- Узартуу аралык: Up to 100 meters (328 feet) over Cat6a/7 cable
- Электр камсыздоо: DC 12V (via included power adapters)
- Өндүрүүчү: Vivolink
- ASIN: B0CPWLBPGF
10. Кепилдик жана колдоо
Vivolink products are designed for reliability and performance. For information regarding warranty coverage, technical support, or service, please refer to the warranty card included with your product or visit the official Vivolink website. Please have your product model number (W126974534) and purchase details ready when contacting support.
Онлайн ресурстар: For the latest drivers, firmware updates, and additional support documentation, please visit the Vivolink support page.