
1. Киришүү
This manual provides essential information for the safe and effective operation of the FNNEMGE MY2600D Digital Clamp Meter. This versatile instrument is designed for precise measurement of AC/DC voltage, AC/DC current, resistance, capacitance, frequency, duty cycle, diode, continuity, and temperature. It features True RMS measurement, Non-Contact Voltage (NCV) detection, Low Pass Filter (LPF), and Low Impedance (LowZ) functions, making it suitable for industrial, automotive, household, and educational applications.

Image 1.1: The FNNEMGE MY2600D Digital Clamp Meter, including test leads and a protective carrying case.
2. Коопсуздук маалыматы
To ensure safe operation and prevent damage to the meter, please read and follow all safety instructions carefully. This device complies with IEC 61010-1, CAT III 600V, and CE standards.
- Жалпы коопсуздук: Always use the meter according to the instructions. Do not operate the meter if it appears damaged or if the insulation is compromised.
- Тtage Лимиттер: Баалангандан ашык колдонбоңузtage, as marked on the meter, between the terminals or between any terminal and earth ground. The maximum operating voltage 600 вольт.
- Учурдагы өлчөө: Ensure the circuit is de-energized before connecting the clamp meter for current measurements, especially when measuring high currents.
- Сыноочулар: Use only the test leads provided with the meter. Inspect test leads for damage before each use.
- Жандуу схемалар: Ток өткөргүчтөр менен иштөөдө өтө этият болуңуз. Жылаңач өткөргүчтөргө же терминалдарга тийүүдөн алыс болуңуз.
- Курчап турган чөйрө: Эсептегичти жарылуучу газ, буу же чаңдуу чөйрөдө колдонбоңуз.
- Ашыкча жүктөн коргоо: The meter features overload protection, double ceramic fuses, and thermistors to protect the circuit. However, always operate within specified ranges.
- Батареяны алмаштыруу: Батареянын аз көрсөткүчү так көрсөткүчтөрдү камсыз кылуу үчүн батарейкаларды дароо алмаштырыңыз.

Image 2.1: Illustration of the internal overload protection mechanism within the clamp meter, designed to prevent damage from misuse.
3. Продукт бүтүп калдыview
Familiarize yourself with the components of your FNNEMGE MY2600D Digital Clamp Метр:

Image 3.1: Detailed diagram of the clamp meter indicating its various parts and controls.
- Clamp: Байланышсыз AC/DC токту өлчөө үчүн колдонулат.
- Коопсуздук тосмолору: Indicates the safe limit for hand placement.
- Function Range Switch: Rotary dial to select measurement functions.
- Дайындарды кармоо баскычы (H): Дисплейдеги учурдагы окууну токтотот.
- Кол чырак баскычы: Activates the built-in LED flashlight.
- LCD экран: Digital display for readings, units, and indicators.
- Киргизүү терминалы: Positive input for test leads.
- COM киргизүү терминалы: Сыноо үчүн жалпы (терс) киргизүү.
- Backlight Reset Button: Дисплейдин арткы жарыгын башкарат.
- Function Selection Button (SEL): Toggles between functions within a rotary switch position (e.g., AC/DC, Diode/Continuity).
- Эскертүү көрсөткүчү: Visual alert for certain conditions (e.g., NCV detection).
- Триггер: cl ачат жана жабатamp жаак.
- Жарыктандыруу Лamp: Provides light for the measurement area.
- NCV Detection Probe: Байланышсыз көлөм үчүн аймакtage аныктоо.
4. Орнотуу
4.1 Батареяны орнотуу
The FNNEMGE MY2600D requires two AAA batteries (included). To install or replace batteries:
- Эсептегич өчүрүлгөнүн текшериңиз.
- Батарея уясынын капкагын эсептегичтин арткы жагында табыңыз.
- Бурагычты колдонуп, бурама(лар)ды бошотуп, капкакты алып салыңыз.
- Бөлүмдүн ичинде көрсөтүлгөндөй туура полярдуулукка (+ жана -) карап, эки AAA батарейкасын салыңыз.
- Батарея уясынын капкагын ордуна коюңуз жана аны бурама(лар) менен бекитиңиз.

Сүрөт 4.1: Клamp meter package contents, including the meter, manual, test leads, and AAA batteries.
5. Иштөө нускамалары
Иштетүүдөн мурун, эсептегичтин жакшы абалда экенин жана батарейкалардын туура орнотулганын текшериңиз.
5.1 Күйгүзүү/өчүрүү
Rotate the Function Range Switch to any desired measurement function to turn the meter ON. Rotate it to the "OFF" position to turn the meter OFF. The meter features an automatic shutdown function to conserve battery life after a period of inactivity.
5.2 AC/DC токту өлчөө (0-600A)
Токту өлчөө үчүн cl колдонупamp:
- Rotate the Function Range Switch to the "600A" or "60A" position for AC/DC current.
- Press the "SEL" button to switch between AC and DC current measurement if necessary.
- cl ачуу үчүн триггерди басыңызamp жаак.
- Enclose only one conductor (not a cable with multiple conductors) within the clamp жаак.
- Release the trigger to close the jaw. The current reading will appear on the LCD.

Сүрөт 5.1: Клamp jaw open, demonstrating how to enclose a single conductor for current measurement. The jaw opening is 26mm.
5.3 AC/DC Voltage Өлчөө
өлчөө үчүн томtage:
- Кызыл тестирлөө чубалгысын "INPUT" терминалына жана кара сыноо өткөргүчтү "COM" терминалына салыңыз.
- Rotate the Function Range Switch to the "V~" (AC Voltagд) же "V-" (ТК көлөмүtage) position. The meter may automatically detect AC or DC.
- Press the "SEL" button to switch between AC and DC voltagэ керек болсо.
- Сыноочу зымдарды өлчөөнү каалаган схемага же компонентке параллель туташтырыңыз.
- Томду окуңузtagLCDдеги e мааниси.

Image 5.2: Measuring voltage by inserting test leads into a power outlet.
5.4 Resistance, Diode, Continuity, Capacitance, Frequency, Duty Cycle Measurement
For these measurements, connect the test leads as described for voltage өлчөө.
- Каршылык (Ω): Rotate the switch to the "Ω" position. Connect leads across the component.
- Diode (→|): Rotate the switch to the "Ω" position and press "SEL" until the diode symbol appears. Connect leads across the diode.
- Continuity (🔊): Rotate the switch to the "Ω" position and press "SEL" until the continuity symbol appears. Connect leads across the circuit. An audible beep indicates continuity.
- Сыйымдуулук (F): Rotate the switch to the "F" position. Connect leads across the capacitor.
- Жыштык (Гц) / Жумуш цикли (%): Rotate the switch to the "Hz%" position. Press "SEL" to toggle between frequency and duty cycle. Connect leads to the signal source.

Сүрөт 5.3: Мисamples of various measurements including voltage, resistance, battery, and diode testing using the meter and its test leads.
5.5 Температураны өлчөө
Температураны өлчөө үчүн:
- Rotate the Function Range Switch to the "°C/°F" position.
- Insert the temperature probe into the "INPUT" and "COM" terminals, observing polarity.
- Температуралык зонддун учун температурасын өлчөөнү каалаган объектиге же анын жанына коюңуз.
- Read the temperature on the LCD. Press "SEL" to switch between Celsius and Fahrenheit.
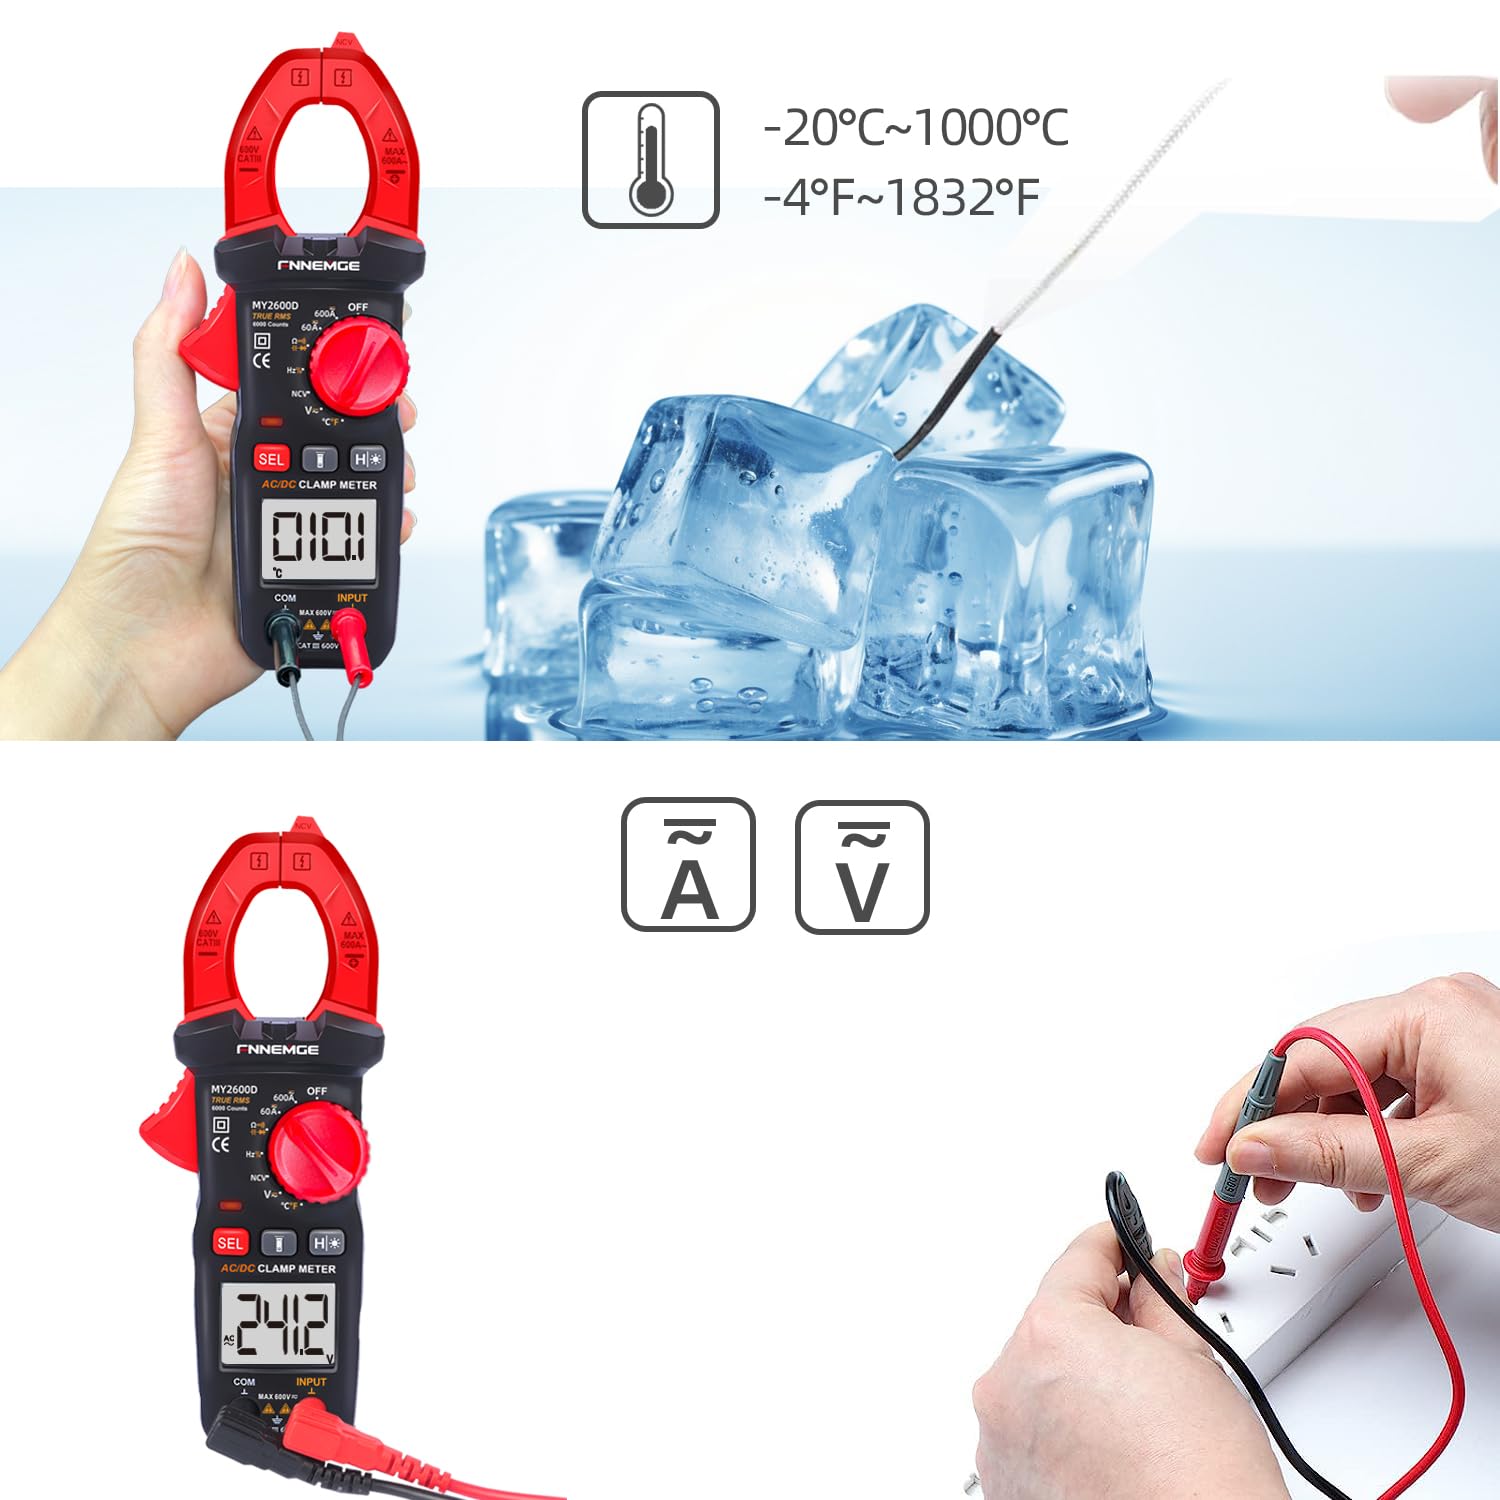
Image 5.4: Using the temperature probe to measure the temperature of ice, demonstrating the meter's temperature function.
5.6 Атайын функциялар
- Байланышсыз томtage (NCV): Rotate the switch to the "NCV" position. Bring the NCV detection probe (top of the clamp jaw) near a live AC voltage source. The meter will indicate the presence of voltage with an audible alarm and visual warning.
- Төмөн өткөрүү чыпкасы (LPF): AC көлөмүн өлчөөдөtage or current in circuits with variable frequency drives or other noise sources, activate LPF by pressing the dedicated button (if available, or via SEL in AC V/A mode). This filters out high-frequency interference for more accurate True RMS readings.
- Low Impedance (LowZ): This function helps prevent ghost voltages by providing a low impedance input, which drains away stray capacitance. Activate LowZ by selecting the appropriate function on the rotary switch or via the "SEL" button.
- True RMS (TRMS): The meter automatically measures True RMS for AC voltage жана ток, синусоидалык эмес толкун формалары үчүн так көрсөткүчтөрдү берет.
- Дайындарды кармоо (H): Press the "H" button to freeze the current reading on the display. Press it again to release.
- Арткы жарык/чырак: Press the backlight button to turn on the LCD backlight. Press the flashlight button to activate the LED flashlight for illuminating the measurement area.

Сүрөт 5.5: Клamp meter's flashlight in use, illuminating a dark area for easier measurement, with the NCV indicator visible.
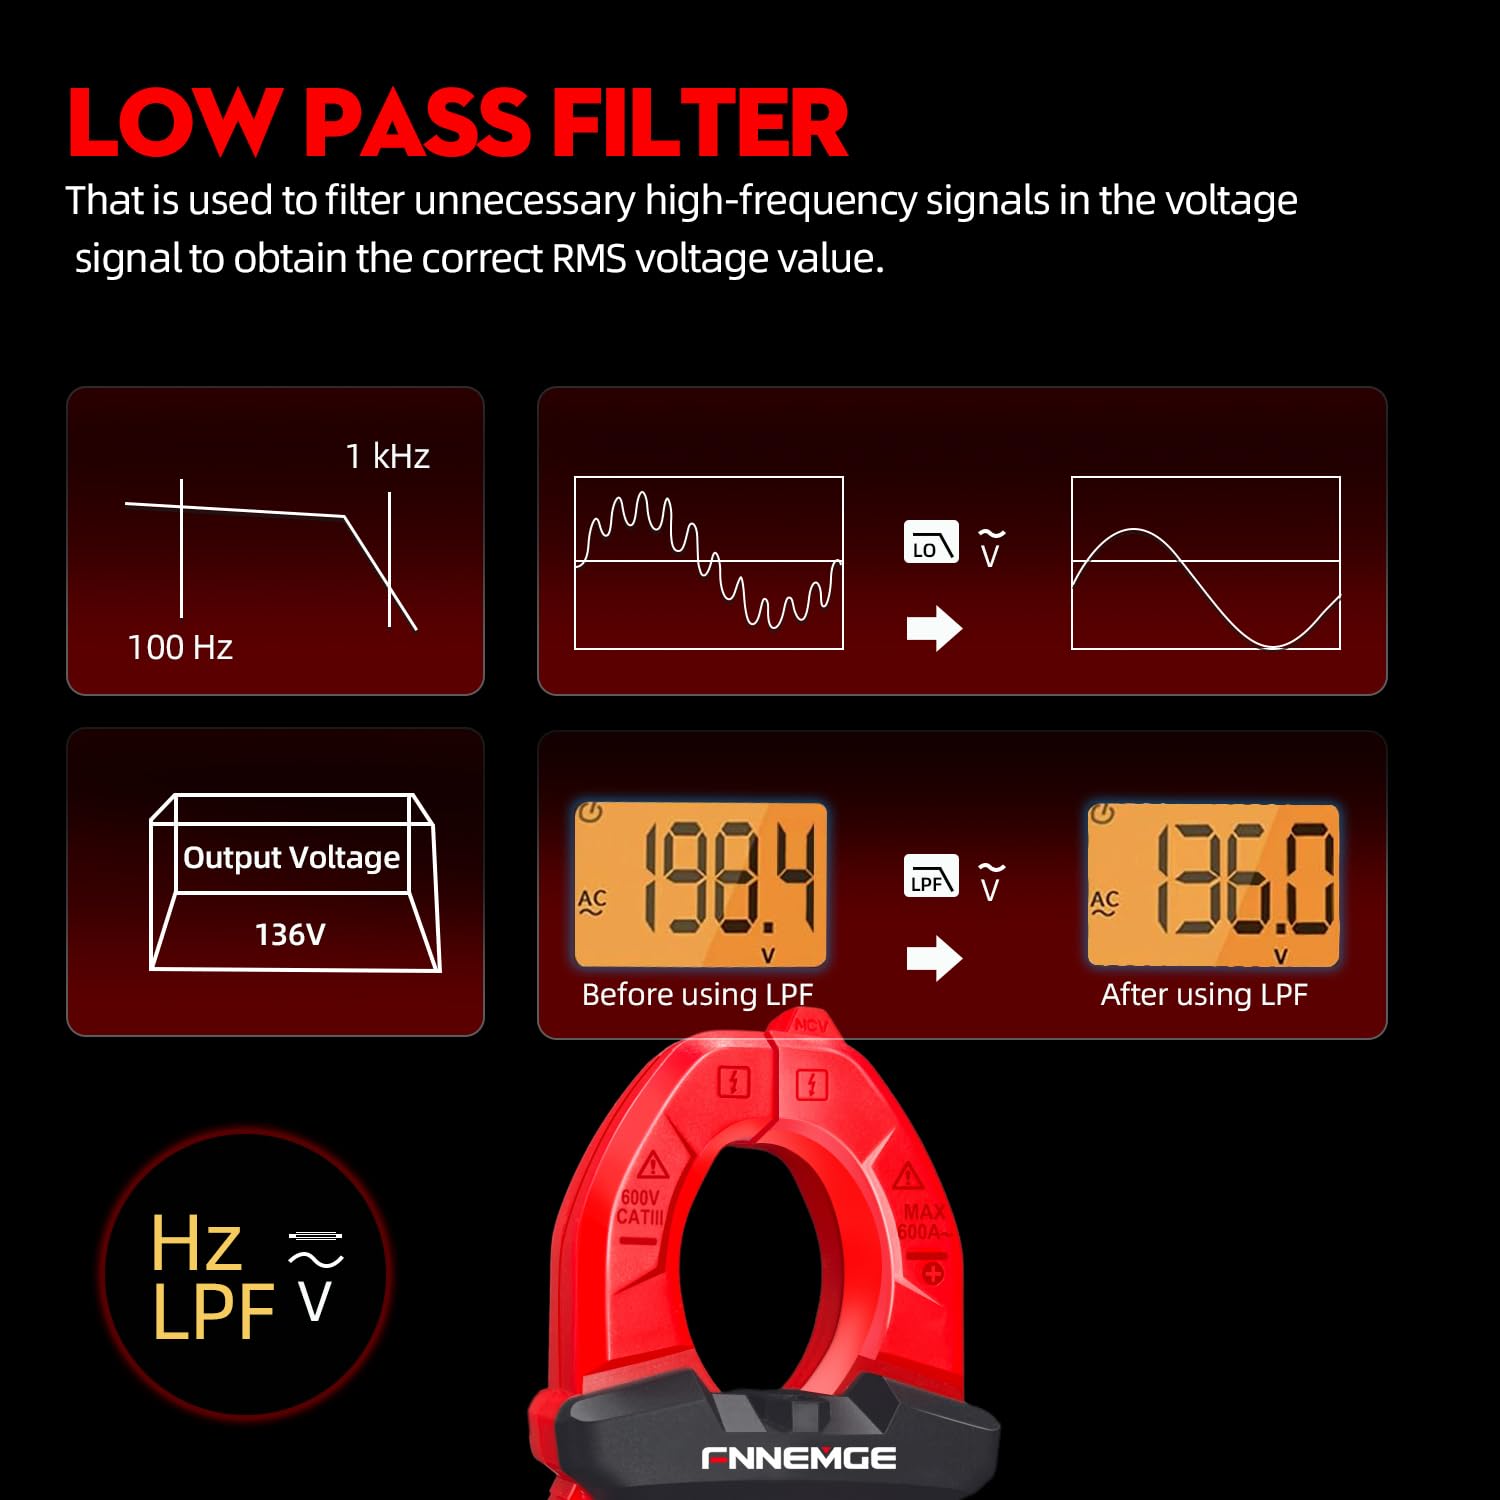
Image 5.6: An illustration detailing the function of the Low Pass Filter (LPF) in filtering out high-frequency noise for accurate voltagэ окуулар.
6. Техникалык тейлөө
6.1 Тазалоо
Wipe the meter with a dry, soft cloth. Do not use abrasives or solvents. Keep the terminals free of dirt and moisture.
6.2 Батареяны алмаштыруу
When the low battery indicator appears on the LCD, replace the batteries as described in Section 4.1. Remove batteries if the meter is not used for an extended period.
6.3 Сактоо
Store the meter in a cool, dry place, away from direct sunlight and extreme temperatures. Use the provided carrying case for protection.
7. Кыйынчылыктарды
If you encounter issues with your FNNEMGE MY2600D, refer to the following common problems and solutions:
- Дисплей жок/Элемент күйбөй жатат:
- Батарея орнотулганын текшерип, туура полярдуулугун текшериңиз.
- Replace batteries if they are depleted.
- Ensure the Function Range Switch is not in the "OFF" position.
- Туура эмес окуулар:
- Туура өлчөө функциясы тандалганын текшериңиз.
- Сыноо өткөргүчтөрү туура туташтырылганын жана бузулбаганын текшериңиз.
- Токту өлчөө үчүн, капкактын ичинде бир гана өткөргүч бар экенин текшериңизamp жаак.
- Тышкы тоскоолдуктарды же күчтүү магниттик талааларды текшериңиз.
- For AC measurements, consider using the LPF function if high-frequency noise is suspected.
- "OL" же ашыкча жүктөө көрсөткүчү:
- The measured value exceeds the meter's range for the selected function. Switch to a higher range if available, or ensure the input is within the meter's capabilities.
- NCV көлөмүн аныктабай жататtage:
- Ensure the NCV function is selected.
- Bring the NCV probe closer to the live AC source.
- Томду ырастаңызtage source is active.
Эгер көйгөйлөр чечилбесе, жардам алуу үчүн кардарларды колдоо кызматына кайрылыңыз.
8. Техникалык шарттар
| Өзгөчөлүк | Спецификация |
|---|---|
| Бренд | FNNEMGE |
| Модель номери | MY2600D |
| Дисплей | 6000 саны |
| Өлчөө түрү | True RMS Digital Clamp Метр |
| AC/DC ток диапазону | 0-600A |
| Max Operating Voltage | 600 вольт |
| Каршылык диапазону | 60 MΩ чейин |
| Кубаттуулук диапазону | Up to 100 mF |
| Температура диапазону | -20°Cден 1000°Cге чейин (-4°Fтен 1832°Fге чейин) |
| Атайын функциялар | NCV, LowZ, LPF, Data Hold, Auto Ranging, Backlight, Flashlight |
| Коопсуздук стандарттары | IEC 61010-1, CAT III 600V, CE |
| Power Source | 2 x AAA Батареялар (кошулган) |
| Продукциянын өлчөмдөрү (L x W x Y) | 18 x 6.4 x 3.4 см |
| Продукт Салмагы | 400 грамм |
| Келип чыккан өлкө | Кытай |
9. Кепилдик жана колдоо
FNNEMGE provides a 36-month after-sales service and lifetime technical support for the MY2600D Digital Clamp Meter. If you have any questions, require technical assistance, or need to claim warranty service, please contact FNNEMGE customer support through your purchase platform or the official FNNEMGE webсайт.