
1. Продукт бүтүп калдыview
The Cuifati H310 LGA 1151 DDR4 Motherboard is designed to support 8th and 9th generation Intel Core processors. It features a Micro ATX form factor, dual-channel DDR4 memory support, and a range of expansion options including M.2 NVMe, PCIe slots, and multiple I/O ports for versatile connectivity.
Негизги өзгөчөлүктөр төмөнкүлөрдү камтыйт:
- Кеңири CPU шайкештиги: Supports 8th and 9th generation Intel Core processors (LGA 1151 socket).
- Кош канал DDR4 эс тутуму: Supports up to 32GB DDR4 RAM across two DIMM slots, with frequencies up to 2666MHz.
- Туруктуу энергия менен камсыздоо: Features a three-phase power supply with solid capacitors and 24+8 pin power sockets for reliable operation.
- High-Speed H310 Chipset: Provides stable and efficient performance for various computing tasks.
- Интегралдык графика: Equipped with an integrated graphics processor and multiple display outputs (DVI, HDMI, VGA) for multi-monitor setups.
- Rich Expansion Ports: Includes SATA 6Gb/s, NVME M.2, PCIe X16, PCIe X1, USB 3.0, USB 2.0, PS/2, RJ45, and audio ports.

1-сүрөт: жогорудан ылдыйга view of the Cuifati H310 LGA 1151 DDR4 Motherboard, showing CPU socket, RAM slots, and various connectors.
2. Орнотуу жана орнотуу
This section provides instructions for installing the Cuifati H310 motherboard and its components into a computer case.
2.1 Коопсуздук чаралары
- Компоненттерди орнотуудан же алып салуудан мурун ар дайым кубат менен жабдууну розеткадан ажыратыңыз.
- Электростатикалык разряддын (ESD) алдын алуу үчүн антистатикалык билек боонун тагыныңыз же жерге туташтырылган металл нерсеге тез-тез тийип туруңуз.
- Сезимтал компоненттерге тийбеш үчүн, энелик платаны четтеринен кармаңыз.
2.2 CPU орнотуу
- LGA 1151 CPU розеткасын энелик платадан табыңыз.
- CPU уячасынын капкагын ачуу үчүн жүктөө рычагын акырын басып, капталга тартыңыз.
- CPUдагы үч бурчтук белгини розеткадагы тиешелүү белги менен тууралаңыз. Процессорду мажбурлабастан розеткага этияттык менен салыңыз.
- Розетка капкагын жаап, жүктөө рычагын чыкылдагыча ордуна түртүңүз.
- Процессорго термикалык пастаны сүйкөңүз жана CPU муздаткычын өндүрүүчүнүн көрсөтмөлөрүнө ылайык орнотуңуз.
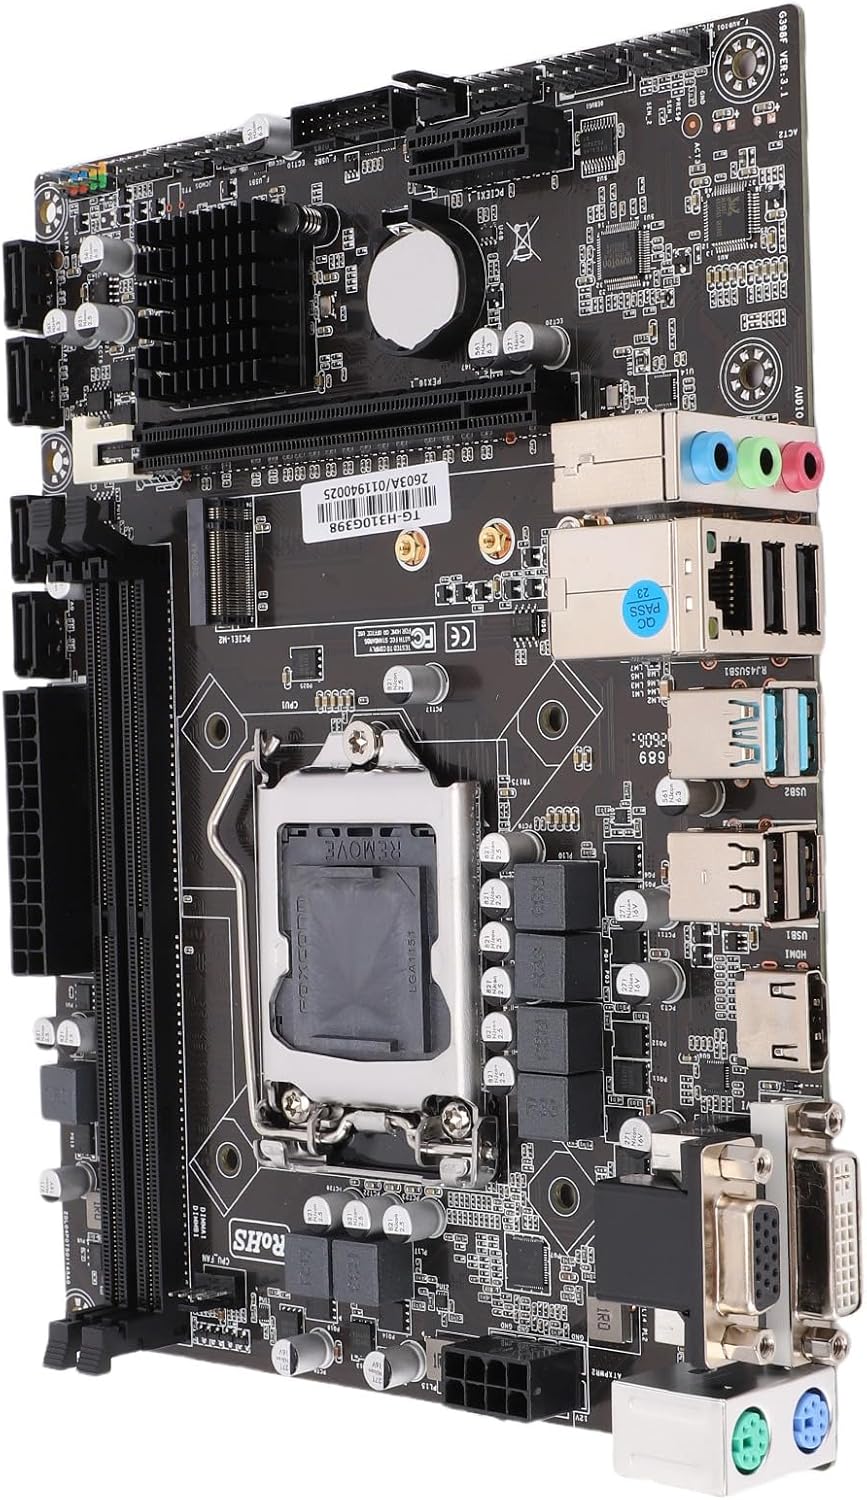
2-сүрөт: Бурчтуу view энелик платанын, LGA 1151 CPU розеткасын жана аны курчап турган компоненттерди баса белгилеп.
2.3 RAM орнотуу
- DDR4 DIMM уячаларынын эки учундагы клиптерди ачыңыз.
- DDR4 эстутум модулундагы оюкту DIMM уячасындагы ачкыч менен тууралаңыз.
- Эстутумдун модулун уячага кынына кыстарылганча кыстарыңыз. Эки клип тең жабык экенин текшериңиз.
- For dual-channel operation, install memory modules in matching slots as indicated in the motherboard manual (typically alternating slots).
2.4 Storage Device Installation (M.2 NVMe / SATA)
2.4.1 M.2 NVMe SSD
- Motherboard боюнча M.2 уячасын табыңыз.
- M.2 туруучу буроону алып салыңыз.
- Insert the M.2 NVMe SSD into the slot at a 30-degree angle.
- SSDди акырын ылдый түртүп, аны бурма менен бекитиңиз.
2.4.2 SATA дисктери
- SATA маалымат кабелинин бир учун энелик платадагы SATA 6Gb/s портуна туташтырыңыз.
- SATA маалымат кабелинин экинчи учун SATA катуу дискиңизге же SSDге туташтырыңыз.
- SATA кубат кабелин кубат менен камсыздоо блогуңуздан (PSU) SATA дискине туташтырыңыз.
2.5 Кубат туташтыруу
- Электр кубат булагынан чыккан 24-пиндүү ATX негизги кубат туташтыргычын энелик платадагы тиешелүү розеткага туташтырыңыз.
- Connect the 8-pin ATX 12V CPU power connector from your PSU to the socket near the CPU.
2.6 Алдыңкы панель жана киргизүү/чыгаруу байланыштары
- Connect the front panel headers (Power LED, HDD LED, Power Switch, Reset Switch) to the designated pins on the motherboard. Refer to the motherboard's silkscreen labels for correct orientation.
- Connect USB 2.0 and USB 3.0 front panel headers.
- Connect the front panel audio header.
- Install the I/O shield into the computer case opening before installing the motherboard.

Figure 3: Rear I/O panel of the motherboard, showing ports for USB, DVI, VGA, HDMI, RJ45, and audio.
2.7 Кеңейтүү картасын орнотуу (PCIe)
- Locate the PCIe X16 slot for a graphics card or other PCIe X1 slots for expansion cards.
- Remove the corresponding slot cover from your computer case.
- Кеңейтүү картасын уяча менен тегиздеп, туура орнотулганга чейин бекем басыңыз.
- Картаны корпуска бурама менен бекитиңиз.
3. Иштөө нускамалары
After successful installation, follow these steps for initial system operation.
3.1 Баштапкы күйгүзүү
- Ensure all components are securely connected and the power supply is plugged into a wall outlet.
- Компьютериңиздин корпусундагы кубат баскычын басыңыз.
- Система күйүп, мониторуңузда дисплейди көрүшүңүз керек.
3.2 BIOS/UEFI орнотуу
- Ишке киргизүү учурунда баскычты кайра-кайра басыңыз DEL or F2 key (common keys, may vary) to enter the BIOS/UEFI setup utility.
- In the BIOS/UEFI, you can configure boot order, system time, CPU settings, memory settings, and other hardware parameters.
- Save changes and exit to continue booting into your operating system installer or existing OS.
3.3 Драйверди орнотуу
- After installing your operating system, install the necessary drivers for the motherboard chipset, integrated graphics, audio, and LAN.
- Drivers are typically provided on a support CD/DVD or can be downloaded from the manufacturer's webсайт.
4. Техникалык тейлөө
Proper maintenance ensures the longevity and optimal performance of your motherboard and system.
4.1 Тазалоо
- Regularly clean dust from inside your computer case, especially around fans and heatsinks, using compressed air.
- Тазалоодон мурун системанын өчүрүлгөнүн жана розеткадан ажыратылганын текшериңиз.
- Суюк тазалагычтарды түздөн-түз компоненттерге колдонуудан алыс болуңуз.
4.2 BIOS/UEFI жаңыртуулары
- Өндүрүүчүнү текшериңиз website periodically for BIOS/UEFI updates.
- Updates can improve compatibility, stability, and performance.
- Follow the update instructions carefully to avoid system damage.
5. Кыйынчылыктарды
Бул бөлүмдө сиз туш болушуңуз мүмкүн болгон жалпы көйгөйлөр каралат жана мүмкүн болгон чечимдер сунушталат.
5.1 No Power / System Does Not Turn On
- Электр байланыштарын текшерүү: 24-пин ATX жана 8-пин CPU электр туташтыргычтары коопсуз орнотулганын текшериңиз.
- Электр камсыздоо: Verify the PSU switch is in the 'ON' position and the power cable is firmly connected to both the PSU and the wall outlet.
- Алдыңкы панелдин аталыштары: Confirm the power switch header is correctly connected to the motherboard.
5.2 No Display on Monitor (No POST)
- Монитор туташуу: Ensure the monitor is connected to the correct display output (DVI, HDMI, or VGA) on the motherboard or graphics card and is powered on.
- RAM: RAM модулдарын кайра орнотуңуз. Бир гана RAM модулу орнотулуп, жүктөөгө аракет кылыңыз.
- CPU: Verify the CPU is correctly installed and the CPU cooler is properly seated.
- Графикалык карта: If using a dedicated graphics card, ensure it is properly seated in the PCIe slot and has adequate power. Try removing it and using the integrated graphics.
5.3 Peripheral Not Detected
- Байланыштарды текшерүү: Ensure the peripheral (e.g., USB device, SATA drive) is correctly connected.
- Айдоочулар: Перифериялык түзүлүшкө керектүү драйверлерди орнотуңуз же жаңыртыңыз.
- BIOS/UEFI Орнотуулары: Check if the port or device is enabled in the BIOS/UEFI settings.
6. Техникалык шарттар
Detailed technical specifications for the Cuifati H310 LGA 1151 DDR4 Motherboard.
| Өзгөчөлүк | Деталь |
|---|---|
| Модель аты | H310 LGA 1151 DDR4 |
| Өндүрүүчү | Cuifati |
| CPU розетка | LGA 1151 |
| Шайкеш келген CPU'лар | 8th and 9th Generation Intel Core Processors (e.g., Intel Core i7-8700K, Intel Core i9-9900K) |
| Чипсет | Intel H310 |
| Эс тутум технологиясы | DDR4 кош каналдуу |
| Memory Slots | 2 x DIMM уячалары |
| Максималдуу RAM сыйымдуулугу | 32 ГБ (2 x 16 ГБ) |
| Memory Clock Speed | 2133 МГц, 2400 МГц, 2666 МГц |
| Графикалык интерфейс | Integrated, PCI-Express x16 |
| Display Outputs | 1 x VGA, 1 x DVI, 1 x HDMI |
| Кеңейтүү уячалары | 1 x PCI Express X16, 1 x PCI Express X1 |
| Сактоо порттору | 4 x SATA 6Gb/s, 1 x NVME M.2 connector |
| USB порттору | 2 x USB 3.0 (rear), 4 x USB 2.0 (rear), 1 x USB 3.0 header (supports 2 ports), 1 x USB 2.0 header (supports 2 ports) |
| LAN | Realtek 100/1000 Mbps Ethernet |
| Аудио | Realtek ALC662 6-канал HD Аудио |
| Power Connector | 24+8 Pin ATX Power |
| Форма фактору | Micro ATX (Approx. 21.5 x 17 cm / 8.5 x 6.7 inches) |
| Батарея | CR2032 (integrated) |
7. Кепилдик маалыматы
The Cuifati H310 LGA 1151 DDR4 Motherboard comes with a Өндүрүүчүнүн кемчиликтерине каршы 1 жылдык кепилдик. Бул кепилдик кепилдик мөөнөтүнүн ичинде нормалдуу колдонуудагы материалдардагы жана жасалгадагы кемчиликтерди камтыйт.
Кепилдик төмөнкүлөрдү камтыбайт:
- Кырсыктан, кыянаттыктан, туура эмес пайдалануудан, суу ташкынынан, өрттөн, жер титирөөдөн же башка тышкы себептерден келип чыккан зыян.
- Damage caused by operating the product outside the permitted or intended uses described by Cuifati.
- Damage caused by service (including upgrades and expansions) performed by anyone who is not a representative of Cuifati or an authorized Cuifati Service Provider.
- Products or parts that have been modified to alter functionality or capability without the written permission of Cuifati.
For warranty claims, please contact Cuifati customer support with your proof of purchase.
8. Кардарларды колдоо кызматы
If you encounter any issues not covered in this manual or require further assistance, please contact Cuifati customer support.
- Онлайн колдоо: Visit the official Cuifati webКөп берилүүчү суроолор, драйверлерди жүктөө жана колдоо булактары үчүн сайт.
- Байланыш маалыматы: Refer to your product packaging or the Cuifati webакыркы байланыш маалыматы үчүн сайт.
When contacting support, please have your product model (H310 LGA 1151 DDR4) and purchase information ready.