
Longer RAY5 XY Kit
Longer RAY5 Laser Engraver XY Axis Expansion Kit User Manual
Model: RAY5 XY Kit
1. Киришүү
This manual provides detailed instructions for the installation, operation, and maintenance of the Longer RAY5 Laser Engraver XY Axis Expansion Kit. This kit is designed to significantly increase the working area of your existing Longer RAY5 5W, 10W, or 20W laser engraver, enabling larger projects and enhanced creative possibilities. Please read this manual thoroughly before proceeding with installation or operation.

Image 1.1: The Longer RAY5 Laser Engraver with the XY Axis Expansion Kit installed, demonstrating an expanded engraving area.
2. Коопсуздук маалыматы
WARNING: Laser radiation can cause eye damage and skin burns. Always wear appropriate laser safety goggles when operating the laser engraver. Never look directly into the laser beam.
- Ensure the work area is well-ventilated to dissipate fumes and smoke generated during engraving.
- Жакын жерде өрт өчүргүчтү кармаңыз.
- Иш учурунда машинаны кароосуз калтырбаңыз.
- Балдарды жана үй жаныбарларын операциядан алыс кармаңыз.
- Бардык электр туташууларынын коопсуз экенин жана жергиликтүү коопсуздук стандарттарына жооп берерин текшериңиз.
- Only engrave materials suitable for laser processing. Avoid highly reflective, flammable, or unknown materials.
3. Пакеттин мазмуну
Verify that all components listed below are present in your expansion kit package:

Image 3.1: The complete contents of the expansion kit, including cables, detailed instructions, timing belts, zippers, and XY-axis beam aluminum profiles.
- XY-axis beam aluminum profiles (elongation shafts)
- Cables for extended connections
- Timing belts
- Cable ties (zippers)
- Detailed instruction manual (physical or digital)
- Necessary fasteners and tools for assembly
4. Орнотуу жана орнотуу
The expansion kit is designed for straightforward installation. Refer to the included detailed instructions for specific steps. The process generally involves replacing the original frame components with the longer profiles and connecting the extended cables.
4.1 Даярдоо
- Power off and unplug your RAY5 laser engraver.
- Clear a spacious and clean work area.
- Gather all tools required for assembly (usually included with the kit).
4.2 Чогултуу кадамдары
- Carefully disassemble the existing frame of your RAY5 laser engraver according to its original manual.
- Replace the original XY-axis aluminum profiles with the longer profiles provided in the expansion kit. Ensure proper alignment and secure fastening.
- Install the new timing belts, ensuring they are correctly tensioned.
- Connect the extended cables to the appropriate ports on the motherboard and stepper motors. The kit includes different cable sets; select the one compatible with your motherboard setup.
- Secure all cables using the provided cable ties to prevent interference with moving parts.
- Verify that all components are securely attached and that the laser module moves freely along both axes without obstruction or excessive friction.

Image 4.1: Detail of the high-precision aluminum profiles and the roller mechanism, highlighting the structural integrity.
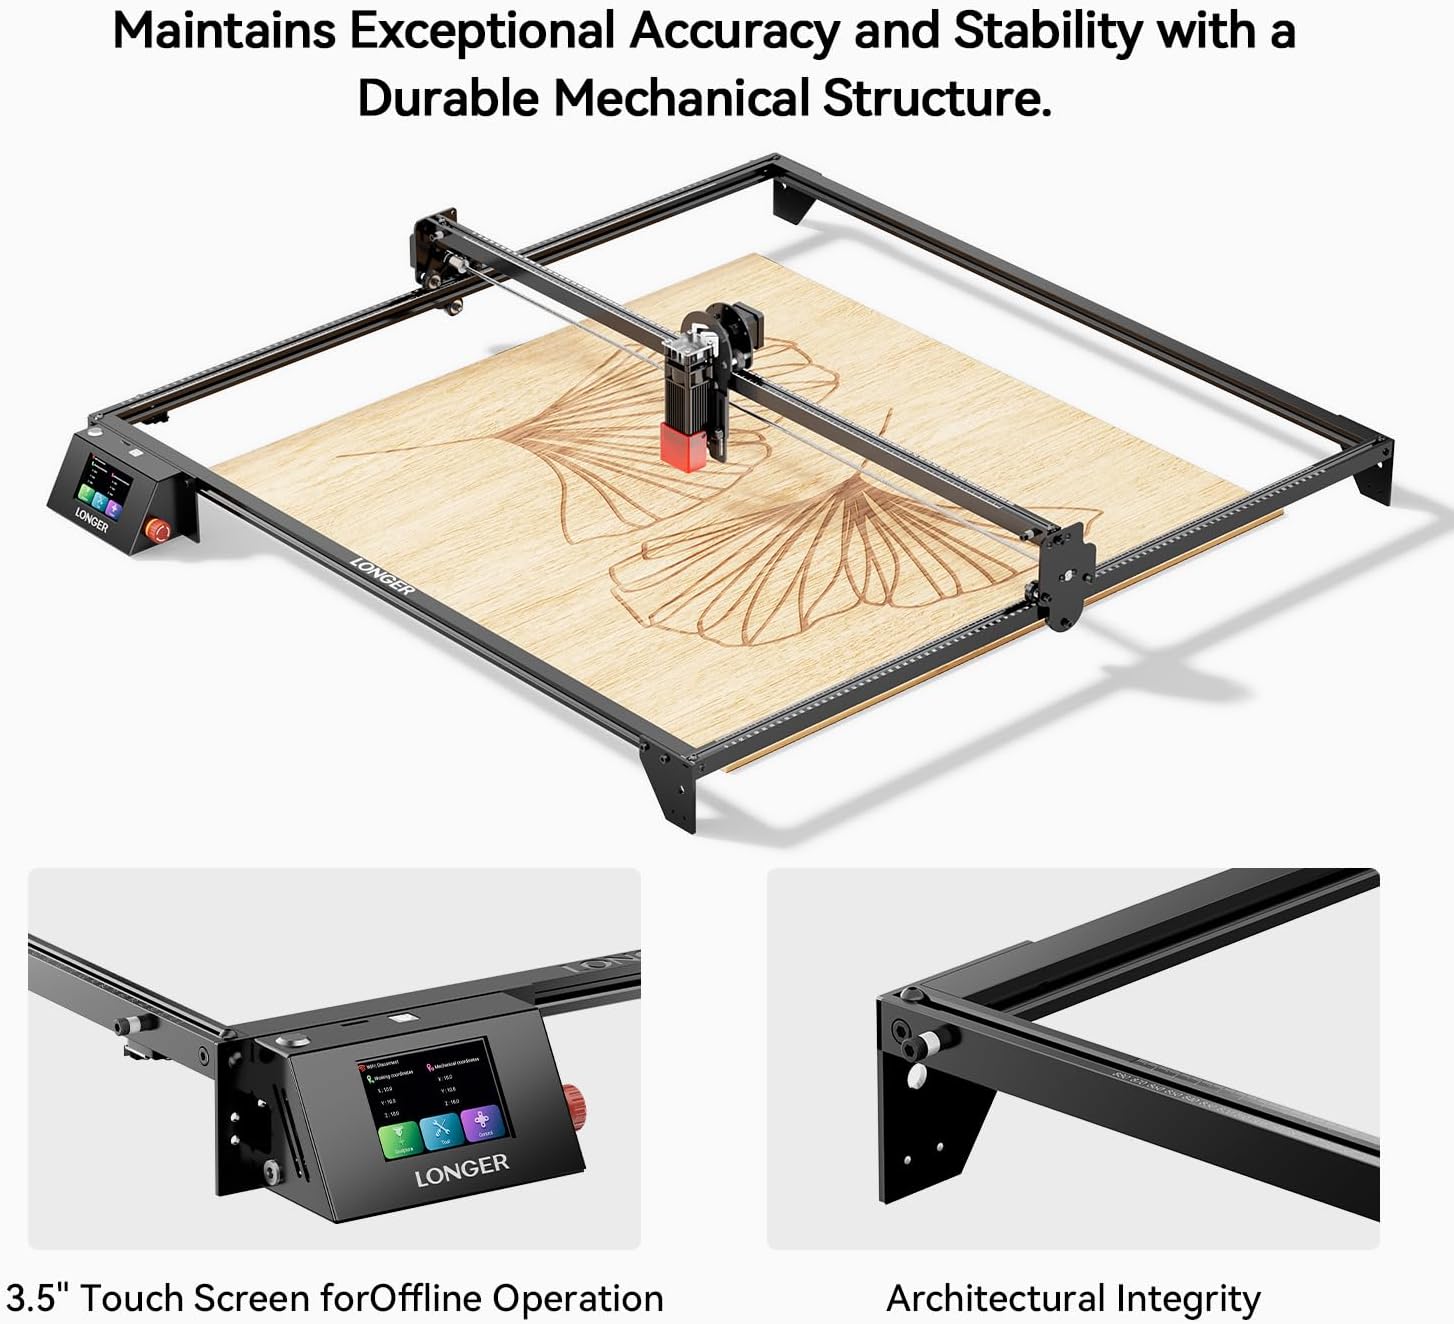
Image 4.2: The expanded frame maintains exceptional accuracy and stability, featuring the 3.5-inch touch screen for offline operation.
5. Иштөө нускамалары
After successful installation of the expansion kit, the operation of your RAY5 laser engraver remains largely the same, but with a significantly larger working area. The expanded area allows for larger designs and batch processing.

Сүрөт 5.1: Мурункуample of the expanded engraving area, ideal for larger projects like the wooden tractor model shown.
5.1 Программанын конфигурациясы
You may need to adjust the working area dimensions in your laser engraving software (e.g., LightBurn, LaserGRBL) to reflect the new, larger engraving size. Refer to your software's documentation for specific instructions on setting workspace dimensions.
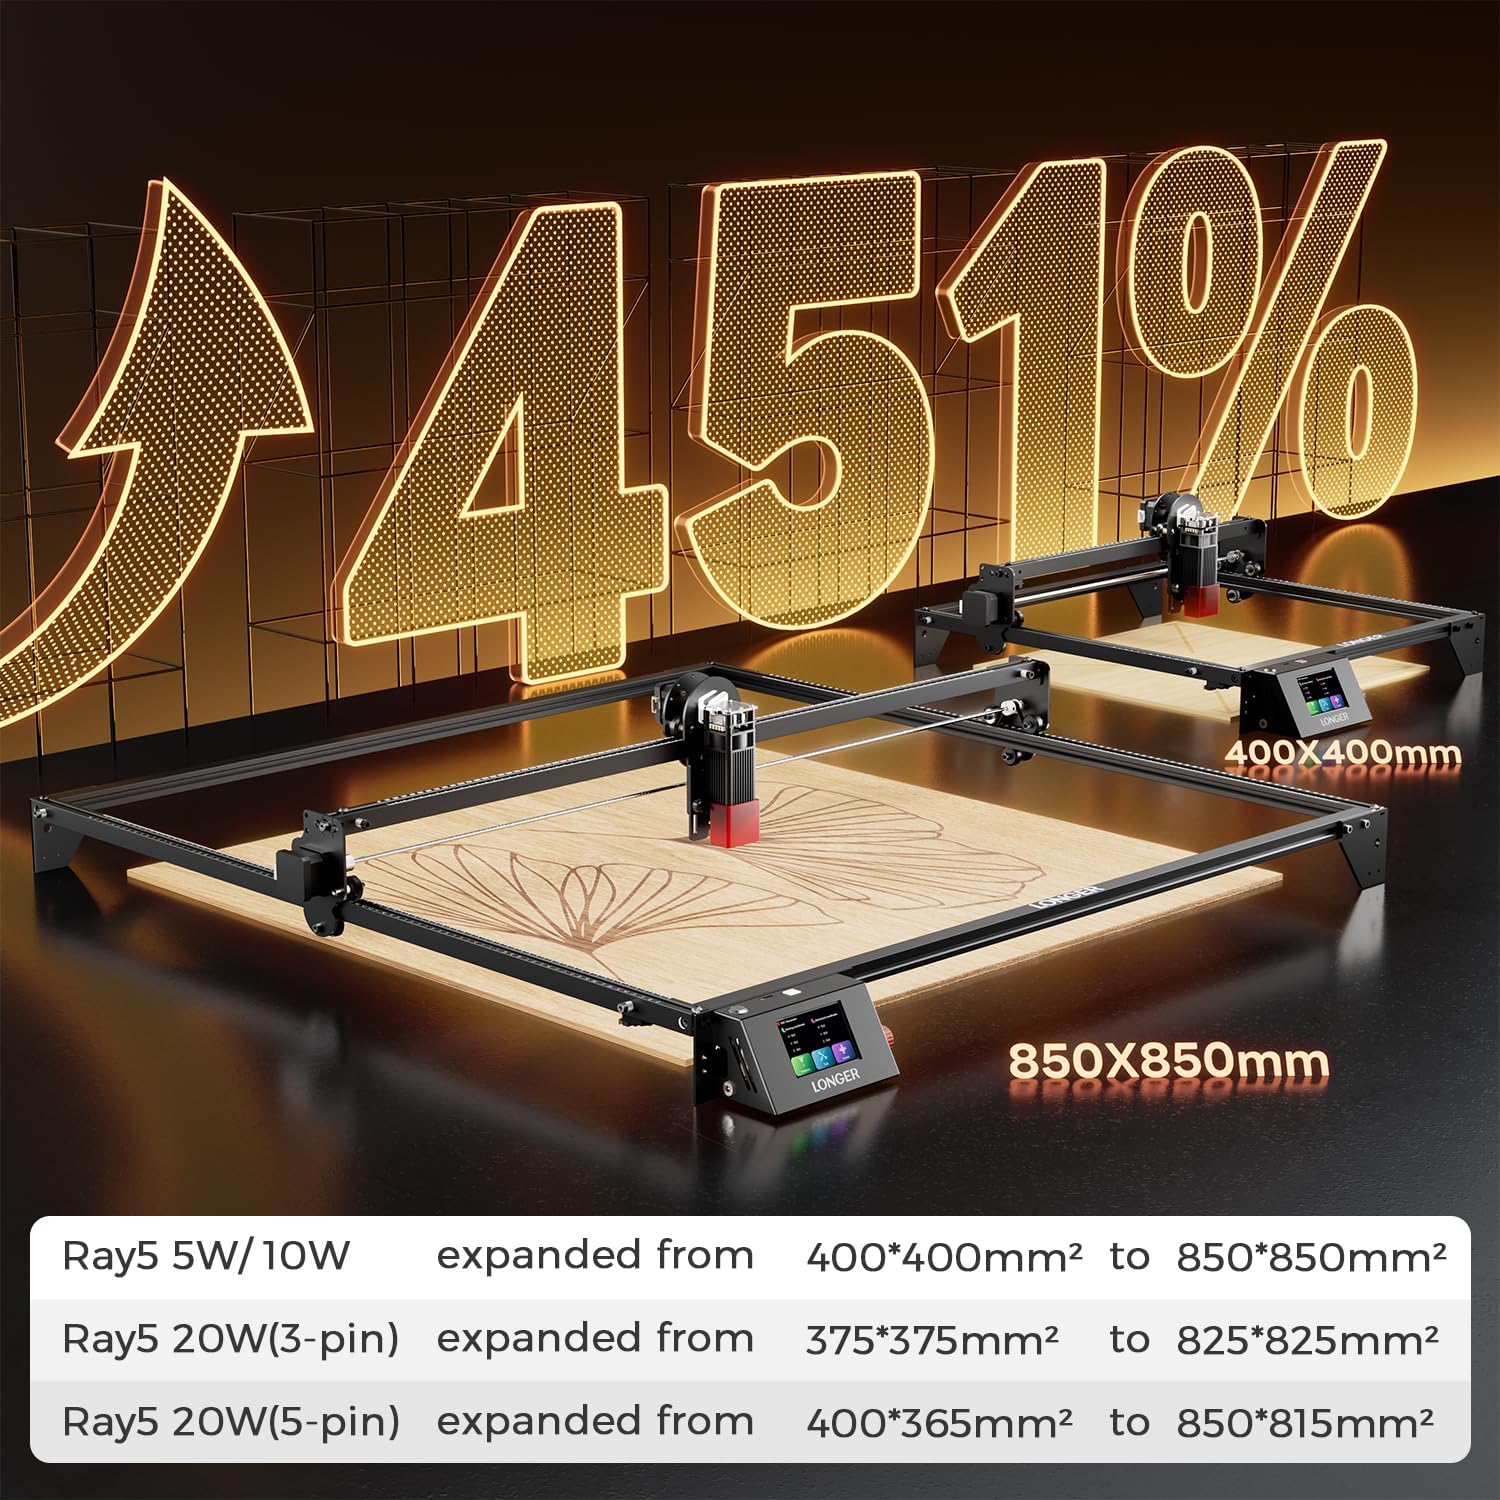
Image 5.2: This graphic illustrates the significant increase in engraving area, up to 451%, depending on the specific RAY5 model.
5.2 Биринчи колдонуу
- Perform a small test engraving to confirm the laser module moves correctly across the entire expanded area.
- Check for any unexpected vibrations or movements.
- Ensure the laser focus is correctly set for the material being used.
6. Техникалык тейлөө
Regular maintenance ensures the longevity and optimal performance of your expanded laser engraver.
- Тазалоо: Алюминий пробиркасын үзгүлтүксүз тазалап туруңузfiles, wheels, and belts to remove dust and debris. Use a soft cloth and avoid abrasive cleaners.
- Кур чыңалуу: Periodically check the tension of the timing belts. They should be taut but not overly tight. Adjust if necessary.
- Майлоо: Apply a small amount of appropriate lubricant to the guide rails and bearings as recommended by the original engraver's manual.
- бекиткичтер: Inspect all screws and fasteners for tightness. Re-tighten any loose connections.
7. Кыйынчылыктарды
This section addresses common issues that may arise after installing the expansion kit.
7.1 X-Axis Movement Issues (Jitter/Tightness)
Some users have reported the X-axis feeling tight or exhibiting jittery movement, particularly after expansion. This can be due to:
- Over-tightened Rollers: The rollers on the laser module carriage might be too tight against the new X-axis profile. Loosen the eccentric nuts on the rollers slightly until the carriage moves smoothly but without excessive play.
- Misaligned Profiles: Ensure the new aluminum profiles are perfectly parallel and square. Even slight misalignment can cause binding.
- Таштандылар: Check for any small particles or debris on the profiles or rollers that might be impeding smooth movement.
- Кабелдик интерференция: Verify that no cables are snagging or creating resistance against the moving parts.
7.2 Inaccurate Engraving/Cutting
- Loose Belts: Check and adjust the tension of the timing belts. Loose belts can lead to skipped steps and inaccurate positioning.
- Бошоң бекиткичтер: Ensure all frame components and the laser module are securely fastened.
- Программалык камсыздоонун жөндөөлөрү: Confirm that the working area dimensions in your software match the physical dimensions of the expanded engraver.
7.3 Machine Not Powering On/Responding
- Кабелдик байланыштар: Double-check all cable connections, especially the extended cables, to ensure they are fully seated and correctly wired.
- Электр камсыздоо: Verify the power supply is correctly connected and functioning.
8. Техникалык шарттар
The Longer RAY5 XY Axis Expansion Kit modifies the working area of your RAY5 laser engraver. The exact expanded dimensions depend on your specific RAY5 model:
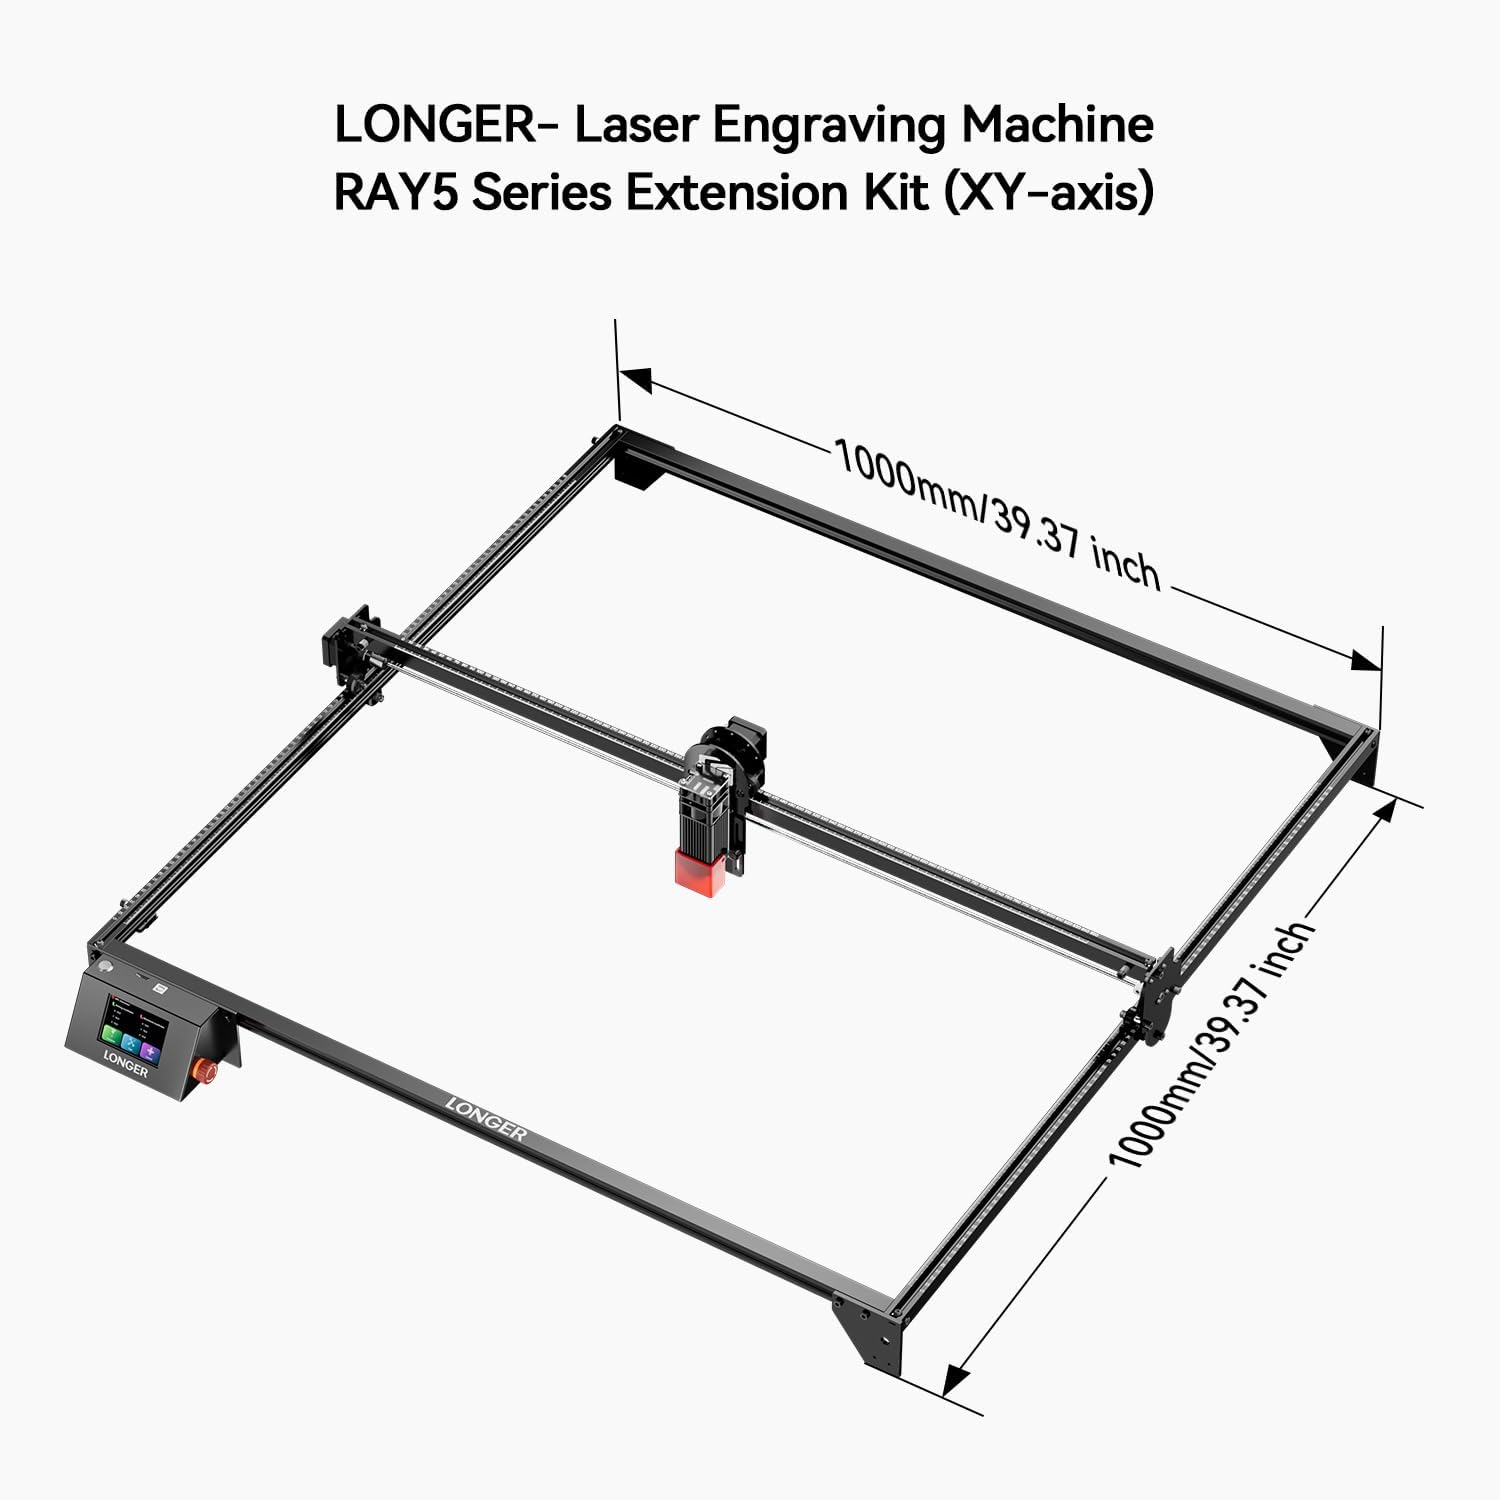
Image 8.1: A diagram illustrating the potential expanded dimensions of the Longer RAY5 series with the XY-axis extension kit, reaching up to 1000mm x 1000mm.
| RAY5 Model | Original Engraving Area | Expanded Engraving Area |
|---|---|---|
| RAY5 5W/10W | 400*400мм² | 850*850мм² |
| RAY5 20W (3-pin) | 375*375мм² | 825*825мм² |
| RAY5 20W (5-pin) | 400*365мм² | 850*815мм² |
- Product Dimensions (Expanded): Approximately 42 x 14 x 3 inches (frame only)
- Элемент Салмагы: 8.43 pounds (kit components)
- Өндүрүүчү: Узунураак
- Модель номери: 20240202
9. Кепилдик жана колдоо
Longer is committed to providing quality products and customer support. For warranty information and technical assistance, please refer to the official Longer webсайтка же түздөн-түз кардарларды тейлөөгө кайрылыңыз.
9.1 Technical Support Contact
For product issues or technical inquiries, please contact Longer customer support:
- Телефон: +1 888-575-9099
- Operating Hours (EST, UTC-5):
- Mon-Fri: 9:00am-6:00pm
- Sun-Thu: 8:30pm-7:00am
Additional resources and FAQs may be available on the Longer Store on Amazon.
Ask a question about this manual
Ask about setup, troubleshooting, compatibility, parts, safety, or missing instructions. Manuals+ will review the question and use this page’s manual context to help answer it.