
Introduction
Thank you for choosing the HERTZ DBA 201 Active Subwoofer. This manual provides essential information for the correct installation, operation, and maintenance of your new car audio component. Please read this manual thoroughly before attempting installation or use to ensure optimal performance and safety.
Маанилүү коопсуздук маалыматы:
- Электр иштерин баштоодон мурун, ар дайым унаанын аккумуляторунун терс терминалын сууруп алыңыз.
- Кыска туташуулардын жана бузулуулардын алдын алуу үчүн бардык зымдар туура изоляцияланганын жана бекемделгенин текшериңиз.
- Орнотуу процессинин кандайдыр бир бөлүгүнө ишенбесеңиз, профессионал орнотуучу менен кеңешиңиз.
- Агрегатты нымдуулукка же экстремалдык температурага дуушар кылбаңыз.
- Operate the subwoofer within its specified power limits to prevent damage.

Image: The HERTZ DBA 201 active subwoofer.
Кутуда эмне бар
Орнотууну баштоодон мурун бардык компоненттер бар экендигин текшериңиз:
- HERTZ DBA 201 Active Subwoofer Unit
- Деңгээлди алыстан башкаруу
- Wiring Harness (Power, Ground, Remote, High-Level Input)
- RCA киргизүү кабели
- Монтаждоочу жабдык
- Колдонуучунун Колдонмосу (бул документ)

Image: Included accessories for the DBA 201, showing the remote control and various wiring harnesses.
Негизги өзгөчөлүктөрү
- Жогорку аткаруу: Delivers powerful bass in a compact design.
- Dual Passive Radiators: Enhances bass response and efficiency.
- Камтылган класс D Ampөмүр берүүчү: Compact, powerful, efficient, and low power consumption.
- HE-LI Technology: Ensures low impedance for optimal performance.
- Деңгээлди алыстан башкаруу: Allows for convenient volume adjustment from the driver's seat.
- Auto Sense Circuit: Automatically turns the unit on and off with the audio signal.
- Жалпы шайкештик: Designed to work with various car audio systems.
- Plug & Play орнотуу: Facilitates quick and removable setup.

Image: Internal components of the DBA 201, illustrating the integrated amplifier and passive radiators.
Техникалык мүнөздөмөлөр
| Өзгөчөлүк | Деталь |
|---|---|
| Модель номери | DBA-201 |
| Динамиктин максималдуу чыгаруу күчү | 440 Ватт (чоку) |
| Program Power (RMS) | 220 Ватт |
| Сабвуфердин диаметри | 8 дюйм (200 мм) |
| Байланыш технологиясы | Зымдуу |
| Аудио чыгаруу режими | Стерео, айлана |
| Коргоочу материал | Жыгач |
| Controller Type | Алыстан башкаруу |
| Элементтин өлчөмдөрү (D x W x Y) | 11.46"D x 10.39"W x 12.42"H (291mm D x 264mm W x 315.5mm H) |
| Power Source | Электр зымдары (Унаа 12V) |

Image: Power specifications for the DBA 201.
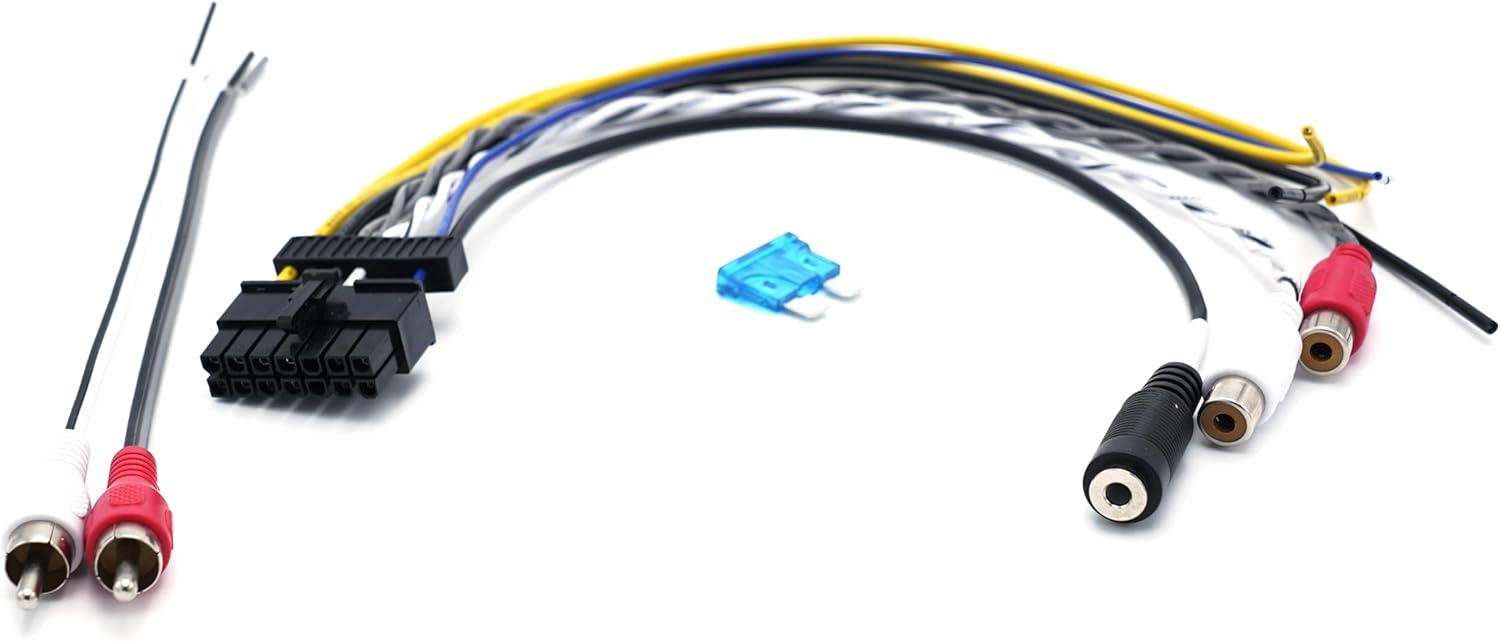
Image: Dimensional drawing of the DBA 201, with measurements A, B, and C.
Орнотуу боюнча колдонмо
Proper installation is crucial for the performance and longevity of your HERTZ DBA 201 subwoofer. Follow these steps carefully:
- Монтаждоо ордун тандаңыз: Select a secure, dry location in your vehicle, such as the trunk or under a seat, that allows for adequate ventilation and does not obstruct vehicle operation. Ensure the subwoofer is firmly mounted to prevent movement during driving.
- Батареяны ажыратыңыз: Before making any electrical connections, disconnect the negative (-) terminal of your vehicle's battery to prevent short circuits.
- Электр зымдары:
- Connect the main power wire (typically red) from the subwoofer's wiring harness to the positive (+) terminal of the vehicle's battery. Use an appropriate fuse holder (included) as close to the battery as possible.
- Connect the ground wire (typically black) from the subwoofer's wiring harness to a clean, unpainted metal surface on the vehicle's chassis. Ensure a good electrical connection.
- Connect the remote turn-on wire (typically blue or yellow) to the remote output of your car stereo. If your stereo does not have a remote output, you can use the "Auto Sense" feature (see Operating section).
- Аудио сигнал киргизүү:
- RCA (Low-Level) Input: If your car stereo has RCA pre-outs, connect them to the RCA input jacks on the DBA 201 using the provided RCA cable.
- Жогорку деңгээлдеги киргизүү: If your car stereo does not have RCA pre-outs, use the high-level input wires from the wiring harness. Connect these wires directly to your car stereo's speaker outputs (e.g., rear left and right speaker wires). Ensure correct polarity.
- Remote Level Control Installation: Mount the remote level control in a convenient location within reach of the driver. Connect its cable to the "REMOTE CONTROL" port on the subwoofer.
- Коопсуз зымдар: Route all wires safely away from moving parts, sharp edges, and heat sources. Use cable ties or clips to secure them.
- Батареяны кайра туташтыруу: Once all connections are made and secured, reconnect the negative (-) terminal of the vehicle's battery.

Image: Rear panel connections and controls of the DBA 201.
Иштетүү жана тууралоо
After installation, fine-tune your DBA 201 for optimal sound performance using the controls located on the rear panel and the remote level control.
- GAIN Control: Adjusts the input sensitivity of the subwoofer. Start with the gain at minimum and slowly increase it until the subwoofer output matches the rest of your audio system without distortion.
- LO-PASS Filter: This control sets the upper frequency limit for the subwoofer. Adjust it to blend smoothly with your main speakers. A common starting point is between 80Hz and 100Hz.
- БАС КҮЧӨТҮҮ: Provides an adjustable bass equalization at a specific frequency. Use sparingly to avoid distortion.
- ФАЗА (0°/180°): Adjusts the phase of the subwoofer output relative to your main speakers. Experiment with both settings to find the one that provides the most impactful and coherent bass response.
- AUTO TURN ON (REM/DC/AUDIO):
- REM: Uses the remote turn-on wire from your head unit.
- DC: Detects a DC offset on the high-level input to turn on the subwoofer.
- АУДИО: Detects an audio signal on the high-level input to turn on the subwoofer.
- Деңгээлди алыстан башкаруу: This knob allows you to conveniently adjust the subwoofer's output level from your listening position without accessing the main unit.

Image: Remote level control for the DBA 201.
Техникалык тейлөө
The HERTZ DBA 201 is designed for reliable performance with minimal maintenance. Follow these guidelines to ensure its longevity:
- Тазалоо: Use a soft, dry cloth to wipe the exterior of the subwoofer. Do not use harsh chemicals, solvents, or abrasive cleaners.
- Вентиляция: Ensure that the subwoofer's ventilation areas are not blocked. Adequate airflow prevents overheating.
- Байланыштары: Мезгил-мезгили менен бардык зымдарды байланыштарды текшерип туруңуз, алар бекем жана коррозиядан таза.
- Курчап турган чөйрө: Avoid exposing the subwoofer to direct sunlight, extreme heat, or moisture for extended periods.
Кыйынчылыктарды табуу боюнча колдонмо
If you experience issues with your HERTZ DBA 201, refer to the following common problems and solutions:
| Көйгөй | Мүмкүн себеп | Чечим |
|---|---|---|
| Сабвуферден үн жок |
|
|
| Distorted Sound |
|
|
| Алсыз басс чыгаруу |
|
|
| Сабвуфер ысып кетти |
|
|
Кепилдик маалымат
The HERTZ DBA 201 Active Subwoofer is covered by a 1 жылдык Өндүрүүчүнүн Кепилдиги from the date of purchase. This warranty covers defects in materials and workmanship under normal use. It does not cover damage caused by improper installation, accident, misuse, abuse, negligence, unauthorized modification, or normal wear and tear.
To make a warranty claim, please retain your proof of purchase and contact your authorized HERTZ dealer or customer support.
Кардарларды колдоо
For further assistance, technical support, or service inquiries regarding your HERTZ DBA 201 Active Subwoofer, please contact:
- HERTZ Official Webсайт: www.hertz-audio.com
- Authorized HERTZ Dealer: Refer to your purchase documentation for local dealer contact information.
- Электрондук почта колдоо: support@hertz-audio.com
When contacting support, please have your product model (DBA-201) and serial number ready.