1. Коопсуздук маалыматы
Бул продуктуну колдонуудан мурун бардык коопсуздук көрсөтмөлөрүн кунт коюп окуп чыгыңыз. Бул көрсөтмөлөрдү аткарбоо электр тогуна урунууга, өрткө же башка коркунучтарга алып келиши мүмкүн.
- Өрт же электр тогуна урунуп калбаш үчүн проекторду жамгырга же нымдуулукка дуушар кылбаңыз.
- Проекторду ачпаңыз casinг. Ичинде колдонуучу тейлей турган бөлүктөр жок. Бардык тейлөөлөрдү квалификациялуу тейлөө кызматкерлерине тапшырыңыз.
- Туура желдетүүнү камсыз кылыңыз. Вентиляция тешиктерин жаап албаңыз.
- Проектор менен келген кубат адаптерин гана колдонуңуз.
- l болгондо проектордун линзасына түздөн-түз көз тийбесинamp күйүк.
- Проекторду жылуулук булактарынан жана түз күн нурунан алыс кармаңыз.
2. Пакеттин мазмуну
Төмөндө тизмеленген нерселердин баары пакетиңизге камтылганын текшериңиз:
- 1 x Jectse Mini LED Projector
- 1 x Remote Control (2 AAA batteries not included)
- 1 x AV Line (3-in-1 RCA cable)
- 1 x Instruction Manual
- 1 х кубат адаптери

Figure 2.1: Contents of the Jectse Mini LED Projector package.
3. Продукт бүтүп калдыview
The Jectse Mini LED Projector is a compact and portable device designed for various multimedia applications. It features a 1080P resolution, LED light source, and multiple connectivity options.

3.1-сүрөт: Алдыңкы жана үстүнкү view of the Jectse Mini LED Projector.
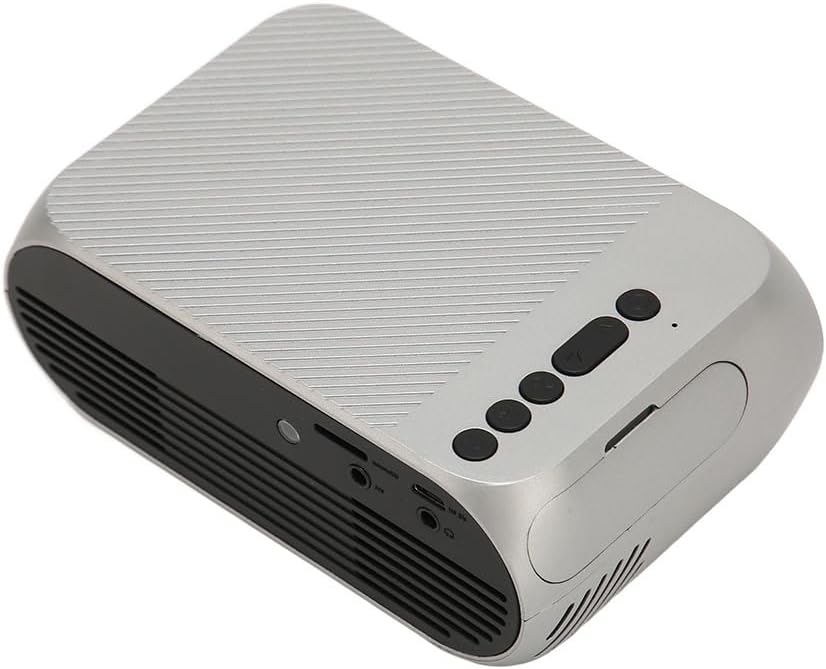
3.1 Проектордун компоненттери

Figure 3.2: Top panel controls of the Jectse Mini LED Projector.
- Объектив: Сүрөттү экранга проекциялайт.
- Желдетүүчү торчо: муздатуу үчүн туура аба агымын камсыз кылат.
- Башкаруу баскычтары: (Refer to Figure 3.2) For basic navigation and power control.
- Фокус дөңгөлөк: Сүрөттүн тунуктугун тууралайт.
3.3-сүрөт: Арткы жана каптал view киргизүү/чыгаруу порттору менен.
3.2 Киргизүү/чыгыш порттору
- HD Multimedia Interface (HDMI): For connecting devices like laptops, gaming consoles, and media players.
- AV порт: Камтылган AV кабелин колдонуу менен эски түзмөктөрдү туташтыруу үчүн.
- USB порт: Медиа ойнотуу үчүн USB дисктерди туташтыруу үчүн fileтүздөн-түз с.
- Кубат киргизүү: Кубат адаптерин туташтыруу үчүн.
- Аудио чыгаруу (3.5 мм уяча): Тышкы динамиктерди же наушниктерди туташтыруу үчүн.
4. Орнотуу
4.1 Орнотуу
Place the projector on a stable, flat surface. Ensure there is adequate space around the projector for ventilation. The ideal projection distance is between 1.5 to 2 meters for optimal image size and clarity.

Figure 4.1: Recommended projection distance and screen sizes.
4.2 Кубат туташтыруу
- Кубат адаптерин проектордун кубат киргизүү портуна туташтырыңыз.
- Кубат адаптерин ылайыктуу электр розеткасына (100-240 В) сайыңыз.
4.3 Киргизүү булактарын туташтыруу
The projector supports HD Multimedia Interface, AV, and USB inputs.

Figure 4.2: Projector compatibility with various devices.
- HD Multimedia Interface: Connect an HD Multimedia Interface cable from your source device (e.g., laptop, game console) to the projector's HD Multimedia Interface port.
- OF: Connect the included AV cable to the projector's AV port and the corresponding audio/video output ports on your source device.
- USB: Insert a USB flash drive into the projector's USB port.
4.4 Фокусту тууралоо
After powering on the projector, rotate the focus wheel (usually located near the lens) until the projected image appears clear and sharp.
5. Иштөө нускамалары
5.1 Күйгүзүү/өчүрүү
- Күйгүзүү үчүн: Press the Power Switch button on the projector or the power button on the remote control.
- Өчүрүү үчүн: Press the Power Switch button again. The projector will shut down.
5.2 Булакты тандоо
After powering on, use the "Signal Source Button" on the projector or the "Source" button on the remote control to cycle through available input sources (HD Multimedia Interface, AV, USB).
5.3 Меню Навигациясы
Use the Direction Buttons and Confirm Button on the projector or the arrow keys and OK button on the remote control to navigate through the projector's on-screen menu for settings adjustments (e.g., picture mode, aspect ratio, sound settings).
5.4 Алыстан башкарууну колдонуу
Insert two AAA batteries (not included) into the remote control. Point the remote control towards the projector's IR receiver to operate functions such as power, source selection, volume, and menu navigation.
6. Техникалык тейлөө
6.1 Линзаны тазалоо
Проектордун линзасын акырын сүртүү үчүн атайын оптикалык линзалар үчүн жасалган жумшак, түксүз кездемени колдонуңуз. Абразивдүү тазалагычтарды же ашыкча күч колдонбоңуз, анткени бул линзаны чийип алышы мүмкүн.
6.2 Жалпы тазалоо
Wipe the exterior of the projector with a soft, dry cloth. Do not use liquid cleaners or solvents. Ensure the ventilation grilles are free from dust and debris to maintain optimal cooling.
7. Кыйынчылыктарды
| Көйгөй | Мүмкүн себеп | Чечим |
|---|---|---|
| Сүрөт чагылдырылган жок |
|
|
| Сүрөт бүдөмүк |
|
|
| Үн жок |
|
|
| Пульт иштебей жатат |
|
|
8. Техникалык шарттар
| Өзгөчөлүк | Деталь |
|---|---|
| Бренд | Jectse |
| Модель номери | Jectse3giz17bkpy |
| Резолюция | 1920*1080p |
| Жарык булагы | LED |
| LED Life | 3000 саат |
| Проекциялык аралык | 1.5-2м |
| Проекциянын катышы | 1.6:1 |
| Аспект катышы | 16:9 |
| Power Input | 100-240V |
| Продукт өлчөмү | 13 x 8.5 x 5 см (болжол менен 5.1 x 3.3 x 2 дюйм) |
| Элемент Салмагы | 1.1 фунт |
| Байланыш технологиясы | HD Multimedia Interface, AV, USB |
| Өзгөчөлүктөр | Adjustable, Portable Design |
9. Кепилдик жана колдоо
For warranty information or technical support, please refer to the contact details provided with your purchase or visit the official Jectse webсайт. Кепилдик дооматтар үчүн сатып алганыңыздын далилин сактаңыз.