1. Киришүү
Thank you for choosing the Jectse HD Door Peephole Camera. This device is designed to enhance your home security by providing a clear, wide-angle view of your doorstep, along with advanced features such as night vision, two-way audio, and motion detection. Please read this manual carefully before installation and operation to ensure proper use and optimal performance.
2. Продукт бүтүп калдыview
2.1 Негизги өзгөчөлүктөрү
- Уурулукка каршы дизайн: Can be installed in the security door peephole, preventing tampering and unwanted postings.
- Кең бурчтуу линза: Features a 1.6mm fisheye lens with approximately 170-degree viewing angle for unobstructed doorway visibility.
- APP көзөмөлү: Supports TUYA mobile APP for remote viewing and control, connecting via home Wi-Fi router.
- Көп функциялуулугу: Includes motion detection alarm, built-in speaker and microphone for two-way talk, and infrared night vision for enhanced security.
- Сактоо параметрлери: Supports up to 128GB memory card (not included) and cloud storage. Compatible with Open Network Video Interface Forum protocol for NVR storage.
2.2 Пакеттин мазмуну
- 1 x Door Eye Hole Camera Unit
- 1 x USB кабели
- 1 x Байланыш кабели
- 1 x Кубат адаптери (АКШ сайгычы)
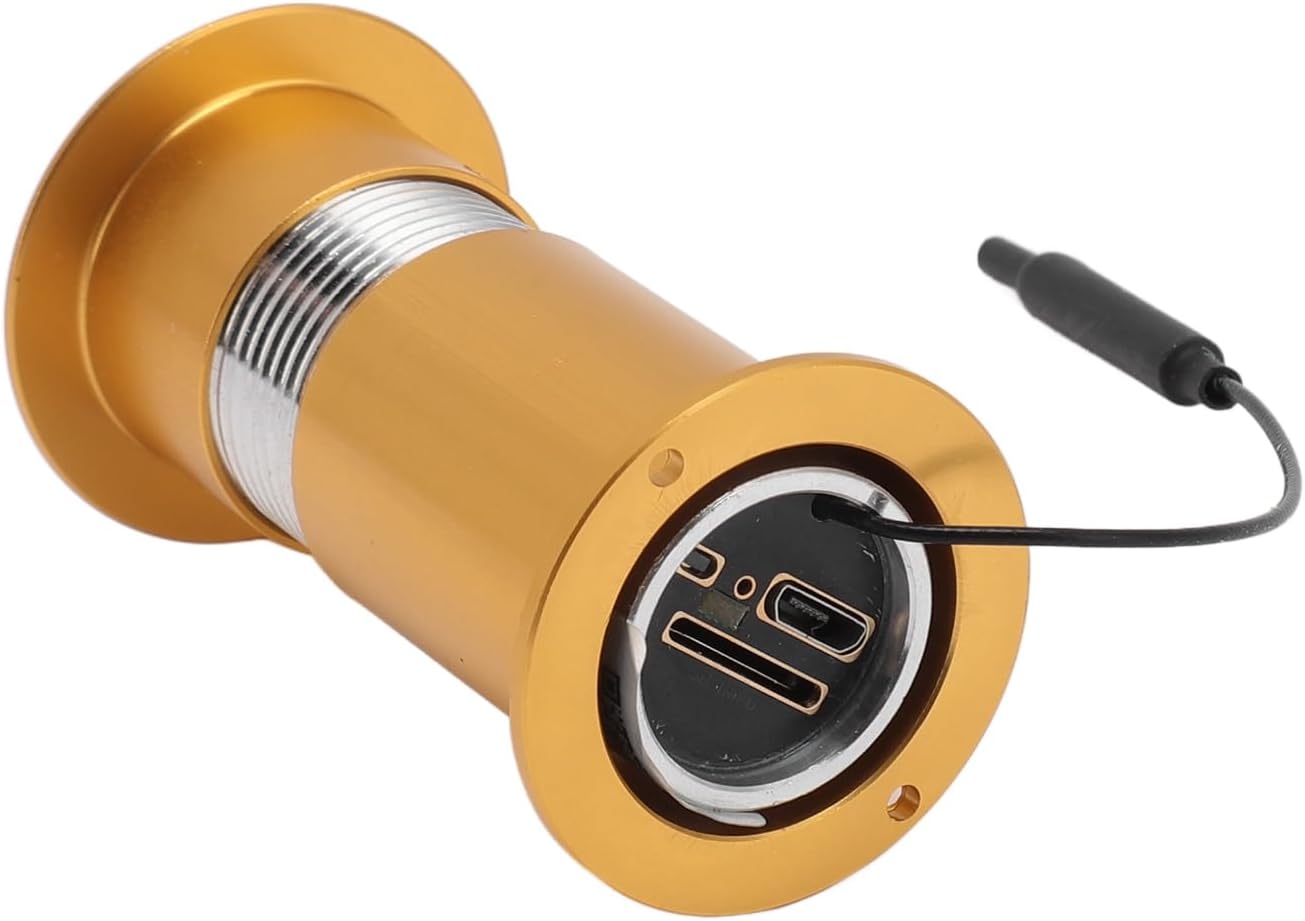
Figure 1: Main unit of the Jectse Door Peephole Camera, featuring the camera lens and connection cable.

2-сүрөт: Сүрөттүн көрсөтмөсүasing the Jectse Door Peephole Camera's HD 1080P resolution, Wi-Fi connectivity, SD card support, and Open Network Video Interface Forum compatibility.
3. Техникалык шарттар
| Спецификация | Нарк |
|---|---|
| Horizontal Resolution | 1080P |
| Сенсордун өлчөмү | 1/2.8 |
| Үн түрү | Voice Talk (Two-Way) |
| Объектив | Approx. 1.6mm/0.06in (Fisheye) |
| Viewбурч | Болжол менен 170 градус |
| Ойготкуч функциясы | Motion Detection |
| Infrared Night Vision Дистанция | Болжол менен 1-3 метр / 3.3-9.8 фут |
| Колдоого алынган формат | H.264 |
| Supported Wi-Fi | Dual Band |
| Эстутум картасын колдоо | Maximum 128G (Not Included) |
| Тtage | 100-240V |
| Элемент Салмагы | 5.6 унция |
| Пакеттин өлчөмдөрү | 6.3 x 3.54 x 1.57 дюйм |
4. Орнотуу жана орнотуу
Follow these steps to install your Jectse Door Peephole Camera:
- Measure Door Dimensions: Ensure your door's thickness and the existing peephole diameter are compatible with the camera. Refer to the product dimensions.
- Prepare the Peephole: If replacing an existing peephole, remove it. If drilling a new hole, ensure it matches the camera's diameter.
- Insert Outdoor Unit: Push the outdoor camera unit through the door hole from the outside. Ensure the camera is oriented correctly.
- Кабелдерди туташтыруу: From the inside, connect the camera's cable to the indoor display unit.
- Ички блокту орнотуу: Secure the mounting bracket to the inside of the door, aligning it with the camera cable. Then, attach the indoor display unit to the bracket.
- Күйгүзүү: Insert the required batteries (4pcs AAA, not included) into the indoor unit or connect the power adapter.
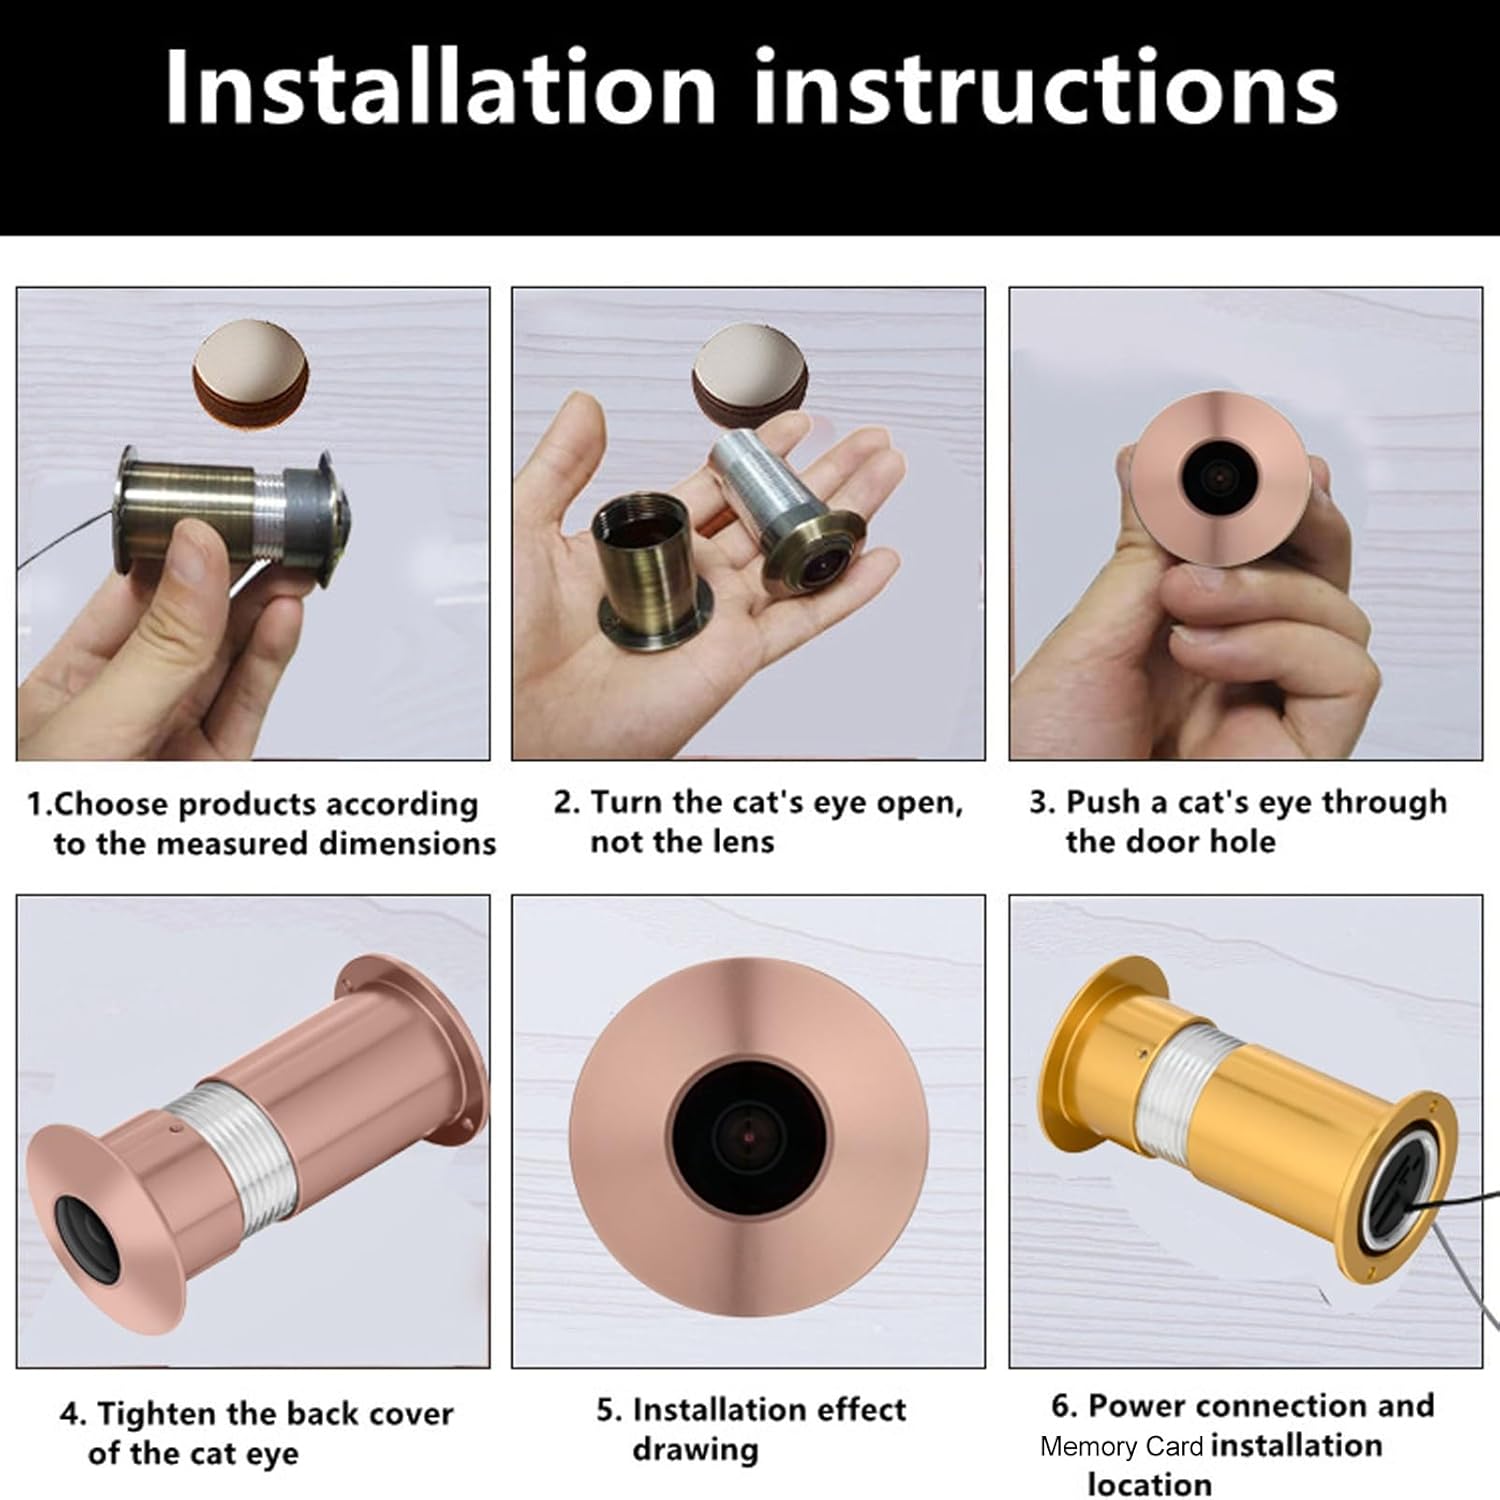
Figure 3: Visual guide detailing the installation process, from choosing the correct product dimensions to power connection and memory card installation.

Figure 4: Demonstrating how to accurately measure door thickness and door hole diameter to ensure proper installation of the peephole camera.

Figure 5: Diagram showing the physical dimensions of the peephole camera, including its length and diameter, and suitable door thickness.
4.1 Орнотуу видеолору
Video 1: This video demonstrates the installation process of a digital peephole viewer, showing how to mount the outdoor camera and connect it to the indoor display unit.
Видео 2: Кыскача алдын алаview video illustrating the basic steps for installing a digital peephole camera, including connecting the components.
Video 3: A brief demonstration of installing a generic peephole camera, focusing on the physical mounting of the camera unit.
5. Иштөө нускамалары
5.1 Күйгүзүү/өчүрүү
Press and hold the power button on the indoor display unit to turn the device on or off. The screen will activate, displaying the live view from the outdoor camera.
5.2 Колдонмону алыстан башкаруу
Download the TUYA mobile application from your device's app store (e.g., Google Play Store). Follow the in-app instructions to connect your Jectse Door Peephole Camera to your home Wi-Fi network. Once connected, you can view жаша фооtage, receive alerts, and control features remotely.

Figure 6: This image emphasizes the camera's Wi-Fi capability, allowing connection to a home wireless router and control via the Tuya mobile app, available on Google Play and other application stores.
5.3 Кыймылды аныктоо
The camera is equipped with motion detection capabilities. When motion is detected, the device can trigger an alarm and send notifications to your connected mobile app. Adjust motion sensitivity settings within the TUYA app to suit your environment.
5.4 Эки тараптуу сүйлөшүү
Utilize the built-in speaker and microphone for two-way communication with visitors at your door. This feature can be accessed via the indoor display unit or remotely through the TUYA mobile app.
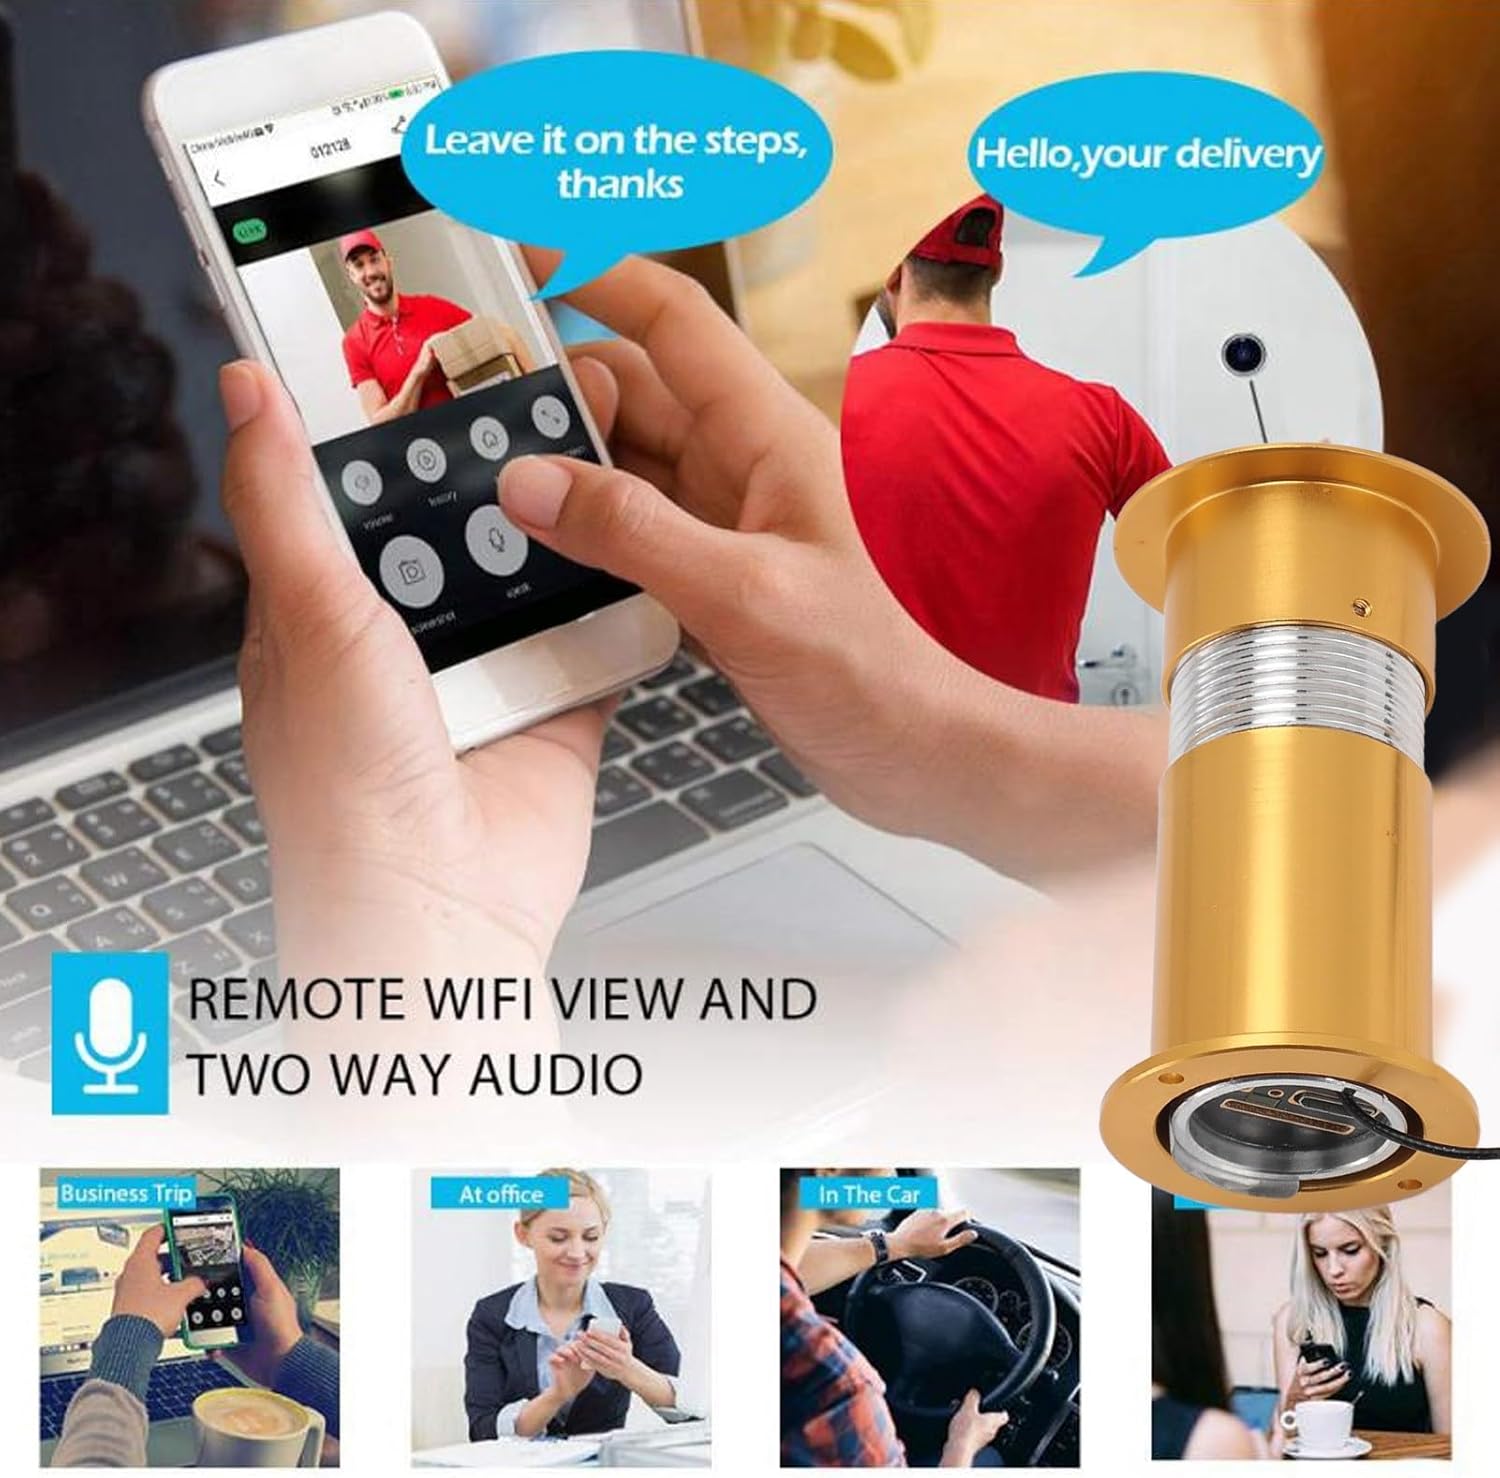
Figure 7: This image illustrates the remote viewing capabilities via a mobile app and the two-way audio function, showing a user interacting with a delivery person through the camera.
5.5 Түнкү көрүнүш
The integrated infrared night vision ensures clear visibility even in low-light conditions or complete darkness, with an effective range of approximately 1-3 meters.
5.6 Сактоо
Insert a compatible memory card (up to 128GB, not included) into the designated slot on the indoor unit for local video storage. Alternatively, configure cloud storage options through the TUYA app. The camera also supports Open Network Video Interface Forum protocol for integration with NVR systems.

Figure 8: The camera installed in a door peephole, highlighting its anti-theft design and the ability to view potential threats or unwanted visitors remotely on a smartphone.
6. Техникалык тейлөө
- Тазалоо: Gently wipe the camera lens and display screen with a soft, dry cloth. Avoid using abrasive cleaners or solvents.
- Батареяны алмаштыруу: If using AAA batteries, replace them when the low battery indicator appears on the display.
- Программалык камсыздоонун жаңыртуулары: Periodically check the TUYA app for any available firmware updates to ensure optimal performance and security.
7. Кыйынчылыктарды
- Дисплейде сүрөт жок:
- Ensure the camera unit is properly connected to the indoor display unit.
- Check if the device is powered on and batteries are charged/power adapter is connected.
- Wi-Fi'га туташуу мүмкүн эмес:
- Verify your Wi-Fi network is 2.4GHz (dual-band routers often support both 2.4GHz and 5GHz).
- Камеранын Wi-Fi роутериңиздин чегинде экенин текшериңиз.
- Роутериңизди жана камераңызды өчүрүп-күйгүзүп, андан кийин кайра туташтырып көрүңүз.
- Кыймылды аныктоо иштебей жатат:
- Check motion detection settings in the TUYA app.
- Камера объективинин таза жана тоскоолдуксуз экенин текшериңиз.
- Түнкү көрүү начар:
- Ensure there are no obstructions blocking the infrared sensors on the outdoor unit.
- Камера линзасын тазалаңыз.
8. Кепилдик жана колдоо
For warranty information and technical support, please refer to the product packaging or contact Jectse customer service directly. Keep your purchase receipt as proof of purchase.