HOCO QS2
Hoco QS2 Portable Smart Air Pump & Emergency Start-Up Power Bank User Manual
Модел: QS2
1. Киришүү
Thank you for choosing the Hoco QS2 Portable Smart Air Pump & Emergency Start-Up Power Bank. This device is a multi-functional tool designed to provide reliable assistance in various situations, including jump-starting vehicles, inflating tires, and charging electronic devices. Please read this manual thoroughly before use to ensure proper operation and to maximize the lifespan of your device.
2. Коопсуздук чаралары
Always observe the following safety guidelines to prevent injury or damage to the device and property.
- Аппаратты экстремалдык температурага, түз күндүн нуруна же отко калтырбаңыз.
- Балдар жетпеген жерде сактаңыз.
- Do not disassemble, modify, or attempt to repair the device yourself. Contact qualified service personnel.
- Ensure proper ventilation during operation, especially when using the air pump or jump start function.
- Чыгуу терминалдарын кыска туташуудан сактаңыз.
- Эгерде батареясы күйүп калса, стартерди колдонбоңуз.ampс же кабелдер бузулган.
- When jump-starting, ensure the vehicle's ignition is off and all accessories are unplugged.
- Do not over-inflate tires. Always refer to the recommended tire pressure for your vehicle.
- If the device becomes excessively hot during use, discontinue operation immediately.
3. Пакеттин мазмуну
Сураныч, төмөнкү нерселер үчүн кутучаны белгилеңиз:
- 1 x Hoco QS2 8000 mAh Portable Smart Air Pump Emergency Start-Up Power Bank
- 1 x Jump Start Cables (Red and Black Clamps)
- 1 x Air Hose with Valve Connector
- Various Nozzle Adapters (e.g., for bicycles, balls)
- 1 x USB Type-C заряддоо кабели

Figure 1: Hoco QS2 and its complete set of accessories.
4. Продукциянын компоненттери
Familiarize yourself with the different parts of your Hoco QS2 device.
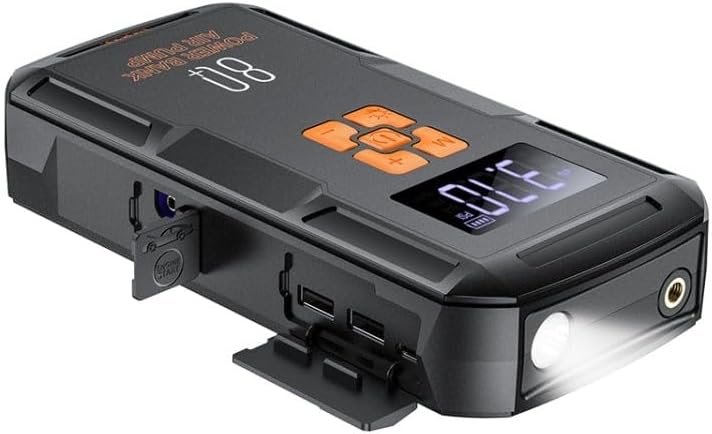
Figure 2: ашыкview of the Hoco QS2 device.
- Санариптик дисплей: Shows current pressure, battery level, and selected mode.
- Башкаруу баскычтары: Power, Mode selection, Increase/Decrease pressure.
- Аба шланг порту: Connects the inflation hose.
- Jump Start Port: Connects the jump start cables.
- USB Output Ports (2x): For charging external devices (5V/2.4A).
- Type-C киргизүү порту: For charging the Hoco QS2 itself (5V/2.4A).
- LED фонарик: жарыктандырууну камсыз кылат.
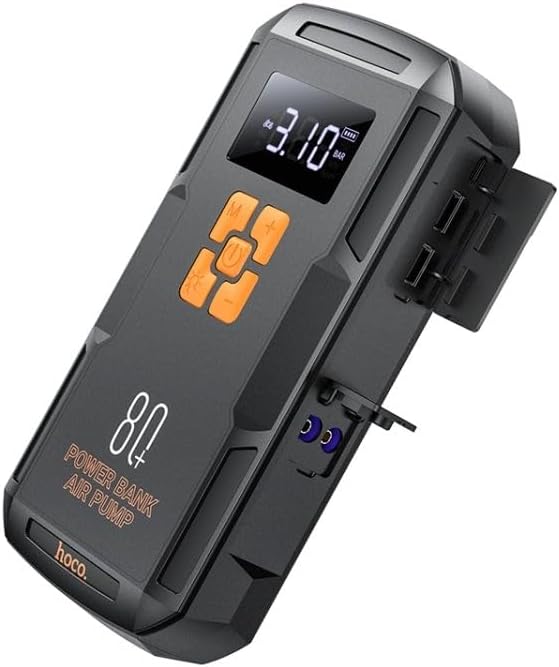
3-сүрөт: Каптал view of the Hoco QS2 with ports visible.
5. Орнотуу жана заряддоо
5.1 Charging the Hoco QS2
Before first use, fully charge the Hoco QS2. It is recommended to keep the device charged above 50% for optimal performance, especially for jump-starting.
- Connect the provided USB Type-C charging cable to the Type-C input port on the Hoco QS2.
- Connect the other end of the USB cable to a 5V/2.4A USB wall adapter (not included) or a compatible USB port.
- The digital display will indicate the charging status and battery level.
- Заряддоо убактысы кубат булагына жараша өзгөрүшү мүмкүн.
6. Иштөө нускамалары
6.1 Jump Start Function
The Hoco QS2 can jump-start vehicles with up to 4.0L gasoline or 2.0L diesel engines.
- Ensure the Hoco QS2 is sufficiently charged (at least 75% battery recommended).
- Унаанын от алдыруучу системасын жана бардык электр жабдууларын өчүрүңүз.
- Кызыл (+) cl туташтырыңызamp of the jump start cable to the positive (+) terminal of the vehicle's battery.
- Кара (-) cl туташтырыңызamp to the negative (-) terminal of the vehicle's battery or a solid, unpainted metal part of the engine block (ground point).
- Insert the blue connector of the jump start cable into the jump start port on the Hoco QS2.
- Once connected, the Hoco QS2 will automatically enter jump start mode.
- Унаанын кыймылдаткычын от алдырыңыз. Эгер ал дароо от албаса, кайра аракет кылуудан мурун 30 секунд күтө туруңуз. Ар бир аракетте 3 секунддан ашык айландырбаңыз.
- Once the vehicle starts, immediately disconnect the jump start cable from the Hoco QS2, then remove the black (-) clamp, андан кийин кызыл (+) cl келетamp унаанын аккумуляторунан.
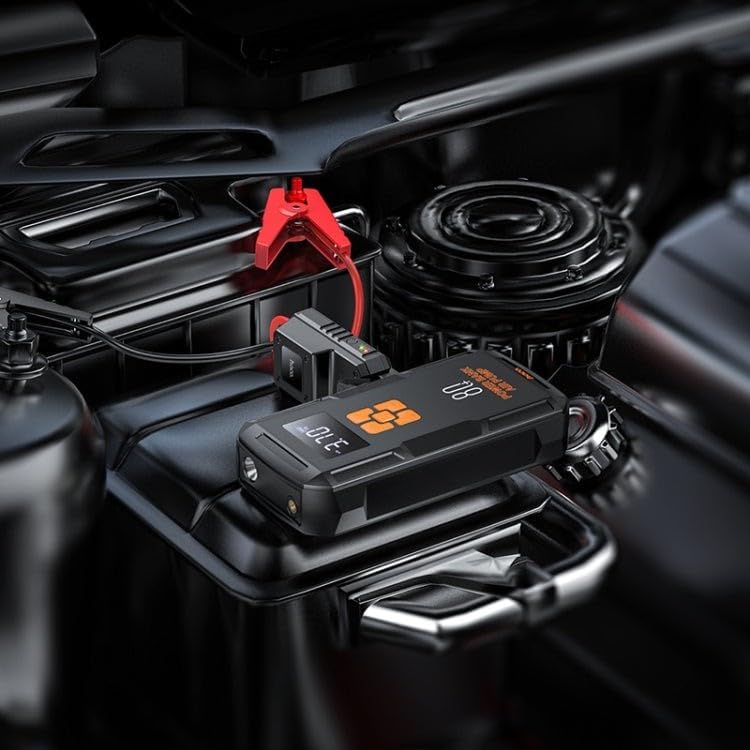
Figure 4: Using the Hoco QS2 for jump-starting a vehicle.
6.2 Tire Inflation Function (Air Pump)
The Hoco QS2 can inflate tires up to 10.3 bar (150 PSI) and features multiple inflation modes.
- Connect the air hose to the air hose port on the Hoco QS2.
- Attach the other end of the air hose to the tire valve. Ensure a secure connection to prevent air leakage. Use appropriate nozzle adapters for other inflatables (e.g., bicycle tires, sports balls).
- Press the Power button to turn on the device. The display will show the current tire pressure.
- Press the 'M' (Mode) button to cycle through the inflation modes: Car, Motorcycle, Bicycle, Basketball. Each mode has a default pressure setting, which can be adjusted.
- Use the '+' and '-' buttons to set your desired target pressure.
- Press the Power button again to start inflation. The pump will automatically stop once the target pressure is reached.
- Аба түтүгүн дөңгөлөк клапанынан жана түзмөктөн ажыратыңыз.

Figure 5: Inflating a car tire with the Hoco QS2.
6.3 Power Bank функциясы
The Hoco QS2 can charge your electronic devices via its dual USB output ports.
- Connect your device's USB charging cable to one of the USB output ports on the Hoco QS2.
- Кабелдин экинчи учун электрондук түзүлүшкө туташтырыңыз (мисалы, смартфон, планшет).
- The Hoco QS2 will automatically begin charging your device.
- Санариптик дисплейде Power Bankтын калган батарея деңгээли көрсөтүлөт.
6.4 LED Flashlight Function
Интегралдык LED фонариги ар кандай кырдаалдарда жарык берет.
- To turn on the flashlight, press and hold the 'Light' button (usually indicated by a light bulb icon).
- Press the 'Light' button again to cycle through different light modes (e.g., steady on, SOS signal, strobe).
- Press and hold the 'Light' button again to turn off the flashlight.
7. Техникалык тейлөө жана сактоо
- Аппаратты жумшак, кургак чүпүрөк менен тазалаңыз. Катуу химиялык заттарды же абразивдүү тазалагычтарды колдонбоңуз.
- Store the Hoco QS2 in a cool, dry place, away from direct sunlight and moisture.
- For long-term storage, charge the device every 3-6 months to maintain battery health.
- Ensure all ports are covered when not in use to prevent dust and debris from entering.
8. Кыйынчылыктарды
| Көйгөй | Мүмкүн себеп | Чечим |
|---|---|---|
| Түзмөк күйбөй жатат. | Батарея аз. | Аппаратты толук заряддаңыз. |
| Унаа секирип отпойт. | Incorrect cable connection; Device battery too low; Vehicle battery severely discharged. | Ensure correct polarity (+ to +, - to -). Charge the Hoco QS2. Allow more time for the vehicle battery to receive a charge, or seek professional assistance if the battery is completely dead. |
| Air pump not inflating or inflating slowly. | Air hose not securely connected; Nozzle adapter not suitable; Device battery low. | Check all connections for leaks. Use the correct adapter. Charge the device. |
| USB кубаттоо иштебей жатат. | Device battery low; Cable faulty; Device not compatible. | Charge the Hoco QS2. Try a different USB cable. Ensure your device is compatible with 5V/2.4A charging. |
9. Техникалык шарттар
| Өзгөчөлүк | Спецификация |
|---|---|
| Модель номери | QS2 |
| Батарея сыйымдуулугу | 8000 мАч (29.6 Втч) |
| Type-C киргизүү | 5V / 2.4A |
| USB Output 1/2 | 5V / 2.4A |
| Жалпы USB чыгышы | 5V / 2.4A |
| Чыгууну баштоо | 12V (for vehicle emergency start) |
| Макс аба басымы | 10.3 бар / 150 PSI |
| Өлчөмдөр | Болжол менен. 12 x 10 x 8 см |
| Салмагы | Болжол менен 800 грамм |
| Иштөө температурасы | Белгилүү бир ассортимент үчүн продуктунун таңгагын караңыз. |
10. Кепилдик жана колдоо
HOCO products are designed and manufactured to the highest quality standards. For warranty information and customer support, please refer to the warranty card included with your purchase or visit the official HOCO webсайт. Сатып алуу квитанциясын кепилдик дооматтары үчүн сатып алуунун далили катары сактаңыз.
Ask a question about this manual
Ask about setup, troubleshooting, compatibility, parts, safety, or missing instructions. Manuals+ will review the question and use this page’s manual context to help answer it.