1. Киришүү
This manual provides detailed instructions for the installation, operation, and maintenance of your PUTORSEN Monitor Wall Mount. This heavy-duty wall-mounted monitor arm is designed to support ultrawide screens up to 49 inches and weighing up to 44 lbs. It features a gas spring for smooth adjustments, along with tilt, swivel, and rotation capabilities to optimize your viewing experience and reclaim desk space.
Сураныч, орнотуудан мурун бул колдонмону кылдат окуп чыгыңыз жана аны келечекте маалымат үчүн сактап коюңуз.

Image 1.1: The PUTORSEN Monitor Wall Mount installed with a 49-inch ultrawide monitor, showcasing its strength and stability.
2. Коопсуздук маалыматы
- Салмак сыйымдуулугу: Do not exceed the maximum weight capacity of 44 lbs (20 kg). Exceeding this limit may result in serious injury or product damage.
- Экрандын өлчөмү: 17 дюймдан 49 дюймга чейинки мониторлор менен шайкеш келет.
- VESA шайкештиги: Ensure your monitor has VESA mounting patterns of 75x75mm or 100x100mm.
- Дубал түрү: This mount is designed for installation on wood stud walls, brick walls, or concrete walls. DO NOT mount solely on drywall. Drywall cannot support the weight of the mount and monitor.
- Кесиптик орнотуу: Эгерде сиз орнотуу процесси же дубалдын түрү боюнча күмөн санасаңыз, квалификациялуу адиске кайрылыңыз.
- Gas Spring Warning: The gas spring is under pressure. Exercise caution during assembly and adjustment. Do not attempt to disassemble the gas spring cylinder.
- Балдар: кичинекей бөлүктөрүн балдардан алыс кармаңыз.
3. Пакеттин мазмуну
Please verify that all components are present and undamaged before proceeding with installation. All necessary hardware for installation is included.
Note: An ultrawide adapter for monitors with circular/non-standard VESA patterns is not included. Check your monitor's original packaging for a conversion adapter if needed.
4. Техникалык шарттар
| Өзгөчөлүк | Спецификация |
|---|---|
| Бренд | ПУТОРЛОР |
| Модел | B0CZDS7RYY |
| Материал | Акрилонитрил бутадиен стирол (ABS), болоттон жасалган эритме, алюминий |
| Түс | Кара |
| Монтаж түрү | Дубалга орнотуу |
| Кыймыл түрү | Swivel, Tilt, Rotation, Height Adjustment |
| Монитордун өлчөмү шайкештиги | 17" - 49" (flat or curved) |
| Салмак сыйымдуулугу | 44 фунтка чейин (20 кг) |
| VESA шайкештиги | 75x75мм, 100x100мм |
| Тилтүү диапазону | +50°тан -20°ка чейин |
| Айналма тоо | ±90° |
| Айлануу аралыгы | 360° (±180°) |
| Бийиктигин тууралоо | Up to 11.34 inches (via gas spring) |
| Дубалдын аралыгы (мин/макс) | 4.15" / 22.58" |
| Элемент Салмагы | 8.16 фунт |
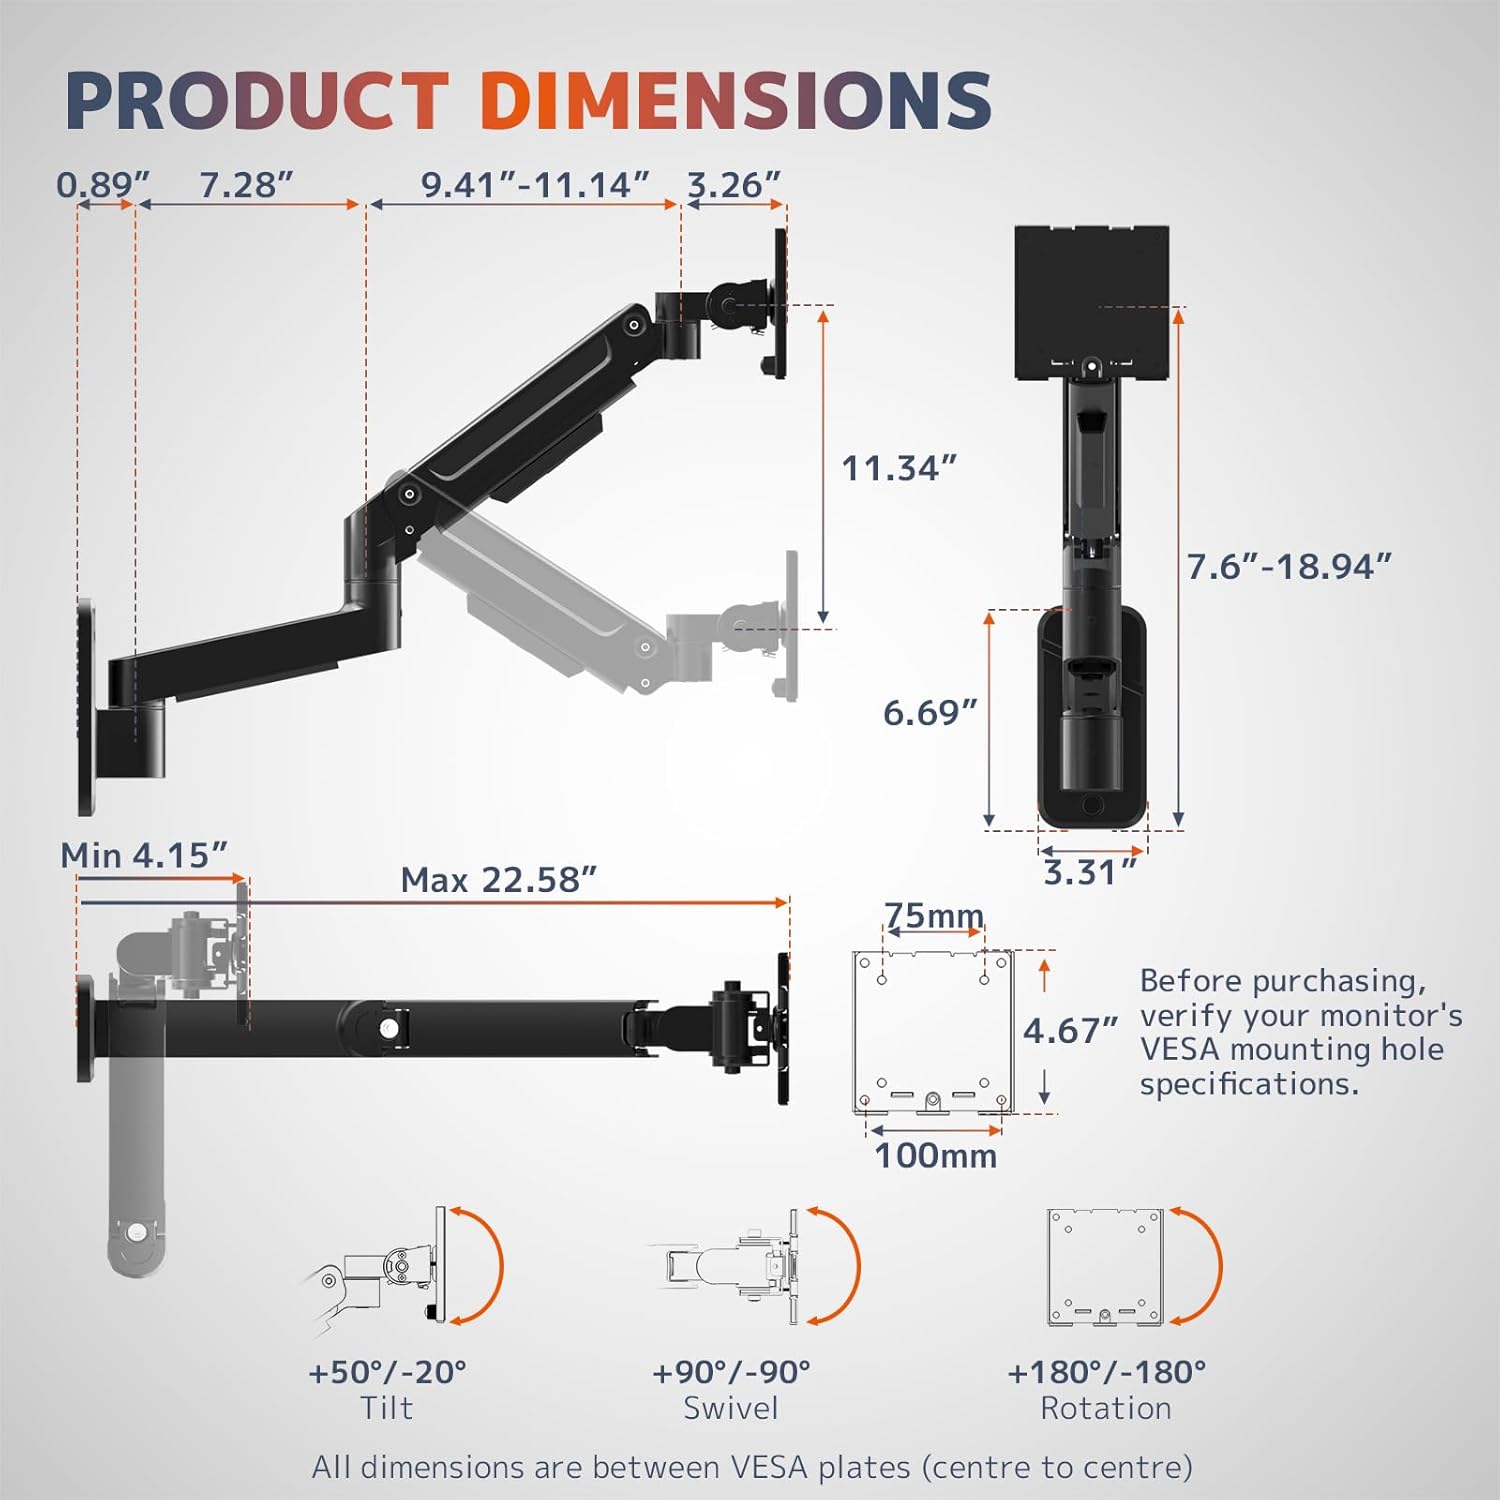
Image 4.1: Detailed product dimensions and movement ranges. Verify your monitor's VESA specifications before purchase.
5. Орнотуу жана орнотуу
Follow these steps carefully for a secure installation. It is recommended to have a second person assist during certain stages of installation, especially when mounting the monitor.
5.1 Choose a Mounting Location
- Identify a suitable wall location that can support the combined weight of the mount and your monitor.
- Ensure the wall is a wood stud, brick, or concrete wall. Avoid drywall-only installations.
- Use a stud finder to locate the center of a wood stud if mounting on a wood stud wall.
5.2 Attach Wall Plate
- Position the wall plate at the desired height and mark the drilling locations.
- Drill pilot holes according to the provided template and hardware instructions.
- Secure the wall plate to the wall using the appropriate screws and anchors for your wall type. Ensure it is firmly attached.
5.3 Assemble Arm Sections
- Connect the arm sections as shown in the assembly diagram. The modular design allows for straightforward assembly.
- Бардык байланыштар бекем жана коопсуз экендигин текшериңиз.

Image 5.1: Streamlined installation process, illustrating modular assembly and compatible wall types. Remember: Do not mount solely on drywall.
5.4 Мониторго VESA пластинкасын бекитиңиз
- Мониторуңузду кылдаттык менен жумшак, таза бетке ылдый караңыз.
- VESA плитасын мониторуңуздун артындагы (75x75мм же 100x100мм) орнотуу тешиктерине тууралаңыз.
- Secure the VESA plate to the monitor using the provided screws. Do not overtighten.

Image 5.2: The heavy-duty tilt mechanism and VESA interface. Ensure proper alignment and secure fastening of the VESA plate to your monitor.
5.5 Мониторду колго орнотуу
- Жардам менен мониторду тиркелген VESA плитасы менен кылдаттык менен көтөрүңүз.
- Slide the VESA plate onto the monitor arm's mounting head until it clicks into place or is securely fastened.
- Tighten any safety screws or mechanisms to prevent accidental dislodgement.
5.6 Кабелди башкаруу
- Route monitor cables through the integrated cable management channels on the arm.
- This helps maintain a neat and clutter-free workspace.

Image 5.3: Reinforced base with integrated cable management for a clean setup.
6. Иштөө нускамалары
The PUTORSEN Monitor Wall Mount offers full motion capabilities for optimal viewсооронуч.
6.1 Бийиктикти жөндөө (Газ пружинасы)
- To adjust the monitor height, gently push or pull the monitor to the desired position. The gas spring system allows for smooth vertical movement up to 11.34 inches.
- If the arm does not hold its position or is difficult to move, refer to the "Troubleshooting" section for gas spring tension adjustment.
6.2 Эңкейүүнү тууралоо
- The monitor can be tilted +50° upwards and -20° downwards.
- Loosen the tilt adjustment screw slightly, adjust the monitor to the desired angle, then re-tighten the screw to secure it.
6.3 Айланууну жөндөө
- The monitor arm allows for a ±90° swivel range.
- Gently rotate the monitor horizontally to achieve your preferred viewбурч.
6.4 Айланууну тууралоо
- The VESA plate allows for a full 360° rotation (±180°).
- Rotate the monitor to switch between landscape and portrait orientations as needed.

Image 6.1: The monitor arm's extendable design allows for flexible positioning and space optimization.
7. Техникалык тейлөө
- Тазалоо: жумшак колдонуу, damp cloth to clean the surface of the mount. Avoid harsh chemicals or abrasive cleaners.
- Мезгилдүү текшерүүлөр: Мезгил-мезгили менен бардык бурамалар менен байланыштарды текшерип туруңуз, алар бекем жана бекем бойдон калууда. Керек болсо кайра тартыңыз.
- Газ булагы: The gas spring is designed for long-term performance. No specific maintenance is required for the gas spring itself, but ensure its tension is correctly adjusted for your monitor's weight.
8. Кыйынчылыктарды
| Көйгөй | Чечим |
|---|---|
| Arm will not raise: Monitor feels too heavy, arm sags. | Tighten the gas spring adjustment screw in the "+" direction (counter-clockwise) until the arm can hold the monitor's weight. |
| Arm will not lower: Monitor feels too light, arm stays up. | Loosen the gas spring adjustment screw in the "-" direction (clockwise) until the arm can be lowered smoothly. |
| Tilt is too loose: Monitor tilts freely or sags. | Tighten the tilt adjustment screw clockwise to prevent the monitor from lowering. |
| Tilt is too stiff: Difficult to adjust monitor tilt. | Loosen the tilt adjustment screw counter-clockwise for smoother movement. |
| Маунт туруксуз сезилет. | Ensure all mounting screws are securely tightened. Verify the wall type is appropriate and the mount is anchored correctly. |
| Cables are messy. | Utilize the integrated cable management channels on the arm to route and conceal cables. |

Image 8.1: Joint adjustment guide for gas spring tension and tilt mechanism.
9. Кепилдик жана колдоо
PUTORSEN products are manufactured with quality and durability in mind. While specific warranty details may vary by region and retailer, we stand by the quality of our products.
Кардарларды колдоо: Our dedicated customer support team is available to assist with any installation guidance, compatibility questions, or usage concerns you may have. We are committed to providing clear and practical support to ensure a smooth experience with your product.
For assistance, please refer to the contact information provided with your purchase or visit the official PUTORSEN webсайт.