
SKY TOPPOWER STP3005
User Manual for SKY TOPPOWER STP3005 DC Power Supply
Adjustable 30V 5A Lab Bench Power Supply with 3-Digit Display
1. Киришүү
Thank you for choosing the SKY TOPPOWER STP3005 DC Power Supply. This adjustable lab bench power supply is designed for various applications including circuit testing, electrolysis, DIY electronics projects, battery charging, repairing, and research. It offers high accuracy with 0.1V (100mV) and 0.01A (10mA) regulation, a 3-digit LED display, and multiple protection features to ensure safe and reliable operation.
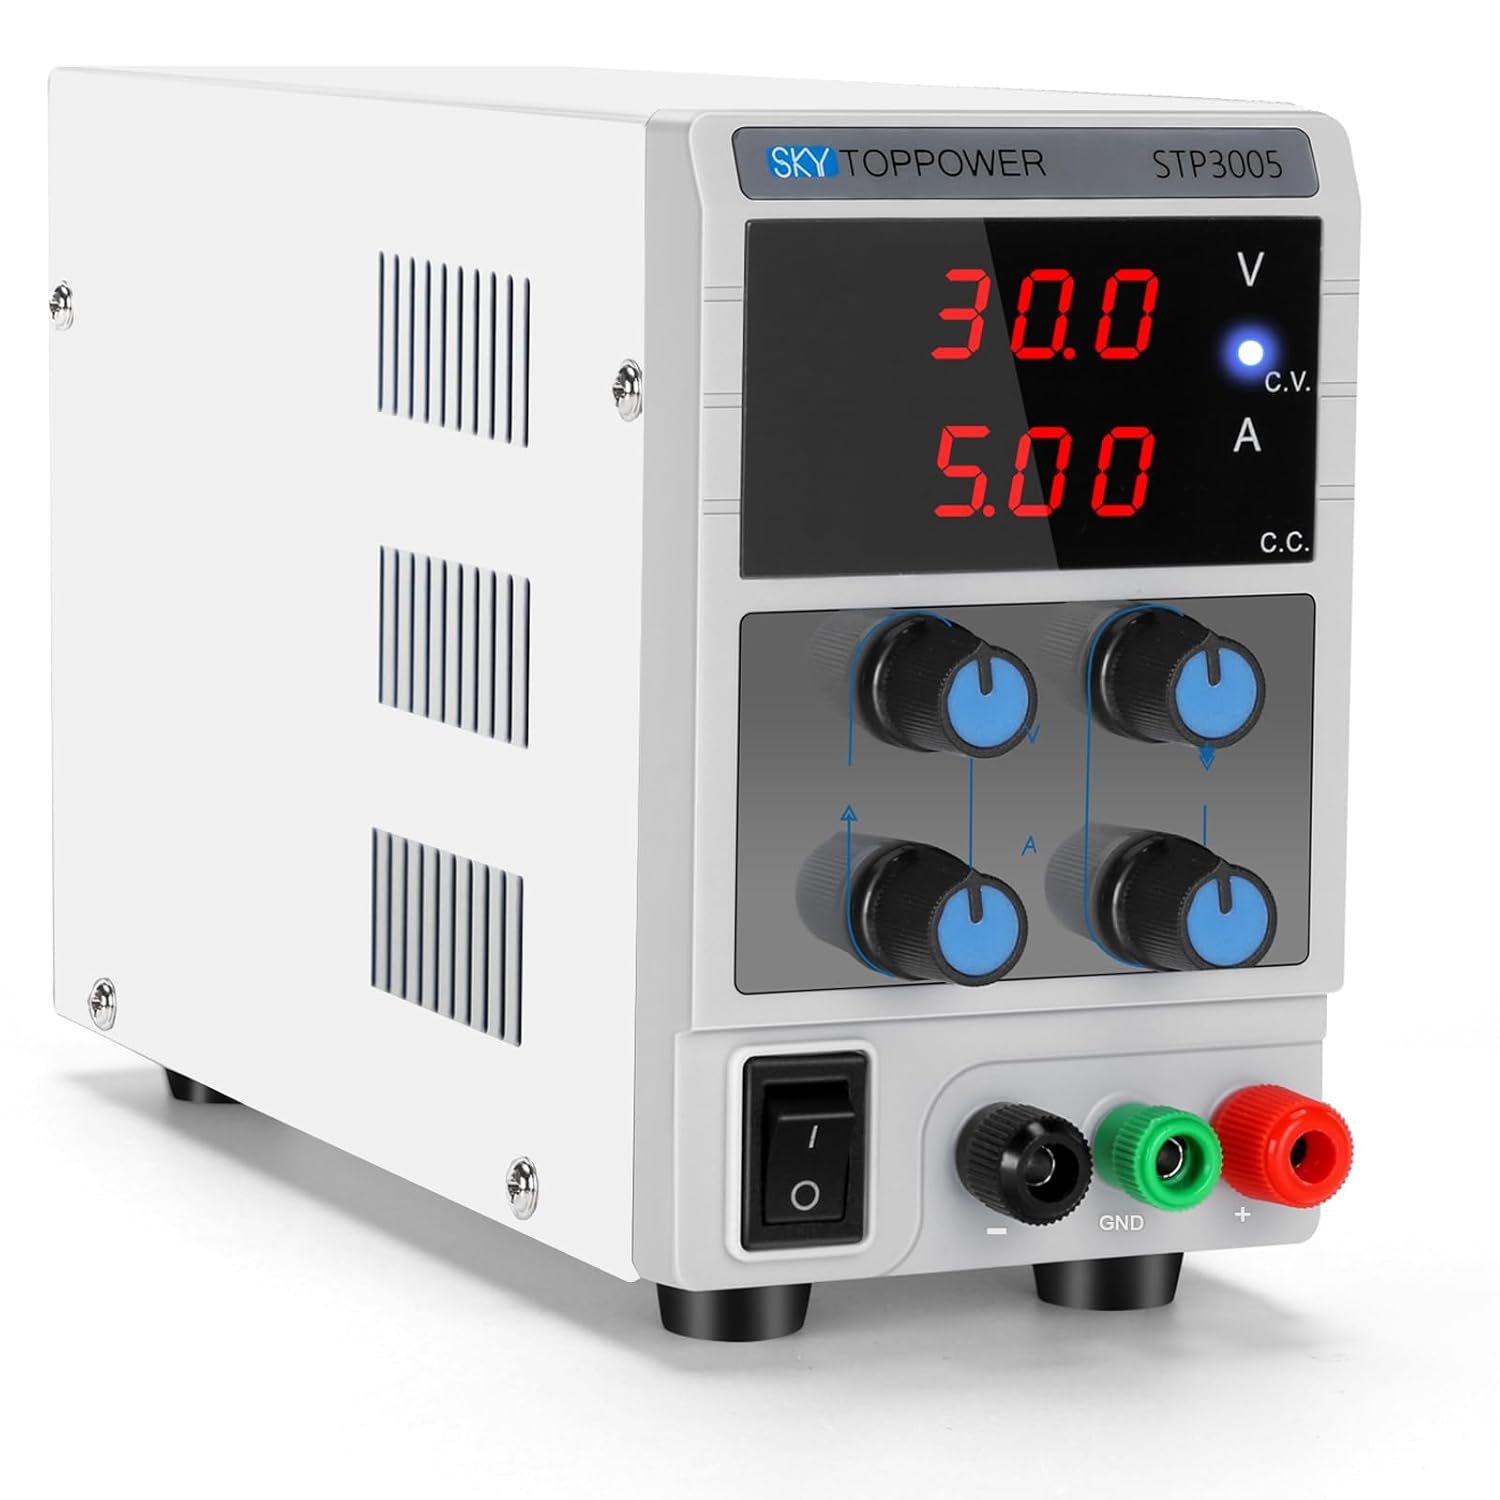
Сүрөт 1.1: Алдыңкы view of the SKY TOPPOWER STP3005 DC Power Supply.
Коопсуздук чаралары
- Always connect the grounding wire to a proper ground source to prevent electric shock.
- Ensure the power supply is turned off before connecting or disconnecting any leads or loads.
- Аппаратты нымдуу жерде иштетпеңиз же damp шарттар.
- Avoid short-circuiting the output terminals for extended periods, although the unit has short-circuit protection.
- Ашыкча ысып кетүүнүн алдын алуу үчүн аппараттын айланасында туура желдетүүнү камсыз кылыңыз.
2. Орнотуу
2.1 Таңгактан чыгаруу жана текшерүү
Carefully remove the power supply from its packaging. Inspect the unit for any signs of damage that may have occurred during transit. Verify that all accessories, including the power cord and alligator clip leads, are present.
2.2 Орнотуу
Place the power supply on a stable, flat surface. Ensure there is adequate space around the unit for proper ventilation. The compact design (approximately 8.89(D)x3.3(W)x5.5(H) inches and 2.75 lbs) allows it to save valuable workbench space.

Figure 2.1: The compact and lightweight design of the power supply.
2.3 Кубат туташтыруу
Connect the provided power cord to the AC input on the rear of the power supply and then to a grounded electrical outlet. Ensure the power switch on the front panel is in the OFF position before plugging in.
3. Иштөө нускамалары
3.1 Front Panel Overview

3.1-сүрөт: Детальдуу view of the front panel controls and indicators.
- Тtage Дисплей: Чыгарылыштын көлөмүн көрсөтөтtage вольт менен (V).
- Учурдагы дисплей: Shows the output current in Ampэрес (А).
- C.V. Indicator Light: Түзмөк туруктуу Көлөмдө иштеп жатканда күйөтtage режими.
- C.C. Indicator Light: Түзмөк туруктуу ток режиминде иштеп жатканда күйөт.
- Output Voltage Coarse/Fine Knobs: Чыгаруу көлөмүн тууралаңызtage. Use Coarse for large changes, Fine for precise adjustments.
- Output Current Coarse/Fine Knobs: Adjust the output current limit. Use Coarse for large changes, Fine for precise adjustments.
- Кубат которгучу: Аппаратты КҮЙГҮЗҮП/ӨЧҮРӨТ.
- Чыгуу терминалдары: Black (-) for negative, Green (GND) for ground, Red (+) for positive.

Сүрөт 3.2: Жакын пландан view томдунtage/current adjustment knobs and output terminals.
3.2 Presetting Voltage жана Current
It is recommended to preset the desired voltage and current before connecting your load to prevent damage. The unit features a constant voltage and constant current mode that automatically switches based on the load.
- Алдын ала орнотуу Voltage:
- Ensure no load is connected to the output terminals.
- Кубат өчүргүчтү колдонуу менен кубат менен камсыздоону күйгүзүңүз.
- тууралаңыз Output Voltage Coarse жана Жакшы knobs until the desired voltage is displayed. The C.V. indicator light should be on.
- Presetting Current (Short-Circuit Method):
- After presetting the voltage, turn off the power supply.
- Connect the positive (+) and negative (-) output terminals together using a shorting wire or the provided alligator clip leads (ensure the leads are rated for the maximum current).
- Turn on the power supply. The C.C. indicator light should illuminate, and the voltage display will drop to near zero.
- тууралаңыз Output Current Coarse жана Жакшы knobs until the desired current limit is displayed.
- Turn off the power supply and remove the shorting wire. The unit is now ready to connect to your load with the preset voltage жана учурдагы чек.
Video 3.1: Demonstration of presetting voltage and current, and connecting a load.
This video illustrates the process of setting the desired voltage and current limits on the power supply. It also shows how to connect a load and observe the unit operating in constant voltage and constant current modes.
3.3 Жүктөмдү туташтыруу
With the power supply off and voltage/current preset:
- Connect the positive (+) lead from the power supply to the positive terminal of your load.
- Connect the negative (-) lead from the power supply to the negative terminal of your load.
- If required, connect the ground (GND) terminal to the chassis or ground of your circuit.
- Turn on the power supply. The display will show the actual voltage and current being supplied to the load.

Figure 3.3: The power supply demonstrating high accuracy in voltage output, compared with a multimeter reading.

Figure 3.4: The power supply in a laboratory environment, connected to test equipment.
3.4 Constant Voltage (CV) жана туруктуу ток (CC) режимдери
The STP3005 automatically switches between Constant Voltage (CV) and Constant Current (CC) modes depending on the load conditions:
- Constant Voltage (CV) режими: When the load current is less than the preset current limit, the unit operates as a constant voltage source. The output voltage remains stable at the preset value, and the C.V. indicator light is on.
- Туруктуу ток (ТК) режими: If the load current attempts to exceed the preset current limit, the unit automatically switches to constant current mode. The output current is maintained at the preset limit, the voltage drops to protect the load, and the C.C. indicator light is on.
3.5 Тиркемелер
This power supply is suitable for a wide range of applications:
- Laboratory experiments and research
- Electronic equipment maintenance and repair
- Product line testing
- Battery charging (e.g., lead-acid batteries, LiFePO4 batteries)
- Anodizing processes
- DIY electronics projects
- Educational purposes in schools and universities

Figure 3.5: Instructions for battery charging using the power supply.

Figure 3.6: Wide range of applications for the DC power supply.
4. Техникалык тейлөө
4.1 Тазалоо
Агрегаттын сыртын тазалоо үчүн жумшак, гamp cloth. Do not use abrasive cleaners or solvents. Ensure the unit is unplugged and turned off before cleaning.
4.2 Вентиляция
The power supply has a built-in fan to reduce operational noise and prolong product life. Ensure that the ventilation openings on the sides and rear of the unit are not obstructed. Regular inspection for dust buildup in these areas is recommended.
4.3 Сактоо
When not in use for extended periods, store the power supply in a cool, dry place, away from direct sunlight and excessive dust.
5. Кыйынчылыктарды
Бул бөлүмдө сиз кабылышы мүмкүн болгон жалпы маселелерди чечүү жолдору каралган. Бул жерде көрсөтүлбөгөн көйгөйлөр үчүн кардарларды колдоо бөлүмүнө кайрылыңыз.
| Көйгөй | Мүмкүн себеп | Чечим |
|---|---|---|
| Кубат жок/Дисплей өчүк | Электр зымы туташкан эмес; Электр өчүрүү; Күйгүзүүчү. | Check power cord connection; Turn on power switch; Check and replace fuse if necessary (refer to specifications for fuse type). |
| Чыгаруунун көлөмү жокtage/Current | Output terminals not connected; Voltage/current knobs set to zero; Unit in protection mode. | Ensure leads are properly connected; Adjust voltage/current knobs; Check for short circuits or overloads on the load. |
| Тtage drops significantly under load | Unit is in Constant Current (CC) mode; Load resistance too low for preset current. | Increase the preset current limit; Verify the load's current requirements. |
| Бирдик ашыкча ысып жатат | Poor ventilation; Excessive load for extended periods. | Ensure ventilation openings are clear; Reduce load or operating time; Allow unit to cool down. |
Коргоо өзгөчөлүктөрү
The SKY TOPPOWER STP3005 includes multiple protection mechanisms:
- Жылуулук коргоо: Ички температура коопсуз чектен ашып кетсе, автоматтык түрдө өчөт.
- Limit Current Protection: Prevents current from exceeding the preset limit, protecting both the power supply and the load.
- Тtage Ашыкча жүктөмдөн коргоо: Ашыкча томдон коргойтtage шарттары.
- Кыска туташуулардан коргоо: Protects the unit from damage in case of a short circuit at the output.
- Anti-Reverse Connection Protection: Unique function to protect the equipment and power supply from reverse polarity connections.

Figure 5.1: Illustration of the anti-reverse connection protection feature.
6. Техникалык шарттар
| Өзгөчөлүк | Деталь |
|---|---|
| Модель номери | STP3005 |
| Бренд | SKY TOPOWER |
| Output Voltage | 0-30V (жөнгө салынуучу) |
| Output Current | 0-5A (Жөнгө салынуучу) |
| Дисплей түрү | 3-Digit LED Digital Display |
| Тtage Тактык | 0.1V (100mV) |
| Учурдагы тактык | 0.01А (10мА) |
| Өлчөмдөр (D x W x H) | 8.89 x 3.3 x 5.5 дюйм (болжол менен) |
| Элемент Салмагы | 2.75 фунт (1.3 килограмм) |
| Туташтыргыч түрү | Barrel Connector |
| Келип чыккан өлкө | Кытай |
| Биринчи жеткиликтүү күн | 10-август, 2018-жыл |
7. Кепилдик жана колдоо
SKY TOPPOWER is committed to providing high-quality products and excellent customer service. While specific warranty terms may vary by region or retailer, we offer professional technical support services.
For any questions regarding the use, maintenance, or troubleshooting of your STP3005 DC Power Supply, please do not hesitate to contact the SKY TOPPOWER Team. Our customer service is available 24/7 to assist you.
Please refer to your purchase documentation or the official SKY TOPPOWER webэң акыркы байланыш маалыматы жана кепилдик маалыматы үчүн сайт.
Ask a question about this manual
Ask about setup, troubleshooting, compatibility, parts, safety, or missing instructions. Manuals+ will review the question and use this page’s manual context to help answer it.