1. Киришүү
This manual provides essential information for the safe and efficient operation of your WLLKIY Hybrid Solar Inverter. This device is a multi-functional inverter/charger that integrates an inverter, solar charger, and battery charger to provide uninterruptible power support in a compact design. Please read this manual thoroughly before installation and use, and retain it for future reference.
2. Коопсуздук нускамалары
Please observe the following safety precautions during installation, operation, and maintenance of the inverter. Failure to comply with these instructions may result in electric shock, fire, or severe injury.
- Бардык зымдарды квалификациялуу адистер аткарганын текшериңиз.
- Do not attempt to disassemble or repair the inverter yourself. Refer to authorized service personnel.
- Киргизилген томtage and current ratings match the specifications of your solar panels and battery bank.
- Инверторду тез күйүүчү материалдардан жана нымдуулуктан алыс, жакшы желдетилген жерге орнотуңуз.
- Always disconnect all power sources (AC, PV, Battery) before performing any maintenance or wiring.
- Инвертордун туура жерге туташтырылышын камсыз кылыңыз.
3. Продукциянын өзгөчөлүктөрү
- Сезимтал электроника үчүн таза синус толкунунун чыгышы.
- Конфигурациялануучу киргизүү томtagар кандай колдонмолор үчүн (тиричилик техникасы, жеке компьютерлер) электрондук диапазон.
- User-configurable battery charging current via LCD settings.
- Configurable AC/Solar charger priority via LCD settings.
- Compatibility with mains voltage же генератордун күчү.
- Кондиционер калыбына келгенде автоматтык түрдө өчүрүп-күйгүзүү.
- Integrated protection against overload, over-temperature, and short circuits.
- Батареянын оптималдуу иштеши үчүн акылдуу кубаттагычтын дизайны.
- Муздак баштоо функциясы.
- Optional WIFI/GPRS module for remote monitoring.
- Supports connection to lithium batteries.
4. Продукт бүтүп калдыview
Familiarize yourself with the components and connections of your WLLKIY Hybrid Solar Inverter.

Сүрөт 4.1: Алдыңкы view of the WLLKIY Hybrid Solar Inverter, showing the main casing and front display panel.
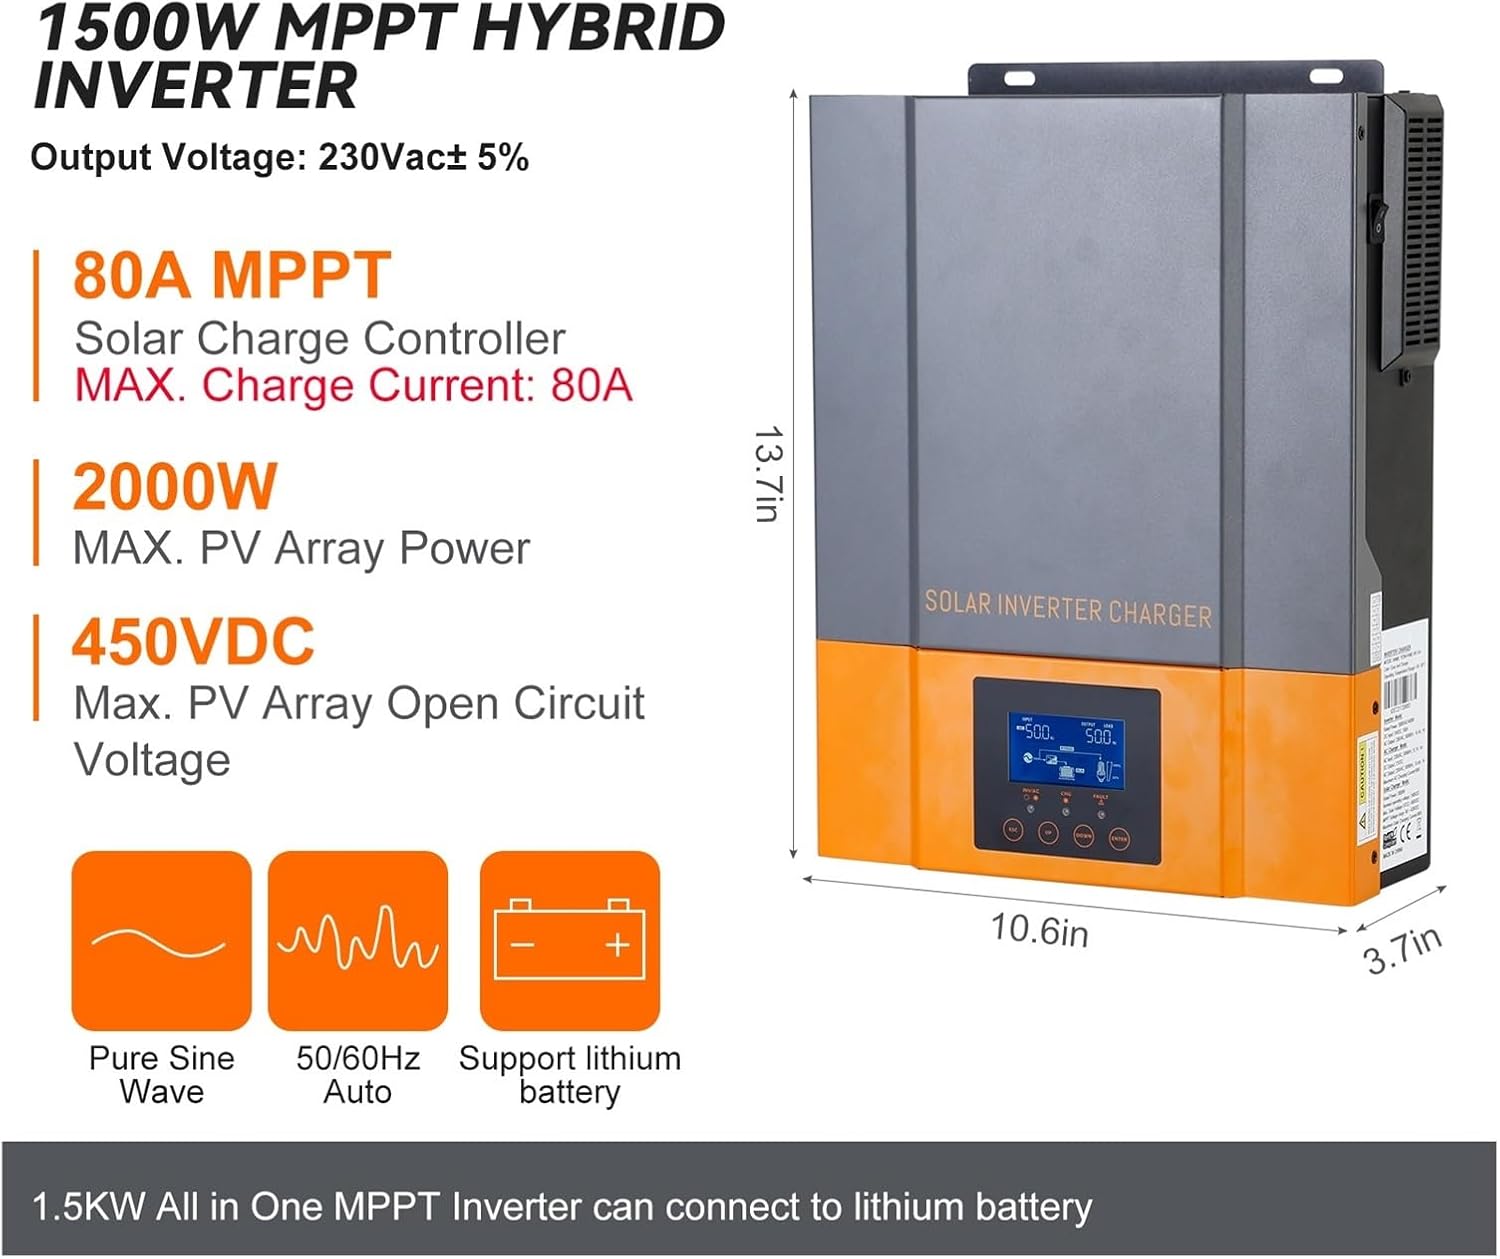
Figure 4.2: Inverter dimensions (13.7in H x 10.6in W x 3.7in D) and key electrical specifications including 230Vac output, 80A MPPT solar charge controller, 2000W max PV array power, and 450VDC max PV open circuit voltage. It supports pure sine wave output, 50/60Hz auto frequency, and lithium batteries.

4.3-сүрөт: Детальдуу view of the LCD display, LED indicators (AC/INV, CHG, FAULT), and function keys (ESC, UP, DOWN, ENTER) on the front panel. The power ON/OFF switch is located on the side of the unit.
LED көрсөткүч билдирүүлөрү
| LED көрсөткүч | Мамлекет | Кабарлар |
|---|---|---|
| AC / INV | Solid On (Green) | Чыгуу Line режиминде утилита менен иштейт. |
| Жаркылдаган (жашыл) | Чыгуу батарея режиминде батарея же PV менен иштейт. | |
| CHG | Solid On (Green) | Батарея толук заряддалган. |
| Жаркылдаган (жашыл) | Батарея заряддалууда. | |
| КҮНӨӨ | Solid On (Red) | Инвертордо ката пайда болот. |
| Жаркылдаган (Кызыл) | Эскертүү шарты инвертордо пайда болот. |
Функция баскычтарынын сүрөттөмөлөрү
| Function Key | Description |
|---|---|
| ESC | Орнотуу режиминен чыгуу үчүн |
| UP | Мурунку тандоого өтүү үчүн |
| ылдый | Кийинки тандоого өтүү үчүн |
| ENTER | Жөндөө режиминде тандоону ырастоо же орнотуу режимине кирүү |
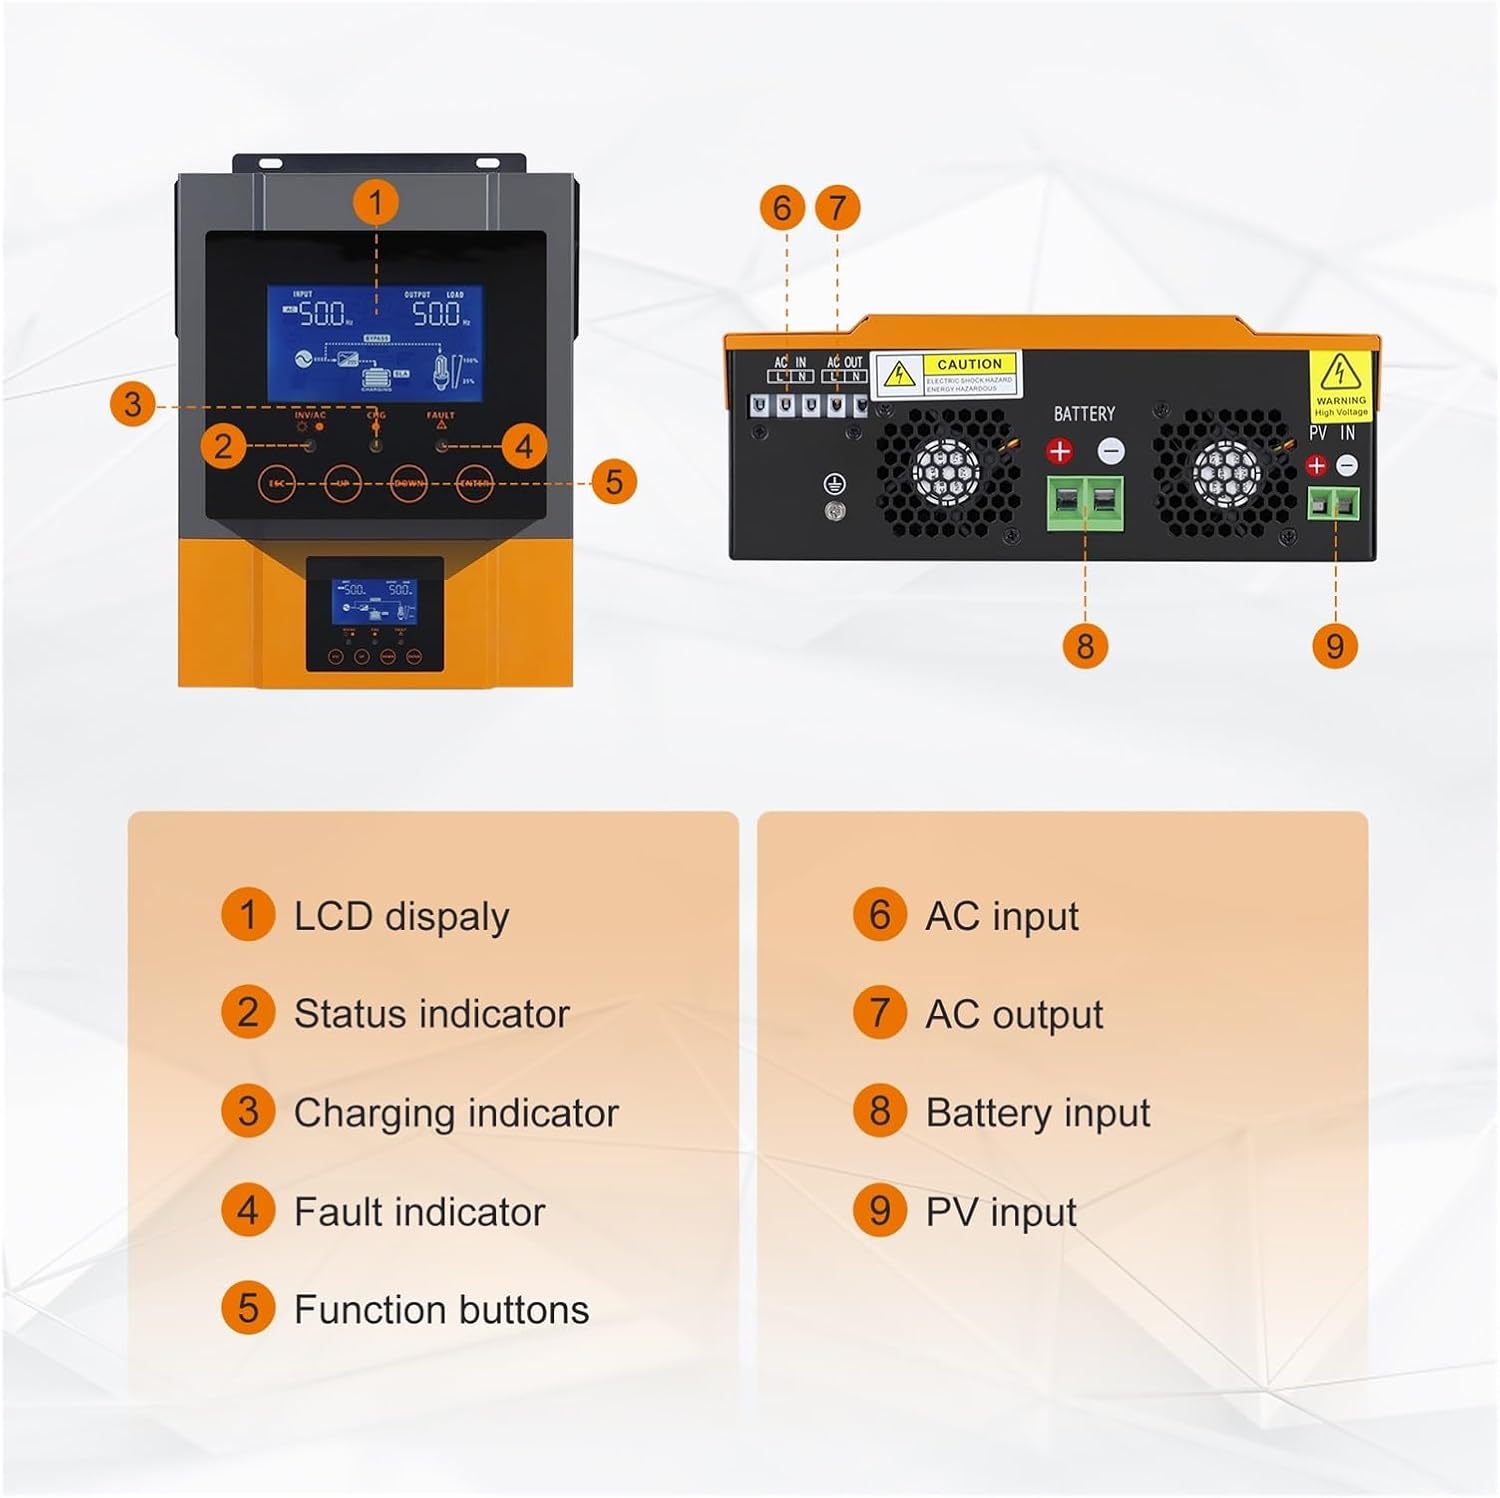
Figure 4.4: Key components and connection points. 1: LCD display, 2: Status indicator, 3: Charging indicator, 4: Fault indicator, 5: Function buttons, 6: AC input, 7: AC output, 8: Battery input, 9: PV input.

Figure 4.5: The inverter supports optional WIFI monitoring, allowing real-time performance viewing and parameter changes via a mobile application. The WIFI module is not included in the standard package.
5. Орнотуу жана орнотуу
This section outlines the steps for installing your hybrid solar inverter. Ensure all safety instructions are followed.
5.1 Инверторду орнотуу
- Choose a suitable location: The inverter should be mounted indoors, in a dry, well-ventilated area, protected from direct sunlight, high temperatures, and moisture.
- Ensure adequate clearance: Allow at least 20 cm (8 inches) of clearance around the unit for proper heat dissipation.
- Secure mounting: Use appropriate screws and anchors to securely mount the inverter to a solid wall surface.
5.2 Зымдарды туташтыруу
Refer to Figure 4.4 for connection port locations. All wiring must comply with local electrical codes.
- Батарея туташуу: Connect the battery cables to the Battery Input terminals (8). Ensure correct polarity (positive to positive, negative to negative).
- Фотоэлектрдик массивдин туташуусу: Connect the solar panel cables to the PV Input terminals (9). Observe correct polarity and ensure the PV array voltage is within the inverter's specified range.
- AC киргизүү туташуу: Connect the utility grid or generator AC power to the AC Input terminals (6).
- AC чыгаруу туташуусу: Connect your loads to the AC Output terminals (7).
- Негиздөө: Инвертордун жерге туташтыруучу терминалын ишенимдүү жерге туташтыргычка туташтырыңыз.
5.3 Баштапкы кубаттуулук
- Бардык туташуулар бекем орнотулгандан кийин, батарея өчүргүчтү күйгүзүңүз.
- Фотоэлектрдик массивдин өчүргүчүн күйгүзүңүз.
- AC киргизүү өчүргүчүн күйгүзүңүз (эгер туташкан болсо).
- Turn on the inverter's power switch (refer to Figure 4.3).
- Observe the LCD display and LED indicators for normal operation.
6. Иштөө нускамалары
Инвертордо LCD дисплей жана көзөмөлдөө жана конфигурациялоо үчүн функция баскычтары бар.
6.1 LCD Display and Button Operation
The LCD displays real-time system status, including input/output voltage, battery status, and charging information. Use the function keys (ESC, UP, DOWN, ENTER) to navigate through menus and adjust settings as described in Figure 4.3.
6.2 LED көрсөткүчтөрү
The LED indicators provide a quick visual status of the inverter's operation. Refer to the table in Figure 4.3 for detailed descriptions of each indicator's state and corresponding message.
6.3 Орнотууларды конфигурациялоо
The inverter allows configuration of various parameters to optimize performance for your specific setup. These include:
- Батареяны заряддоо тогу.
- Кондиционер/күн энергиясы менен иштеген кубаттагыч артыкчылыктуу.
- Киргизүү тtage диапазону.
- Output frequency (50Hz/60Hz).
To access and modify settings, press the ENTER button to enter the setting mode, use UP/DOWN to navigate, and ENTER to confirm selections. Press ESC to exit.
7. Техникалык тейлөө
Үзгүлтүксүз тейлөө сиздин инверторуңуздун узак иштөөсүн жана оптималдуу иштешин камсыздайт.
- Тазалоо: Инвертордун сыртын мезгил-мезгили менен кургак чүпүрөк менен тазалап туруңуз. Желдетүүчү тешиктердин чаң жана таштандылардан тазаланганын текшериңиз.
- Байланыштары: Жыл сайын бардык электр туташууларынын бекемдигин жана дат басуу белгилерин текшерип туруңуз.
- Курчап турган чөйрө: Орнотуу чөйрөсү белгиленген температуранын жана нымдуулуктун чегинде болушун камсыз кылыңыз.
- Батареянын ден соолугу: Монитор батареянын көлөмүtage and performance regularly, especially for lead-acid batteries.
8. Кыйынчылыктарды
Бул бөлүм сиз кабылышы мүмкүн болгон жалпы маселелер боюнча чечимдерди берет.
| Көйгөй | Мүмкүн себеп | Чечим |
|---|---|---|
| Инвертор күйбөй жатат | Батарея туташуусу жок же батареянын деңгээли төмөнtage. Power switch off. | Батарея байланыштарын жана тtage. Ensure power switch is ON. |
| AC чыгышы жок | Overload. Short circuit. Inverter fault. | Reduce load. Check for short circuits. Refer to FAULT LED. |
| Батарея заряддалбай жатат | PV input too low. AC input not present. Charger settings incorrect. | Check PV array and AC input. Verify charger settings on LCD. |
| FAULT LED is solid red | Ички күнөө. | Disconnect all power sources, wait 5 minutes, then reconnect. If fault persists, contact support. |
9. Техникалык шарттар
Detailed technical specifications for the WLLKIY Hybrid Solar Inverter models.
| Өзгөчөлүк | 1.5 kW 12V Model | 2.4 kW 24V Model | 3.2 KVA / 3 KW 24V Model |
|---|---|---|---|
| Чыгуучу кубаттуулук | 1.5 кВт | 2.4 кВт | 3200 VA / 3000 Вт |
| Output Voltage Waveform | Таза синус толкуну | ||
| Output Voltage Регламент | 230 Вак ± 5% | ||
| Заряддоо алгоритми | 3-сtage | ||
| Максималдуу AC заряддоо агымы | 60 Amp | ||
| Жаппай заряддоо Voltage (Суу баскан батарея) | 14.6 V | 29.2 V | |
| Жаппай заряддоо Voltage (AGM/Gel Battery) | 14.1 V | 28.2 V | |
| Floating Charging Voltage | 13.5 VDC | 27.0 VDC | |
| Max PV Array Power | 2000 Вт | 3000 Вт | |
| Номиналдуу PV Voltage | 240 VDC | ||
| MPPT Voltage Range (PV Array) | 90 ~ 430 VDC | ||
| Max PV Open Circuit Voltage | 450 VDC | ||
| Max Charging Current (AC + Solar) | 80 Amp | ||
| Иштөө температурасы диапазону | -10°Cден 50°Cге чейин | ||
| Сактоо Температура диапазону | -15°Cден 60°Cге чейин | ||
| Нымдуулук | 5% - 95% Салыштырмалуу нымдуулук (конденсацияланбаган) | ||
10. Кепилдик жана колдоо
For warranty information and technical support, please refer to the documentation provided with your purchase or contact your vendor. Keep your purchase receipt as proof of purchase.