
maXpeedingrods RT14YNM
maXpeedingrods Coilover Suspension Kit Instruction Manual
Model: RT14YNM | For Toyota Camry ACV30/MCV30 2002-2006
1. Киришүү
This manual provides essential information for the installation, operation, and maintenance of your maXpeedingrods Coilover Suspension Kit, Model RT14YNM. This kit is specifically designed for Toyota Camry ACV30/MCV30 models manufactured between 2002 and 2006. It features 24 levels of adjustable damping and adjustable ride height, allowing for customized vehicle dynamics.
Please read this manual thoroughly before attempting any installation or adjustment. Proper installation and maintenance are crucial for the performance and longevity of the coilovers and the safety of your vehicle.

Image 1: Complete maXpeedingrods Coilover Suspension Kit components.
2. Коопсуздук маалыматы
- Кесиптик орнотуу сунушталат: Installation of suspension components requires specialized tools and knowledge. It is highly recommended that this kit be installed by a qualified automotive technician.
- Унаа колдоо: Always use appropriate jack stands or a vehicle lift to securely support the vehicle when working underneath it. Never rely solely on a jack.
- Моменттин мүнөздөмөлөрү: Ensure all fasteners are tightened to the vehicle manufacturer's specified torque values. Refer to your vehicle's service manual.
- Дөңгөлөктү тегиздөө: After installation, a professional wheel alignment is mandatory to ensure proper handling, tire wear, and vehicle safety.
- Үзгүлтүксүз текшерүү: Periodically inspect all suspension components for wear, damage, or loose fasteners.
- Жол шарттары: Be aware that lowering your vehicle may affect ground clearance and handling characteristics, especially on uneven surfaces or speed bumps.
3. Пакеттин мазмуну
Орнотууну баштоодон мурун бардык компоненттер бар экенин жана бузулбаганын текшериңиз:
- Front Coilover Assemblies (2 units)
- Rear Coilover Assemblies (2 units)
- Spanner Wrenches for Height Adjustment (2 units)
- Hex Key for Damping Adjustment (1 unit)
4. Техникалык шарттар
| Өзгөчөлүк | Спецификация |
|---|---|
| Бренд | maXpeedingrods |
| Модель номери | RT14YNM |
| Унаа шайкештиги | Toyota Camry ACV30/MCV30 (2002-2006) |
| Auto Part Position | Алдыңкы, Арткы |
| Алдыңкы пружиналардын ылдамдыгы | 8 kg/mm (448 lbs/in) |
| Арткы пружина ылдамдыгы | 6 kg/mm (336 lbs/in) |
| Жазгы Preload | 7-10 мм |
| Dampтууралоо | 24 Levels (Rebound Force) |
| Бийиктигин тууралоо диапазону | 1-3 inches lowering (from original ride height) |
| Camber Plate Top Mount | 6061-T6 алюминий |
| Жазгы материал | High Rigidity 55CrSi Steel |
| Shock Body Finish | Anodized with Galvanized Anti-Corrosion Coating |
| Piston Rod Diameter | 22мм |
| Элемент Салмагы | 74.5 фунт (жалпы пакет) |
| Продукциянын өлчөмдөрү | 27.95 x 20.08 x 7.87 дюйм (пакет) |

Сүрөт 2: Детальдуу view of coilover components and materials.
5. Орнотуу жана орнотуу
Installation of coilovers is a complex procedure that should ideally be performed by a certified mechanic. The following is a general overview and not a substitute for a professional service manual.
Жалпы орнотуу кадамдары:
- Унаа даярдоо: Safely lift the vehicle and secure it on jack stands or a lift. Remove the wheels.
- OEM суспензиясын алып салуу: Carefully disconnect and remove the original shock absorbers and springs. Note the orientation of all components.
- Install New Coilovers: Mount the maXpeedingrods coilover assemblies. Ensure all bolts are finger-tightened initially.
- Баштапкы тууралоолор: Толук чыңдоодон мурун, алгачкы жүрүү бийиктигин жана damping settings as desired (refer to Section 6).
- Акыркы бекемдөө: With the vehicle's weight on the suspension (or simulating it), tighten all mounting bolts to the vehicle manufacturer's torque specifications.
- Дөңгөлөктөрдү кайра орнотуу: Reattach the wheels and lower the vehicle.
- Professional Alignment: Immediately after installation, have a professional wheel alignment performed. This is critical for vehicle safety and performance.

Image 3: Thread-type ride height adjustment during installation.
6. Пайдалануу боюнча нускамалар жана жөндөөлөр
6.1 Дamping Adjustment (24 Levels)
The coilovers feature 24 distinct levels of rebound damping adjustment, allowing you to fine-tune the ride comfort and handling characteristics. The adjustment knob is located at the top of each coilover unit.
- Жөнгө салуу процедурасы: To adjust, remove the protective cap (if present) from the top of the coilover. Use the provided hex key or turn the knob by hand to select the desired damping level. Turning clockwise generally increases damping (harder ride), while turning counter-clockwise decreases damping (softer ride).
- Сунушталган орнотуулар:
- 0-8-деңгээлдер: Suggested for street use, providing a more comfortable ride.
- 9-16-деңгээлдер: Suggested for mountain roads or spirited driving, offering a balance of comfort and control.
- 17-24-деңгээлдер: Suggested for track use, providing maximum stiffness and control for performance driving.
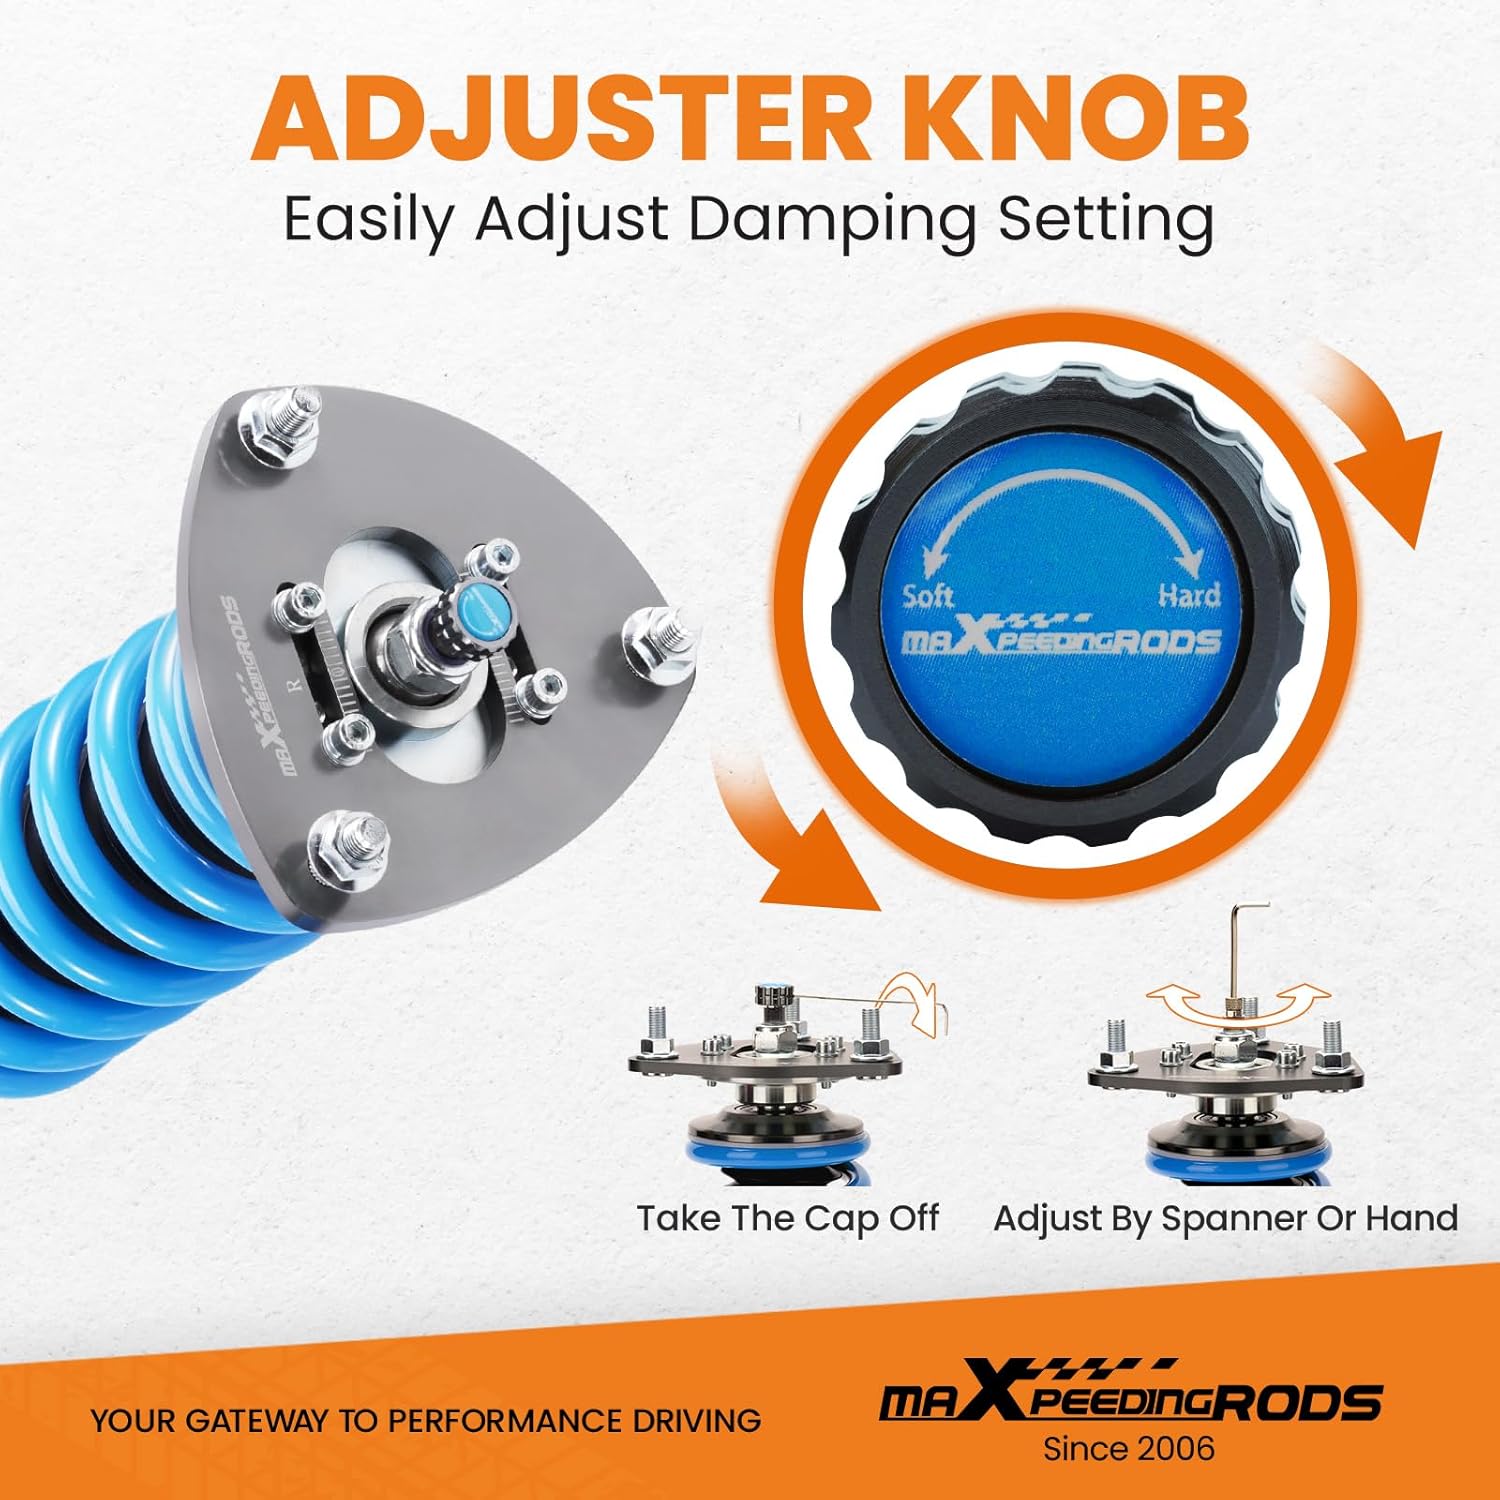
Сүрөт 4: Damping adjustment knob and procedure.

Сүрөт 5: Damping level recommendations for various driving conditions.
6.2 Бийиктигин тууралоо
The coilovers allow for independent ride height adjustment, separate from spring preload. This enables lowering the vehicle by 1-3 inches from the original ride height.
- Жөнгө салуу процедурасы: Use the provided spanner wrenches to loosen the locking rings on the coilover body. Rotate the lower perch to raise or lower the vehicle. Once the desired height is achieved, securely tighten the locking rings to prevent movement.
- Маанилүү ойлор:
- Ensure both sides of the vehicle (front or rear axle) are adjusted to the same height to maintain balance.
- After any significant height adjustment, a wheel alignment is necessary.
- Do not lower the vehicle beyond the recommended limits, as this can compromise suspension travel and safety.

Image 6: Illustration of height adjustment capability.

Image 7: Detail of perches and locking rings for height adjustment.
7. Техникалык тейлөө
Regular maintenance helps ensure the longevity and optimal performance of your maXpeedingrods coilovers.
- Визуалдык текшерүү: Periodically inspect the coilovers for any signs of damage, leaks, corrosion, or loose components. Check the dust boots for tears.
- Тазалоо: Keep the coilover bodies and threads clean, especially in environments with road salt, dirt, or debris. Use mild soap and water, then rinse thoroughly.
- бекиткичтерди текшерүү: Ensure all mounting bolts and locking rings remain securely tightened. Re-torque if necessary.
- Подшипник текшерүү: If equipped with camber plates, check the radial bearings for smooth operation and any signs of wear.
8. Кыйынчылыктарды
This section addresses common issues that may arise with coilover suspension systems.
Жалпы маселелер жана мүмкүн болгон чечимдер:
- Knocking or Clunking Noise:
- Себеби: Loose mounting bolts, improper spring preload, worn top mounts, or contact with other vehicle components.
- Чечим: Re-check all mounting hardware for proper torque. Verify spring preload is set correctly (7-10mm). Inspect top mounts and ensure no components are contacting the chassis or suspension arms. Professional inspection is recommended.
- Тегиз эмес жүрүү бийиктиги:
- Себеби: Inconsistent height adjustment between left and right sides.
- Чечим: Measure the ride height from a consistent point (e.g., fender lip to wheel center) on both sides and adjust accordingly.
- Poor Handling or Instability:
- Себеби: Туура эмес damping settings, improper ride height, or misaligned wheels.
- Чечим: тууралоо damping settings (refer to Section 6.1). Ensure ride height is appropriate and consistent. Obtain a professional wheel alignment.
- Чыкырган үндөр:
- Себеби: Dirt or debris on spring coils, dry bushings, or worn components.
- Чечим: Clean the springs and coilover body. Inspect bushings for wear and lubricate if necessary.
If you encounter persistent issues that cannot be resolved with these steps, it is advisable to consult a qualified automotive technician or contact maXpeedingrods customer support.
9. Кепилдик жана колдоо
maXpeedingrods is committed to providing quality products and customer satisfaction. For specific warranty information regarding your coilover suspension kit, please refer to the warranty card included with your product or visit the official maXpeedingrods webсайт.
Should you require technical assistance, have questions about installation, or need to report a product issue, please contact maXpeedingrods customer support. Our team is available to provide expert assistance and support.
Байланыш маалыматы: Please refer to the contact details provided on the maXpeedingrods official webсайт же сатып алуу документтери.
Ask a question about this manual
Ask about setup, troubleshooting, compatibility, parts, safety, or missing instructions. Manuals+ will review the question and use this page’s manual context to help answer it.