1. Киришүү
Thank you for choosing the Aiwa AWPOK200D Bluetooth Audio Tower. This powerful audio system is designed to deliver clear, precise sound with deep bass, suitable for both indoor and outdoor use. It features Bluetooth connectivity, TWS function, USB playback and charging, microphone inputs for karaoke, and dynamic LED lighting. This manual provides essential information for safe and optimal use of your device.
2. Коопсуздук маалыматы
Please read all safety instructions carefully before using the device and retain this manual for future reference. Incorrect operation due to disregard of instructions may cause damage to the product or personal injury.
- Кубат булагы: Connect the device only to an AC 100-240V, 50/60Hz power supply. Ensure the voltage matches the requirements before plugging in.
- Вентиляция: Желдетүү тешиктерин жаппаңыз. Аба агымынын туура болушу үчүн түзмөктүн айланасында жетиштүү орун калтырыңыз.
- Суу жана ным: Do not expose the device to rain, moisture, or dripping/splashing liquids. Do not place objects filled with liquids, such as vases, on the apparatus. The device is not waterproof.
- Жылуулук булактары: Түзмөктү радиаторлор, жылыткычтар, плиталар же башка жылуулук булактарынан (анын ичинде ampкөтөргүчтөр) жылуулукту пайда кылуучу.
- Тазалоо: Тазалоодон мурун түзмөктү розеткадан сууруп алыңыз. Кургак, жумшак чүпүрөктү колдонуңуз. Суюк тазалоочу каражаттарды же аэрозоль тазалоочу каражаттарды колдонбоңуз.
- Тейлөө: Бул продуктту өзүңүз тейлөөгө аракет кылбаңыз. Бардык тейлөөнү квалификациялуу тейлөө кызматкерлерине тапшырыңыз.
- Жайгашкан жери: Түзмөктү кулап кетпеши үчүн, аны туруктуу, тегиз жерге коюңуз.
- Балдар: Балдар жетпеген жерде сактаңыз.
3. Продукт бүтүп калдыview
Familiarize yourself with the main components of your Aiwa AWPOK200D Audio Tower.

Сүрөт 3.1: Фронт view of the Aiwa AWPOK200D Audio Tower, showcasing its dual speakers and dynamic blue and purple LED lighting.

Сүрөт 3.2: Арткы view of the Aiwa AWPOK200D Audio Tower, highlighting the power input and bass reflex ports.

Сүрөт 3.3: Деталдаштырылган view of the top control panel of the Aiwa AWPOK200D, showing USB ports, AUX input, microphone inputs, and various control buttons for playback, volume, and functions.
4. Орнотуу
Follow these steps to set up your Aiwa AWPOK200D Audio Tower.
- Пакеттен чыгаруу: Carefully remove the audio tower from its packaging. Retain the packaging for future transport or storage.
- Жайгашкан жери: Place the audio tower on a stable, flat surface. Ensure there is enough space around the unit for proper ventilation.
- Кубат туташуу: Connect the power cable to the AC input on the rear of the unit and then plug it into a standard AC 100-240V, 50/60Hz wall outlet.
- Баштапкы күйгүзүү: Press the power button (usually located on the top control panel) to turn on the device. The LCD display should illuminate.
5. Иштөө нускамалары
This section details how to use the various functions of your audio tower.
5.1. Bluetooth байланышы
- Bluetooth иштетүү: Turn on the audio tower. Press the "FUNCTION" button on the control panel until "BT" appears on the LCD display, indicating Bluetooth mode.
- Жупташтыруу: On your mobile device (smartphone, tablet, etc.), enable Bluetooth and search for available devices. Select "AWPOK200D" from the list.
- Байланыш: Once paired, the audio tower will indicate a successful connection, and you can now play audio from your device wirelessly.
5.2. Чыныгы зымсыз стерео (TWS) функциясы
The TWS function allows you to pair two AWPOK200D units together for a stereo sound experience.
- Эки блокту тең күйгүзүү: Ensure both AWPOK200D units are powered on and in Bluetooth mode.
- Initiate TWS Pairing: On one of the units (this will be the primary unit), press and hold the TWS button (if available, otherwise refer to specific button on control panel, often combined with another function or a dedicated TWS button). The unit will search for another AWPOK200D.
- Туташуу: Once connected, both units will play audio in stereo. Connect your mobile device to the primary unit via Bluetooth as described in section 5.1.
5.3. USB ойнотуу жана заряддоо
- USB ойнотуу: MP3 аудиосу бар USB флэш-дискти салыңыз files into the USB port labeled "USB" (5V=200mA). The unit will automatically switch to USB mode and begin playback. Use the playback controls (Play/Pause, Next/Previous) on the control panel.
- Мобилдик заряддоо: The USB port labeled "USB CHARGE" (5V=1000mA) can be used to charge your mobile devices. Connect your device's USB charging cable to this port.
5.4. Auxiliary (AUX) and RCA Inputs
- AUX киргизүү: Connect an external audio device (e.g., MP3 player, smartphone) using a 3.5mm audio cable to the "AUX IN" port. Press the "FUNCTION" button until "AUX" is displayed.
- RCA киргизүү: Connect devices with RCA audio output (e.g., DVD player, TV) to the "AUDIO RCA" input ports (red for right, white for left). Press the "FUNCTION" button until "RCA" is displayed.
5.5. Microphone Inputs and Karaoke Function
- Микрофон туташуу: Connect up to two microphones to the 6.3mm "MIC 1" and "MIC 2" input jacks.
- Микрофондун үнү: Adjust the microphone volume using the "MIC VOL +/-" controls.
- Эхо эффектиси: Use the "EQ/ECHO" knob or button to add an echo effect to the microphone audio.
- Voice Cancel: Activate the "VOICE CANCEL" function (often labeled "KEY/VOICE CANCEL") to reduce or remove vocals from a playing track, making it suitable for karaoke.
5.6. Sound Enhancements and Equalizer
- Супер басс: Press the "SUPER BASS" button to activate or deactivate the enhanced bass effect.
- Эквалайзердин алдын ала орнотуулары: Use the "EQ" button to cycle through 5 preset equalizer functions (e.g., Pop, Rock, Jazz, Classic, Flat) to optimize sound for different music genres.
5.7. LED жарыктандыруу
- Жарыкты башкаруу: Press the "LIGHT" button to cycle through different LED light modes or to turn the lights off. The unit features intermittent LED lights with mode selection.
6. Техникалык тейлөө
Proper care and maintenance will ensure the longevity of your audio tower.
- Тазалоо: Always unplug the device before cleaning. Use a soft, dry cloth to wipe the exterior surfaces. Do not use abrasive cleaners, waxes, or solvents as they may damage the finish.
- Сактагыч: If not in use for an extended period, unplug the power cable and store the unit in a cool, dry place, away from direct sunlight and extreme temperatures.
- Вентиляция: Ensure the ventilation openings are free from dust and debris. Use a soft brush or vacuum cleaner to gently clear any blockages.
7. Кыйынчылыктарды
If you encounter issues with your Aiwa AWPOK200D, refer to the following common problems and solutions.
| Көйгөй | Мүмкүн себеп | Чечим |
|---|---|---|
| Күч жок | Power cable not connected; Power outlet not working; Unit is off. | Ensure power cable is securely connected. Test the outlet with another device. Press the power button to turn on the unit. |
| Үн жок | Volume too low; Incorrect input mode selected; Audio cable not connected properly; Bluetooth not paired. | Increase the master volume. Select the correct input mode (Bluetooth, USB, AUX, RCA). Check audio cable connections. Re-pair Bluetooth device. |
| Bluetooth жупташтыруу ишке ашпай калды | Device too far; Bluetooth not enabled on source device; Unit not in pairing mode. | Move the source device closer to the audio tower. Ensure Bluetooth is enabled on your device. Make sure the audio tower is in Bluetooth pairing mode. |
| Микрофон иштебей жатат | Microphone not connected; Microphone volume too low; Microphone switch off. | Ensure microphone is securely plugged into the correct input. Increase "MIC VOL". Check if the microphone's power switch is on. |
| TWS жупташтыруу ишке ашпай калды | Units too far apart; One unit not in TWS pairing mode; Already connected to another device. | Ensure both units are close to each other. Verify both units are in Bluetooth mode and one is initiating TWS pairing. Disconnect any existing Bluetooth connections before TWS pairing. |
8. Техникалык шарттар
Detailed technical specifications for the Aiwa AWPOK200D Audio Tower.

Сүрөт 8.1: Technical specifications of the Aiwa AWPOK200D, including features, power output, and power supply details.
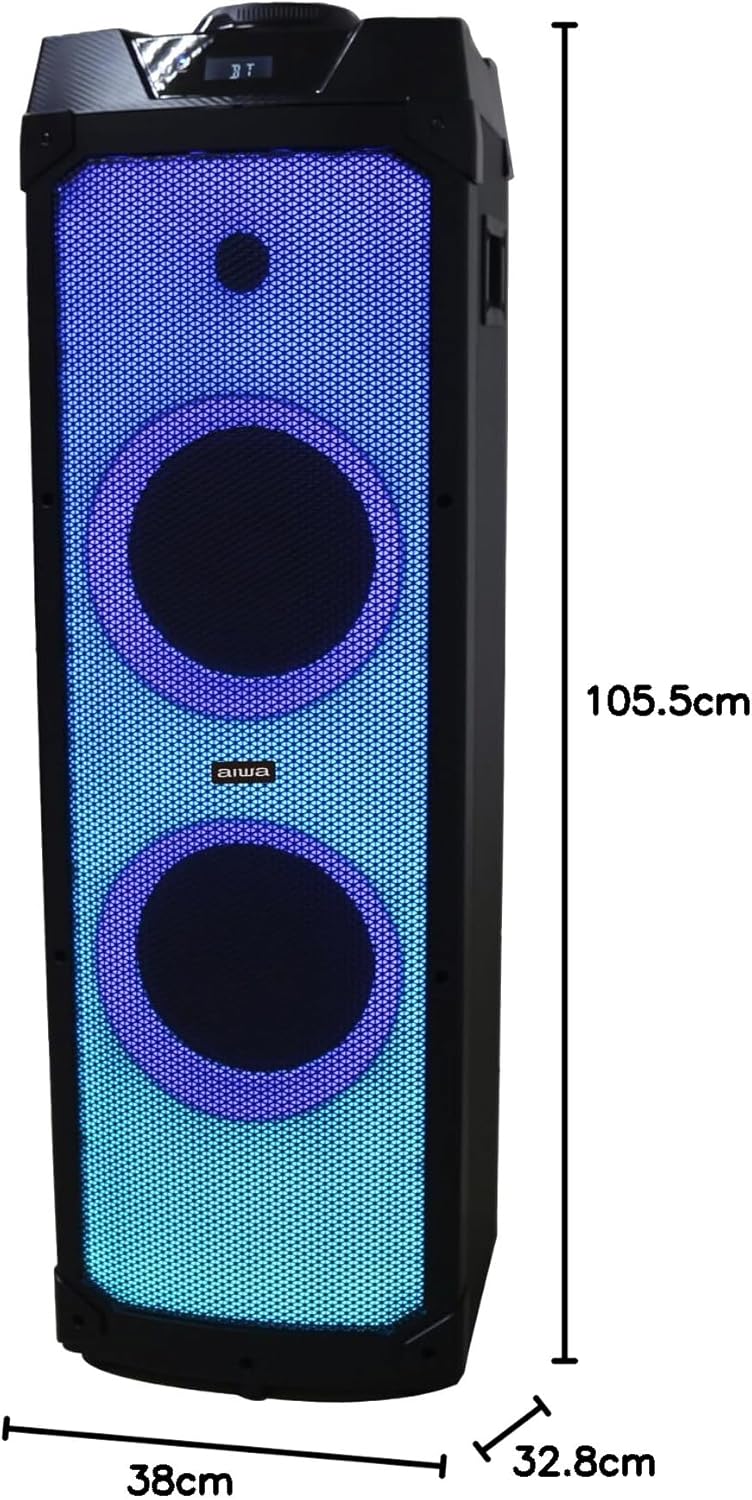
Сүрөт 8.2: Dimensions of the Aiwa AWPOK200D Audio Tower, showing a height of 105.5 cm, width of 38 cm, and depth of 32.8 cm.
| Өзгөчөлүк | Деталь |
|---|---|
| Бренд | Айва |
| Модел | AWPOK200D |
| Динамик түрү | Subwoofer, Floor-standing |
| Максималдуу чыгаруу күчү | 2000 Watts (PMPO) |
| Чыгуу күчү (RMS) | 80W х 2 |
| Байланыш технологиясы | Bluetooth V5.1, USB, AUX (3.5mm), RCA |
| Power Source | AC 100-240V, 50/60Hz |
| Микрофон кириштери | 2 x 6.3 мм |
| USB порттору | 1 for playback (5V=200mA), 1 for charging (5V=1000mA) |
| Өзгөчөлүктөр | TWS Function, Intermittent LED Lights, Super Bass Effect, 5 Preset Equalizer Functions, Voice Cancel for Karaoke, LCD Display |
| Башкаруу ыкмасы | Tactile buttons, Knob |
| Өлчөм бирдиги (У x Т x Б) | 328 (L) X 381 (D) X 1040 (H) mm |
| Динамик өлчөмү | 2 x 8" woofers, 1 x tweeter |
9. Кепилдик жана колдоо
The Aiwa AWPOK200D Audio Tower comes with a limited warranty. For specific details regarding warranty coverage, duration, and terms, please refer to the warranty card included with your product or contact Aiwa customer support.
For technical assistance, troubleshooting beyond this manual, or service inquiries, please visit the official Aiwa webсайтка же кардарларды тейлөө бөлүмүнө кайрылыңыз. Сатып алуу квитанциясын кепилдик дооматтары үчүн сатып алуунун далили катары сактаңыз.
You can find more information and support by visiting the official Aiwa store: Aiwa Official Store