1. Киришүү
The PEAKMETER PM8237 is a high-precision, autoranging digital multimeter designed for professional and home use. It features a 30000-count display with automatic unit symbol indication, True RMS measurement capabilities, and a USB interface for data logging. This manual provides essential information for the safe and effective operation of your PM8237 multimeter.
Негизги өзгөчөлүктөр төмөнкүлөрдү камтыйт:
- 30000 Counts Display with Digital and Analog Bar Graph
- True RMS (TRMS) Measurement
- Чаралар AC/DC Voltage, AC/DC Current, Resistance, Capacitance, Frequency, Duty Cycle, Diode, Continuity, hFE, and NCV (Non-Contact Voltage)
- USB Interface for PC Connectivity
- Low Pass Filter (LPF) for accurate AC measurements
- MAX/MIN, Data Hold, and Relative Measurement functions
- Automatic Power Off and Low Battery Indication
- Over-range indication: “OL” is displayed
- Backlight for improved visibility in dim conditions

Image 1.1: The PM8237 multimeter highlighting its comprehensive range of functions, including AC/DC Voltage, Current, Resistance, Capacitance, Frequency, Diode, Continuity, HFE, USB Interface, Auto Power Off, and Auto Range.
2. Коопсуздук маалыматы
To ensure safe operation and avoid damage to the meter, please read and follow all safety instructions carefully. This device complies with EN61010-1, EN61010-2-033, EN61326, CAT.Ⅲ 1000V/CAT.Ⅳ 600V safety standards.
Жалпы коопсуздук чаралары:
- Always inspect the test leads for damage (cracks, breaks) before use. Do not use if damaged.
- Колдонбоңуз томtage or current that exceeds the maximum rated value for the selected range. The maximum voltage allowed between measurement ends and earth is 1000V DC or 1000V AC RMS.
- Ensure the function switch is in the correct position for the measurement you intend to make.
- Be extremely cautious when working with high voltages. Avoid contact with live circuits.
- Батареянын аз көрсөткүчү так көрсөткүчтөрдү камсыз кылуу үчүн батарейкаларды дароо алмаштырыңыз.
- Эгерде эсептегич бузулуп калса же корпусу ачык болсо иштетпеңиз.
- Эсептегичти ушул колдонмодо көрсөтүлгөндөй гана колдонуңуз; антпесе, эсептегич тарабынан берилген коргоо бузулушу мүмкүн.
- Before measuring current, ensure the circuit power is off and the test leads are connected in series with the circuit.
- When measuring resistance, capacitance, or diode, ensure the circuit under test is de-energized and all capacitors are discharged.
3. Продукт бүтүп калдыview
Familiarize yourself with the components and controls of your PM8237 Digital Multimeter.
3.1 Алдыңкы панелдин жайгашуусу
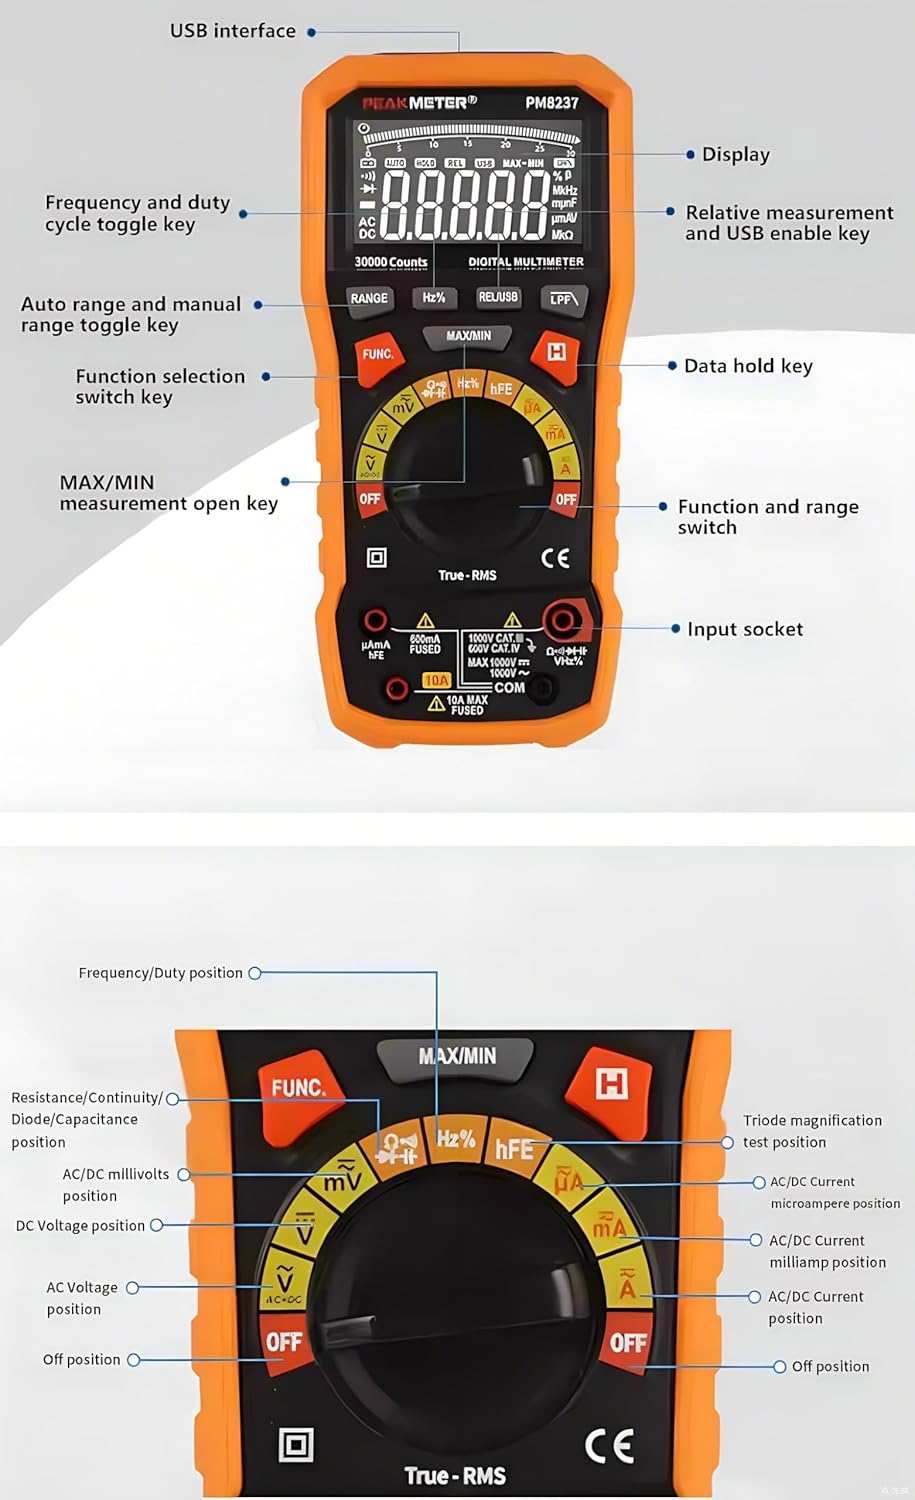
Image 3.1: Detailed diagram of the PM8237's front panel, indicating the display, USB interface, function keys, rotary switch, and input sockets.
- Дисплей: 30000-count LCD with backlight and analog bar graph.
- USB интерфейси: Маалыматтарды өткөрүп берүү үчүн компьютерге туташуу үчүн.
- RANGE баскычы: Toggles between auto range and manual range.
- Hz% баскычы: Жыштыкты же жумуш циклин өлчөөнү тандайт.
- REL/USB баскычы: Activates relative measurement mode or enables USB communication.
- LPF Button: Activates Low Pass Filter for AC voltage/учурдагы өлчөөлөр.
- MAX/MIN баскычы: Максималдуу жана минималдуу маанилерди жазып алат.
- FUNC баскычы: Selects different functions within a single rotary switch position (e.g., AC/DC, Diode/Continuity).
- HOLD баскычы: Учурдагы дисплейдеги окууну токтотот.
- Айлануучу которгуч: Selects the main measurement function (e.g., Voltage, Current, Resistance).
- Киргизүү розеткалары:
- COM: Бардык өлчөөлөр үчүн жалпы терминал.
- VΩHz: Көлөм үчүн киргизүүtage, Resistance, Frequency, Capacitance, Diode, Continuity, Temperature, NCV.
- mAµA: Milli үчүн киргизүүampere жана микроampучурдагы өлчөөлөр.
- 10A: Input for 10 Ampучурдагы өлчөөлөр.
3.2 Өлчөмдөр

Image 3.2: Physical dimensions of the PM8237 multimeter, measuring 204mm (L) x 94mm (W) x 57mm (H).
4. Орнотуу
4.1 Батареяны орнотуу
The PM8237 requires four 1.5V AA batteries for operation. The battery compartment is located on the back of the meter.
- Мультиметр өчүрүлгөнүн текшериңиз.
- Аппараттын артындагы батарея бөлүкчөсүнүн капкагын табыңыз.
- Капкактын бекитүүчү бурамасын(ларын) бошотуу үчүн бурагычты колдонуңуз.
- Капкакты алып салыңыз.
- Insert four 1.5V AA batteries, observing the correct polarity (+ and -) as indicated inside the compartment.
- Батарея бөлүмүнүн капкагын кайра ордуна коюп, бурамалар(дар)ды бекемдеңиз.

Image 4.1: The PM8237 multimeter shown with its carrying case and the four AA batteries required for operation.
4.2 Сыноо өткөргүчтөрүн туташтыруу
Always connect the black test lead to the COM input jack. Connect the red test lead to the appropriate input jack based on the measurement type:
- VΩHz: Том үчүнtage, каршылык, жыштык, сыйымдуулук, диод, үзгүлтүксүздүк жана температураны өлчөө.
- mAµA: 300 мА чейинки ток өлчөө үчүн.
- 10A: 10А чейинки ток өлчөөлөрү үчүн.
5. Иштөө нускамалары
This section details how to perform various measurements with your PM8237 multimeter.
5.1 DC Voltage Өлчөө (V–)
- Кара сыноо зымын COM уячасына, ал эми кызыл сыноо зымын VΩHz уячасына киргизиңиз.
- Turn the rotary switch to the V– position.
- Сыноо өткөргүчтөрүн DC Voltagөлчөө үчүн булак же компонент.
- Томду окуңузtage мааниси дисплейде.
5.2 AC томtage Өлчөө (V∼)
- Кара сыноо зымын COM уячасына, ал эми кызыл сыноо зымын VΩHz уячасына киргизиңиз.
- Turn the rotary switch to the V∼ position.
- Сыноо өткөргүчтөрүн AC том аркылуу туташтырыңызtagөлчөө үчүн булак же компонент.
- Томду окуңузtage value on the display. Press the LPF button for measurements in noisy environments.

Сүрөт 5.1: Мисamples of common measurements: DC Voltage, Resistance, Diode Test, DC mA, and DC Ampэре.
5.3 DC Current Measurement (A–, mA–, µA–)
- Электр чынжырын өчүрүңүз.
- Insert the black test lead into the COM jack.
- For currents up to 300mA, insert the red test lead into the mAµA jack. For currents up to 10A, insert the red test lead into the 10A jack.
- Turn the rotary switch to the appropriate A–, mA–, or µA– position.
- Break the circuit and connect the test leads in series with the circuit.
- Схемага электр кубатын калыбына келтириңиз жана учурдагы маанини окуңуз.
5.4 AC Current Measurement (A∼, mA∼, µA∼)
- Follow steps 1-5 for DC Current Measurement, but turn the rotary switch to the appropriate A∼, mA∼, or µA∼ position.
- Read the current value. Press the LPF button for measurements in noisy environments.
5.5 Каршылыкты өлчөө (Ω)
- Схема кубаты өчүрүлгөнүн жана бардык конденсаторлордун зарядсыздангандыгын текшериңиз.
- Кара сыноо зымын COM уячасына, ал эми кызыл сыноо зымын VΩHz уячасына киргизиңиз.
- Айлануучу которгучту Ω абалына буруңуз.
- Сыноо өткөргүчтөрүн өлчөнө турган компонентке туташтырыңыз.
- Каршылык маанисин окуңуз.
5.6 Сыйымдылыкты өлчөө (F)
- Өлчөөнүн алдында конденсатордун толук зарядсыздангандыгын текшериңиз.
- Кара сыноо зымын COM уячасына, ал эми кызыл сыноо зымын VΩHz уячасына киргизиңиз.
- Turn the rotary switch to the F position.
- Конденсатор аркылуу сыноо өткөргүчтөрүн туташтырыңыз.
- Сыйымдуулуктун маанисин окуңуз.
5.7 Frequency and Duty Cycle Measurement (Hz%)
- Кара сыноо зымын COM уячасына, ал эми кызыл сыноо зымын VΩHz уячасына киргизиңиз.
- Turn the rotary switch to the Hz% position.
- Сыноо өткөргүчтөрүн сигнал булагы аркылуу туташтырыңыз.
- Press the Hz% button to toggle between frequency and duty cycle display.
5.8 Diode Test (→|•))
- Схема кубаты өчүрүлгөнүн текшериңиз.
- Кара сыноо зымын COM уячасына, ал эми кызыл сыноо зымын VΩHz уячасына киргизиңиз.
- Turn the rotary switch to the →|•)) position.
- Press the FUNC button to select Diode Test.
- Кызыл тестти анодго, кара сынагын диоддун катодуна туташтырыңыз.
- Алдыдагы томду окуңузtagд тамчы. Ачык чынжырды (OL) текшерүү үчүн өткөргүчтөрдү тескери буруңуз.
5.9 Continuity Test (•))
- Схема кубаты өчүрүлгөнүн текшериңиз.
- Кара сыноо зымын COM уячасына, ал эми кызыл сыноо зымын VΩHz уячасына киргизиңиз.
- Turn the rotary switch to the →|•)) position.
- Press the FUNC button to select Continuity Test.
- Сыноочу зымдарды чынжыр же компонент аркылуу туташтырыңыз. Үзгүлтүксүз сигнал үзгүлтүксүздүктү (төмөнкү каршылыкты) билдирет.
5.10 hFE Measurement
- Кара сыноо зымын COM уячасына, ал эми кызыл сыноо зымын VΩHz уячасына киргизиңиз.
- Айлануучу которгучту hFE абалына буруңуз.
- Insert the transistor leads (E, B, C) into the corresponding hFE socket holes on the meter.
- Дисплейдеги hFE маанисин окуңуз.
5.11 Контактсыз томtage (NCV) аныктоо
- Айлануучу которгучту NCV абалына буруңуз.
- Мультиметрдин үстүнкү учунун жандуу AC томдун жанына жылдырыңызtage булагы.
- The meter will emit an audible beep and the NCV indicator will light up, indicating the presence of AC voltage.
5.12 Атайын функциялар
- Автоматтык/Кол менен башкаруу: Эсептегич автоматтык түрдө өлчөөгө коюлган. Баскычын басыңыз RANGE button to switch to manual ranging. In manual ranging, press RANGE жеткиликтүү диапазондорду айланып өтүү үчүн кайра-кайра басыңыз.
- Дайындарды кармоо: басыңыз БЕРҮҮ Учурдагы көрсөткүчтү дисплейде тоңдуруу үчүн баскычты басыңыз. Бошотуу үчүн кайра басыңыз.
- МАКС/МИН: басыңыз МАКС/МИН button to enter MAX/MIN recording mode. The meter will display the maximum or minimum value measured since activation. Press again to cycle between MAX, MIN, and current reading.
- Салыштырмалуу өлчөө (REL): басыңыз REL/USB Учурдагы көрсөткүчтү шилтеме мааниси катары сактоо үчүн баскычын басыңыз. Кийинки өлчөөлөр ушул шилтемеден айырма катары көрсөтүлөт. Чыгуу үчүн кайрадан басыңыз.
- Арткы жарык: Жарык аз шартта жакшыраак көрүнүү үчүн арткы жарыкты күйгүзсө болот.
6. Техникалык тейлөө
6.1 Тазалоо
Жарнама менен эсептегичти сүртүңүзamp кездеме жана жумшак жуугуч. Абразивдерди же эриткичтерди колдонбоңуз. Колдонуудан мурун эсептегич толугу менен кургатылганын текшериңиз.
6.2 Батареяны алмаштыруу
When the low battery indicator appears on the display, replace the batteries as described in Section 4.1. Always use four new 1.5V AA batteries.
6.3 Сактагычты алмаштыруу
If the current measurement function fails, the fuse may need replacement. Fuse replacement should only be performed by qualified personnel.
- Мультиметрдин өчүрүлгөнүн жана бардык сыноо өткөргүчтөрү ажыратылганын текшериңиз.
- Батарея бөлүмүнүн капкагын жана батарейкаларды алып салыңыз.
- Unscrew the case screws and carefully open the meter casing.
- Locate the blown fuse (typically near the current input jacks).
- Replace the fuse with one of the exact same type and rating (e.g., F10A/600V for the 10A range).
- Эсептегичти кылдаттык менен кайра чогултуп, бардык бурамалардын бекем тартылганын текшериңиз.
7. Кыйынчылыктарды
- Дисплей жок: Батареянын орнотулушун текшерип, батарейкалары түгөнүп калбагандыгын текшериңиз.
- "OL" көрсөткүчү: This indicates an over-range condition. The measured value exceeds the current range. Switch to a higher range if available, or the value is simply too high for the meter.
- Туура эмес окуулар: Ensure test leads are properly connected, the function switch is in the correct position, and the circuit under test is prepared correctly (e.g., de-energized for resistance). Check battery level.
- Учурдагы өлчөө иштебей жатат: 6.3-бөлүмдө сүрөттөлгөндөй, сактагычты текшериңиз.
- Авто өчүрүү: The meter will automatically power off after a period of inactivity to conserve battery life. Press any button or turn the rotary switch to reactivate.
8. Техникалык шарттар
| Өлчөө | Диапазон | Тактык |
|---|---|---|
| DC Voltage | ||
| 300мВ | ±(0.1%+5) | |
| 3V/30V/300V | ±(0.05%+5) | |
| 1000V | ±(0.1%+5) | |
| Туруктуу ток | ||
| 300µA/3mA/30mA/300mA | ±(0.5%+10) | |
| 10A | ±(1.2%+50) | |
| AC+DC Voltage (40Гц-500Гц) | ||
| 3V/30V/300V/1000V | ±(1.8%+70) | |
| AC тогу | ||
| 300µA (40Hz-1KHz) | ±(0.8%+10) | |
| 300µA (1KHz-10KHz) | ±(3.0%+50) | |
| 3mA (40Hz-1KHz) | ±(0.8%+10) | |
| 3mA (1KHz-10KHz) | ±(3.0%+50) | |
| 30mA (40Hz-1KHz) | ±(1.2%+10) | |
| 30mA (1KHz-10KHz) | ±(3.0%+50) | |
| 300mA (40Hz-1KHz) | ±(1.2%+10) | |
| 300mA (1KHz-10KHz) | ±(3.0%+50) | |
| 10A (40Hz-1KHz) | ±(1.2%+10) | |
| 10A (1KHz-10KHz) | ±(3.0%+50) | |
| Каршылык | ||
| 300Ω/3KΩ/30KΩ/300KΩ | ±(0.5%+10) | |
| 3МΩ | ±(0.8%+10) | |
| 30МΩ | ±(1.5%+10) | |
| 300МΩ | ±(3.0%+10) | |
| Сыйымдуулук | ||
| 30nF/300nF/3µF/30µF | ±(3.0%+5) | |
| 300μF | ±(4.0%+5) | |
| 3мФ | ±(4.0%+5) | |
| 30мФ | ±(10.0%+5) | |
| 300мФ | ±(20.0%+5) | |
| Жыштык | ||
| 10Гц-300МГц | ±(0.01%+5) | |
| Милдеттик цикл | ||
| 0.1%~99.9% | ±(2.0%+5) | |
Жалпы мүнөздөмөлөрү:
- Дисплей: 30000 саны
- Электр камсыздоо: 4 × 1.5V AA Batteries
- Өлчөмдөрү: 204 (L) × 94 (W) × 57 (H) мм
- Салмагы: Болжол менен 1 кг (батареяларды кошкондо)
- Коопсуздук рейтинги: EN61010-1, EN61010-2-033, EN61326, CAT.Ⅲ 1000V / CAT.Ⅳ 600V
- Иштөө температурасы: 0℃ден 40℃ге чейин (32℉ден 104℉ге чейин)
- Сактоо температурасы: -10℃ден 50℃ге чейин (14℉ден 122℉ге чейин)
- Нымдуулук: <80% RH (конденсацияланбаган)
9. Кепилдик жана колдоо
For warranty information and technical support, please refer to the documentation provided with your purchase or contact the seller directly. PEAKMETER products typically come with a manufacturer's warranty covering defects in materials and workmanship.