1. Киришүү
This instruction manual provides essential information for the safe and effective operation of your PEAKMETER PM2128 / PM2128S Digital Clamp Multimeter. Please read this manual thoroughly before use and retain it for future reference. This device is designed for measuring AC/DC voltage, AC/DC current, resistance, capacitance, frequency, temperature, and performing continuity tests.
1.1 Коопсуздук маалыматы
Always adhere to basic safety precautions when using this instrument to avoid potential electric shock, injury, or damage to the meter or equipment under test. Pay close attention to all warnings and cautions.
- Колдонбоңуз томtage or current that exceeds the maximum specified limits.
- Ток чынжырлары менен иштөөдө өтө этият болуңуз.
- Сыноочу зымдар жакшы абалда жана туура туташтырылганын текшериңиз.
- Эгерде эсептегич бузулуп калса же корпусу ачык болсо иштетпеңиз.
- Always turn off power to the circuit and discharge all high-voltage capacitors before measuring resistance, continuity, or capacitance.
- Батареяны так көрсөткүчтөрдү камсыз кылуу үчүн батарейка аз индикатор пайда болгондо алмаштырыңыз.
2. Продукт бүтүп калдыview
The PEAKMETER PM2128 / PM2128S is a compact and versatile digital clamp multimeter featuring auto-ranging capabilities and a 6000-count display. It is designed for precise electrical measurements in various applications.

Figure 2.1: PEAKMETER PM2128 Digital Clamp Multimeter with its packaging and carrying case.
2.1 Негизги өзгөчөлүктөрү
- Автоматтык жана кол менен диапазон: Automatically selects the appropriate measurement range, with an option for manual selection.
- 6000 саны дисплей: Жогорку чечилиштеги көрсөткүчтөрдү берет.
- Чыныгы RMS: Accurate measurements for non-sinusoidal waveforms (PM2128S model).
- Ашыкча жүктөн коргоо: Бардык өлчөө диапазондорунда коопсуздукту камсыз кылат.
- Автоматтык өчүрүү: Conserves battery life by powering off after 10 minutes of inactivity.
- Макс томtage: Capable of handling up to 1000V DC or 1000V AC between measurement terminal and ground.
- Diverse Measurements: Includes DC/AC Voltage, AC/DC Current, Resistance, Capacitance, Frequency, Temperature, LowZ, and DC uA.
- Байланышсыз томtage (NCV): AC томун аныктайтtagд түз байланышсыз.
- Analogue Bar Graph Display: Provides a visual representation of measurement trends.

Figure 2.2: Visual representation of the multimeter's fully functional capabilities.
2.2 Компоненттер
Familiarize yourself with the main components of the clamp мультиметр:
- Clamp Жаак: Байланышсыз AC/DC токту өлчөө үчүн колдонулат.
- Айлануучу которгуч: Негизги өлчөө функциясын тандайт.
- LCD дисплей: Өлчөө окууларын, бирдиктерди жана көрсөткүчтөрдү көрсөтөт.
- Функция баскычтары: (e.g., FUNC, RAN, REL, HOLD, HZ/%) For selecting sub-functions, range, relative measurement, data hold, and frequency/duty cycle.
- Киргизүү уячалары: For connecting test leads (COM, INPUT).
- Триггер: Клини ачатamp жаак.
- NCV сенсору: Located at the top of the clamp jaw for non-contact voltage аныктоо.
- Кол чырак: Караңгы чөйрөдө жарыкты камсыз кылат.

2.3-сүрөт: Детальдуу view of the NCV sensor and flashlight on the clamp метр.
3. Орнотуу
3.1 Батареяны орнотуу
The PEAKMETER PM2128 / PM2128S requires 1 Lithium Polymer battery (included). To install or replace the battery:
- Эсептегич өчүрүлгөнүн текшериңиз.
- Батарея уясынын капкагын эсептегичтин арткы жагында табыңыз.
- Капкактын бекитүүчү бурамасын бошотуу үчүн бурагычты колдонуңуз.
- Remove the cover and insert the battery, observing correct polarity (+ and -).
- Батарейканын капкагын ордуна коюп, бурамасын бекемдеңиз.
3.2 Күйгүзүү/өчүрүү
To power on the meter, rotate the rotary switch from the 'OFF' position to any desired measurement function. To power off, rotate the rotary switch back to the 'OFF' position. The meter also features an automatic shutdown function after approximately 10 minutes of inactivity to conserve battery life.
4. Иштөө нускамалары
This section details how to perform various measurements using your clamp мультиметр.
4.1 AC/DC Voltage Өлчөө
- Insert the black test lead into the 'COM' jack and the red test lead into the 'INPUT' jack.
- Rotate the rotary switch to the 'V~' (AC Voltage) же 'V=' (ТКнын көлөмүtage) position. If the symbol is combined, press the 'FUNC' button to toggle between AC and DC.
- Сыноочу зымдарды өлчөөнү каалаган схемага же компонентке параллель туташтырыңыз.
- Томду окуңузtage дисплейдеги e мааниси.
4.2 AC/DC Ток өлчөө (Clamp)
Абайлаңыз: For current measurement using the clamp, ensure only one conductor passes through the clamp jaw. Measuring multiple conductors will result in an inaccurate reading.

Figure 4.1: Operating the clamp токту өлчөө үчүн жаак.
- Rotate the rotary switch to the 'A~' (AC Current) or 'A=' (DC Current) position. If the symbol is combined, press the 'FUNC' button to toggle between AC and DC.
- cl ачуу үчүн триггерди басыңызamp жаак.
- Enclose a single conductor of the circuit with the clamp жаак.
- Түйүндү жабуу үчүн триггерди коё бериңизamp jaw around the conductor.
- ЖК дисплейдеги учурдагы маанини окуңуз.
4.3 Каршылыкты өлчөө
- Insert the black test lead into the 'COM' jack and the red test lead into the 'INPUT' jack.
- Rotate the rotary switch to the 'Ω' (Resistance) position.
- Схема кубаты өчүрүлгөнүн жана бардык конденсаторлордун зарядсыздангандыгын текшериңиз.
- Компоненттин каршылыгын өлчөө үчүн сыноо зымдарын туташтырыңыз.
- ЖК дисплейдеги каршылыктын маанисин окуңуз.
4.4 Сыйымдуулукту өлчөө
- Insert the black test lead into the 'COM' jack and the red test lead into the 'INPUT' jack.
- Rotate the rotary switch to the 'F' (Capacitance) position.
- Сыноочу зымдарды туташтыруудан мурун, конденсатордун толук разряддалганын текшериңиз.
- Конденсатор терминалдары аркылуу сыноо өткөргүчтөрүн туташтырыңыз.
- ЖК дисплейдеги сыйымдуулуктун маанисин окуңуз.
4.5 Жыштыктарды өлчөө
- Insert the black test lead into the 'COM' jack and the red test lead into the 'INPUT' jack.
- Rotate the rotary switch to the 'Hz' (Frequency) position.
- Connect the test leads in parallel to the circuit where you want to measure frequency.
- Жыштыктын маанисин ЖК дисплейден окуңуз.
4.6 Температураны өлчөө
If your model includes a K-type thermocouple (check package contents), you can measure temperature:
- Rotate the rotary switch to the 'TEMP' position.
- Insert the K-type thermocouple into the input jacks, observing polarity.
- Термопара зондун температурасын өлчөгүңүз келген объекттин үстүнө же жанына коюңуз.
- ЖК дисплейдеги температуранын маанисин окуңуз.
4.7 Үзгүлтүксүздүк тести
- Insert the black test lead into the 'COM' jack and the red test lead into the 'INPUT' jack.
- Rotate the rotary switch to the continuity symbol (often shared with resistance or diode test, use 'FUNC' to select).
- Схема кубаты өчүрүлгөнүн текшериңиз.
- Сыноо өткөргүчтөрүн компонент же зым аркылуу туташтырыңыз.
- Эгерде каршылык болжол менен 30Ω төмөн болсо, үзгүлтүксүздүктү көрсөтүүчү сигнал угулат.
4.8 Контактсыз томtage (NCV) аныктоо
- Rotate the rotary switch to the 'NCV' position.
- Клдин жогору жагын жылдырыңызamp jaw (where the NCV sensor is located) close to the conductor or outlet.
- Эсептегич AC том бар экендигин көрсөтөтtage through audible beeps and/or visual indicators on the display.
4.9 Төмөн Импеданс Voltage (LowZ) өлчөө
The LowZ function is designed to detect ghost voltages by providing a low impedance input. This helps to drain away stray voltages that can give false readings on standard high-impedance multimeters.
- Insert the black test lead into the 'COM' jack and the red test lead into the 'INPUT' jack.
- Rotate the rotary switch to the 'LowZ' position.
- Connect the test leads in parallel to the circuit.
- Томду окуңузtage дисплейдеги e мааниси.
4.10 Маалыматты кармоо функциясы
Press the 'HOLD' button to freeze the current reading on the display. Press it again to release the hold and resume live measurements.
5. Техникалык шарттар
The following table outlines the technical specifications for the PEAKMETER PM2128 and PM2128S models.

Figure 5.1: Comprehensive specifications for PM2128 and PM2128S.
| Өзгөчөлүк | Спецификация |
|---|---|
| Модель номери | EC-PM2128 |
| Дисплей | 6000 саны |
| Power Source | 1 Литий Полимердик батарейка (кошулган) |
| Автоматтык өчүрүү убактысы | 10 мүнөт |
| Макс томtage (Input to Ground) | 1000V DC же 1000V AC |
| Продукциянын өлчөмдөрү (L x W x Y) | 5.91 x 3.94 x 7.09 дюйм (150 x 100 x 180 мм) |
| Элемент Салмагы | 1 Kilogram (approx. 2.2 Pounds) |
| Коопсуздук рейтинги | EN61010-1, EN61010-2-032, EN61326, CAT.III 1000V |
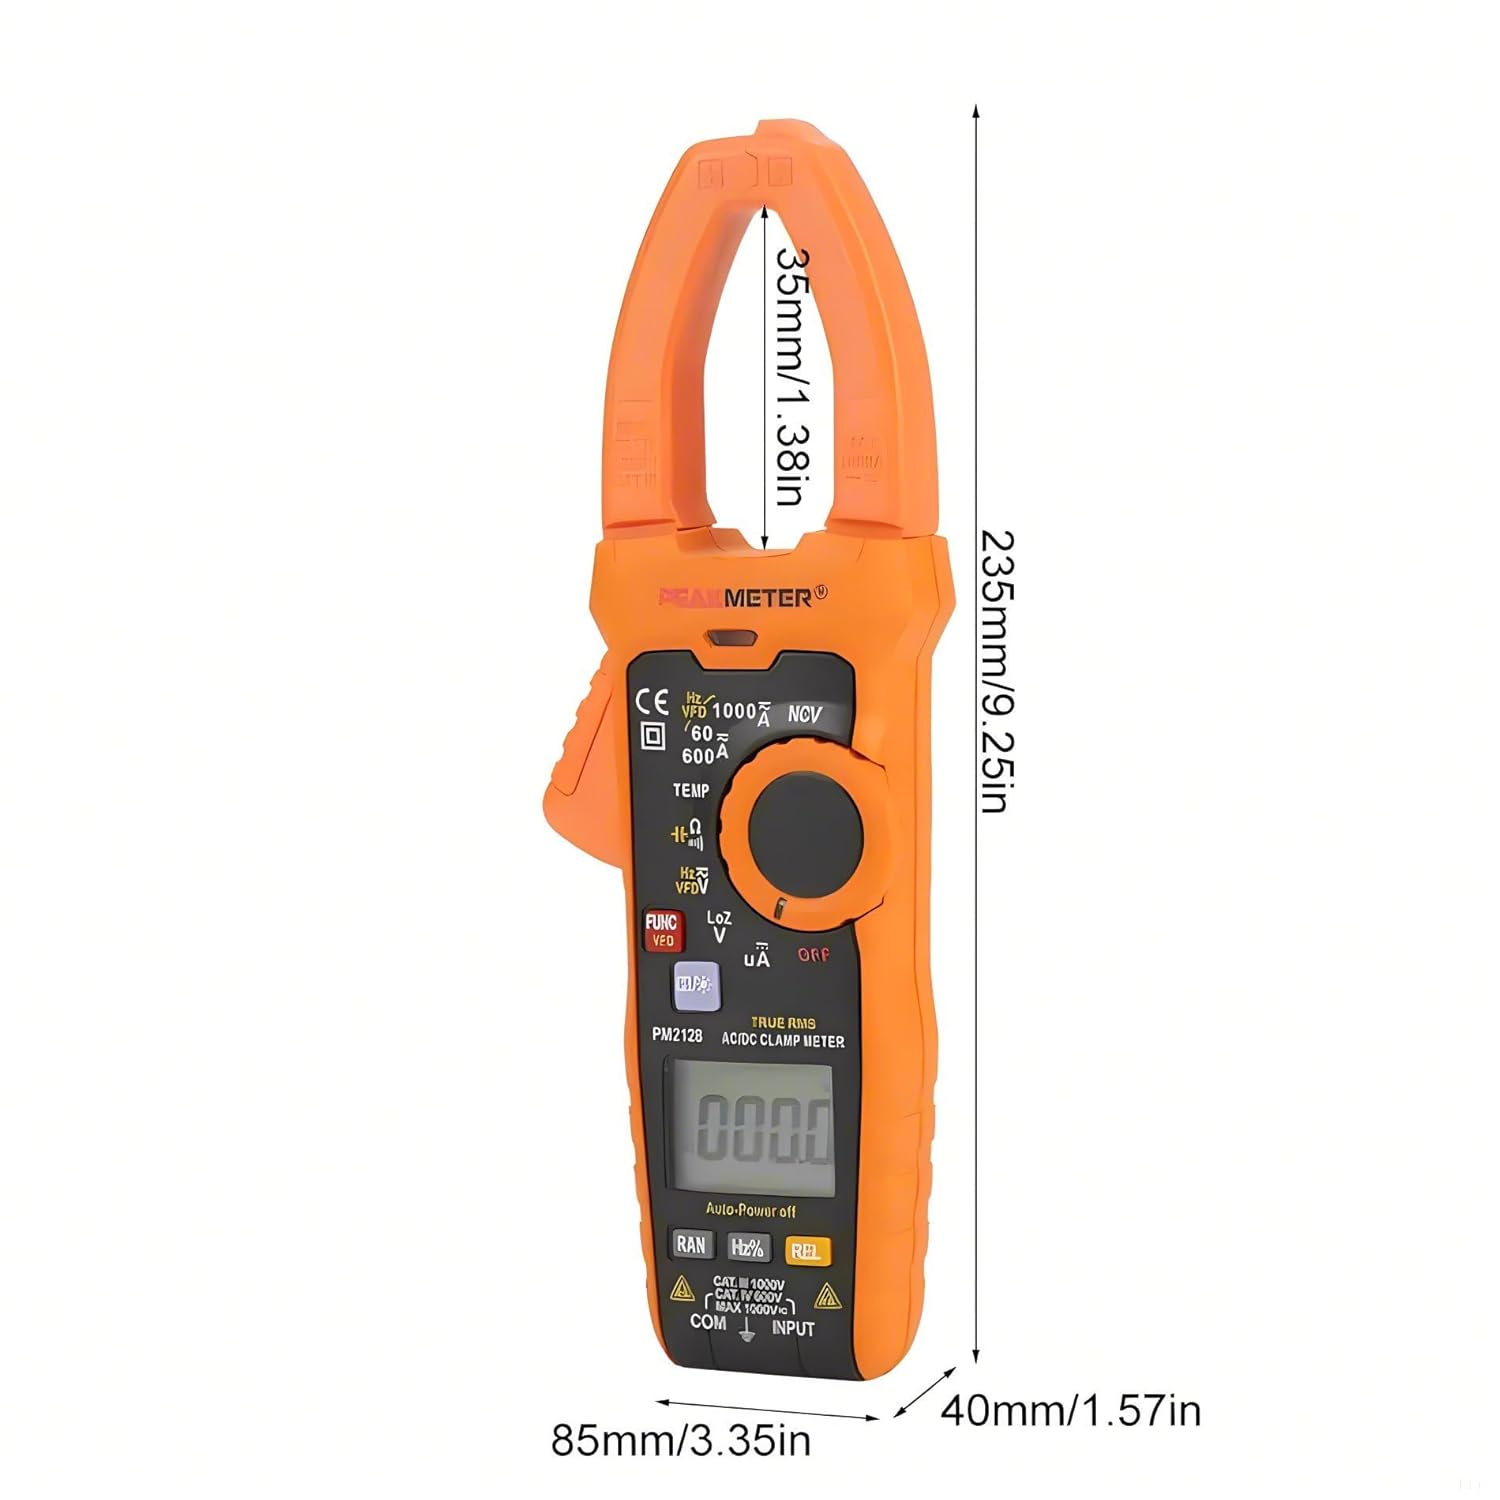
Figure 5.2: Dimensions of the PEAKMETER PM2128.
6. Техникалык тейлөө
6.1 Тазалоо
Эсептегичти тазалоо үчүн корпусту жарнама менен сүртүңүзamp кездеме жана жумшак жуугуч. Абразивдерди же эриткичтерди колдонбоңуз. Колдонуудан мурун эсептегич толугу менен кургатылганын текшериңиз.
6.2 Батареяны алмаштыруу
When the low battery indicator appears on the display, replace the battery promptly to ensure accurate measurements. Refer to Section 3.1 for battery installation instructions.
6.3 Сактоо
If the meter is not used for an extended period, remove the battery to prevent leakage and damage. Store the meter in a cool, dry place, away from direct sunlight and extreme temperatures.
7. Кыйынчылыктарды
This section addresses common issues you might encounter with your clamp мультиметр.
- Дисплей жок: Check if the rotary switch is in an 'OFF' position. Ensure the battery is correctly installed and has sufficient charge. Replace the battery if necessary.
- Туура эмес окуулар: Verify that the correct measurement function is selected. Check test lead connections and ensure they are not damaged. Ensure the battery is not low. For current measurements, confirm only one conductor is within the clamp жаак.
- Meter Shuts Off Automatically: This is a normal function (Auto Power Off) after 10 minutes of inactivity. To disable or reset, refer to the specific instructions in the full product manual if available, or simply turn the rotary switch to 'OFF' and then back to the desired function.
- 'OL' or 'OVER' on Display: Indicates an overload or out-of-range measurement. Select a higher range if available, or ensure the input does not exceed the meter's maximum specifications.
8. Кепилдик жана колдоо
PEAKMETER products are manufactured to high-quality standards. This product is covered by a standard manufacturer's warranty against defects in materials and workmanship. For specific warranty terms, duration, and to obtain technical support or service, please refer to the warranty card included with your product or contact your point of purchase. Please have your model number (PM2128 or PM2128S) and purchase information ready when contacting support.