
1. Киришүү
This manual provides detailed instructions for the setup, operation, maintenance, and troubleshooting of your mooas Multi-Hexagon Clock Timer (Yellow Ver.2) and mooas Visual Timer Clock. Please read this manual thoroughly before using the products to ensure proper functionality and to maximize your user experience.
2. Продукт бүтүп калдыview
2.1 mooas Multi-Hexagon Clock Timer
The Multi-Hexagon Clock Timer is a versatile, compact device designed for efficient time management. Its unique hexagonal shape allows for quick selection of preset timers by simply rotating the device. It features a backlit display for visibility in various lighting conditions and offers both sound and vibration alarm modes.

Image: The yellow mooas Multi-Hexagon Clock Timer, showing the current time.

Image: A comparison of three Multi-Hexagon Timers in different colors, illustrating various timer presets.
2.2 mooas Visual Timer Clock
The Visual Timer Clock is a multi-functional device that displays time, date, temperature, and humidity. It features a large, clear backlit LCD display and is waterproof (IPX5 rated), making it suitable for use in bathrooms and kitchens. It offers flexible placement options including tabletop, wall-mounted, or magnetic attachment.
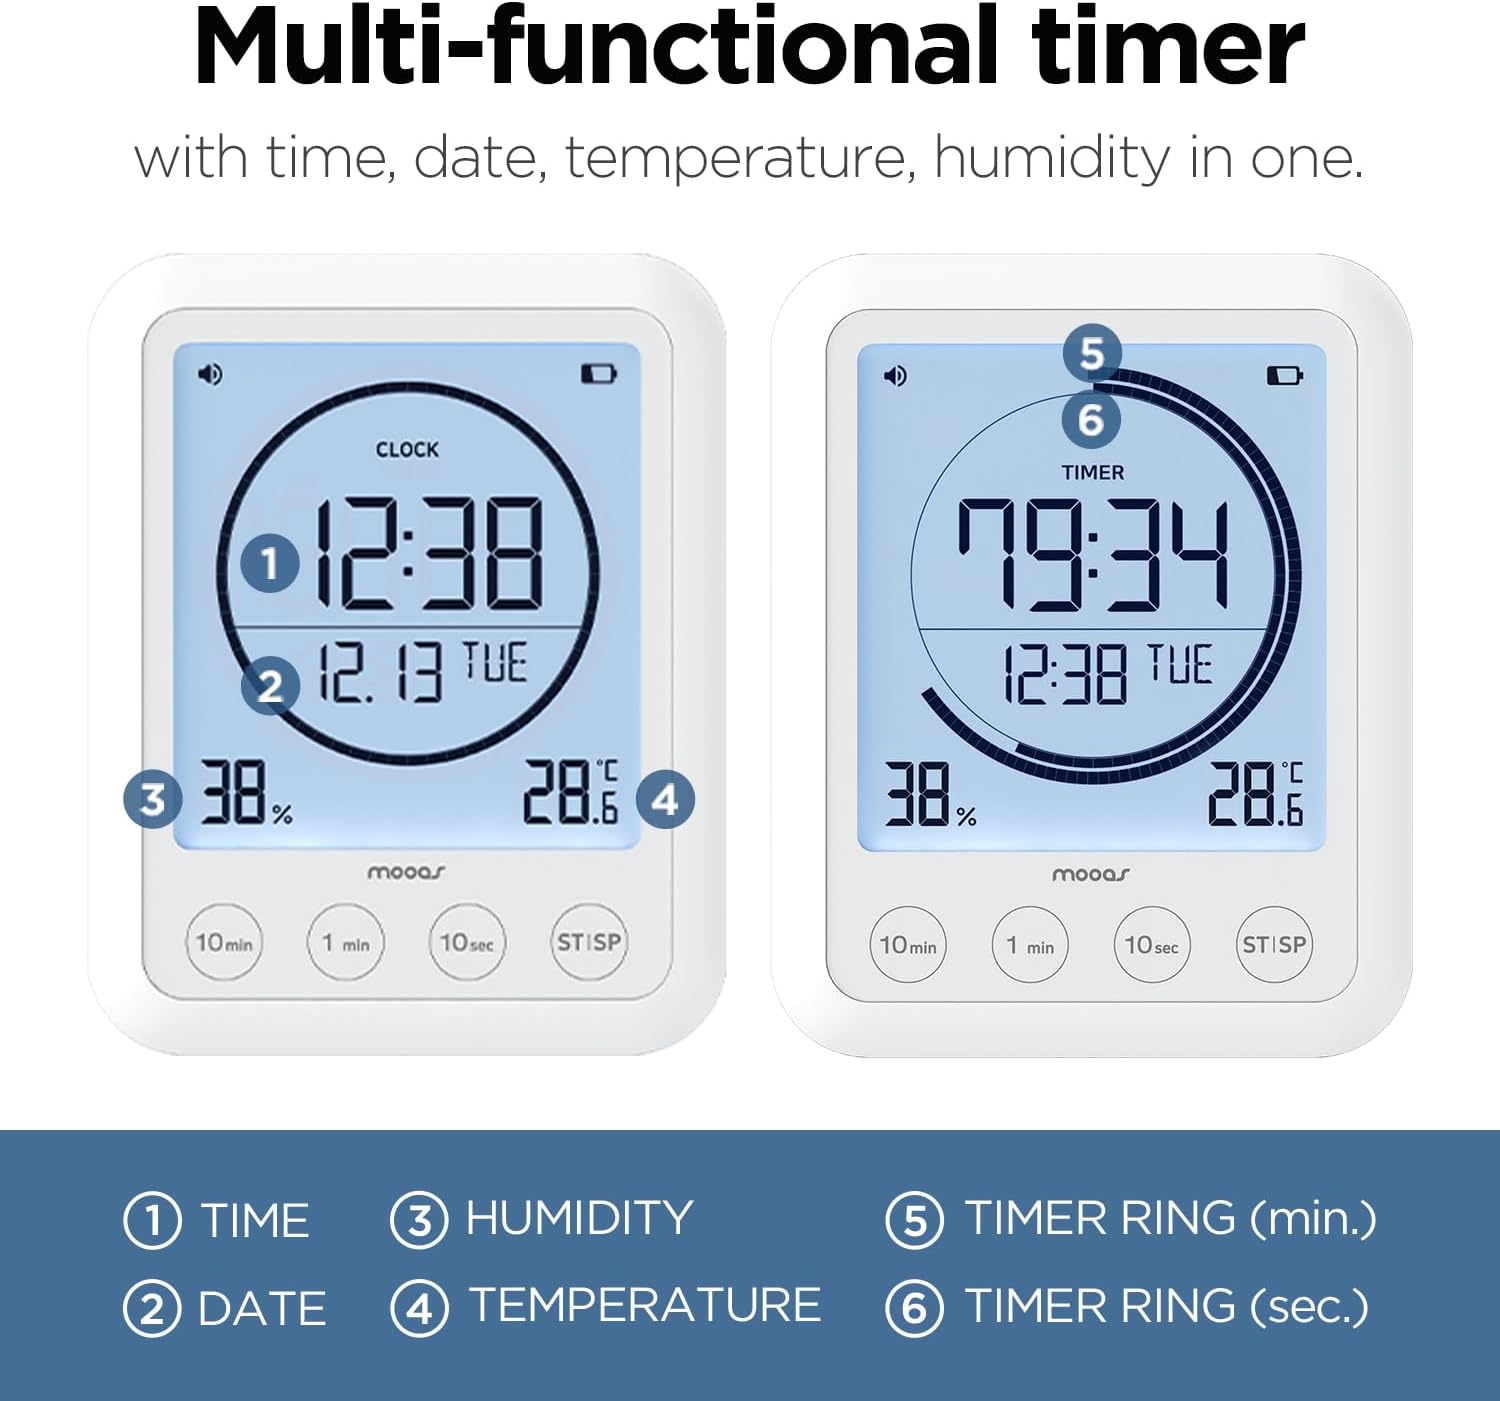
Image: The mooas Visual Timer Clock display, highlighting its various informational readouts.
3. Орнотуу
3.1 Батареяны орнотуу
Both the Multi-Hexagon Clock Timer and the Visual Timer Clock are battery-powered. Locate the battery compartment on the back or bottom of each device. Insert the required batteries (typically AAA or AA, refer to the compartment label) ensuring correct polarity (+/-). Close the battery compartment securely.
3.2 Initial Setup - Multi-Hexagon Clock Timer
- Күйгүзүү: After battery installation, the display should activate.
- Саатты орнотуу: Refer to the small buttons on the side or bottom of the device. Typically, a 'SET' or 'MODE' button allows you to cycle through time settings (hour, minute). Use '+' or '-' buttons to adjust values.
- Ойготкуч орнотуулары: Access alarm settings via the 'SET' or 'ALARM' button. Adjust alarm time and select between sound, vibration, or both.
- Арткы жарык: The backlight usually activates automatically when the device is moved or a button is pressed.
3.3 Initial Setup - Visual Timer Clock
- Күйгүзүү: The large LCD display will activate upon battery installation.
- Убакытты жана датаны коюу: Use the 'SET' or 'MODE' button to enter time and date adjustment mode. Use the adjustment buttons (e.g., '10min', '1min', '10sec') to change values for hour, minute, year, month, and day.
- Температура бирдиги: Look for a small button (often on the back or inside the battery compartment) to switch between Celsius (°C) and Fahrenheit (°F).
- Монтаждоо: Decide on your preferred placement. The Visual Timer Clock can stand on a flat surface using its integrated kickstand, be mounted on a wall using a nail or screw (not included), or attached to a metallic surface via its built-in magnets.
4. Иштөө нускамалары
4.1 Using the Multi-Hexagon Clock Timer
This timer is designed for intuitive operation by rotating its sides.
- Selecting a Preset Timer: Simply rotate the timer so that the desired preset time (e.g., 5, 10, 25, 30, 50, 60 minutes) faces upwards. The timer will automatically start counting down.
- Start/Pause/Reset:

Image: Demonstrating the Start, Pause, and Reset functions of the Multi-Hexagon Timer.
- Баштоо: Once a side is facing up, the timer starts automatically.
- Тыныгуу: To pause the countdown, place the timer on a neutral side (often indicated by a blank face or a specific icon) or press a designated button.
- Кайтаруу: To reset the timer, turn it to a different preset or press the reset button if available.
- Ойготкуч функциясы: When the timer reaches zero, the alarm will activate according to your settings (sound, vibration, or both). To stop the alarm, simply pick up or rotate the timer.
- Арткы жарык: The display features a backlight for improved visibility, especially in low-light conditions. It typically activates with movement or button press.
- Pomodoro Technique: The 25-minute preset is ideal for implementing the Pomodoro Technique for focused work intervals.
4.2 Using the Visual Timer Clock
This timer offers a clear display and button-based operation.
- Маалыматты көрсөтүү: The large LCD continuously shows:
- Current Time (1)
- Дата (2)
- Нымдуулук (3)
- Температура (4)
- Таймерлерди орнотуу: Use the dedicated buttons (e.g., '10min', '1min', '10sec') to set your desired countdown time. Pressing these buttons adds the respective time increments.
- Баштоо/токтотуу таймери: Press the 'ST/SP' (Start/Stop) button to begin or pause the countdown. When the timer reaches zero, an alarm will sound. Press 'ST/SP' again to stop the alarm.
- Жөнгө салынуучу Көлөмү: The timer features adjustable alarm volume. Refer to the side or back of the device for volume control buttons or a switch.
- Эсептөө таймери: If no countdown time is set and 'ST/SP' is pressed, the device may function as a count-up timer.
- Арткы жарык: The display is backlit for easy reading. The backlight typically activates when buttons are pressed.

Сүрөт: Мисamples of the Visual Timer Clock in various daily activities.
5. Техникалык тейлөө
- Тазалоо: Wipe the devices with a soft, dry, or slightly damp кездеме. Абразивдүү тазалагычтарды же эриткичтерди колдонбоңуз.
- Батареяны алмаштыруу: Replace batteries when the display dims or functions become erratic. Always use new batteries of the specified type and dispose of old batteries responsibly.
- Сактагыч: Store the timers in a cool, dry place away from direct sunlight and extreme temperatures when not in use for extended periods.
6. Кыйынчылыктарды
- Дисплей бош же күңүрт: Check battery installation. Replace with fresh batteries.
- Timer not starting/responding: Ensure batteries are correctly installed. For the Multi-Hexagon Timer, ensure a preset side is fully facing upwards. For the Visual Timer, ensure 'ST/SP' button is pressed.
- Inaccurate temperature/humidity readings (Visual Timer): Ensure the device is not placed near heat sources, vents, or in direct sunlight, which can affect sensor accuracy.
- Сигнализация иштебей/дирилдеп жатат: Check alarm settings to ensure the desired mode is selected. For the Visual Timer, check volume settings.
7. Техникалык шарттар
| Өзгөчөлүк | Деталь |
|---|---|
| Бренд | mooas |
| Дисплей түрү | Санарип |
| Стиль | Заманбап |
| Өзгөчө өзгөчөлүк | Adjustable Volume (Visual Timer) |
| Продукциянын өлчөмдөрү | 2.46"W x 2.36"H (Multi-Hexagon Timer) |
| Power Source | Батарея менен иштейт |
| Бөлмө түрү | Bathroom, Kitchen, Study |
| Форма | Hexagonal (Multi-Hexagon Timer) |
| Ички/тышкы колдонуу | Indoor |
| Батареялар камтылган | Ооба |
| Монтаж түрү | Tabletop, Wall Mount (Visual Timer) |
| Ойготкуч саат | Ооба |
| Иштөө режими | Электрдик |
| Frame Material | Пластик |
| Саат формасы | Көп дисплей |
| Суу өткөрбөйт рейтинги | IPX5 (Visual Timer) |
8. Кепилдик жана колдоо
For warranty information or technical support, please refer to the product packaging or contact mooas customer service through the retailer's platform where the product was purchased. Keep your purchase receipt for warranty claims.