
DORHEA ESP32-WROOM-32 3.5-inch LCD Module
ESP32 Development Board 3.5" LCD Display Screen User Manual
Модел: ESP32-WROOM-32 3.5-inch LCD Module | Бренд: DORHEA
1. Киришүү
The DORHEA ESP32 Development Board with a 3.5-inch LCD Display Screen is a versatile module designed for various embedded system applications. It integrates the powerful ESP32-WROOM-32 module, featuring dual-core MCU, Wi-Fi, and Bluetooth capabilities. The board includes a 3.5-inch resistive touch LCD with a 320x480 resolution, making it suitable for projects requiring graphical user interfaces and interactive controls.
This manual provides essential information for setting up, operating, maintaining, and troubleshooting your ESP32 Development Board. It is compatible with popular development environments such as Arduino IDE, ESP IDE, Micropython, and Mixly.
2. Негизги өзгөчөлүктөрү
- 3.5-inch color screen supporting 16-bit RGB 65K color display with 320x480 resolution.
- Integrated ESP32-WROOM-32 module as the main control, featuring a dual-core MCU, Wi-Fi, and Bluetooth functions.
- Main frequency up to 240MHz, with 520KB SRAM, 448KB ROM, and 4MB Flash memory.
- Resistive touch display, including LCD display screen, backlight control circuit, touch screen control circuit, speaker drive circuit, photosensitive circuit, and RGB-LED control circuit.
- Equipped with TF card interface, serial interface, temperature and humidity sensor interface (DHT11 compatible), and reserved IO ports.
- Supports development with Arduino IDE, ESP IDE, Micropython, and Mixly.
- Pre-programmed with a sample program from the factory for immediate use.
- Includes TF card slot for easy storage expansion.
- Provides Arduino library functions and sample programs to facilitate rapid secondary development.
- Supports one-click program download.
3. Продукт компоненттери жана андан ашыкview
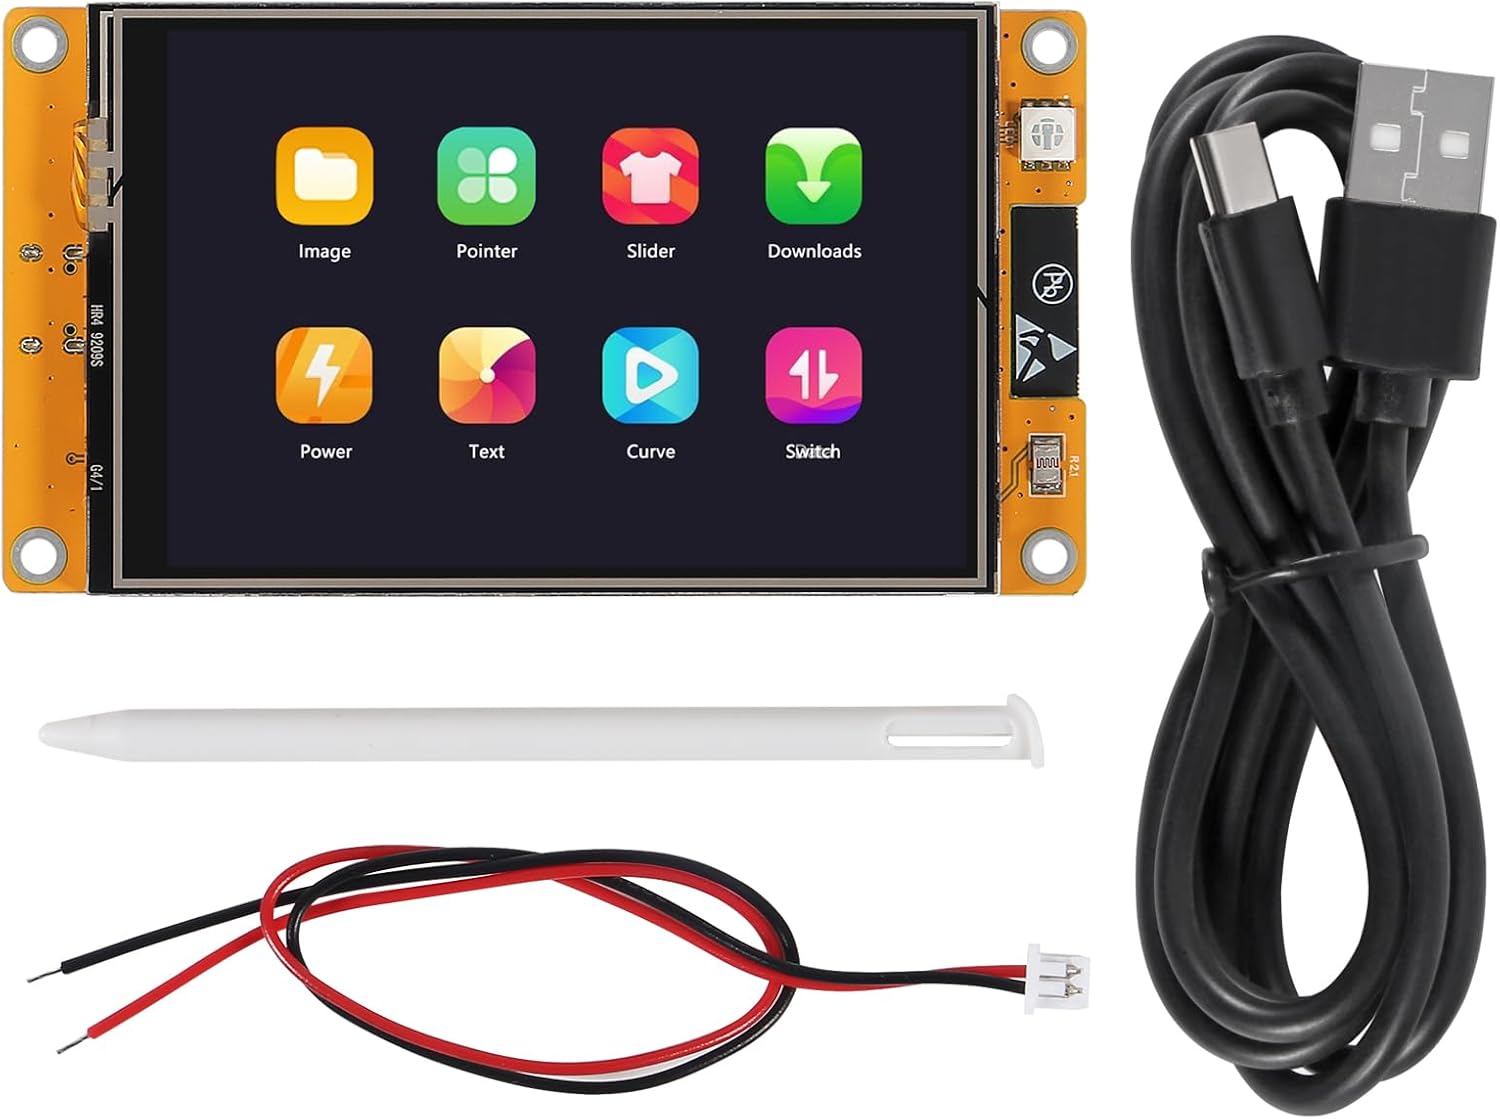
3.1-сүрөт: ESP32 Development Board with included accessories.
This image shows the ESP32 development board with its integrated 3.5-inch LCD display, a USB Type-C cable for power and data, and a white stylus for resistive touch input.

3.2-сүрөт: Алдыңкы жана арткы view коллегиянын
This image displays both the front (with the LCD screen) and the back (showing the ESP32-WROOM-32 module and other components) of the development board.
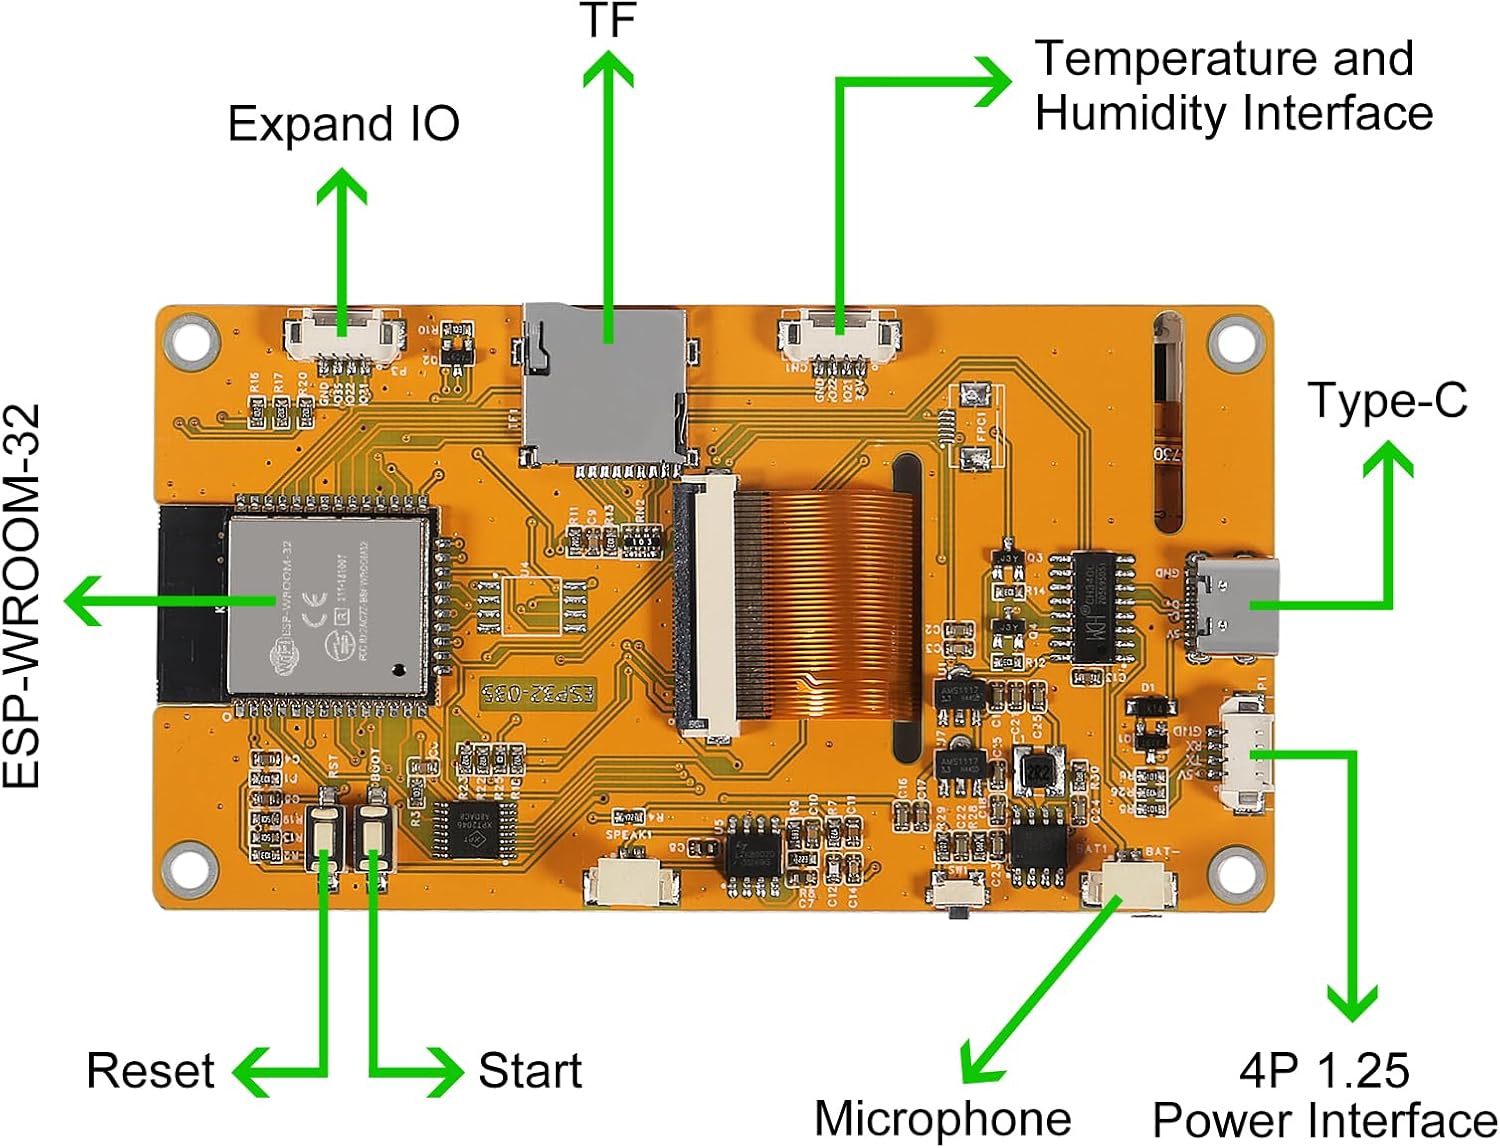
3.3-сүрөт: Labeled diagram of the ESP32 Development Board.
This diagram highlights key components on the back of the ESP32 board, including the ESP-WROOM-32 module, TF card slot, Expand IO, Temperature and Humidity Interface, Type-C port, 4P 1.25 Power Interface, Microphone, Reset button, and Start button.
4. Орнотуу колдонмосу
The ESP32 Development Board comes pre-programmed with a sample application, allowing for immediate use upon power-up. Follow these steps for initial setup:
- Кубат туташуу: Connect the provided USB Type-C cable to the Type-C port on the development board. Connect the other end of the cable to a 5V USB power source (e.g., computer USB port, USB wall adapter). The board will power on automatically.
- Баштапкы дисплей: Upon successful power-up, the 3.5-inch LCD will display the pre-loaded sample program interface.
- TF картасы (кошумча): If your application requires additional storage, insert a formatted TF card into the designated TF card slot on the back of the board.
- Стилус колдонуу: Use the included stylus for precise interaction with the resistive touch screen.
5. Иштөө жана программалоо
The ESP32 Development Board is designed for flexible programming and operation across various integrated development environments (IDEs).
5.1. Programming Environments
The board supports development using:
- Arduino IDE: A popular choice for beginners and experienced users due to its extensive libraries and community support.
- ESP IDE: Espressif's official IoT Development Framework, offering advanced features for ESP32 development.
- Микропитон: Allows programming the ESP32 using Python, simplifying development for many applications.
- Mixly: A graphical programming environment based on Blockly, ideal for educational purposes and visual programming.
5.2. Getting Started with Arduino IDE
To program the ESP32 Development Board using Arduino IDE, you will need to install the ESP32 board support package. The manufacturer provides Arduino library functions and sample programs to facilitate rapid secondary development.
- Arduino IDE орнотуу: Download and install the latest version of Arduino IDE from the official webсайт.
- Add ESP32 Board Manager URL: барыңыз File > Параметрлер in Arduino IDE. In the 'Additional Boards Manager URLs' field, add the URL for ESP32 board support. Refer to the ESP32 Arduino Core documentation for the most current URL.
- Install ESP32 Boards: барыңыз Куралдар > Башкармалык > Башкармалык менеджери... Издөө 'ESP32' деп терип, 'esp32 by Espressif Systems' пакетин орнотуңуз.
- Тактаны жана портту тандаңыз: After installation, select your specific ESP32 board model (e.g., 'ESP32 Dev Module') from Куралдар > Такта. Then, select the correct COM port for your connected board from Куралдар > Порт.
- Upload Program: катары ачууample program or write your own code. Click the 'Upload' button to compile and flash the program to your ESP32 board. The board supports one-click program download.

5.1-сүрөт: Arduino IDE Preferences for Board Manager URLs.
A screenshot of the Arduino IDE's preferences window, highlighting the 'Additional Boards Manager URLs' field where users can add URLs for ESP32 board support.

5.2-сүрөт: Arduino IDE Tools Menu.
A screenshot of the Arduino IDE's 'Tools' menu, with options like 'Serial Monitor' and board-specific settings visible, indicating where to configure and interact with the ESP32 board.

5.3-сүрөт: Board displaying code.
A hand holds the ESP32 development board, which is displaying lines of code on its 3.5-inch screen, demonstrating its programming capabilities.

5.4-сүрөт: Board with stylus.
The ESP32 development board is shown with its 3.5-inch LCD displaying a graphical user interface, accompanied by the white stylus for touch interaction.

5.5-сүрөт: Physical dimensions of the board.
This image provides the physical dimensions of the ESP32 development board, showing a width of 55mm (2.16 inches) and a length of 101mm (3.97 inches).

5.6-сүрөт: Board in a typical development setup.
The ESP32 development board is placed on a desk next to a laptop, illustrating a typical development environment setup.
6. Техникалык тейлөө
Proper care and maintenance will extend the lifespan of your ESP32 Development Board:
- Колдонуу: Handle the board by its edges to avoid touching sensitive components or the screen surface directly.
- Тазалоо: Use a soft, dry, lint-free cloth to clean the screen and board. For stubborn smudges on the screen, a slightly damp cloth with distilled water can be used, ensuring no liquid enters the board's components.
- Сактагыч: Store the board in a dry, cool environment, away from direct sunlight, extreme temperatures, and high humidity.
- Өчүрүү: Always disconnect power before making any physical connections or disconnections to the board.
- Статикалык абалдан качыңыз: Take precautions against electrostatic discharge (ESD) when handling the board, especially in dry environments.
7. Кыйынчылыктарды
If you encounter issues with your ESP32 Development Board, refer to the following common problems and solutions:
| Көйгөй | Мүмкүн себеп | Чечим |
|---|---|---|
| Board does not power on / No display | Loose USB connection, insufficient power, faulty cable. | Ensure the USB Type-C cable is securely connected to both the board and the power source. Try a different USB port or power adapter. Verify the cable is not damaged. |
| Display is blank or shows garbled characters | Incorrect program uploaded, display connection issue, software error. | Re-upload a known working sample program. Check for any loose ribbon cable connections between the LCD and the board. Ensure your code correctly initializes the display. |
| Cannot upload code to the board | Incorrect COM port selected, wrong board type selected in IDE, driver issues, boot mode not activated. | Verify the correct COM port is selected in your IDE (e.g., Arduino IDE: Tools > Port). Ensure the correct ESP32 board type is selected. Install necessary USB drivers if prompted by your operating system. For some ESP32 boards, you may need to press and hold the 'BOOT' button while pressing 'RESET' before uploading. |
| Touch screen is unresponsive or inaccurate | Calibration issue, physical damage, software not handling touch input. | Ensure your program includes touch screen initialization and calibration routines. Check for any physical damage to the screen. Use the provided stylus for optimal resistive touch input. |
| Wi-Fi or Bluetooth not working | Incorrect firmware, antenna issues, software configuration. | Verify your uploaded program correctly initializes and configures Wi-Fi/Bluetooth. Ensure there are no physical obstructions or damage to the onboard antenna. Check your network credentials. |
8. Техникалык шарттар
| Өзгөчөлүк | Спецификация |
|---|---|
| Дисплей өлчөмү | 3.5 дюйм |
| Display Resolution | 320 x 480 пиксель |
| Түс тереңдиги | 16-bit RGB (65K colors) |
| Типти басыңыз | Резистивдик тийүү |
| Негизги башкаруу модулу | ESP32-WROOM-32 |
| CPU | Dual-core MCU |
| Негизги жыштык | 240 МГц чейин |
| SRAM | 520KB |
| ROM | 448KB |
| Flash өлчөмү | 4MB |
| Зымсыз байланыш | Wi-Fi, Bluetooth |
| Interfaces | TF card, Serial, DHT11 (Temperature/Humidity), Reserved IO, Type-C, 4P 1.25 Power, Microphone |
| Power Input | USB Type-C (5V) |
| Пакеттин өлчөмдөрү | 1.9 x 1 x 0.3 дюйм |
| Элемент Салмагы | 0.48 унция |
| Өндүрүүчү | DORHEA |
Ask a question about this manual
Ask about setup, troubleshooting, compatibility, parts, safety, or missing instructions. Manuals+ will review the question and use this page’s manual context to help answer it.