1. Киришүү
This manual provides detailed instructions for the setup, operation, maintenance, and troubleshooting of your TERRAMASTER T12-500 Pro Network Attached Storage (NAS) device. Please read this manual thoroughly before using the product to ensure proper functionality and data security.
2. Продукт бүтүп калдыview
2.1 Негизги өзгөчөлүктөрү
- Процессор: Intel Core i7-1255U (10 cores, 12 threads, up to 4.7GHz)
- Графика: Intel Iris Xe Graphics (1.25GHz dynamic frequency)
- Эстутум: 16GB DDR5 RAM (upgradable to 64GB)
- Тармак: Dual 10 Gigabit Ethernet ports (up to 20Gbps with SMB multichannel)
- Storage Bays: 12-bay for 3.5-inch SATA hard drives (up to 288TB total capacity with 24TB HDDs)
- SSD Cache: Two M.2 NVMe slots for storage efficiency with Hyper Cache
- RAID колдоо: Single, RAID 0, 1, 5, 6, 10, and TerraMaster TRAID/TRAID+
- Операция системасы: TOS 6
- Камдык чечимдер: TerraMaster Business Backup Suite (BBS) including Centralized Backup, TerraSync, Duple Backup, CloudSync, and Snapshot
- Коопсуздук: System Security Enhanced (SPC), Ransomware Protection features
2.2 Алдыңкы жана арткы панелдер
The front panel features the drive bays and power indicator. The rear panel includes various ports for connectivity and cooling fans.
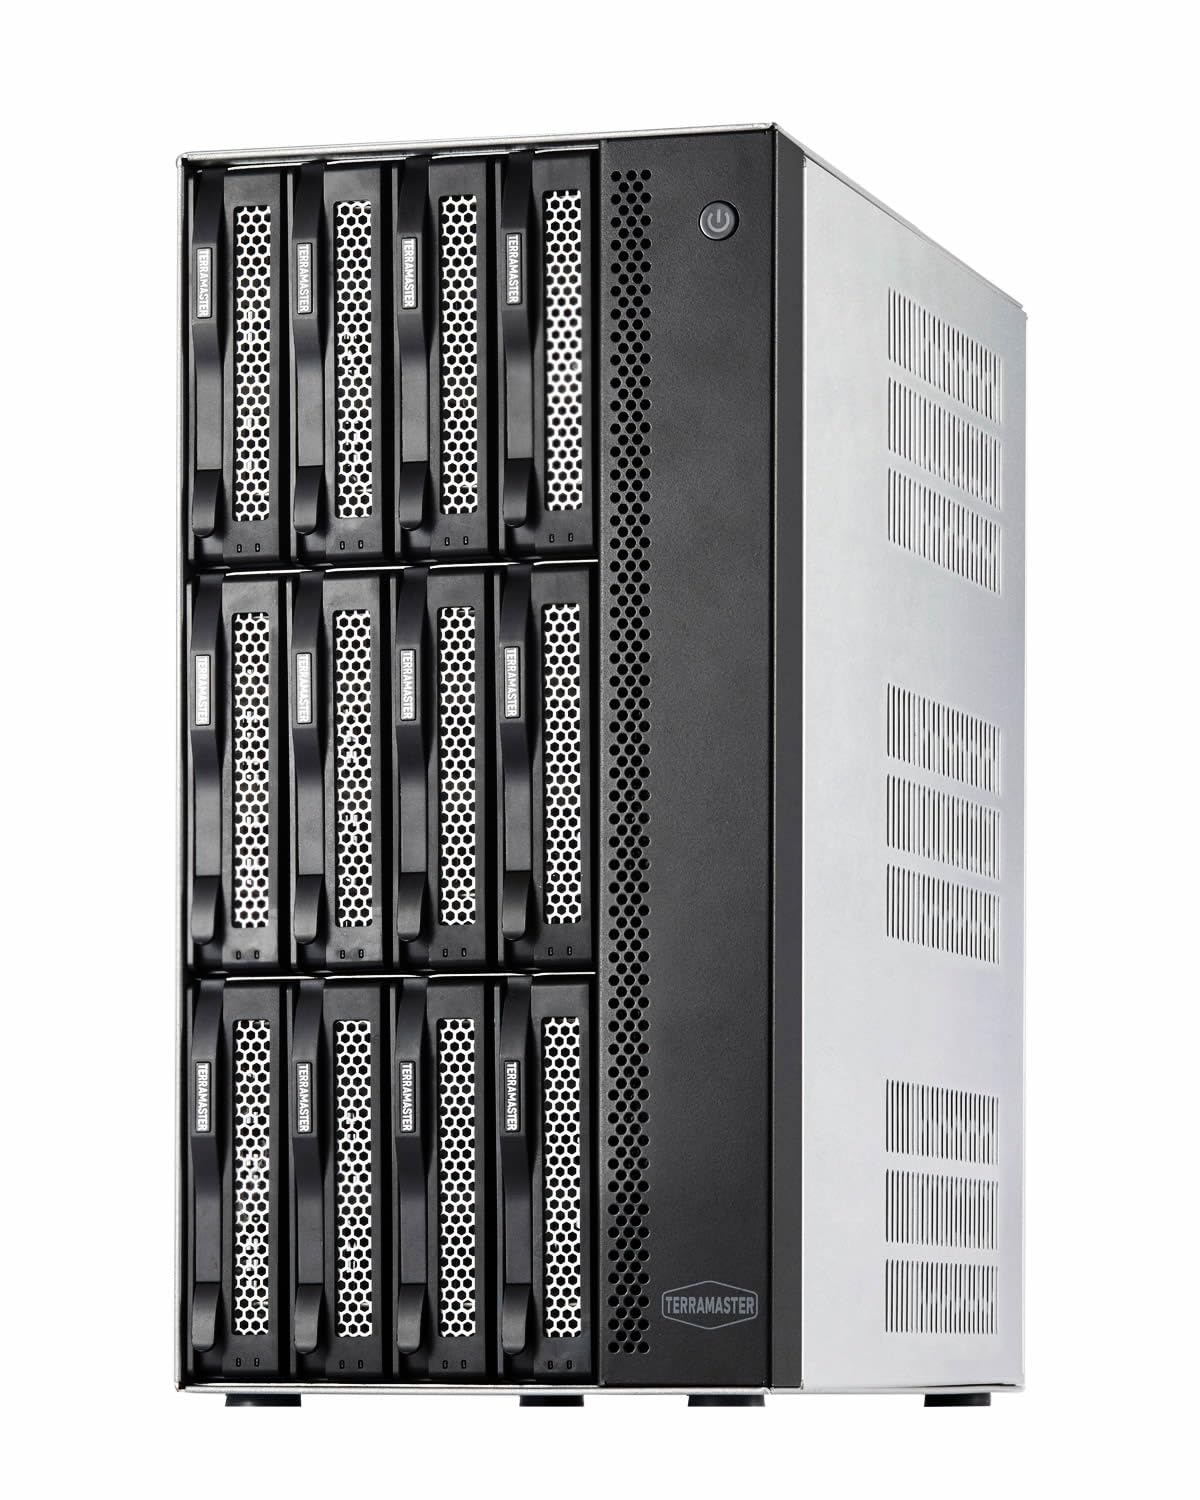
Сүрөт 2.2.1: Алдыңкы view of the TERRAMASTER T12-500 Pro NAS, showing the 12 hot-swappable drive bays.

2.2.2-сүрөт: Арткы view of the TERRAMASTER T12-500 Pro NAS, highlighting the dual 10GbE ports, USB ports, HDMI, and cooling fans.
3. Орнотуу
3.1 Аппараттык камсыздоону орнотуу
3.1.1 Installing Hard Drives/SSDs
The T12-500 Pro supports 3.5-inch SATA hard drives and 2.5-inch SATA SSDs. Ensure the drives are compatible with the system. Slide each drive into an empty bay until it clicks into place. For M.2 NVMe SSDs, refer to the internal installation guide.

Figure 3.1.1: The TERRAMASTER T12-500 Pro with hard drives securely installed in the front bays.
3.1.2 RAM and M.2 SSD Installation/Upgrade
The device comes with 16GB DDR5 RAM and can be upgraded to 64GB. It also features two M.2 NVMe slots for SSD cache. To access these components, you may need to open the chassis. Carefully follow the instructions below for installation.

Figure 3.1.2: Illustrates the process of installing RAM and M.2 SSDs onto the motherboard of the NAS for memory and cache upgrades.
Видео 3.1.1: Бүттүview of the TERRAMASTER T12-500 Pro NAS internal components, including the motherboard, RAM, and M.2 slots. This video provides a visual guide to the hardware layout.
3.2 Тармактык туташуу
Connect the NAS to your network using the dual 10GbE Ethernet ports. For optimal performance, connect to a 10GbE switch or directly to a compatible workstation. Ensure your network infrastructure supports 10GbE for maximum throughput.
3.3 Initial Power On and TOS 6 Installation
After installing the drives and connecting to the network, power on the device. Follow the on-screen instructions or refer to the quick installation guide to install the TerraMaster Operating System (TOS 6). TOS 6 offers a user-friendly interface for managing your NAS.
Figure 3.3.1: The TOS 6 operating system interface, designed for user-friendly management and enhanced security.
3.4 RAID конфигурациясы
The T12-500 Pro supports various RAID levels (0, 1, 5, 6, 10) and TerraMaster's proprietary TRAID/TRAID+. TRAID offers flexible disk array management, including automatic combination of disk space, disk failure redundancy protection, reduced disk space waste, and automatic capacity expansion and migration. Configure your preferred RAID level during initial setup or via the TOS 6 interface.

Figure 3.4.1: A comparison illustrating the higher disk space utilization offered by TRAID and TRAID+ compared to traditional RAID levels like RAID5 and RAID6.
4. УИАны иштетүү
4.1 File Management and Access
Сиздин кирүү files through the TOS 6 web interface or via network protocols such as SMB, AFP, NFS, FTP, SFTP, WebDAV, and iSCSI. The NAS supports cross-platform file services, allowing seamless integration with Windows, Mac, Linux, Android, and iOS devices.
4.2 Backup Solutions (TerraMaster Business Backup Suite)
The T12-500 Pro includes the TerraMaster Business Backup Suite (BBS) for comprehensive data protection.
- Centralized Backup: Consolidate data from multiple devices (Windows, Mac, physical servers, virtual machines) to the NAS.
- TerraSync: Синхрондоштуруу files between your NAS and client devices (Windows, Mac) or between multiple NAS devices.
- Duple Backup: Create off-site backups to another NAS or cloud storage for disaster recovery.
- CloudSync: Synchronize data with various cloud storage services.
- Сүрөт: Protect against ransomware with point-in-time recovery.

Figure 4.2.1: A comprehensive diagram illustrating the full-scenario backup and disaster recovery capabilities of the TerraMaster Business Backup Suite.
4.3 Multimedia Server
Transform your T12-500 Pro into a powerful multimedia server. Effortlessly stream 4K content and manage your media library with versatile multimedia support.
4.4 Virtualization Support
The NAS excels in fast and simple virtualization, supporting various operating systems including Windows 11, 10, 8.x, XP, Windows Server (2016, 2012, 2008), Linux, Arch, CentOS, ChromeOS, Debian, Fedora, and Docker.
5. Техникалык тейлөө
5.1 Системаны жаңыртуу
Regularly check for and install TOS updates to ensure optimal performance, security, and access to new features. Updates can be managed through the TOS 6 web интерфейс.
5.2 Disk Health Monitoring
Utilize the disk management tools within TOS 6 to monitor the health and status of your installed hard drives and SSDs. Proactive monitoring helps prevent data loss due to drive failure.
5.3 Data Backup Best Practices
Implement a robust backup strategy, such as the 3-2-1 rule: keep at least three copies of your data, store two backup copies on different storage media, and keep one backup copy off-site.

Figure 5.3.1: The 3-2-1 backup rule, a fundamental strategy for ensuring data safety and recoverability.
5.4 Тазалоо
Regularly clean the exterior of the NAS with a soft, dry cloth. Ensure ventilation openings are free from dust to maintain optimal cooling performance.

5.4.1-сүрөт: Ички view highlighting the innovative cooling system with smart fans and vents designed for efficient heat dissipation.
6. Кыйынчылыктарды
6.1 Жалпы маселелер
- Кубат жок: Check power cable connections and power outlet. Verify the power supply unit (PSU) is functioning.
- Тармакка туташуу маселелери: Ensure Ethernet cables are securely connected. Verify network settings in TOS 6. Check router/switch status.
- Диск аныкталган жок: Ensure drives are properly seated in their bays. Check drive health in TOS 6.
- Жай аткаруу: Check network bandwidth, CPU/RAM usage in TOS 6. Consider adding M.2 SSD cache or upgrading RAM.
- Access Problems: Verify user permissions and network share settings in TOS 6.
6.2 System Security and Ransomware Protection
The T12-500 Pro incorporates multiple security measures to protect your data.
- TerraMaster File Системанын сүрөтү
- OTP Two-Factor Authentication
- DoS коргоо
- SSL Security Certificate
- Security Isolation Mode
- Firewall
- Enable Auto-Blocking

Figure 6.2.1: ашыкview of the comprehensive security features designed to protect the NAS from ransomware and other threats.
7. Техникалык шарттар
| Өзгөчөлүк | Деталь |
|---|---|
| Бренд | TERRAMASTER |
| Модел | T12-500 Pro |
| Процессор | Intel Core i7-1255U (10-Cores, 12-Threads, up to 4.7GHz) |
| RAM | 16GB DDR5 (upgradable to 64GB) |
| Ethernet порттору | Dual 10GbE |
| M.2 Slots | 2 x NVMe |
| Drive Bays | 12 x 3.5-inch/2.5-inch SATA |
| Max Capacity | 288TB (with 24TB HDDs) |
| RAID колдоо | Single, RAID 0, 1, 5, 6, 10, TRAID/TRAID+ |
| Өлчөмдөр (D x W x H) | 13.15"D x 6.42"W x 11.61"H |
| Салмагы | 20 фунт |
| Материал | Металл |
| Шайкеш түзмөктөр | Android, Linux, Mac, Windows, iOS |
8. Кепилдик жана колдоо
8.1 Продукциянын кепилдиги
The TERRAMASTER T12-500 Pro NAS Storage comes with a 2-year manufacturer's warranty. Please retain your proof of purchase for warranty claims. The warranty covers defects in materials and workmanship under normal use.
8.2 Техникалык колдоо
For technical assistance, troubleshooting, or further inquiries, please visit the official TERRAMASTER support webсайт. Ал жерден кардарларды тейлөө боюнча көп берилүүчү суроолорду, драйверлерди жүктөп алууну жана байланыш маалыматын таба аласыз.