
Продукт бүттүview
The DORHEA ESP32 Development Board integrates a 3.5-inch LCD display, offering a versatile platform for various embedded projects. It features the powerful ESP32-WROOM-32 module, providing Wi-Fi and Bluetooth connectivity, making it suitable for IoT applications, smart home interfaces, and educational purposes.
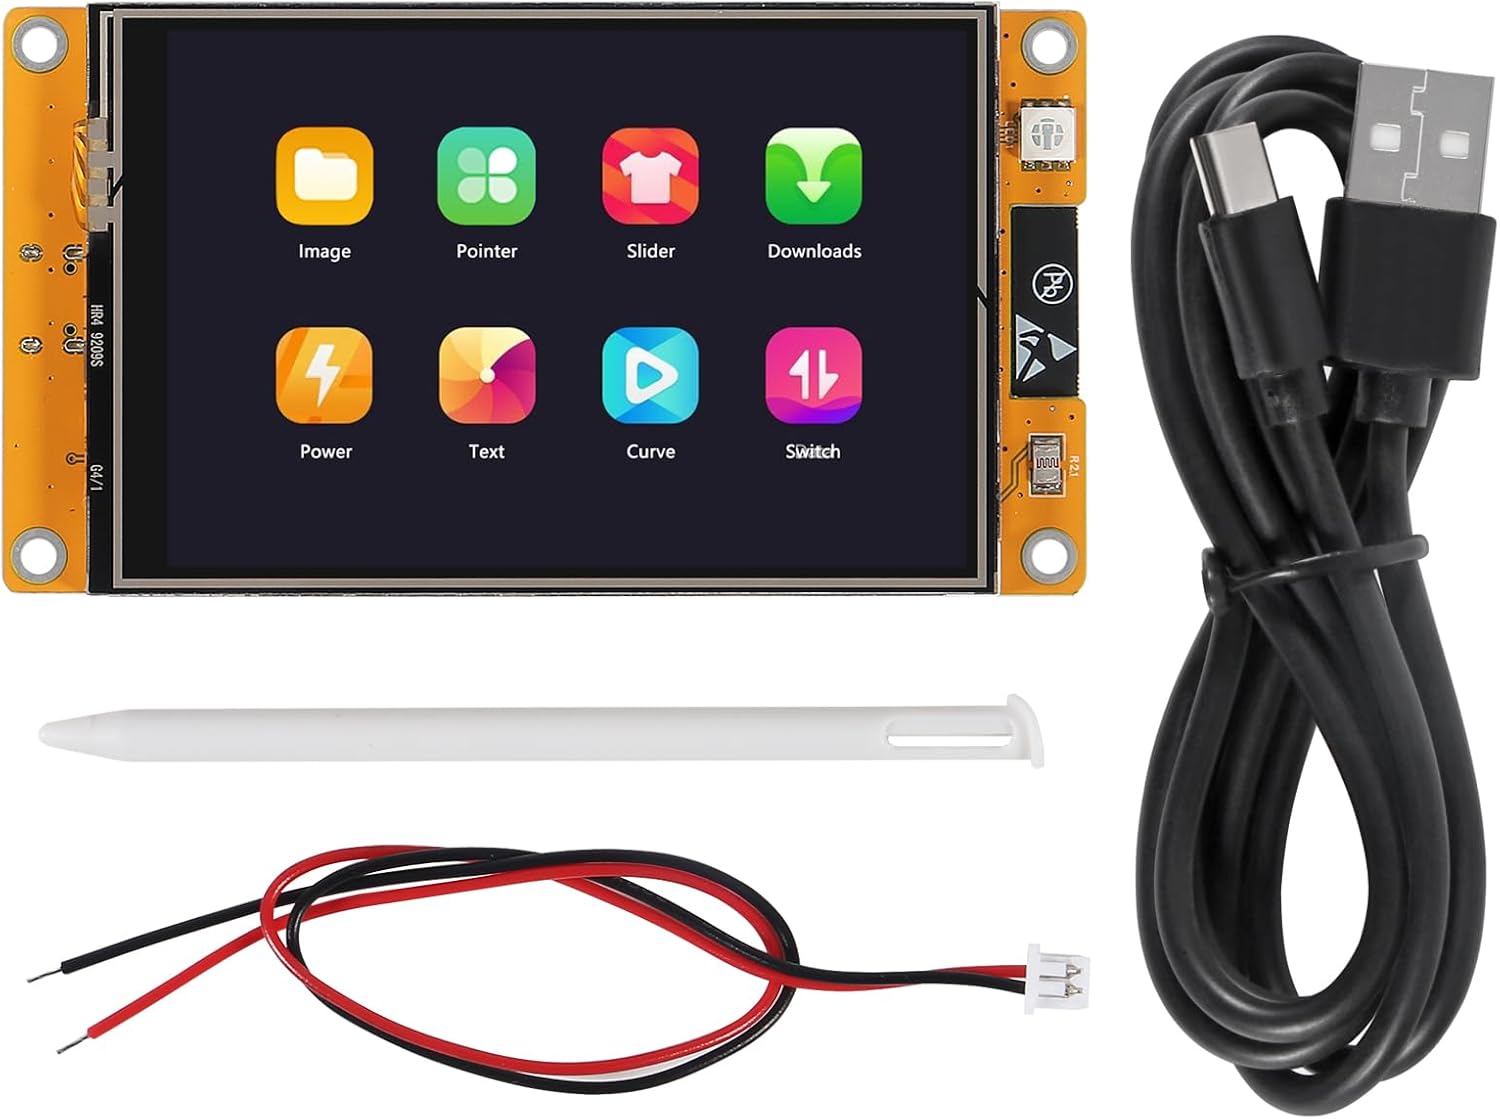
Image: The ESP32 Development Board, including the 3.5-inch LCD display, a white stylus, and a USB-C data cable.
- Дисплей: 3.5-inch color screen with 320x480 resolution, supporting 16-bit RGB 65K color display. Features a resistive touch interface.
- Main Control: ESP32-WROOM-32 module, a dual-core MCU with integrated Wi-Fi and Bluetooth functions. Operates at up to 240MHz, with 520KB SRAM, 448KB ROM, and 4MB Flash memory.
- Интегралдык компоненттер: Includes LCD display, backlight control, touch screen control, speaker drive, photosensitive circuit, and RGB-LED control circuits.
- Интерфейстер: Equipped with a TF card interface, serial interface, temperature and humidity sensor interface (DHT11 compatible), reserved IO ports, Type-C USB port, 4P 1.25 power interface, and a microphone.
- Development Support: Compatible with Arduino IDE, ESP IDE, Micropython, and Mixly. Comes with a pre-programmed sample and supports one-click program download.
Орнотуу жана баштапкы конфигурация
This section guides you through the initial setup of your ESP32 Development Board. The board comes with a sample program pre-installed, allowing for immediate use upon connection.
1. Powering On and Basic Functionality
- Connect the provided USB-C cable to the Type-C port on the development board and to a power source (e.g., computer USB port or USB power adapter).
- The board will power on, and the pre-programmed sample application (often an LVGL demo) will display on the screen.

Image: The ESP32 board in use, demonstrating its display capabilities.
2. Component Identification and Pinout
Understanding the board's layout and pin assignments is crucial for custom development. Refer to the diagram below for key component locations and common pin definitions.
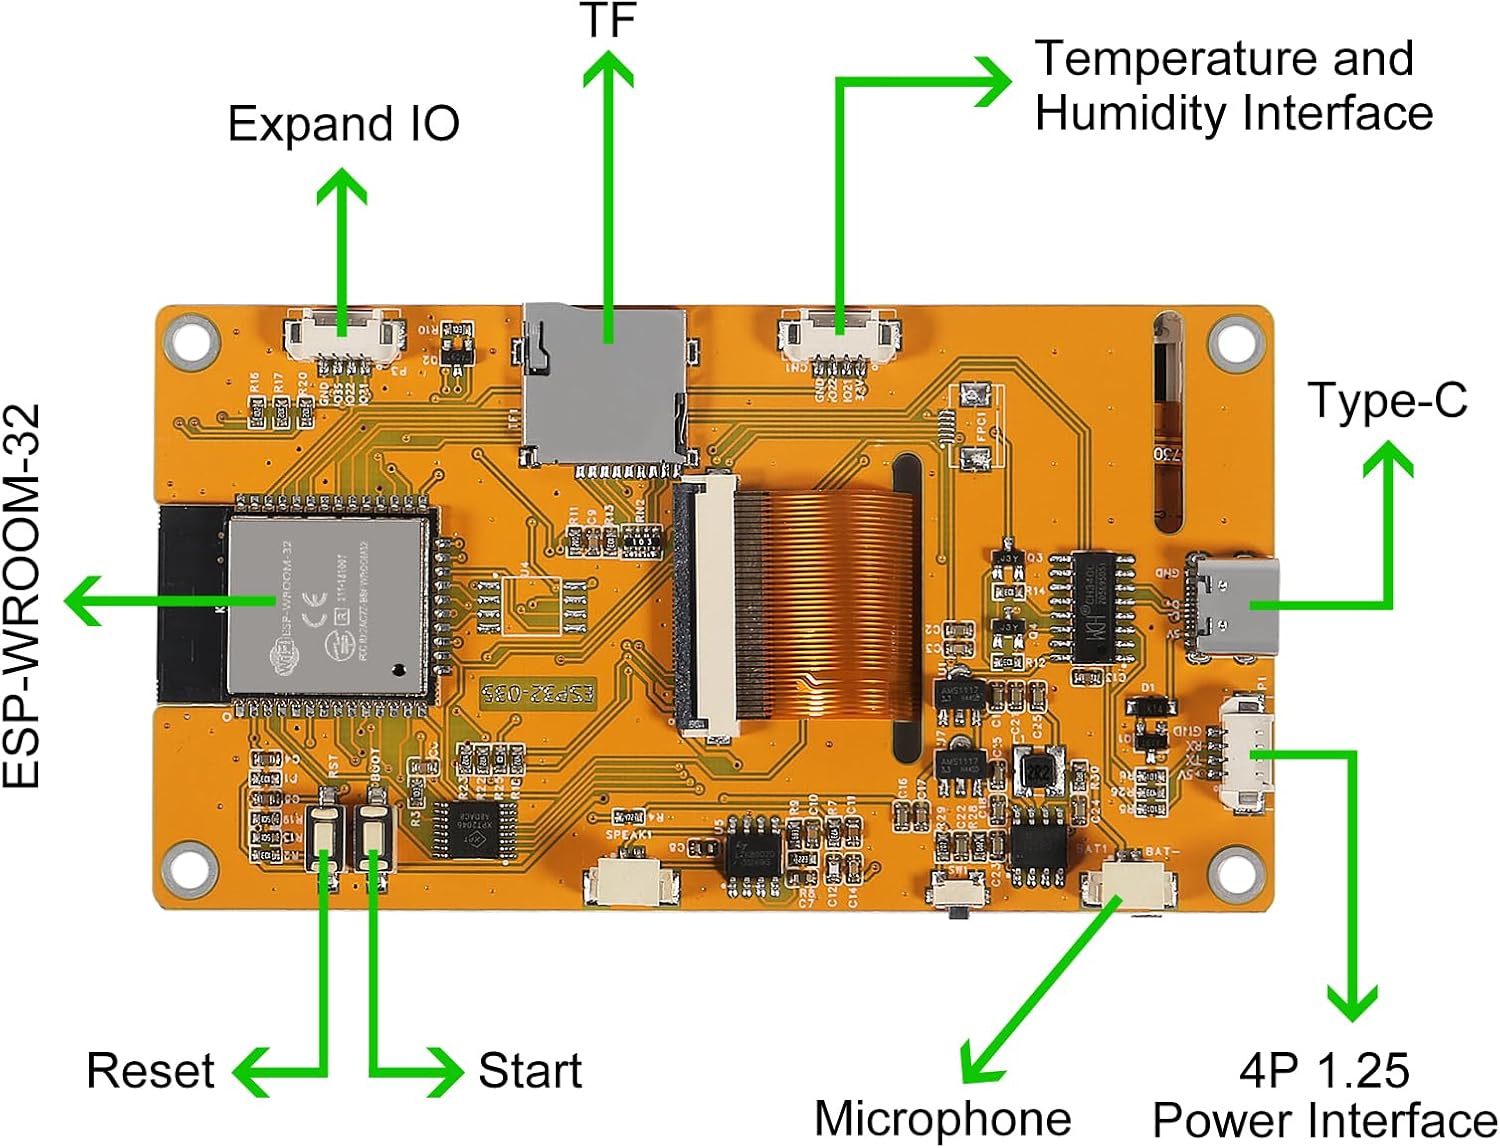
Сүрөт: Арткы бетинин чоо-жайы view of the ESP32 Development Board, highlighting various interfaces and components.
Key Interfaces:
- ESP-WROOM-32: The main microcontroller module.
- TF карта уячасы: Кеңейтилүүчү сактагыч үчүн.
- Expand IO: General Purpose Input/Output pins for connecting external sensors and modules.
- Temperature and Humidity Interface: Dedicated port, compatible with DHT11 sensors.
- C түрү: USB port for power and data communication.
- Микрофон: Аудио киргизүү үчүн орнотулган микрофон.
- 4P 1.25 Power Interface: Альтернативдүү кубат киргизүү.
- Калыбына келтирүү баскычы: Resets the ESP32 module.
- Баштоо баскычы: Used for entering bootloader mode during firmware flashing.
3. Development Environment Setup (Arduino IDE Exampле)
To develop custom applications, you will need to set up a development environment. Arduino IDE is a popular choice due to its ease of use and extensive library support.
- Arduino IDE орнотуу: Download and install the latest version from the official Arduino webсайт.
- Add ESP32 Board Manager URL:
- барыңыз File > Параметрлер in Arduino IDE.
- "Кошумча кеңештердин менеджери" бөлүмүндө URLs" field, add:
https://raw.githubusercontent.com/espressif/arduino-esp32/gh-pages/package_esp32_index.json - Click OK.

Image: Arduino IDE Preferences window, illustrating the location for adding the ESP32 Boards Manager URL.
- Install ESP32 Boards:
- барыңыз Куралдар > Башкармалык > Башкармалык менеджери...
- Издөө "esp32" and install the "esp32 by Espressif Systems" package.
- Install Required Libraries: For display and touch functionality, install the following libraries via Эскиз > Китепкананы кошуу > Китепканаларды башкаруу...:
- Adafruit GFX китепканасы
- TFT_eSPI (or similar ILI9341 compatible library, though the display is 320x480, not 240x320 as sometimes mentioned for ILI9341)
- XPT2046_Touchscreen by Paul Stoffregen (for resistive touch control)
- Тактаны жана портту тандаңыз:
- барыңыз Куралдар > Такта and select "ESP32 Dev Module" or a similar ESP32 board.
- барыңыз Куралдар > Порт and select the COM port corresponding to your connected ESP32 board.

Image: Arduino IDE Tools menu, showing options for board and port selection.
4. Pin Definitions for Display and Touch (Common Configuration)
The following pin definitions are commonly used for the display and touch controller. These may need adjustment based on specific library configurations or board revisions. The touch controller is typically an XPT2046.
// For the TFT display (320 x 480 resolution)
#define DC 2
#define CLK 14
#define TFT_CS 15 // TFT display Chip Select
#define MOSI 13
#define MISO 12
#define TFT_BACKLIGHT 27
#define TFT_RST -1 // Use -1 for no hardware reset pin if not connected

// For the XPT2046 Touch Controller
#define XPT2046_IRQ 36
#define XPT2046_CS 33 // Dedicated Chip Select for the touch controller
Ensure these pin definitions are correctly configured in your Arduino sketches or other development environments.
Operating the Development Board
Once configured, the ESP32 Development Board can be operated for various applications. Its primary function is to provide a visual and interactive interface for your ESP32 projects.
1. Interacting with the Resistive Touch Screen
The 3.5-inch LCD features a resistive touch screen. Use the provided stylus or a fingernail to interact with on-screen elements. Resistive touch screens detect pressure, so a firm but gentle press is usually sufficient.
- Калибрлөө: For accurate touch response, especially after initial setup or if touch input seems off, touch screen calibration may be required. Many touch libraries include calibration examples.
- Жооптуулук: The speed of display updates and touch response can vary depending on the libraries used and the complexity of the graphics being rendered. Optimizing SPI speeds and using efficient drawing routines can improve performance.
2. Utilizing Onboard Interfaces
- TF карта уячасы: Insert a microSD card (formatted as FAT32) into the TF card slot for data logging, storing images, or loading application resources. Libraries like the SD library for Arduino can be used to interface with the card.
- Сериялык интерфейс: The USB-C port provides a serial communication interface, allowing you to send and receive data from your computer for debugging or data exchange. Use the Serial Monitor in Arduino IDE.
- DHT11 Interface: Connect a DHT11 temperature and humidity sensor directly to the dedicated interface for environmental monitoring applications.
- Expand IO Ports: These pins provide access to the ESP32's GPIOs, enabling connection to a wide range of external sensors, actuators, and other electronic components. Refer to the ESP32 datasheet for specific pin capabilities.
- Микрофон: The integrated microphone can be used for audio input, enabling sound detection or simple voice control applications.
Техникалык тейлөө жана кам көрүү
Proper care and maintenance will ensure the longevity and reliable operation of your ESP32 Development Board.
- Колдонуу: Always handle the board by its edges to avoid touching electronic components, which can be sensitive to static electricity and oils from your skin.
- Тазалоо: Use a soft, dry, lint-free cloth to gently wipe the screen and board. For stubborn marks on the screen, a slightly dampened cloth with distilled water can be used, ensuring no liquid enters the board's components. Do not use harsh chemicals or abrasive materials.
- Сактагыч: Store the board in a dry, cool environment, away from direct sunlight, extreme temperatures, and high humidity. If not in use for extended periods, consider storing it in an anti-static bag.
- Электр камсыздоо: Always use a stable 5V DC power supply via the USB-C port. Avoid using power sources that exceed the recommended voltage же учурдагы.
- Курчап турган чөйрөнү коргоо: Protect the board from dust, dirt, and liquids. Avoid exposing it to strong vibrations or impacts.
Проблемаларды чечүү
This section addresses common issues you might encounter with your ESP32 Development Board.
- Issue: Board does not power on or display anything.
- Ensure the USB-C cable is securely connected to both the board and the power source.
- Try a different USB-C cable or power source to rule out cable/power supply issues.
- Verify that the power source provides sufficient current (typically 500mA to 1A).
- Issue: Unable to upload code (flashing issues).
- Ensure the correct COM port is selected in your IDE (e.g., Arduino IDE).
- Verify that the correct ESP32 board type is selected in your IDE.
- During upload, you may need to press and hold the Баштоо (Boot) button on the board, then press and release the Калыбына келтирүү button, and then release the Баштоо button when the upload begins. Some boards automatically enter bootloader mode.
- Check for driver issues. Install the necessary USB-to-serial drivers (e.g., CP210x or CH340G, depending on the chip used on the board, though often automatically installed).
- If stuck in a "demo mode" or previous program, a full erase and re-flash might be necessary. This can often be done via esptool.py or an option in your IDE.
- Issue: Touch screen is unresponsive or inaccurate.
- Ensure the XPT2046 touch controller library is correctly installed and initialized in your code with the correct pin definitions.
- Perform touch screen calibration. Many libraries provide example sketches for calibration.
- Remember this is a каршылык көрсөтүүчү touch screen, requiring pressure, not just a light touch like capacitive screens.
- Check for physical damage to the screen or its FPC connector.
- Issue: Display updates are slow.
- Optimize your display code. Avoid redrawing the entire screen unnecessarily.
- Increase the SPI clock speed in your display library configuration, if supported and stable.
- Consider using more efficient graphics libraries or optimizing your drawing routines.
Техникалык мүнөздөмөлөр
| Өзгөчөлүк | Спецификация |
|---|---|
| Продукт модели | ESP32 Development Board with 3.5" LCD |
| Дисплей өлчөмү | 3.5 дюйм |
| Display Resolution | 320 x 480 пиксель |
| Түс тереңдиги | 16-bit RGB (65K colors) |
| Типти басыңыз | Резистивдик тийүү |
| Негизги башкаруу модулу | ESP32-WROOM-32 |
| CPU | Dual-core MCU, up to 240MHz |
| SRAM | 520KB |
| ROM | 448KB |
| Flash Memory | 4MB |
| Зымсыз байланыш | Wi-Fi, Bluetooth |
| Interfaces | TF Card Slot, Serial, DHT11, Reserved IO, Type-C USB, 4P 1.25 Power, Microphone |
| Өлчөмдөрү (болжол менен) | 1.9 x 1 x 0.3 дюйм (48.26 x 25.4 x 7.62 мм) |
| Элемент Салмагы | 0.48 унция (13.6 грамм) |
| Өндүрүүчү | DORHEA |

Image: Physical dimensions of the ESP32 Development Board.
Кепилдик маалымат
Specific warranty details for this product are typically provided at the point of purchase or by the retailer. Please refer to your purchase documentation or the seller's policy for information regarding warranty coverage, duration, and claims procedures.
Generally, electronic components are covered against manufacturing defects for a limited period. Misuse, physical damage, or unauthorized modifications may void the warranty.
Кардарларды колдоо
For technical assistance, additional documentation, or inquiries regarding your DORHEA ESP32 Development Board, please contact the manufacturer or seller directly.
You can often find support resources, FAQs, and community forums related to ESP32 development online, which can be valuable for programming and project-specific questions.
Өндүрүүчү: DORHEA
For more information and resources, visit the official DORHEA store or product page where you purchased the item.

Image: DORHEA brand logo.