PHORUS 8909
PHORUS 52 Inch Tropical Ceiling Fan Instruction Manual
Модель: 8909
Introduction
Сатып алганыңыз үчүн рахматasing the PHORUS 52 Inch Tropical Ceiling Fan. This manual provides detailed instructions for the safe installation, operation, and maintenance of your new ceiling fan. Please read this manual thoroughly before installation and keep it for future reference.

Figure 1: PHORUS 52 Inch Tropical Ceiling Fan (Dark Brown)
This image shows the complete PHORUS 52 Inch Tropical Ceiling Fan, featuring five dark brown palm leaf-shaped blades and a central integrated LED light. A remote control and a smartphone displaying the control app are also visible, indicating multiple control options.
Маанилүү коопсуздук маалыматы
Өрт, электр тогуна урунуу жана жеке жаракат алуу коркунучун азайтуу үчүн бул шайманды орнотуп жана иштетип жатканда ар дайым негизги коопсуздук чараларын сактаңыз.
- Орнотууну баштоодон мурун бардык көрсөтмөлөрдү окуп чыгыңыз.
- Ensure the power is turned off at the circuit breaker before wiring.
- Бардык зымдар улуттук жана жергиликтүү электр эрежелерине ылайык болушу керек.
- The mounting structure must be capable of supporting the fan's weight (16 pounds).
- Вентиляторду бычактары бузулган абалда иштетпеңиз.
Орнотуу жана орнотуу
This section details the steps for assembling and installing your ceiling fan. Refer to the provided video for visual guidance.
Пакеттин мазмуну
Монтаждоону баштоодон мурун бардык бөлүктөр бар экенин текшериңиз.
Video 1: Installation Guide for 52 Inch Outdoor Tropical Ceiling Fan
This video provides a comprehensive guide for the installation of the 52-inch tropical ceiling fan, covering all assembly steps from unboxing to final mounting and wiring. It is an official seller video.
The installation video (Video 1) provides a detailed visual walkthrough of the assembly process. Key components include the fan body assembly, mounting bracket, downrod, hanger ball, blades, lamp shade, LED light source, receiver, and remote control.
Чогултуу кадамдары
- Бычак монтажы: Attach the palm leaf blades to the blade holders using the provided screws. Ensure all screws are tightened securely.
- Light Kit орнотуу: Secure the LED light source to the fan body. Connect the wiring as instructed in the manual and video. Attach the lampкөлөкө.
- Downrod and Mounting Bracket: Assemble the downrod with the hanger ball and attach it to the fan motor. Secure the mounting bracket to your ceiling's electrical box. The fan supports both flat and angled ceiling mounts (up to 15°).
- Зымдар: Connect the fan's electrical wires to the household wiring according to the wiring diagram in the video. Ensure all connections are secure and properly insulated.
- Жыйынтыктоочу жыйын: Lift the fan assembly and hang it on the mounting bracket. Secure the canopy to cover the wiring.

2-сүрөт: Детальдуу view of a palm leaf fan blade.
This image shows a close-up of one of the unique palm leaf-shaped fan blades, highlighting its textured surface and the attachment points for the blade holder.

Figure 3: LED Light Source and Lampкөлөкө.
Бул сүрөт майда-чүйдөсүнө чейин камсыз кылат view of the fan's integrated LED light source, showing the individual LED chips and the large luminous area of the lampshade, which is 11.61 inches in diameter.
Figure 4: Fan Dimensions and Mounting Options.
This image also contains the dimensions and mounting options, indicating suitability for rooms between 256-387 sq.ft.
Иштөө нускамалары
Your PHORUS ceiling fan can be controlled via the included remote control or a smartphone application.
Алыстан башкаруу функциялары
The remote control allows for comprehensive control over the fan and light features.

5-сүрөт: Алыстан башкаруу пульту.
This image displays the remote control for the PHORUS ceiling fan, with various buttons labeled for functions such as power on/off, fan speed control (1-6), light on/off, brightness adjustment, color temperature adjustment, 2-hour timer, night mode, and reverse function. It also shows a QR code for the companion app.
- Күйгүзүү/өчүрүү: Вентиляторду жана жарыкты күйгүзөт же өчүрөт.
- Желдетүүчү ылдамдык (1-6): Adjusts the fan speed from gentle breeze (1-2) to strong airflow (5-6).
- Жарыкты башкаруу: Turn the light on/off, adjust brightness (stepless dimming), and change color temperature (3000K Warm Light, 4500K Natural Light, 6000K White Light).
- Timer (2H): Sets the fan to turn off automatically after 2 hours.
- Тескери функция: Changes the direction of the fan blades for summer (downward airflow) or winter (upward airflow for heat distribution).

Figure 6: Customizable Light Effect.
This image demonstrates the fan's customizable light effect, showing three different color temperatures: 3000K Warm Light, 4500K Natural Light, and 6000K White Light. It also indicates that the color temperature and dimming range (10% to 100%) can be adjusted.

Figure 7: Downdraft and Updraft Modes.
This diagram illustrates the two operational modes of the fan: Summer Mode (strong wind, rapid cooling) with downdraft airflow, and Winter Mode (balance indoor heating and cooling) with updraft airflow. It also highlights the 6 adjustable wind speeds.
Remote Code Pairing
If your remote control is not responding, you may need to pair it with the fan.
Video 2: Remote Code Pairing Guide
This video demonstrates the steps to pair the remote control with the 52-inch palm leaf ceiling fan. It shows how to turn off and on the main power supply and long-press the code key on the remote for successful pairing.
- Turn off the main power supply to the fan for one minute.
- Turn on the main power supply and simultaneously long-press the "code key" on the remote control for 3-5 seconds.
- When the fan light blinks for 2-3 times, it indicates successful code matching. The remote control can now be operated normally.
Смартфон колдонмосун башкаруу
Control your fan conveniently from your smartphone. Scan the QR code on the remote control (Figure 5) or visit jasonghost.com/fanlampпро "Fan L" жүктөп алуу үчүнamp "Pro" колдонмосу.
Video 3: App Setting Guide
This video provides a guide for setting up and using the smartphone application to control the fan. It demonstrates how to connect the fan to the app, adjust fan speeds, change light color temperature, and utilize the reverse function via the app interface.
The app allows for similar control as the remote, including 6 wind speeds, 3 light colors, stepless dimming, and reverse function. Ensure your phone's Bluetooth is enabled for connection.
Техникалык тейлөө
Үзгүлтүксүз тейлөө сиздин шыптын желдеткичиңиздин узак иштөөсүн жана оптималдуу иштешин камсыз кылат.
- Тазалоо: Финишке зыян келтирбөө үчүн желдеткичти жумшак, г менен гана тазалаңызamp кездеме. Катуу химиялык заттарды же абразивдүү тазалагычтарды колдонбоңуз.
- Бычакты багуу: Periodically check the blade attachments for tightness. Loose blades can cause wobbling and noise.
- Мотор: The DC motor is designed for high efficiency and low noise. It requires no lubrication.
Проблемаларды чечүү
If you experience issues with your fan, refer to the following common problems and solutions.
| Көйгөй | Мүмкүн себеп | Чечим |
|---|---|---|
| Күйөрман иштебейт | No power to the fan; Loose wire connections; Remote not paired. | Check circuit breaker and wall switch. Verify all wire connections are secure. Perform remote code pairing (refer to Operating Instructions). |
| Күйөрман солкулдайт | бош бурамалар; Туура эмес балансталган бычактар; Бошоң монтаждык кронштейн. | Tighten all blade screws. Ensure blades are balanced (balancing kit not included, but can be purchased). Verify mounting bracket is securely fastened to the ceiling. |
| Жарык иштебейт | Loose wire connection; Faulty LED light source. | Check light kit wiring connections. Contact customer support for LED light source replacement if necessary. |
| Пульт иштебей жатат | Dead batteries; Remote not paired; Obstruction between remote and receiver. | Replace AAA batteries (2 required, included). Re-pair the remote control. Ensure clear line of sight to the fan's receiver. |
Техникалык шарттар
| Өзгөчөлүк | Деталь |
|---|---|
| Бренд | ФОРУС |
| Модель аты | 8909 |
| Өлчөмү | 52 дюйм |
| Түс | Кара күрөң |
| Материал | Пластик, темир, акрил |
| Стиль | Тропикалык |
| Ички/тышкы колдонуу | Тышкы, ички |
| Power Source | DC (90~265 volt) |
| Ватtage | 50 watts (Motor) |
| Жарык булагы | LED (28W, 3640LM) |
| Башкаруу ыкмасы | Колдонмо, алыстан башкаруу |
| Өзгөчөлүктөр | Remote Controlled, LED Light, Timer, App Operable, Dimmable, 6 Speeds, Reversible |
| Элемент Салмагы | 16 фунт |
| Продукциянын өлчөмдөрү | 52 x 52 x 16.33 дюйм |
| Сунушталган бөлмө өлчөмү | 256-387 sq.ft. |
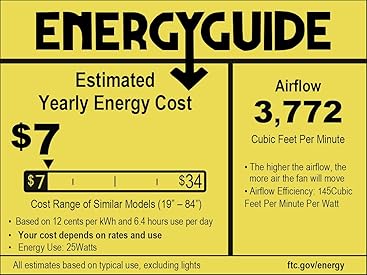
Figure 8: Energy Guide Information.
This image displays the Energy Guide label for the fan, indicating an estimated yearly energy cost of $7 based on 12 cents per kWh and 6.4 hours use per day. It also shows an airflow of 3,772 Cubic Feet Per Minute and an airflow efficiency of 145 Cubic Feet Per Minute Per Watt.
Кепилдик
PHORUS provides a one-year quality warranty for this product. We offer free replacement service for any damage and quality problems within this period.
Кардарларды колдоо
If you have any questions or require assistance, please feel free to contact us. We aim to provide a satisfactory answer within 24 hours.
For online installation video guides and app downloads, please refer to the links provided in the Operating Instructions section or scan the QR code on your remote control.
Ask a question about this manual
Ask about setup, troubleshooting, compatibility, parts, safety, or missing instructions. Manuals+ will review the question and use this page’s manual context to help answer it.