Introduction
This manual provides detailed instructions for the operation and maintenance of your ASHATA Compact Digital Camera. Please read this manual thoroughly before using the camera to ensure proper function and optimal performance. Keep this manual for future reference.
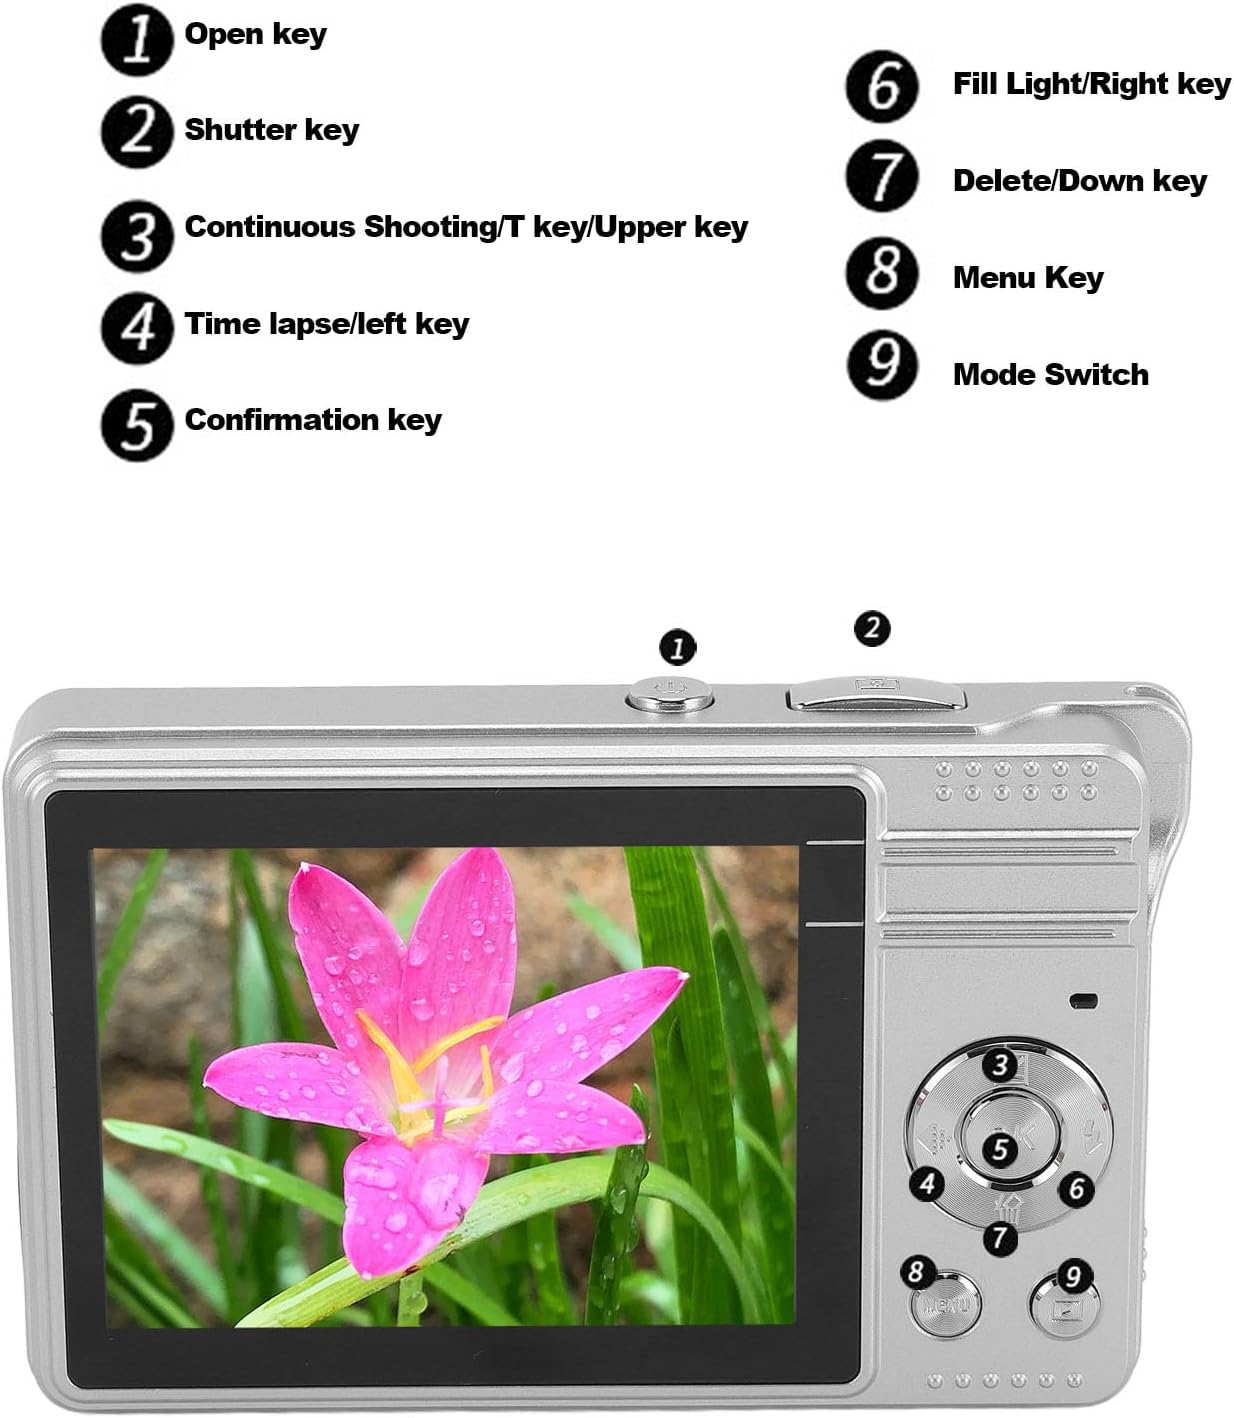
Продукт бүттүview
Камеранын компоненттери жана башкаруу элементтери менен таанышыңыз.

Сүрөт: алдыңкы жана арткы view of the camera with key components labeled.
- Ачкычты ачуу: Камераны күйгүзөт же өчүрөт.
- Shutter Key: Press to capture a photo or start/stop video recording.
- Continuous Shooting/T Key/Upper Key: Activates continuous shooting mode, controls zoom (telephoto), and navigates menus upwards.
- Time Lapse/Left Key: Activates time-lapse video mode and navigates menus left.
- Confirmation Key: Менюдагы тандоолорду ырастайт.
- Fill Light/Right Key: Activates the built-in LED fill light and navigates menus right.
- Delete/Down Key: Deletes selected photos/videos and navigates menus downwards.
- Меню ачкычы: Accesses the camera's settings menu.
- Режим которуу: Сүрөт, видео жана ойнотуу режимдери ортосунда которулат.
Сүрөт: алдыңкы view of the ASHATA Compact Digital Camera, showing the lens, flash, and microphone.

Сүрөт: каптал view of the ASHATA Compact Digital Camera, highlighting the TF card slot and USB port.
Жайгашуу
1. Батареяны орнотуу
- Камеранын ылдый жагындагы батарея уясынын капкагын табыңыз.
- Бөлүктү ачуу үчүн капкактын илгичин жылдырыңыз.
- Батареяны бөлүмдүн ичиндеги полярдуулук көрсөткүчтөрүнө (+/-) ылайык салыңыз.
- Батарея бөлүкчөсүнүн капкагын чыкылдагыча бекем жабыңыз.
2. Эстутум картасын орнотуу
This camera uses a TF (MicroSD) card for storage. A memory card is required to save photos and videos.
- Locate the TF card slot on the side of the camera (refer to the side view сүрөт).
- Insert the TF card with the metal contacts facing downwards until it clicks into place.
- Картаны алып салуу үчүн, аны сыртка чыкканга чейин акырын түртүңүз.
3. Камераны заряддоо
Connect the camera to a power source using the provided USB cable. The charging indicator light will illuminate during charging and turn off when fully charged.
Иштөө нускамалары
1. Күйгүзүү/өчүрүү
басыңыз Open Key (1) to turn the camera on. Press and hold the Open Key кайра өчүрүү үчүн.
2. Сүрөт тартуу
- Ensure the camera is in photo mode using the Режимди которуу (9).
- Frame your shot using the 2.8-inch TFT screen. The camera features autofocus to ensure clarity.
- басыңыз Жапкыч (2) halfway down to focus, then press fully to capture the image.
Zoom функциясы
колдонуу Continuous Shooting/T Key (3) for telephoto zoom (magnifying the subject) and the Time Lapse/Left Key (4) for wide-angle zoom (broadening the view). The camera supports 16x digital zoom.
Flashlight (Fill Light)
басыңыз Fill Light/Right Key (6) to activate or deactivate the built-in LED flashlight for low-light conditions.

Image: Demonstrates the effect of the built-in LED flash, showing a 'Before' image without flash and an 'After' image with flash for improved lighting.
Авто Таймер
Менюну колдонуп кириңиз Меню ачкычы (8) to set the auto timer for 2s, 5s, or 10s. This allows for delayed photo capture.
Үзгүлтүксүз атуу
басыңыз Continuous Shooting/T Key (3) to activate continuous shooting mode, capturing multiple photos in quick succession.
Advanced Photo Settings
аркылуу Меню ачкычы (8), you can adjust settings such as exposure compensation, white balance, ISO sensitivity, and anti-shake for various shooting conditions.
3. Видеолорду жаздыруу
- которуштуруу Режимди которуу (9) to video mode.
- басыңыз Жапкыч (2) to start recording. A recording indicator will appear on the screen.
- басыңыз Жапкыч (2) again to stop recording.
Time-Lapse and Slow Motion
These functions can be accessed through the camera's menu (Меню ачкычы 8) in video mode. Refer to the on-screen prompts for specific settings.
4. Ойнотуу
- которуштуруу Режимди которуу (9) to playback mode.
- Use the navigation keys (3, 4, 6, 7) to browse through your photos and videos.
- басыңыз Ырастоо ачкычы (5) чейин view тандалган нерсе.
- To delete an item, select it and press the Delete/Down Key (7), then confirm your choice.
5. Меню багыттоо жана орнотуулар
басыңыз Меню ачкычы (8) to enter the camera's settings menu. Use the navigation keys (3, 4, 6, 7) to scroll through options and the Ырастоо ачкычы (5) to select. Press the Меню ачкычы (8) again to exit the menu.
Фильтр эффекттери
The camera offers various filter effects to enhance your photos. These can be applied through the menu settings.

Image: A grid displaying a single image with various color filters applied, demonstrating the camera's filter effects feature.
Техникалык тейлөө
1. Камераны тазалоо
- Камеранын корпусун тазалоо үчүн жумшак, түксүз чүпүрөктү колдонуңуз.
- Линза жана экран үчүн атайын линза тазалоочу чүпүрөктү жана эритмени колдонуңуз. Күчтүү химиялык заттардан алыс болуңуз.
- Do not spray cleaning solution directly onto the camera.
2. Сактоо
- Камераны салкын, кургак жерде күндүн тике тийген нурунан жана экстремалдык температурадан алыс сактаңыз.
- Узак мөөнөткө сактасаңыз, акып кетпеш үчүн батареяны алып салыңыз.
- Use the provided pouch to protect the camera from dust and scratches.
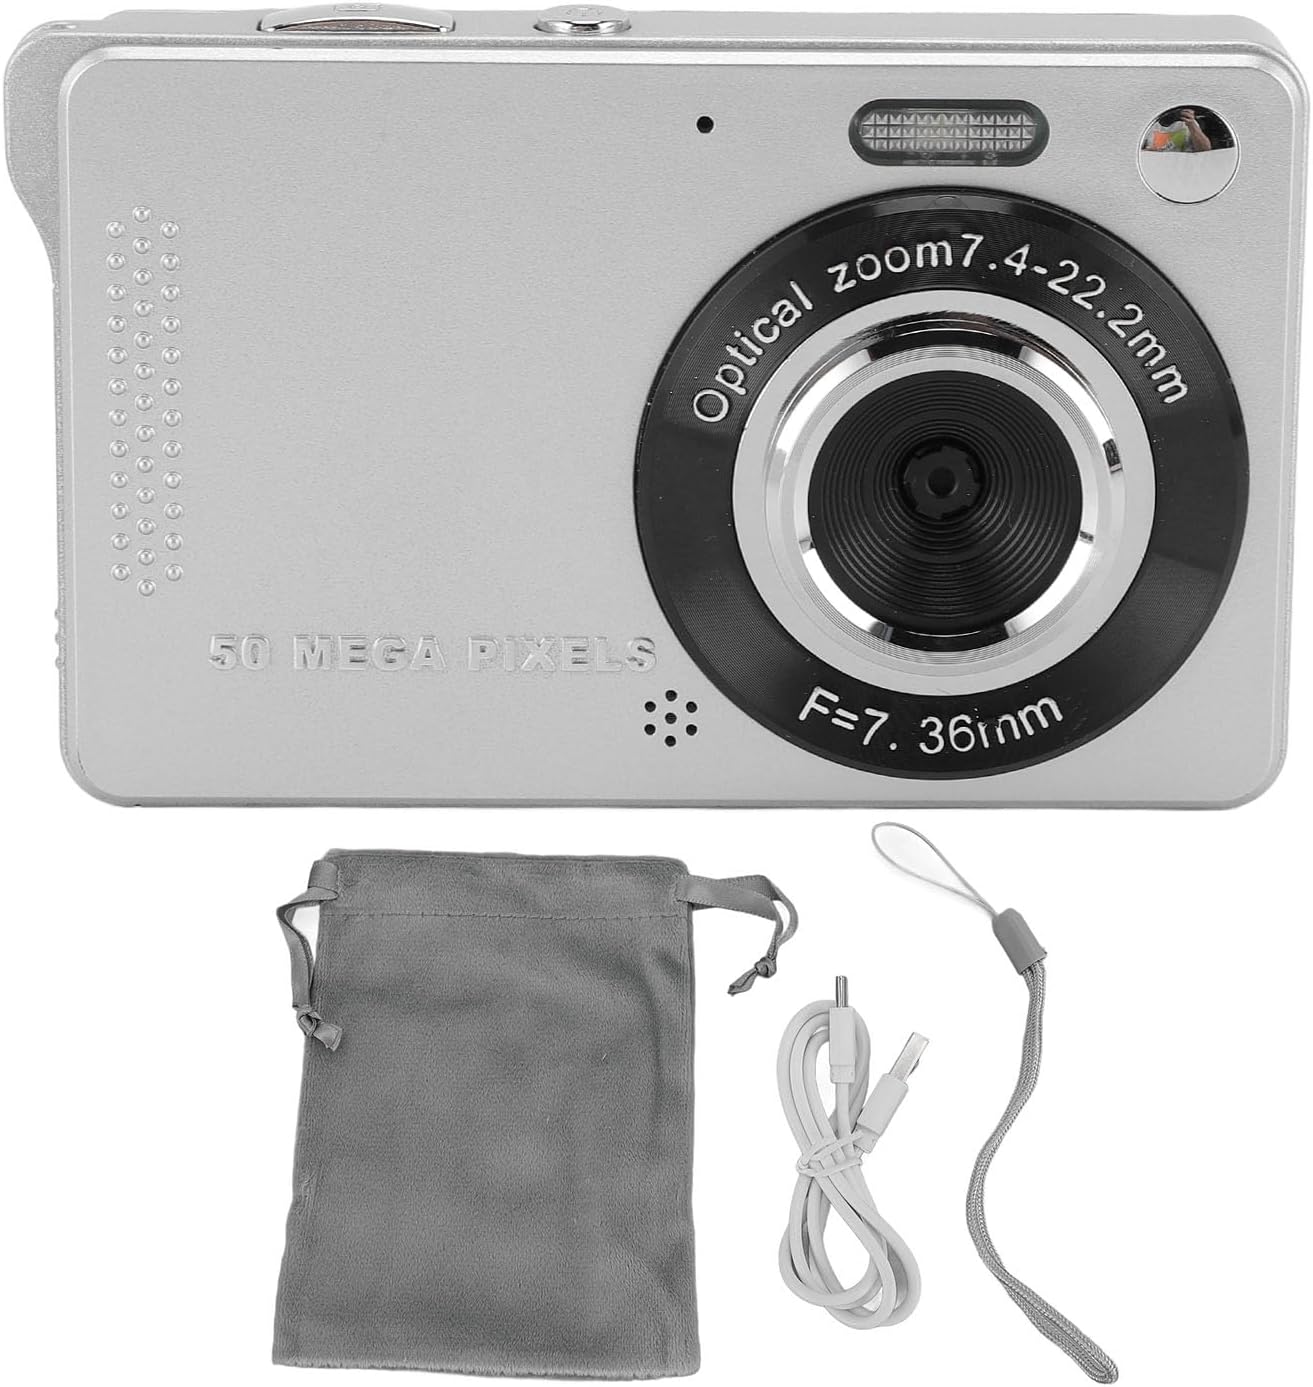
Image: The ASHATA Compact Digital Camera displayed alongside its accessories, including a protective pouch, USB cable, and wrist strap.
3. Батареяга кам көрүү
- Биринчи жолу колдонуудан мурун батарейканы толук кубаттаңыз.
- Батареянын иштөө мөөнөтүн узартуу үчүн аны дайыма толугу менен бошотуп туруудан алыс болуңуз.
- Батареяны жогорку температурага калтырбаңыз.
Проблемаларды чечүү
| Көйгөй | Мүмкүн себеп | Чечим |
|---|---|---|
| Камера күйбөйт. | Батарея аз же туура салынган эмес. | Батареяны заряддаңыз же туура кыстарыңыз. |
| Сүрөткө/видео тартууга болбойт. | Эстутум картасы толгон, салынбаган же бузулган. | Insert a TF card, delete unnecessary fileс, же картаны форматтаңыз (бул бардык маалыматтарды өчүрөт). |
| Сүрөттөр бүдөмүк. | Линза кир, жарык жетишсиз же камеранын титирөөсү. | Clean the lens, use the flash, or enable anti-shake in settings. |
| Флэш иштебей жатат. | Flash is turned off or battery is low. | басыңыз Fill Light/Right Key (6) to activate, or charge the battery. |
Техникалык шарттар
- Модел: ASHATA3os5gpbrk9-12
- Натыйжалуу дагы эле чечим: 50 мегапиксел
- Видеонун чечилиши: 1080P
- Экрандын өлчөмү: 2.8 дюймдук TFT
- Digital Zoom: 16x
- Автофокус: Ооба
- Flash: Камтылган LED кол чырагы
- Сактоочу медиа: TF картасы (MicroSD)
- Өзгөчөлүктөр: Playback, Fill Light, Time Lapse Video, Slow Motion, Continuous Shooting, Auto Timer (2s, 5s, 10s), Exposure Compensation, White Balance, ISO, Anti-shake.
Кепилдик жана колдоо
For warranty information and technical support, please refer to the documentation included with your purchase or contact ASHATA customer service through their official channels. Keep your proof of purchase for warranty claims.