1. Киришүү
This manual provides essential instructions for the safe and efficient operation of your AFYEEV Level 1/2 Tesla Charger, Model K4-16A-TSL-5M. This portable EV charger is designed to provide flexible charging solutions for all Tesla models (Model 3, X, Y, S) using both 110V (Level 1) and 240V (Level 2) power sources. It features a maximum current of 16A and a maximum power output of 3.6kW, with adjustable current settings to suit your needs.
Please read this manual thoroughly before using the charger to ensure proper function and safety.
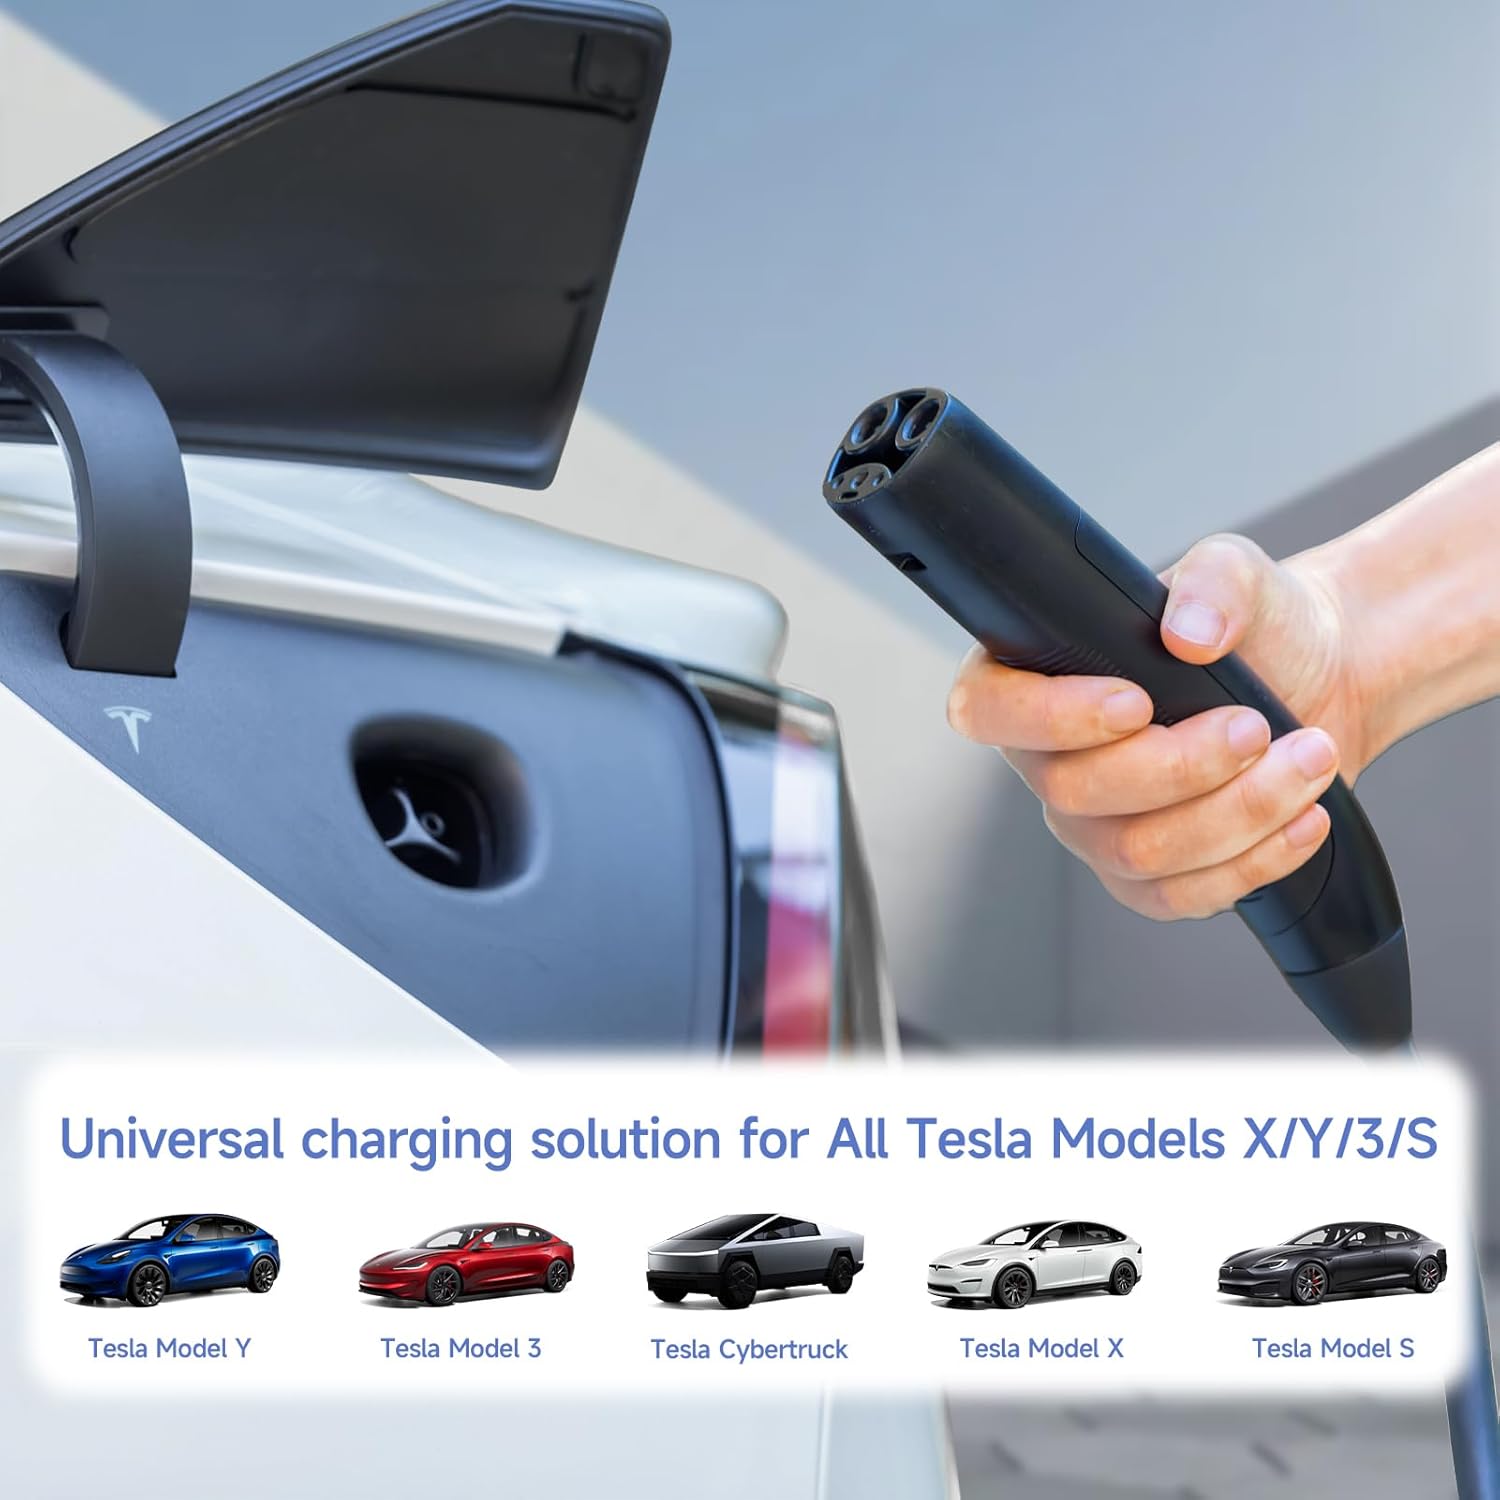
Image: The AFYEEV charger is compatible with all Tesla models, including Model Y, Model 3, Cybertruck, Model X, and Model S.
2. Коопсуздук маалыматы
Always observe the following safety precautions to prevent injury or damage to the charger or your vehicle:
- Эгерде кабель же сайгыч бузулган болсо, кубаттагычты колдонбоңуз.
- Do not use an extension cord with this charger. Connect directly to a suitable wall outlet.
- Ensure the charging port on your vehicle is clean and dry before connecting the charger.
- Заряддоо түзүлүштү күйүүчү материалдардан алыс кармаңыз.
- Do not attempt to disassemble or repair the charger yourself. Contact customer support for assistance.
- This charger is designed for electric vehicle charging only. Do not use it for other purposes.
The charger incorporates a 10-point safety system for protection against:
- Ашыкча ысып кетүү
- Өчүрүү
- Көлөмүtage
- Көлөмдүн астындаtage
- Ашыкча ток
- Ашыкча жүктөө
- Суу өткөрбөйт (IP65 рейтинги)
- Чагылган
- Кыска туташуу
- Агышуудан коргоо
The charger is designed to operate safely in temperatures ranging from -30℃ to 65℃ (-22℉ to 149℉) and is IP65 waterproof, allowing for safe charging in various weather conditions.

Image: The charger's internal components are protected, featuring IP65 waterproofing and resistance to extreme temperatures.
3. Пакеттин мазмуну
Пакетте бардык буюмдар бар экенин текшериңиз:
- AFYEEV Level 1/2 EV Charger Unit (with NEMA 6-20 plug)
- NEMA 5-15 адаптер
- User Manual
- Портативдик сумка

Image: The package includes the Level 1/2 EV Charger, Operating Manual, Portable Bag, and NEMA 5-15 to 6-20 Adapter.
4. Техникалык шарттар
| Өзгөчөлүк | Спецификация |
|---|---|
| Модель номери | K4-16A-TSL-5M |
| Максималдуу ток | 16A |
| Максималдуу күч | 3.6 кВт |
| Киргизүү көлөмүtage | 110-240В AC |
| Кабелдин узундугу | 5 метр (16.4 фут) |
| Суу өткөрбөйт рейтинги | IP65 |
| Иштөө температурасы | -30℃ден 65℃ге чейин (-22℉ден 149℉ге чейин) |
| Электр сайгычтары | NEMA 6-20 (main), NEMA 5-15 (adapter) |
| Унаа туташтыргычы | Tesla NACS |
5. Орнотуу
5.1 Кубатка туташуу
The charger comes with a NEMA 6-20 plug for 240V (Level 2) charging. For 110V (Level 1) charging, use the included NEMA 5-15 adapter.
- Identify the appropriate wall outlet (NEMA 6-20 for 240V or NEMA 5-15 for 110V).
- If using a NEMA 5-15 outlet, securely attach the NEMA 5-15 adapter to the charger's NEMA 6-20 plug.
- Plug the charger (or adapter) firmly into the wall outlet. The charger's LCD screen should illuminate.
5.2 Connecting to Your Tesla Vehicle
- Open the charging port on your Tesla vehicle. Note: The button on the charger handle may not activate the charging port door; manual opening via the vehicle's screen or app may be required.
- Insert the Tesla NACS connector firmly into the vehicle's charging port until it clicks into place.
- The charger will begin communicating with the vehicle, and charging should start automatically based on your vehicle's settings or the charger's current settings.
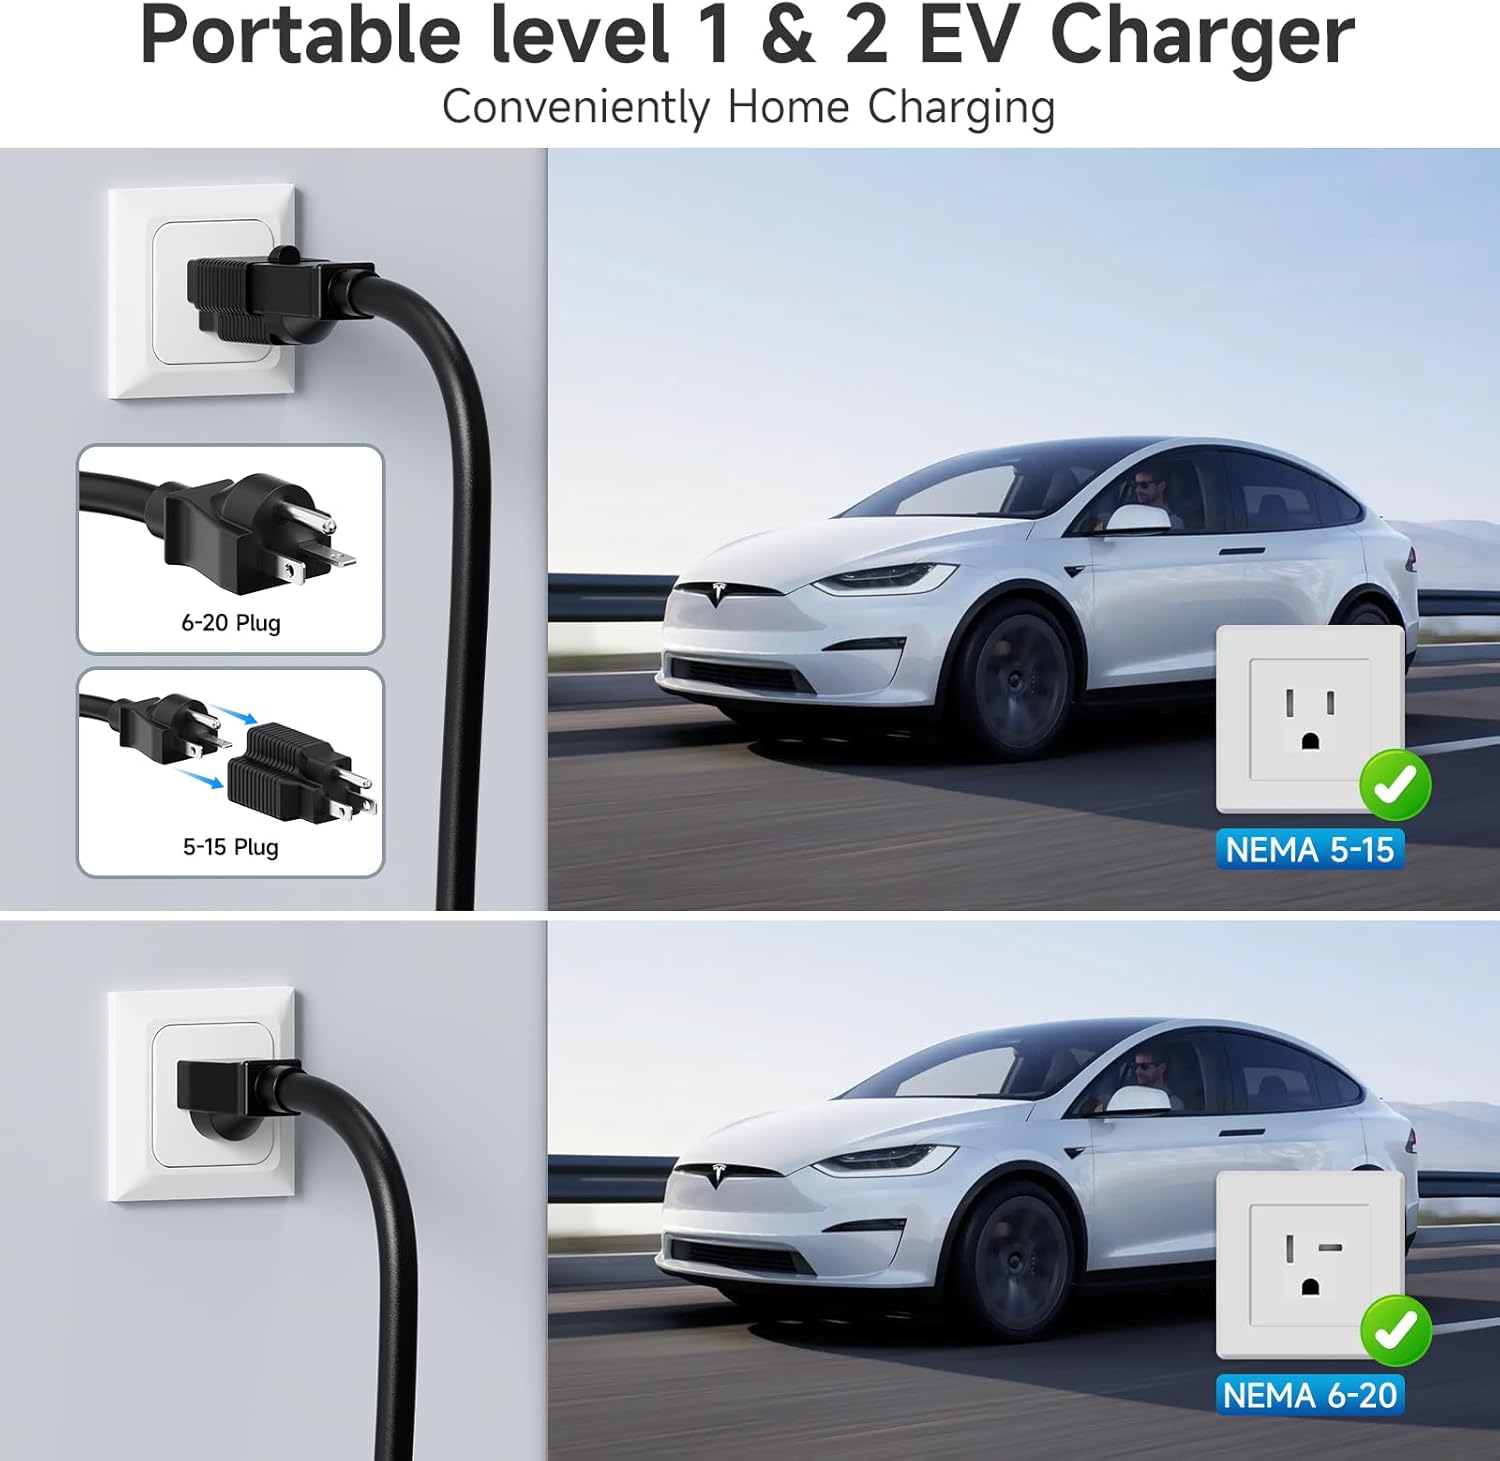
Image: The charger supports both NEMA 5-15 (110V) and NEMA 6-20 (240V) outlets for convenient home charging.
6. Иштөө нускамалары
6.1 ЖК дисплей аштыview
The charger features a 2.8-inch LCD screen that displays real-time charging information:
- Current charging ampачуулануу (A)
- Total energy charged (kWh)
- Charging duration (HH:MM:SS)
- Internal temperature (℃/℉)
- Current power output (kW)
- Киргизүү тtage (V)
- Current status (e.g., Idle, Charging)
6.2 Кубаттоо тогун жөндөө
The charging current can be adjusted between 6A, 8A, 10A, 13A, and 16A. This adjustment is typically done via a button on the charger unit. While not always the easiest to change, it is a functional feature.
- Ensure the charger is connected to power but not actively charging the vehicle.
- Locate the adjustment button on the charger unit (often indicated by an arrow or 'A' symbol).
- Press the button to cycle through the available current settings (6A/8A/10A/13A/16A). The selected current will be displayed on the LCD screen.
- Once the desired current is set, connect the charger to your vehicle to begin charging at the selected rate.
6.3 Smart Timing (Delay Charging)
The charger supports a delay charging function, allowing you to set a specific number of hours before charging begins (e.g., 1-15 hours). This can be useful for utilizing off-peak electricity rates.
- To activate, press the timing button on the charger unit (often indicated by a clock symbol).
- Each press will increase the delay time.
- Note that this feature sets a delay duration, not a precise start time. For exact charging schedules, it is recommended to use your Tesla vehicle's built-in scheduling features.
6.4 Tuya/SmartLife App Integration
This charger is compatible with the Tuya/SmartLife IoT system. Through the app, you can:
- Set the charging current.
- Initiate delayed charging.
- View records of charging sessions to track power costs.
While the app offers convenience, it may have limited advanced scheduling options compared to your vehicle's native system.

Image: The charger's LCD screen displays charging status and allows for current and time adjustments.
7. Техникалык тейлөө
7.1 Тазалоо
- Ensure the charger is unplugged from both the power outlet and the vehicle before cleaning.
- Заряддоочу түзүлүштү жана кабелдерди жумшак, d менен сүртүңүзamp кездеме. Катуу химиялык заттарды же абразивдүү тазалагычтарды колдонбоңуз.
- Ensure all components are completely dry before reconnecting.
7.2 Сактоо
- When not in use, store the charger in the provided portable carry bag.
- Keep the charger in a cool, dry place, away from direct sunlight and extreme temperatures.
- Зыян келтирбөө үчүн кабелди өтө катуу ороп албаңыз.
7.3 Кабельге кам көрүү
- Regularly inspect the charging cable and connectors for any signs of wear, cuts, or damage.
- Do not drive over the charging cable.
- Avoid sharp bends or kinks in the cable during use and storage.
8. Кыйынчылыктарды
If you encounter issues with your AFYEEV Tesla Charger, refer to the following common troubleshooting steps:
| Көйгөй | Мүмкүн себеп | Чечим |
|---|---|---|
| Charger not powering on / LCD screen is blank. | No power from the outlet; loose connection; internal fault. | Ensure the charger is firmly plugged into a working outlet. Check the circuit breaker. Try a different outlet. If the issue persists, contact support. |
| Charging not starting when connected to vehicle. | Vehicle charging settings; loose connection; charger fault; vehicle fault. | Ensure the connector is fully inserted into the vehicle's port. Check your Tesla's charging schedule or settings. Verify the charger is powered on and displaying information. Disconnect and reconnect the charger. |
| Charging stops unexpectedly. | Overheating protection activated; power interruption; vehicle charging complete. | Check the charger's LCD for error messages. Ensure the charger is not covered and has adequate ventilation. Verify the power supply is stable. Check vehicle charging status. |
| Cannot adjust charging current. | Incorrect operating state; button malfunction. | Ensure the charger is connected to power but not actively charging the vehicle when attempting to adjust current. Refer to section 6.2. |
Бул кадамдар маселени чечпесе, кошумча жардам алуу үчүн кардарларды тейлөө кызматына кайрылыңыз.
9. Кепилдик жана колдоо
For warranty information or technical support, please refer to the contact details provided with your purchase documentation or visit the official AFYEEV webсайт. Сатып алуу квитанциясын кепилдик дооматтары үчүн сатып алуунун далили катары сактаңыз.