1. Киришүү
This manual provides comprehensive instructions for the installation, operation, and maintenance of your Technicolor CGA4234VGW DOCSIS 3.1 WiFi Gigabit Modem. This device is designed to provide high-speed internet access, supporting DOCSIS 3.1 technology for ultra-fast speeds and advanced WiFi capabilities for seamless connectivity across multiple devices.
Please read this manual thoroughly before setting up your modem to ensure proper installation and optimal performance.
2. Коопсуздук маалыматы
- Модем менен берилген кубат адаптерин гана колдонуңуз.
- Модемди сууга же нымга тийгизбеңиз.
- Желдетүүчү тешиктерди жаппаңыз. Түзмөктүн айланасында жетиштүү аба айланышын камсыз кылыңыз.
- Модемди жылуулук булактарынын жанына же түз күн тийген жерге коюудан алыс болуңуз.
- Do not attempt to open or repair the modem yourself. Refer all servicing to qualified personnel.
- Чагылган түшкөн учурда же көпкө чейин колдонулбаган учурда кубат адаптерин сууруп коюңуз.
3. Пакеттин мазмуну
Пакетте бардык буюмдар бар экенин текшериңиз:
- Technicolor CGA4234VGW DOCSIS 3.1 WiFi Gigabit Modem
- Кубаттуу адаптер
- Ethernet кабели
- Ыкчам баштоо колдонмосу (эгер бар болсо)
4. Продукт бүтүп калдыview жана өзгөчөлүктөрү
The Technicolor CGA4234VGW is a high-performance DOCSIS 3.1 modem with integrated Wi-Fi capabilities, designed for robust internet connectivity. Key features include:
- DOCSIS 3.1 технологиясы: Supports multi-gigabit downstream and upstream rates for ultra-fast internet speeds.
- Кош тилкелүү Wi-Fi: Simultaneous 2.4GHz and 5GHz bands for optimized wireless performance.
- Гигабит Ethernet порттору: Four (4) Gigabit LAN ports for high-speed wired connections to devices like PCs, gaming consoles, and smart TVs.
- Шайкештик: Works with Rogers Ontario TPIA providers such as Netcrawler, Teksavvy, CIK, and Start.ca.
- Жагымдуу дизайн: Compact and modern design to blend into any home or office environment.
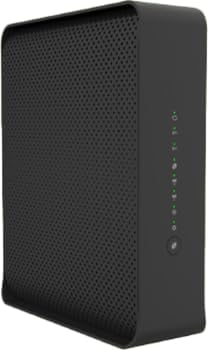
4.1. Алдыңкы панелдин индикаторлору
The front panel of the modem features LED indicators that provide status information:

Сүрөт: алдыңкы view of the Technicolor CGA4234VGW modem, displaying the vertical row of status indicator lights. From top to bottom, these typically include Power, Downstream, Upstream, Online, Wi-Fi 2.4GHz, Wi-Fi 5GHz, and Phone (if applicable), followed by a WPS button and a Reset button.
- Күч: Модемдин кубаттуулук абалын көрсөтөт.
- Төмөнкү агым: Shows the status of the downstream connection.
- Жогорку агым: Shows the status of the upstream connection.
- Онлайн: Интернетке ийгиликтүү туташууну көрсөтөт.
- Wi-Fi 2.4 ГГц: Indicates activity on the 2.4GHz wireless network.
- Wi-Fi 5 ГГц: Indicates activity on the 5GHz wireless network.
- WPS: Wi-Fi корголгон орнотуунун абалын көрсөтөт.
4.2. Арткы панелдин порттору
The rear panel contains all the necessary connection ports:
Сүрөт: бурчтуу view of the Technicolor CGA4234VGW modem, showcasing анын компакттуу кара casing and the rear panel where various ports are located. These ports typically include the coaxial cable input, four Gigabit Ethernet LAN ports, and the power input.
- Coaxial Cable Port: Connects to your cable service outlet.
- Ethernet Ports (LAN 1-4): Connects to computers, routers, or other network devices.
- Электр порту: Берилген кубат адаптерине туташат.
- Калыбына келтирүү баскычы: Used to restore factory default settings (recessed).
5. Орнотуу жана орнотуу
5.1. Орнотууга чейинки текшерүү тизмеси
- Ensure you have an active cable internet service subscription with a compatible TPIA provider (e.g., Rogers TPIA, Netcrawler, Teksavvy, CIK, Start.ca).
- Locate a coaxial cable outlet near a power source.
- Have your account information ready for service activation.
5.2. Connecting the Modem
- Коаксиалдык кабелди туташтыруу: Screw one end of the coaxial cable (not included) into the cable wall outlet and the other end into the "Cable" port on the rear of the modem. Ensure connections are finger-tight.
- Туташуу кубаты: Plug the supplied power adapter into the "Power" port on the modem and then into an electrical outlet. The Power LED on the front panel should illuminate.
- Инициализацияны күтүңүз: Allow the modem several minutes to power on and connect to the network. The Downstream, Upstream, and Online LEDs will flash and then turn solid green (or blue for DOCSIS 3.1 channels) once a connection is established. This process can take 5-10 minutes.
- Түзмөктөрдү туташтыруу (кошумча):
- Зымдуу туташуу: Connect one end of the Ethernet cable to any of the LAN ports on the modem and the other end to your computer or router.
- Зымсыз туташуу: Locate the Wi-Fi Network Name (SSID) and Password on the label on the bottom or back of your modem. Connect your wireless devices to this network.
5.3. Service Activation
Once the modem is physically connected and the Online LED is solid, you may need to activate your service with your internet service provider (ISP). This typically involves:
- Visiting your ISP's activation portal (often automatically redirected when opening a web браузер).
- Calling your ISP's customer support line and providing the modem's MAC address (found on the modem label).
Follow your ISP's specific instructions for activation.
6. Модемди иштетүү
6.1. Understanding LED Behavior
| LED көрсөткүч | Статус | Description |
|---|---|---|
| Күч | Катуу жашыл | Модем күйгүзүлгөн. |
| Ылдый агым | Solid Green/Blue | Connected to downstream channel(s). Blue indicates DOCSIS 3.1. |
| Жаркылдаган жашыл | Scanning for downstream channel(s). | |
| Жогорку агым | Solid Green/Blue | Connected to upstream channel(s). Blue indicates DOCSIS 3.1. |
| Жаркылдаган жашыл | Scanning for upstream channel(s). | |
| Онлайн | Катуу жашыл | Модем онлайн жана интернетке туташкан. |
| Жаркылдаган жашыл | Obtaining IP address/configuration. | |
| Wi-Fi 2.4 ГГц/5 ГГц | Катуу жашыл | Wireless network is active. |
| Жаркылдаган жашыл | Маалыматтар берилүүдө/кабыл алууда. |
6.2. Accessing Modem Settings
To access the modem's web interface for advanced settings (e.g., Wi-Fi name/password changes, port forwarding), follow these steps:
- Компьютериңиз модемге Ethernet же Wi-Fi аркылуу туташкандыгын текшериңиз.
- ачуу а web браузер (мисалы, Chrome, Firefox, Edge).
- In the address bar, type the modem's default IP address (commonly http://192.168.0.1 or http://192.168.1.1) жана Enter басыңыз.
- Enter the default username and password. These are usually found on a label on the modem or in the Quick Start Guide. Common defaults are "admin" for username and "password" or "admin" for password.
- Once logged in, you can configure various settings. Refer to the online help within the interface for specific options.
Note: Your ISP may restrict access to certain modem settings or provide their own management portal.
7. Техникалык тейлөө
- Жайгашкан жери: Place the modem in a central location, away from obstructions, to maximize Wi-Fi coverage. Avoid enclosed spaces.
- Тазалоо: Модемдин сыртын тазалоо үчүн жумшак, кургак чүпүрөктү колдонуңуз. Суюк тазалоочу каражаттарды же аэрозольдорду колдонбоңуз.
- Программалык камсыздоонун жаңыртуулары: Firmware updates are typically managed automatically by your internet service provider. Do not attempt manual firmware updates unless instructed by your ISP.
- Кайра жүктөлүүдө: Periodically rebooting your modem (by unplugging the power for 30 seconds and plugging it back in) can resolve minor connectivity issues and improve performance.
8. Кыйынчылыктарды
8.1. Жалпы маселелер жана чечүү жолдору
| Көйгөй | Мүмкүн себеп | Чечим |
|---|---|---|
| Интернет байланышы жок | Modem not online, cable disconnected, ISP issue. | Check all cable connections. Reboot the modem. Verify LED status (Online LED should be solid green). Contact your ISP if issues persist. |
| Жай Интернет ылдамдыгы | Network congestion, Wi-Fi interference, outdated device drivers. | Reboot modem. Ensure modem is in an open area. Try a wired connection to rule out Wi-Fi issues. Contact ISP if speeds are consistently below expected. |
| Wi-Fi Not Working | Wi-Fi disabled, incorrect password, interference. | Check Wi-Fi LEDs on modem. Ensure Wi-Fi is enabled in modem settings. Verify Wi-Fi password. Try changing Wi-Fi channel in settings. |
| Cannot Access Modem Settings | Incorrect IP address, wrong credentials, network issue. | Ensure correct IP address (192.168.0.1 or 192.168.1.1). Verify username and password. Try connecting via Ethernet. |
8.2. Resetting the Modem to Factory Defaults
If troubleshooting steps do not resolve the issue, you may need to perform a factory reset. This will erase all custom settings and restore the modem to its original configuration.
- With the modem powered on, locate the recessed Reset button on the rear panel.
- Кагаз кыскычты же ушул сыяктуу учтуу нерсени колдонуп, "Кайра коюу" баскычын кеминде 10-15 секунд басып туруңуз.
- Release the button. The modem will reboot, and all LEDs will cycle.
- Allow several minutes for the modem to re-initialize and reconnect to the network. You will need to reconfigure any custom settings or reactivate with your ISP if required.
9. Техникалык шарттар
| Өзгөчөлүк | Деталь |
|---|---|
| Модел | Technicolor CGA4234VGW |
| DOCSIS стандарты | DOCSIS 3.1 |
| Wi-Fi стандарты | Кош тилкелүү (2.4 ГГц жана 5 ГГц) |
| Ethernet порттору | 4 x Gigabit LAN Ports |
| Төмөнкү маалымат ылдамдыгы | 1000 Мегабит/секунда (Мбит/сек) |
| Максималдуу жогорудагы маалымат ылдамдыгы | 1000 Мегабит/секунда (Мбит/сек) |
| Өлчөмдөрү (L x W x Y) | 19.1 x 5.6 x 22.9 см (болжол менен) |
| Салмагы | 1.36 кг (болжол менен) |
| Түс | Кара |
| Шайкеш түзмөктөр | Ноутбук, персоналдык компьютер, планшет, акылдуу телевизор, смартфон |
| Интернет кызматын көрсөтүүчүнүн шайкештиги | Rogers TPIA (Netcrawler, Teksavvy, CIK, Start.ca) |
10. Кепилдик жана колдоо
For warranty information and technical support, please refer to the documentation provided by your internet service provider or contact Technicolor customer support directly. Keep your purchase receipt and modem's serial number handy when seeking support.
Online resources and FAQs may also be available on the Technicolor support website or your ISP's support portal.