1. Киришүү
This manual provides detailed instructions for the installation, operation, and maintenance of your Trux TLED-H110 LED Projector Headlight Assembly. Please read this manual thoroughly before installation and use to ensure proper function and longevity of the product. Retain this manual for future reference.
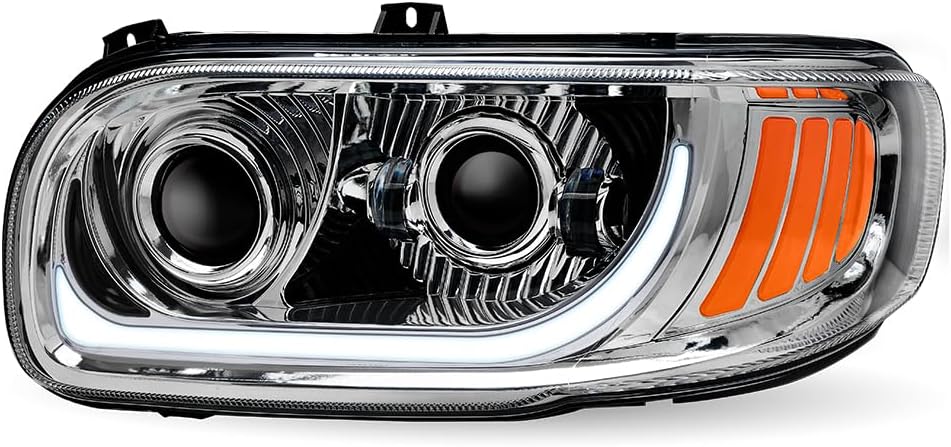
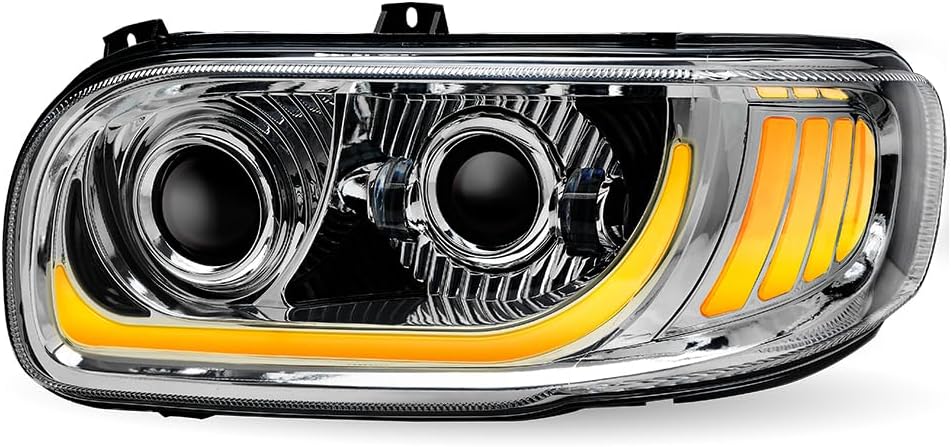
The Trux TLED-H110 is designed to enhance vehicle visibility and safety with its advanced LED projector technology and dual-function accent lighting. This assembly is specifically for the driver side of compatible Peterbilt models.
2. Продукт бүтүп калдыview
2.1. Негизги өзгөчөлүктөрү
- "Plug & Play" design for simplified installation.
- Dual Function White Glow Position (DRL Auxiliary) and Amber Marker LED Accents.
- OE Replacement for part number P54-6112-110.
- Integrated LED Side Marker.
- Projector Technology for a wider and more focused beam pattern.
- Durable, waterproof construction.
2.2. Кутуда эмне бар
- 1 x Trux TLED-H110 LED Projector Headlight Assembly (Driver Side)
3. Унаа шайкештиги
This headlight assembly is compatible with the following Peterbilt truck models:
- Peterbilt 367: 2014 - 2018
- Peterbilt 388: 2006 - 2015
- Peterbilt 389: 2006 - Current Year
- Peterbilt 567: 2014 - 2018
Ensure your vehicle's make, model, and year match the compatibility list before proceeding with installation.
4. Орнотуу боюнча нускамалар
The Trux TLED-H110 headlight assembly features a "Plug & Play" design for straightforward installation. However, professional installation is recommended to ensure correct wiring and alignment, especially for those unfamiliar with vehicle electrical systems.
4.1. Орнотууга чейинки текшерүү тизмеси
- Verify the headlight assembly matches the vehicle's driver side.
- Электр шорт-тосмолорунун алдын алуу үчүн унаанын от алдыруу системасы өчүрүлгөнүнө жана аккумулятордун ажыратылганына ынаныңыз.
- Gather necessary tools (e.g., screwdrivers, wrenches, wire cutters/strippers if custom wiring is needed).
4.2. Орнотуу кадамдары
- Remove Existing Headlight: Carefully remove the old headlight assembly from your Peterbilt truck. This typically involves unscrewing mounting bolts and disconnecting the electrical harness. Refer to your vehicle's service manual for specific removal procedures.
- Зымдарды текшерүү: Examine the vehicle's existing wiring harness for any signs of damage or corrosion. Clean any dirty connections.
- Connect New Headlight: Connect the Trux TLED-H110 headlight assembly's electrical connectors to the vehicle's wiring harness. The "Plug & Play" design means these should match directly. Ensure all connections are secure.
- Mount New Headlight: Position the new headlight assembly into the vehicle's headlight opening. Secure it using the original mounting bolts. Do not overtighten.
- Батареяны кайра туташтыруу: Унаанын аккумуляторун кайра туташтырыңыз.
- Сыноо функциясы: Turn on the vehicle's lights to test all functions: low beam, high beam, DRL (white glow position), and amber marker lights.
- Максатты тууралоо: If necessary, adjust the headlight aim according to local regulations and for optimal road illumination. This usually involves adjustment screws on the headlight housing.

5. Иштөө нускамалары
The Trux TLED-H110 LED Projector Headlight Assembly operates in conjunction with your vehicle's existing lighting controls.
- Жакынкы/алыс жарык: Activate these functions using your vehicle's standard headlight switch. The projector technology provides a clear and wide beam pattern for improved visibility.
- White Glow Position (DRL Auxiliary): This feature provides a white LED accent light, typically functioning as a Daytime Running Light (DRL) or auxiliary position light, enhancing vehicle visibility during daylight hours.
- Amber Marker LED Accents: These amber LEDs function as marker lights, increasing the vehicle's visibility to other drivers, especially in low-light conditions or when signaling turns.
6. Техникалык тейлөө
Regular maintenance ensures optimal performance and extends the lifespan of your headlight assembly.
- Тазалоо: Clean the lens regularly with a soft cloth and mild soap and water. Avoid abrasive cleaners or harsh chemicals that could damage the polycarbonate lens material.
- Текшерүү: Periodically inspect the headlight assembly for any signs of damage, loose connections, or moisture ingress. Although the unit is waterproof, extreme conditions or physical damage can compromise its integrity.
- Лампаны алмаштыруу: The LED components are designed for long life and are generally not user-replaceable. If an LED fails, the entire assembly may need servicing or replacement.
7. Кыйынчылыктарды
If you encounter issues with your headlight assembly, refer to the following common troubleshooting steps:
- Фара күйбөйт:
- Check vehicle fuses related to headlights.
- Бардык электр туташууларынын бекем жана дат баспагандыгын текшериңиз.
- Verify the vehicle's headlight switch is functioning correctly.
- Күңүрт же бүлбүлдөгөн жарыктар:
- Зымдардын бош туташууларын же бузулган изоляциясын текшериңиз.
- Адекваттуу томду текшериңизtage supply to the headlight.
- Линзанын ичиндеги нымдуулук:
- Small amounts of condensation can occur due to temperature changes and usually dissipate.
- If significant water ingress is observed, inspect the housing for cracks or seal damage. This may require professional inspection.
For persistent issues, contact customer support or a qualified automotive technician.
8. Техникалык шарттар
| Бренд | Trux (Manufacturer) |
| Модел | TLED-H110 |
| OEM бөлүктүн номери | P54-6112-110 |
| Линзанын материалы | Поликарбонат |
| Өзгөчөлүктөр | Waterproof, Projector Technology, Dual Function LED Accents |
| Унаа кызматынын түрү | Жарым жүк ташуучу унаалар |
| Auto Part Position | Front (Driver Side) |
| Color/Exterior | Chrome / Clear Lens |
| Ассамблея талап кылынат | Ооба (Орнотуу) |
9. Кепилдик жана колдоо
9.1. Кепилдик маалыматы
This Trux TLED-H110 LED Projector Headlight Assembly is covered by a 3 жылдык кепилдик from the date of purchase. This warranty covers defects in materials and workmanship under normal use. It does not cover damage resulting from improper installation, accident, abuse, modification, or normal wear and tear.
Кепилдик дооматтары үчүн сатып алганыңыздын далилин сактап коюңуз.
9.2. Кардарларды колдоо кызматы
For technical assistance, warranty claims, or further inquiries, please contact your authorized Trux dealer or the point of purchase. When contacting support, please have your product model number (TLED-H110) and proof of purchase readily available.