
1. Киришүү
The Artograph Smart HD Digital Art Projector Flare 100 is a versatile tool designed for artists, muralists, and creatives. It allows for tracing, enlarging, and projecting images onto various surfaces like walls or canvases. Featuring sharp HD resolution, built-in art grids, and flexible setup options, this portable projector enhances precision and efficiency in artistic endeavors. This manual provides detailed instructions for setting up, operating, maintaining, and troubleshooting your Flare 100 projector.
2. Кутуда эмне бар
Upon opening your Artograph Smart HD Digital Art Projector Flare 100 package, please verify that all the following components are included:
- Artograph Flare 100 Digital Art Projector
- Электр кабели
- Алыстан башкаруу
- Колдонуучунун Колдонмосу (бул документ)
- Monopod Arm Clamp Тур
- HDMI кабели
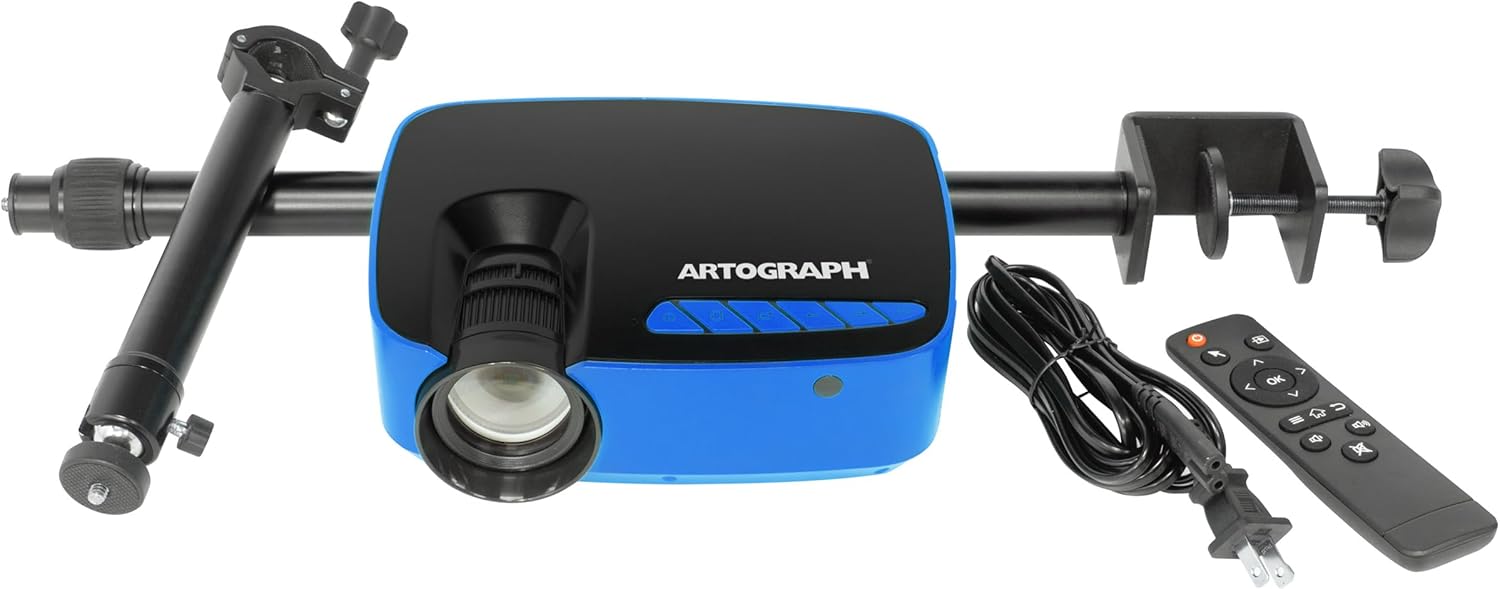
Image: The Artograph Flare 100 Digital Art Projector shown with its included accessories: the projector unit, power cord, remote control, and the monopod arm clamp туруу.
3. Орнотуу
Follow these steps to set up your Artograph Flare 100 projector for optimal performance.
3.1 Физикалык орнотуу
- Проекторду жайгаштыруу: Place the projector on a stable, flat surface or attach it to the included Monopod Arm Clamp Stand. The stand allows for flexible positioning, including projecting onto vertical surfaces or down onto a desktop.
- Attaching the Monopod Arm Clamp Стенд: Securely attach the monopod arm to a table or desk using the clamp. Then, screw the projector onto the monopod's swivel ball head. This allows for 360° projection and adjustment to various angles.

Image: The Artograph Flare 100 projector securely mounted on its adjustable monopod arm clamp stand, ready for use.

Image: Demonstrates the versatility of the Flare 100, showing how it can project images straight, down onto a surface, or up onto a ceiling, thanks to its monopod stand with swivel ball.
3.2 Кубат туташтыруу
- Туташуу кубаты: Plug the provided power cord into the projector's power input port and then into a standard electrical outlet.
3.3 Байланыш
The Flare 100 supports various input sources:
- HDMI: Connect your computer, tablet, or other HDMI-enabled device using the HDMI cable.
- USB-A 2.0: Insert a USB flash drive containing images or media files.
- TF картасы: Insert a TF (microSD) card with your media.
- AV порт: Use the AV port for composite video and audio input.
- Wi-Fi: Connect to a Wi-Fi network for wireless screen sharing from compatible devices. Refer to the on-screen menu for Wi-Fi setup instructions.
3.4 Фокустоо жана Keystone коррекциясы
Adjust the image clarity and shape using the manual controls:
- Фокус: Проекцияланган сүрөт так жана даана болгонго чейин проектордун линзасындагы фокустук шакекчени айландырыңыз.
- Негизги ташты оңдоо: Use the keystone adjustment dial to correct trapezoidal distortion, ensuring the projected image is rectangular, especially when projecting at an angle.
4. Операция
This section details the basic operation of your Artograph Flare 100 projector.
4.1 Күйгүзүү/өчүрүү
- Күйгүзүү: Проектордун же пульттун кубат баскычын басыңыз.
- Өчүрүү: Проекторду өчүрүү үчүн кубат баскычын кайра басыңыз.
4.2 Менюда навигация
Use the control buttons on the projector or the remote control to navigate the on-screen menu. The buttons typically include OK, Left, Right, Return, and Page for selection and navigation.

Image: A detailed diagram illustrating the control buttons (OK, Left, Right, Return, Page, On/Off, Focus, Keystone) on the top of the projector and all available input/output ports (Audio Out, AV, HDMI, USB, TF) on the rear and side.
4.3 Медиа ойнотуу
The Flare 100 features a built-in media player. Select the desired input source (HDMI, USB, TF Card, Wi-Fi) from the main menu.
- Колдоого алынган сүрөт форматтары: BMP, JPG, PNG, TXT
- Колдоого алынган аудио форматтары: AAC, APE, FLAC, MP3, OGG, WAV, WMA
- Колдоого алынган видео форматтары: 3GP, AVI, FLV, MKV, MOV, MP4, MPG, RMVB, VOB
4.4 Using Built-In Art Grids
The projector includes five built-in art grids to assist with proportion and composition when transposing images to a wall or canvas.
- Үчтүктүн эрежеси
- Horizontal Lines
- Concentric Circles
- Crosshatch
- Перспектива
To activate and select a grid, navigate through the projector's menu options. The grid will overlay your projected image.

Image: The Artograph Flare 100 projecting an image with various grid overlays, demonstrating the built-in tools for artistic proportion and composition.
5. Техникалык тейлөө
Туура тейлөө проекторуңуздун узак иштөөсүн жана оптималдуу иштешин камсыз кылат.
5.1 Тазалоо
- Объектив: Use a soft, lint-free cloth specifically designed for optical lenses. Gently wipe the lens to remove dust or smudges. Avoid abrasive materials or harsh chemicals.
- Casing: Проектордун сыртын жумшак, кургак чүпүрөк менен сүртүңүз. өжөр белгилери үчүн, бир аз гamp чүпүрөктү колдонсо болот, бирок аппаратка ным кирбеши керек.
- Тешиктер: Periodically check the ventilation openings for dust accumulation. Use a soft brush or compressed air to clear any blockages, ensuring proper airflow and preventing overheating.
5.2 Сактоо
When not in use, store the projector in a cool, dry place away from direct sunlight and extreme temperatures. If storing for an extended period, consider using the original packaging or a protective case to prevent dust buildup and accidental damage.
6. Кыйынчылыктарды
This section addresses common issues you might encounter with your Artograph Flare 100 projector.
| Көйгөй | Мүмкүн себеп | Чечим |
|---|---|---|
| Сүрөт чагылдырылган жок | Power not connected; Input source not selected; Device not connected properly. | Ensure power cord is securely plugged in. Select the correct input source (HDMI, USB, TF, Wi-Fi). Verify cables are firmly connected to both projector and source device. |
| Сүрөт бүдөмүк же фокуста эмес | Focus ring not adjusted; Projector too close/far from surface; Minimum projection distance not met. | Rotate the focus ring on the lens until the image is clear. Adjust the distance between the projector and the projection surface. Note that the minimum focus distance may result in a projected image size of over 16 inches. |
| Сүрөт бурмаланган (трапеция формасы) | Keystone correction not adjusted. | Use the keystone adjustment dial to correct the image shape until it is rectangular. |
| Проектордон үн чыкпайт | Volume too low; Audio format not supported; External audio device connected. | Increase the volume using the remote or projector controls. Ensure the audio file format is supported. If using external speakers via the 3.5mm jack, ensure they are connected and powered on. |
| Difficulty connecting to Wi-Fi | Incorrect password; Network issues; Device compatibility. | Double-check the Wi-Fi password. Restart your router and the projector. Ensure your device is compatible with the projector's screen sharing feature. |
| Проектордун ысып кетиши | Blocked vents; Prolonged use in hot environment. | Ensure ventilation openings are clear of obstructions. Operate the projector in a well-ventilated area. Allow the projector to cool down if it has been in continuous use for an extended period. |
7. Техникалык шарттар
Detailed technical specifications for the Artograph Smart HD Digital Art Projector Flare 100.
| Өзгөчөлүк | Деталь |
|---|---|
| Модель номери | 25707 |
| Өлчөмдөрү (L x W x Y) | 7.75 x 6.25 x 2.75 дюйм |
| Элемент Салмагы | 1.68 фунт |
| Түс | Көк / Кара |
| Дисплейдин чечилиши (Түпнуска) | 1280 x 720 (HD) |
| Максималдуу чечим колдоо | 1920 x 1080 (Full HD) up to 3840 x 2160 (4K) |
| Жарыктык | 300 Lumens |
| Проекциянын өлчөмү | 30" - 100" |
| Ватtage | 55 Ватт |
| Байланыш технологиясы | 3.5mm Jack, AV Port, TF Card, HDMI, USB-A 2.0, Wi-Fi |
| Өзгөчөлүктөр | Built-In Media Player, Five Built-In Art Grids, Includes Monopod Arm, Manual Keystone and Focus Correction |
8. Кепилдик жана колдоо
8.1 Продукциянын кепилдиги
Artograph products are manufactured with quality and durability in mind. For specific warranty terms and conditions applicable to your Flare 100 projector, please refer to the warranty card included in your product packaging or visit the official Artograph webсайт. Кепилдик адатта нормалдуу колдонууда өндүрүштүк кемчиликтерди камтыйт.
8.2 Кардарларды колдоо
If you encounter any issues not covered in the troubleshooting section or require further assistance, please contact Artograph customer support. You can find contact information, FAQs, and additional resources on the official Artograph webсайт:
Visit Artograph Official Webсайт
Колдоо кызматына кайрылганда продуктуңуздун моделинин номери (25707) жана сатып алуу маалыматы даяр болсун.