
1. Киришүү
This manual provides detailed instructions for the assembly, installation, and maintenance of your NEWWAY NW1 PC Case. Designed for versatility and aesthetics, the NW1 supports ATX, Micro-ATX, and ITX motherboards, features a distinctive wooden front panel, and includes efficient cooling solutions. Please read this manual thoroughly before beginning installation to ensure proper setup and optimal performance.

1.1-сүрөт: Бурчтуу алдыңкы бет view of the NEWWAY NW1 PC Case, showcasing the wooden front panel and tempered glass side panel.
2. Негизги өзгөчөлүктөрү
- Motherboard шайкештиги: Supports ATX, Micro-ATX, and ITX form factors.
- Elegant дизайн: Features a genuine wooden front panel and a tempered glass side panel.
- Өркүндөтүлгөн муздатуу: Compatible with watercooling systems up to 360mm. Includes three 140mm PWM fans for enhanced airflow.
- Component Clearance: Accommodates CPU coolers up to 181mm in height and graphics cards up to 410mm in length.
- Ийкемдүү сактагыч: Offers three dedicated slots for 3.5" HDDs or 2.5" SSDs.
- Алдыңкы I/O порттору: Equipped with USB Type-C, USB 3.0, and audio ports for convenient connectivity.
- Өлчөмдөрү: L430mm x W235mm x H430mm.
- Салмагы: 6.8 кг.
3. Орнотуу жана Компонентти орнотуу
Before installing any components, ensure the PC case is placed on a stable, flat surface.
3.1. Ишти даярдоо
- Carefully remove the tempered glass side panel by unscrewing the thumb screws at the rear of the case and sliding the panel off.
- Remove the rear panel if necessary for cable management access.
3.2. Motherboard орнотуу
The NW1 case supports ATX, Micro-ATX, and ITX motherboards.
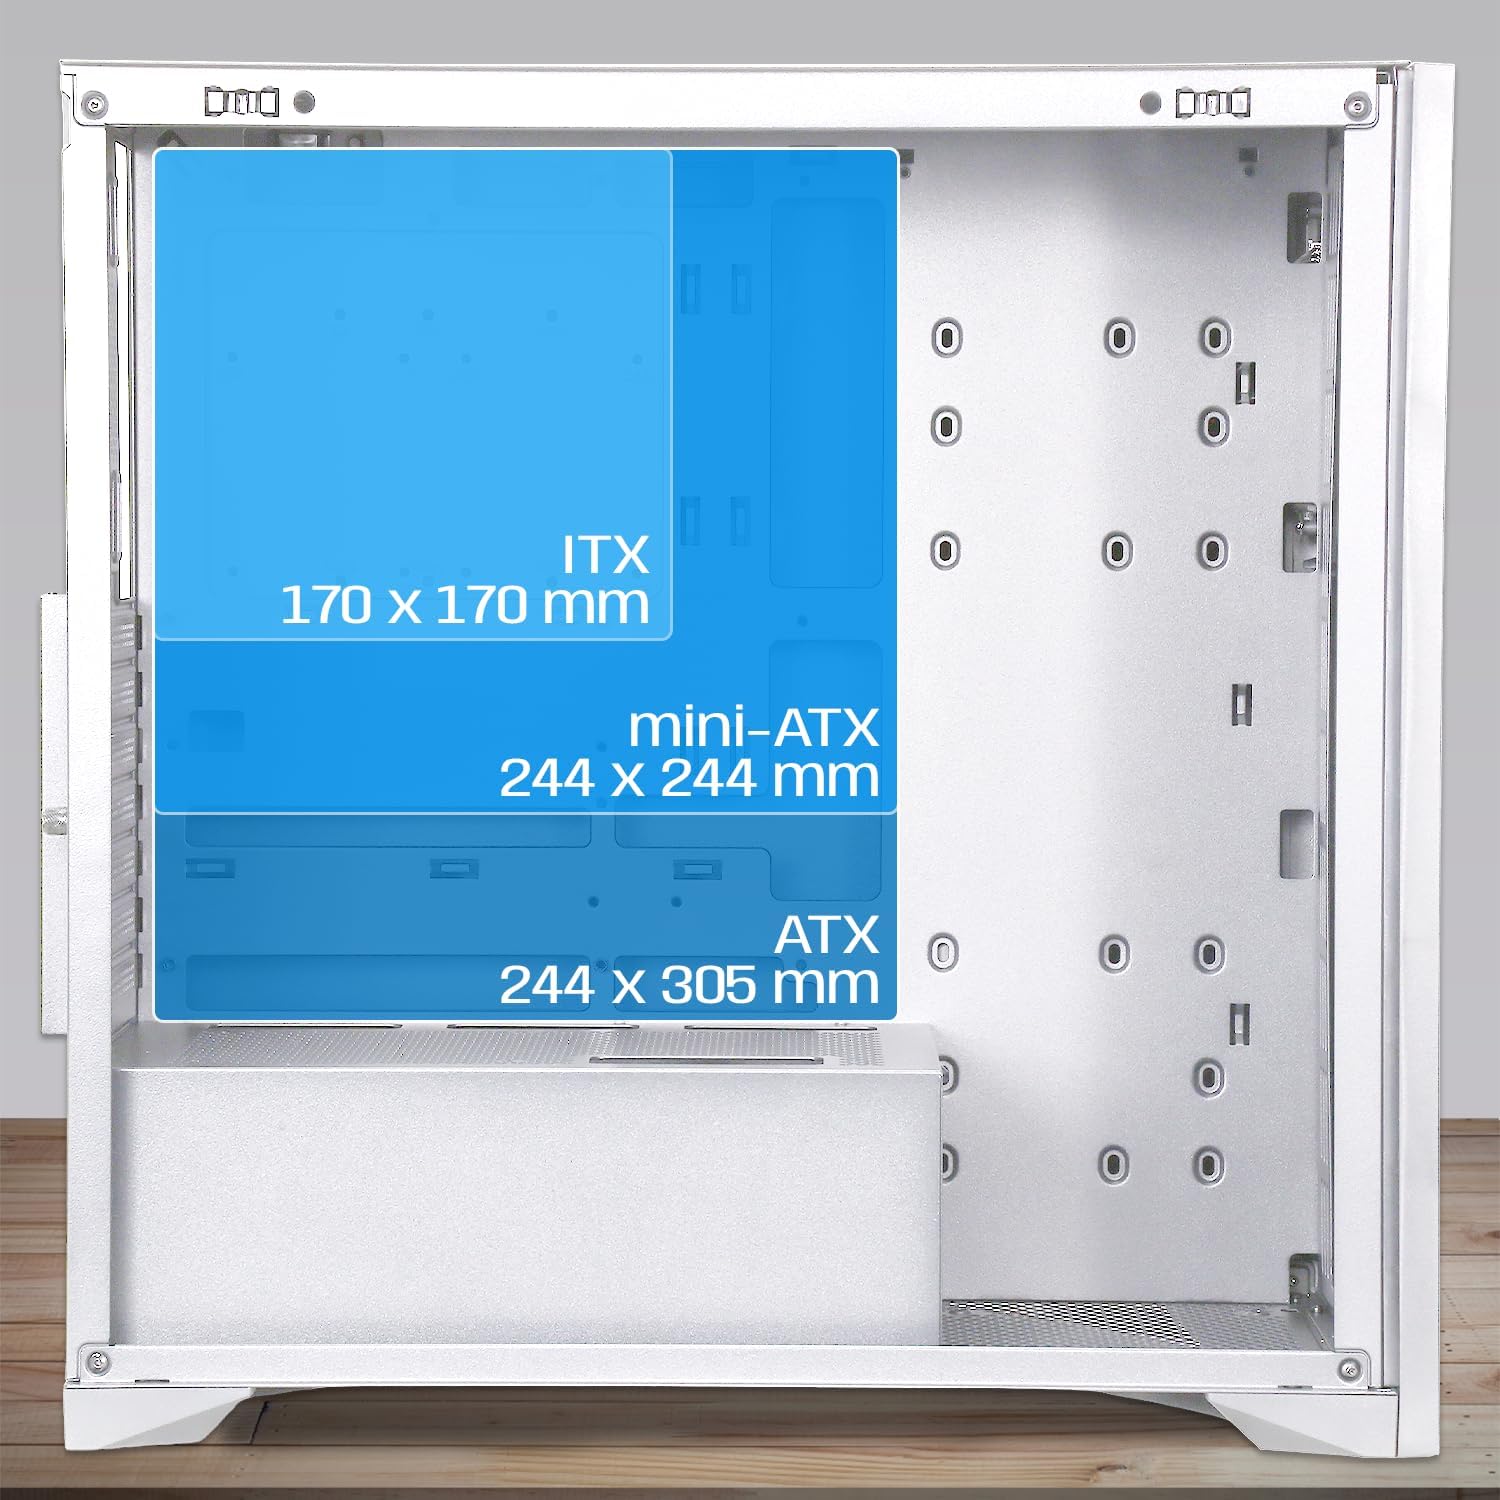
Image 3.1: Diagram illustrating motherboard compatibility and maximum dimensions for ATX, Micro-ATX, and ITX form factors within the case.
- Install the I/O shield into the designated slot at the rear of the case.
- Align your motherboard with the pre-installed standoffs. Ensure the standoffs match your motherboard's form factor.
- Берилген бурамалар менен энелик тактаны бекитиңиз.
3.3. CPU Cooler and Graphics Card Installation
Иш төмөнкүлөрдү камсыз кылат ample space for large components.
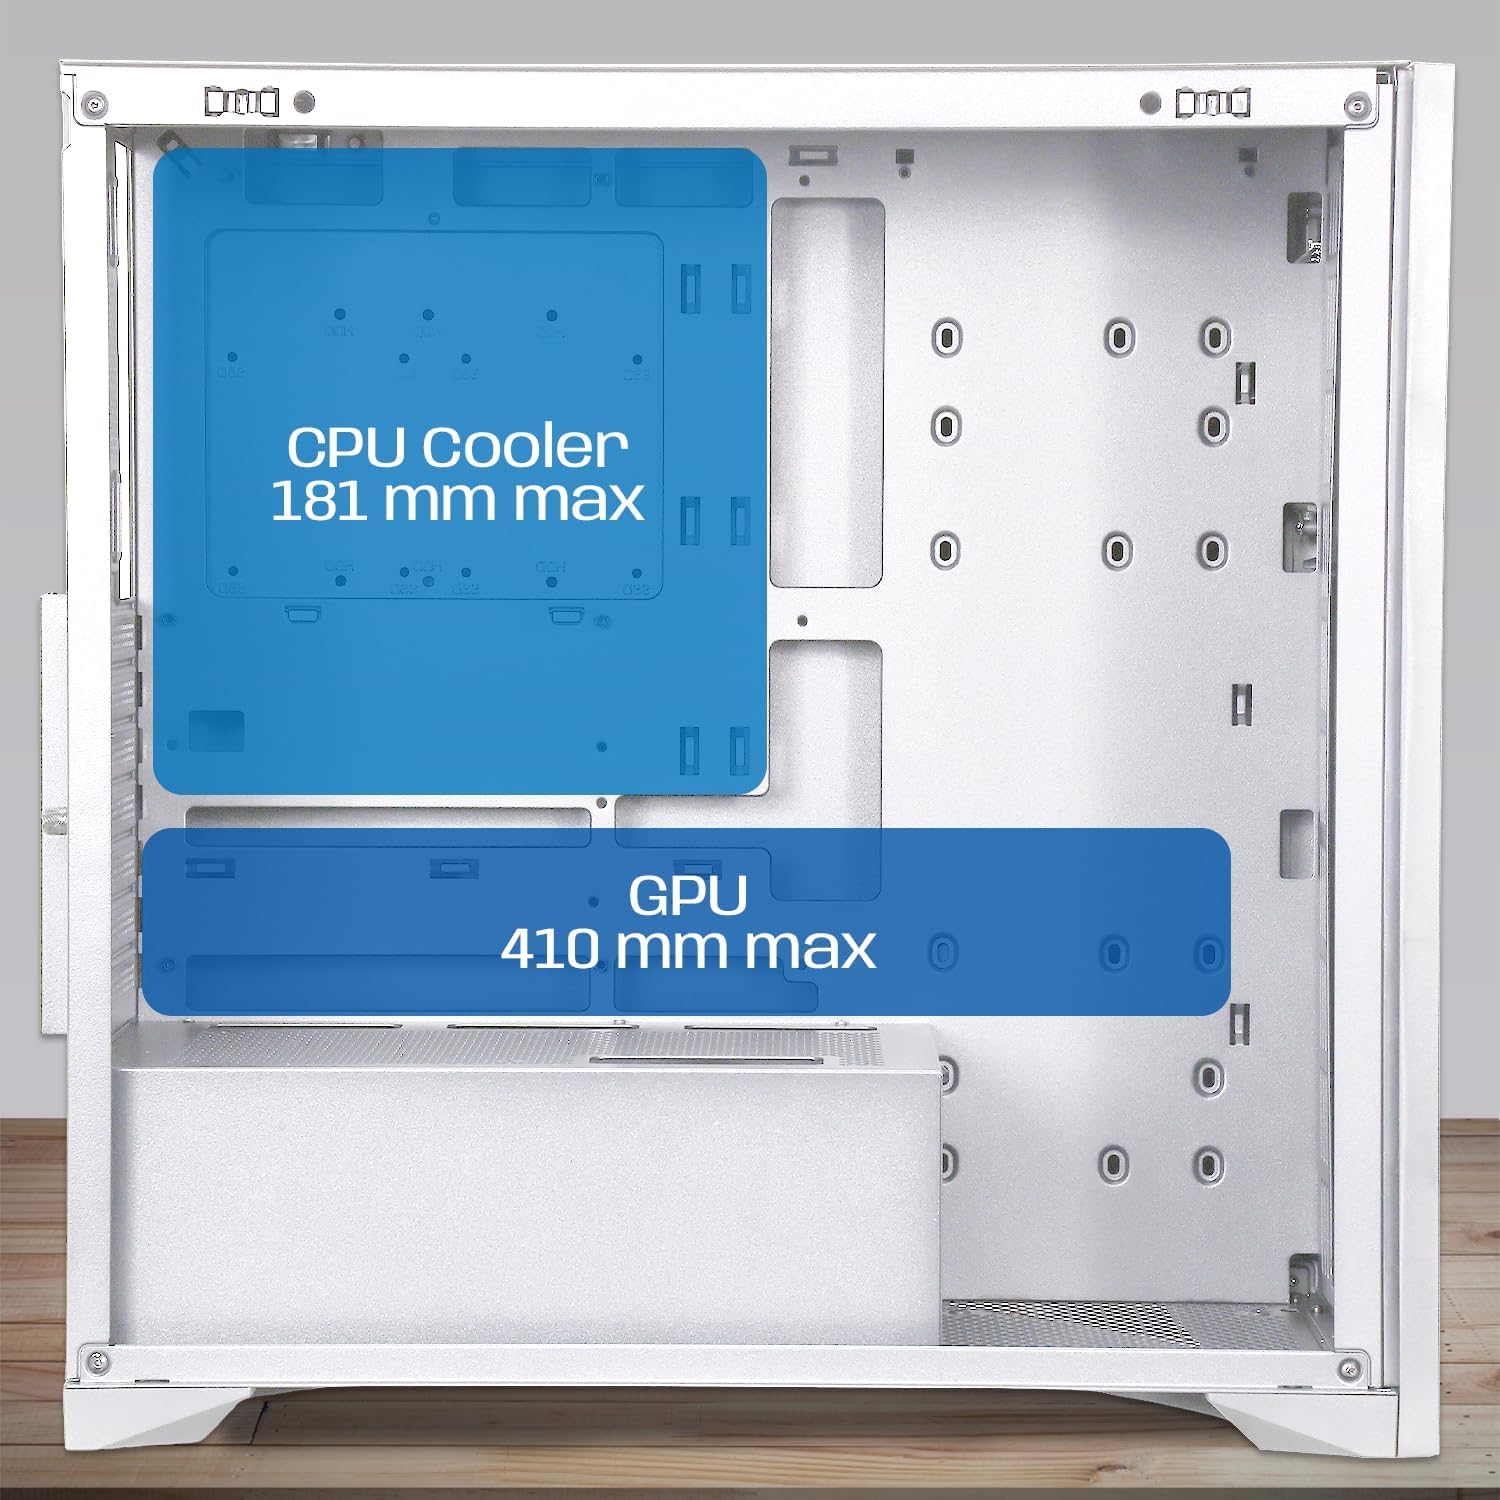
Image 3.2: Diagram showing maximum clearance for CPU coolers (181mm) and graphics cards (410mm) inside the NEWWAY NW1 case.
- CPU муздаткычы: Install your CPU cooler according to its manufacturer's instructions. The case supports coolers up to 181mm in height.
- Графикалык карта (GPU): Remove the necessary expansion slot covers at the rear. Insert your graphics card into the PCIe slot on your motherboard and secure it with screws. The case supports GPUs up to 410mm in length.
3.4. Сактагыч түзмөктү орнотуу
The NW1 offers multiple storage options.

Image 3.3: Diagram illustrating the various mounting points for 2.5" SSDs and 3.5" HDDs within the case.
- Locate the 3.5" HDD/2.5" SSD drive bays.
- Mount your drives using the provided screws.
3.5. Электр менен камсыздоо блогун (PSU) орнотуу
The PSU mounts at the bottom of the case.
- Кубат блогун корпустун арткы астыңкы жагындагы атайын бөлүмгө жылдырыңыз.
- PSUну корпустун артындагы бурамалар менен бекитиңиз.
3.6. Желдеткичти жана Радиаторду орнотуу
The case comes with three 140mm PWM fans pre-installed. Additional cooling can be added.

Image 3.4: Diagram indicating potential fan mounting locations, including the pre-installed front fans and a rear exhaust fan.
- Connect the pre-installed 140mm PWM fans to your motherboard's fan headers.
- For watercooling, install radiators up to 360mm in the designated mounting points (e.g., front or top, depending on size).
3.7. Connecting Front Panel I/O
Connect the front panel cables to the corresponding headers on your motherboard.
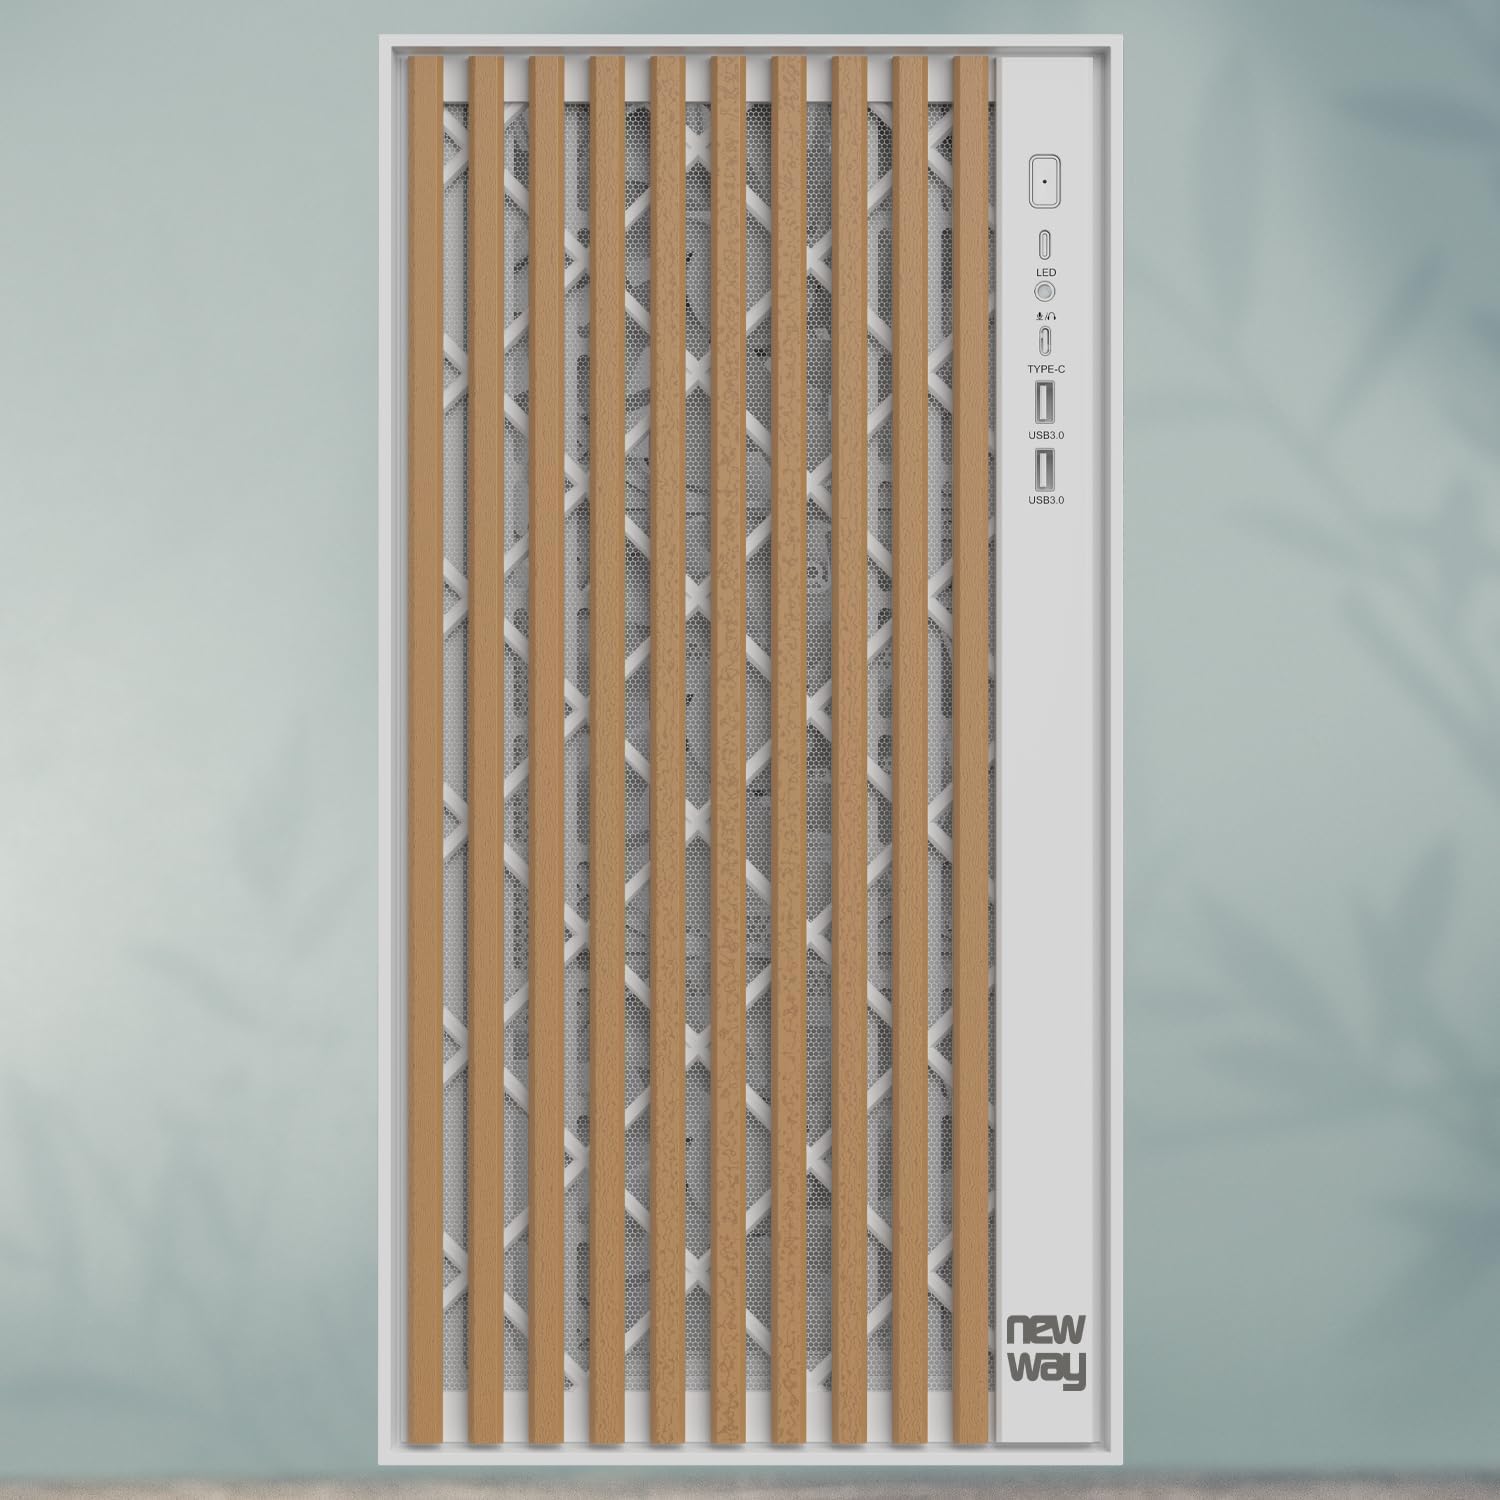
Сүрөт 3.5: Жакын пландан view of the front panel I/O, showing the LED indicator, USB Type-C port, and USB 3.0 ports.
- Connect the USB Type-C cable to the motherboard's Type-C header.
- Connect the USB 3.0 cables to the motherboard's USB 3.0 headers.
- HD аудио кабелин энелик платанын аудио уячасына туташтырыңыз.
- Connect the Power SW, Reset SW, HDD LED, and Power LED cables to the motherboard's front panel headers, ensuring correct polarity for LEDs.
3.8. Кабелдик башкаруу
Кабелдерди тыкан башкаруу үчүн энелик плата лотогунун артындагы кабелдик маршруттук кескичтерди жана байланыш чекиттерин колдонуңуз. Бул аба агымын жана эстетиканы жакшыртат.
3.9. Жыйынтыктоочу жыйын
- Once all components are installed and cables are managed, reattach the rear panel (if removed).
- Carefully reattach the tempered glass side panel and secure it with the thumb screws.
4. Иштөө нускамалары
After completing the assembly, connect your peripherals (monitor, keyboard, mouse, power cable) to your system.
- Бардык кабелдер коопсуз туташтырылганын текшериңиз.
- Press the power button on the front panel to turn on your computer.
- The LED indicator on the front panel will illuminate when the system is powered on.
- To restart the system, press the reset button on the front panel.
5. Техникалык тейлөө
Үзгүлтүксүз тейлөө сиздин PC компоненттеринин оптималдуу иштешин жана узак иштөөсүн камсыз кылууга жардам берет.
- Чаң чыпкалары: The NW1 case is equipped with dust filters. Regularly clean these filters to maintain good airflow and prevent dust buildup inside the case. Gently remove the filters and clean them with compressed air or by rinsing with water (ensure they are completely dry before reinstallation).
- Тышкы тазалоо: Wipe the exterior surfaces, including the wooden front panel and tempered glass, with a soft, damp кездеме. Абразивдүү тазалагычтардан же эриткичтерден качыңыз.
- Ички тазалоо: Periodically open the case and use compressed air to remove dust from internal components and fans.
6. Кыйынчылыктарды
Көйгөйгө туш болсоңуз, төмөнкү жалпы көйгөйлөрдү чечүү кадамдарын караңыз:
- Система күйбөй жатат:
- Check if the power supply unit (PSU) is switched on at the back.
- Бардык электр кабелдери (24-пин ATX, 8-пин CPU, GPU үчүн PCIe) энелик платага жана компоненттерге ишенимдүү туташтырылганын текшериңиз.
- Алдыңкы панелдин кубат которгучу кабели эне платасынын башына туура туташтырылганын текшериңиз.
- Айланбаган күйөрмандар:
- Ensure fan cables are properly connected to the motherboard fan headers.
- Күйөрман башкаруу үчүн BIOS/UEFI жөндөөлөрүн текшериңиз.
- Дисплей чыгышы жок:
- Confirm your monitor cable is connected to the graphics card (not the motherboard, unless using integrated graphics).
- Графикалык картаны PCIe слотуна кайра орнотуңуз.
- Графикалык карта PSUдан кошумча электр кабелдерин талап кылаарын текшериңиз.
- USB порттору иштебейт:
- Алдыңкы панелдеги USB кабелдери энелик платанын USB уячаларына туура туташкандыгын текшериңиз.
- Motherboard драйверлерин текшерүү.
For further assistance, please contact NEWWAY customer support.
7. Техникалык шарттар
| Модель аты | NW1 |
| Продукт номери | ON-CA-2403 |
| Иштин түрү | Орто мунара |
| Motherboard шайкештиги | ATX, Micro ATX, ITX |
| Материал | Tempered Glass, Metal, Wood |
| Түс | Ак |
| Өлчөмдөрү (L x W x Y) | 430мм x 235мм x 430мм |
| Салмагы | 6.8 кг |
| CPU муздаткычын тазалоо | 181 мм чейин |
| GPU Length Clearance | 410 мм чейин |
| Watercooling Support | Up to 360mm radiators |
| Камтылган күйөрмандар | 3 x 140mm PWM fans |
| Сактоочу жайлар | 3 x 3.5" HDD / 2.5" SSD |
| Алдыңкы I / O порттору | USB Type-C, USB 3.0, Audio |
| PSU монтаждоо | Төмөнкү тоо |
8. Кепилдик жана колдоо
The NEWWAY NW1 PC Case comes with a 2 жылдык өндүрүүчүнүн кепилдиги. Бул кепилдик нормалдуу колдонуудагы материалдардагы жана жасалгадагы кемчиликтерди камтыйт.
For warranty claims, technical support, or any inquiries, please contact NEWWAY customer service through their official webпродукт сатылып алынган сайт же сатуучу.
Өндүрүүчү: ОПТИМАЛДУУ ЖОЛ
Келип чыккан өлкө: Кытай