
1. Киришүү
Сатып алганыңыз үчүн рахматasing the MLWSHR Digital LED Alarm Clock Model 8808. This device combines a digital alarm clock with a thermo-hygrometer, offering dual alarms, snooze function, date and year display, 12/24 hour switch, weekday settings, Daylight Saving Time (DST) functionality, auto-dimmable display with three brightness levels, and a convenient 5V1A USB output for charging other devices. Please read this manual carefully to ensure proper use and maintenance of your new alarm clock.
2. Коопсуздук маалыматы
- Түзмөктү суудан жана нымдуулугу жогору чөйрөлөрдөн алыс кармаңыз.
- Аппаратты экстремалдык температурага же түз күн нуруна узак убакытка калтырбаңыз.
- Use only the provided USB Type-C cable for power.
- Түзмөктү өз алдынча бөлүктөргө бөлүүгө же оңдоого аракет кылбаңыз. Көйгөйлөр жаралса, кардарларды колдоо кызматына кайрылыңыз.
- Ensure proper ventilation when using the USB output to charge other devices.
3. Пакеттин мазмуну
- MLWSHR Digital LED Alarm Clock Model 8808
- USB Type-C Кубат кабели
- User Manual
4. Продукт бүтүп калдыview
Ойготкуч саатыңыздын негизги компоненттери жана башкаруу элементтери менен таанышыңыз.
This image displays the front of the MLWSHR Digital LED Alarm Clock, highlighting the time display, weekday indicators, temperature in Celsius, humidity percentage, and dual alarm icons. It also points to the Daylight Saving Time (DST) indicator.

This image illustrates the side and back of the alarm clock, detailing the USB Type-C input for primary power, the battery compartment for 3x AAA backup batteries (not included), and the USB-A output (5V1A) for charging other devices. It also shows the control buttons located on the top edge.
Башкаруу каражаттары:
- SET баскычы: Убакытты, датаны жана ойготкучтарды орнотуу режимине кирет.
- UP (+) Button: Increases values during setting, adjusts brightness.
- DOWN (-) Button: Decreases values during setting, adjusts brightness.
- ТЫНЧТЫК/ЖАРЫК баскычы: Activates snooze, adjusts display brightness.
- СИГНАЛ 1 баскычы: Activates/deactivates Alarm 1, enters Alarm 1 setting.
- СИГНАЛ 2 баскычы: Activates/deactivates Alarm 2, enters Alarm 2 setting.
- 12/24 саат баскычы: Switches between 12-hour and 24-hour time formats.
- °C/°F баскычы: Цельсий жана Фаренгейт температура дисплейинин ортосунда которулат.
5. Орнотуу
5.1 Электр энергиясы
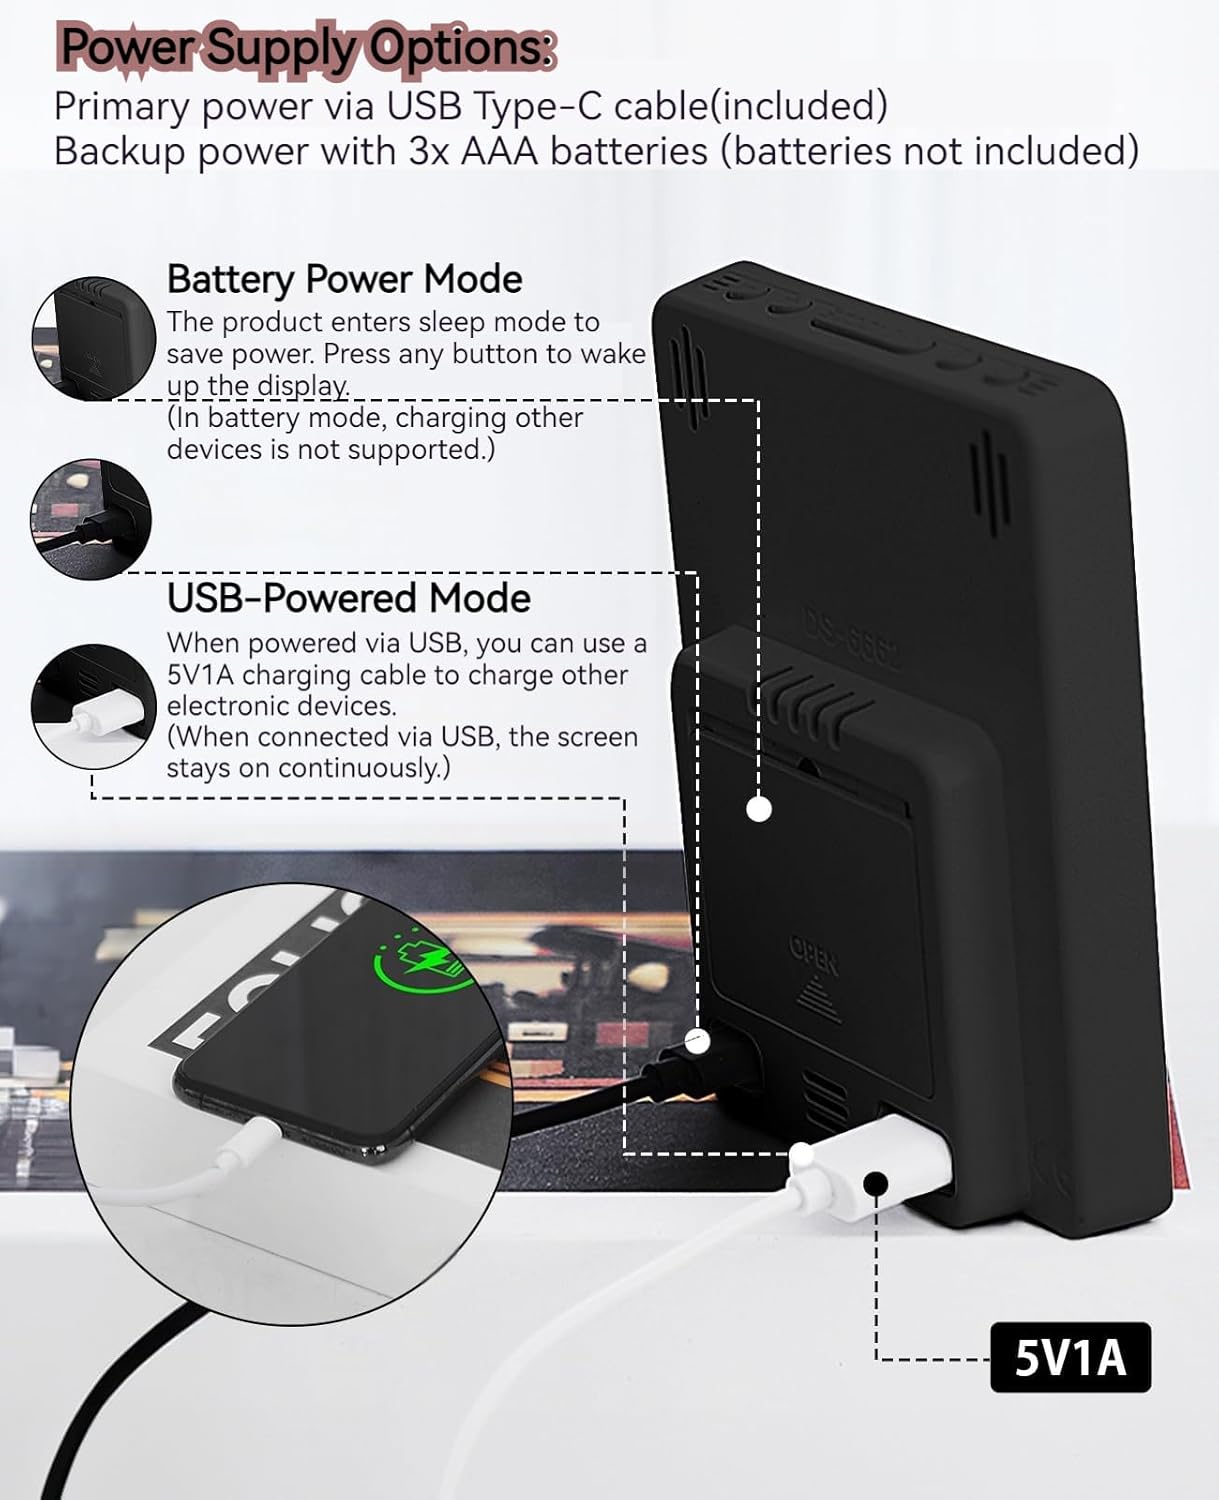
The MLWSHR Digital LED Alarm Clock can be powered in two ways:
- Primary Power (USB Type-C): Connect the provided USB Type-C cable to the clock's input port and plug the other end into a 5V1A USB power adapter (not included). When powered via USB, the display will remain continuously on.
- Backup Power (3x AAA Batteries): Insert 3 AAA batteries (not included) into the battery compartment on the back of the clock. In battery-only mode, the display will enter sleep mode to conserve power. Press any button to temporarily activate the display. Note that the USB output for charging other devices is not supported when operating on battery power alone.
5.2 Алгачкы убакытты жана датаны орнотуу
After connecting power, the clock will typically display a default time. To set the correct time and date:
- басып, кармап туруңуз SET Убакытты орнотуу режимине өтүү үчүн баскычын 3 секунд басып туруңуз. Сааттын сандары күйүп-өчүп турат.
- колдонуу ЖОГОРКУ (+) or ТӨМӨН (-) саатты тууралоо үчүн баскычтар.
- Басыңыз SET Саатты ырастоо жана мүнөт коюуга өтүү үчүн кайрадан басыңыз. Мүнөт сандары күйүп-өчүп турат.
- колдонуу ЖОГОРКУ (+) or ТӨМӨН (-) мүнөттөрдү тууралоо үчүн баскычтар.
- Басууну улантыңыз SET to cycle through and set the Year, Month, and Day using the ЖОГОРКУ (+) or ТӨМӨН (-) buttons for adjustment.
- Күндү койгондон кийин, баскычын басыңыз SET орнотуу режиминен чыгуу үчүн акыркы жолу.
6. Иштөө нускамалары
6.1 12/24 Hour Format Switch
басыңыз 12/24HR 12 сааттык (AM/PM индикатору менен) жана 24 сааттык убакыт форматтарынын ортосунда которулуу үчүн баскычты басыңыз.
This video demonstrates various features of the MLWSHR Digital LED Alarm Clock, including the time, temperature, humidity, weekday display, auto/manual brightness adjustment, 12/24 hour switch, and the easy-to-use buttons and USB-C input/USB-A output.
6.2 Ойготкучтарды орнотуу (ойготкуч 1 & Ойготкуч 2)
The clock features two independent alarms. Each alarm can be set for specific days of the week (Monday-Friday, Monday-Saturday, or Monday-Sunday).

This image illustrates the dual alarm functionality, showing how each alarm can be customized to ring on specific days of the week: Monday to Friday, Monday to Saturday, or every day. It highlights the alarm icons and weekday indicators on the display.
- басыңыз 1-ДАБЛ or 2-ДАБЛ Каалаган ойготкучту тандоо үчүн баскычын басыңыз. Дисплейде ойготкучтун сүрөтчөсү пайда болот.
- Тандалганды басып, кармап туруңуз АЛАРМ button for 3 seconds to enter alarm setting mode. The hour digits will flash.
- колдонуу ЖОГОРКУ (+) or ТӨМӨН (-) ойготкуч саатын тууралоо үчүн баскычтар.
- басыңыз АЛАРМ Саатты ырастоо жана мүнөт жөндөөсүнө өтүү үчүн баскычын кайра басыңыз.
- колдонуу ЖОГОРКУ (+) or ТӨМӨН (-) ойготкуч мүнөттөрдү тууралоо үчүн баскычтар.
- басыңыз АЛАРМ button again to set the alarm frequency (e.g., Mon-Fri, Mon-Sat, Mon-Sun). Use ЖОГОРКУ (+) or ТӨМӨН (-) тандоо үчүн.
- басыңыз АЛАРМ button one last time to exit alarm setting mode.
- To turn an alarm ON or OFF, simply press the corresponding 1-ДАБЛ or 2-ДАБЛ button briefly. The alarm icon will appear (ON) or disappear (OFF) from the display.
6.3 Тындыруу функциясы
When an alarm sounds, you can activate the snooze function for a temporary delay.

This image shows the clock's snooze button and how it functions. When the alarm rings, a brief press of the snooze button will delay the alarm for 5 minutes. Holding the button for more than two seconds will turn off the alarm for that day.
- Ойготкуч шыңгырылганда, басыңыз SNOOZE / LIGHT button briefly. The alarm will pause and ring again after 5 minutes.
- To turn off the alarm for the current day, press and hold the SNOOZE / LIGHT button for more than 2 seconds, or press any other button (except SNOOZE / LIGHT).
6.4 Жарыктыкты жөндөө
The clock features an auto-dimmable display and three manual brightness levels.
- Автоматтык күңгөртүүчү: The built-in light sensor automatically adjusts the display brightness based on ambient light conditions. This is the default setting.
- Manual Brightness: баскычын кыскача басыңыз SNOOZE / LIGHT button to cycle through 3 manual brightness levels (L-01, L-02, L-03).
- To return to auto-dimmable mode, continue pressing the SNOOZE / LIGHT button until 'L-AU' appears on the display.
6.5 Thermometer & Hygrometer
The clock displays indoor temperature and humidity levels.

This image highlights the temperature and humidity readings on the clock's display. It also provides guidance on ideal humidity levels and suggests actions (humidifier/dehumidifier) if levels are too low or too high. The temperature detection range is 23°F to 122°F (-5°C to 50°C) with an error margin of ±2°F.
- Температура бирдигин которуштуруу: басыңыз ° C / ° F button to switch between Celsius and Fahrenheit temperature display.
- The temperature range is 23°F to 122°F (-5°C to 50°C) with an error margin of ±2°F.
- The humidity measurement error is within ±5%.
6.6 USB Power Output (5V1A)
The clock features a USB-A output port (5V1A) that can be used to charge other electronic devices.

This image demonstrates the use of the clock's USB-A output port to charge a smartphone. The clock provides a 5V1A output, making it a convenient charging station. This feature is only available when the clock is powered via its USB Type-C input.
- Connect your device's charging cable to the USB-A output port on the back of the alarm clock.
- Ensure the alarm clock is powered via its USB Type-C input for this feature to function. The USB output is not active when the clock is running on battery power alone.
6.7 Жайкы убакыт (DST)
The clock supports Daylight Saving Time adjustment.
- To activate or deactivate DST, press and hold the DST button (if available, or refer to the SET button sequence for DST in specific models). The DST indicator will appear or disappear.
7. Техникалык тейлөө
- Саатты жумшак, кургак чүпүрөк менен тазалаңыз. Абразивдүү тазалагычтарды же эриткичтерди колдонбоңуз.
- If the clock will not be used for an extended period, remove the AAA batteries to prevent leakage.
- Keep the USB ports free from dust and debris.
8. Кыйынчылыктарды
| Көйгөй | Мүмкүн себеп | Чечим |
|---|---|---|
| Display is off or intermittent. | Running on battery power in sleep mode, or no power. | Press any button to activate display in battery mode. Connect USB Type-C cable for continuous display. Check USB power source. |
| USB output not charging devices. | Clock is running on battery power, or USB cable is faulty. | Ensure the clock is connected to primary USB Type-C power. Try a different USB cable. |
| Ойготкуч угулбайт. | Ойготкуч иштетилген эмес же туура эмес орнотулган. | Check if the alarm icon is displayed. Re-set the alarm time and frequency. |
| Температураны өлчөө так эмес. | Environmental factors or sensor error. | Allow time for the sensor to stabilize. Ensure the clock is not near heat sources or vents. Note the ±2°F error margin. |
| Cannot set time/date. | Not in setting mode, or buttons are unresponsive. | Press and hold the SET button for 3 seconds. Ensure the clock has stable power. |
9. Техникалык шарттар
- Бренд: MLWSHR
- Модель номери: 8808
- Дисплей түрү: LED
- Кубат булагы: USB Type-C (5V1A) / 3x AAA Batteries (backup)
- Продукциянын өлчөмдөрү: 3.54"W x 4.72"H
- Өзгөчөлүктөрү: Dual Alarms, Snooze, Thermo-Hygrometer, Date & Year Display, 12/24 Hour Switch, Weekdays, DST, Auto Dimmable (3 levels), USB Output (5V1A)
- Материал: Eco-friendly Plastic
- Ички/тышкы колдонуу: Indoor
10. Кепилдик жана колдоо
The MLWSHR Digital LED Alarm Clock Model 8808 comes with a 2 жылдык кепилдик сатып алынган күндөн тартып. Бул кепилдик өндүрүштүк кемчиликтерди жана нормалдуу колдонуудагы бузулууларды камтыйт.
For technical support, warranty claims, or any questions regarding your product, please contact MLWSHR customer service through the retailer's platform or visit our official website for contact information. Please have your purchase receipt and model number ready when contacting support.