1. Киришүү
Welcome to the user manual for the Machinist MR9A PRO MAX X99 Motherboard. This guide provides detailed instructions for installing, operating, maintaining, and troubleshooting your motherboard. Please read this manual thoroughly before beginning installation to ensure proper setup and optimal performance.
The Machinist MR9A PRO MAX X99 is designed to support LGA 2011-3 Intel Xeon E5 V3&V4 CPU Processors and DDR4 RAM Memory, offering robust performance for various computing needs.
2. Продукт бүтүп калдыview
2.1 Негизги өзгөчөлүктөрү
- LGA 2011-3 Socket for Intel Xeon E5 V3&V4 Processors
- DDR4 RAM Memory Support (Four Channel)
- NVME M.2 SSD Support
- USB 3.0 Connectivity
2.2 Энелик платанын жайгашуусу жана компоненттери
Монетардык платадагы ар кандай компоненттер жана туташтыргычтар менен таанышыңыз.

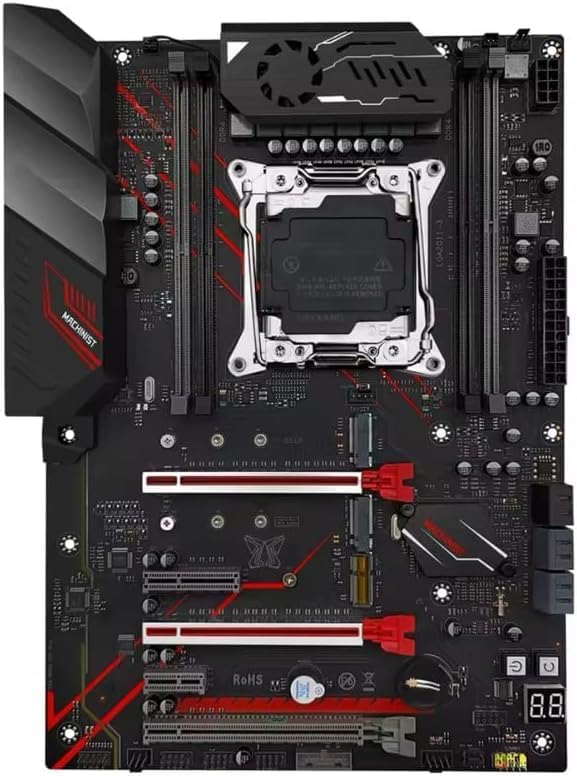
Figure 2.2.1: Detailed layout of the Machinist MR9A PRO MAX X99 Motherboard, highlighting key connectors such as CPU fan headers, power connectors (24PIN DC, 8PIN DC), DDR4 RAM slots, SATA ports, M.2 slots (SATA M.2, NVME M.2, WIFI M.2), USB 2.0 and 3.0 headers, PCIe slots, audio headers, and diagnostic card display.
2.2.2-сүрөт: жогорудан ылдыйга view of the Machinist MR9A PRO MAX X99 Motherboard, showcasing its overall design and component placement.
2.3 Өлчөмдөр

Figure 2.3.1: Dimensions of the Machinist MR9A PRO MAX X99 Motherboard, measuring approximately 300mm in length and 215mm in width.
2.4 Кошумча жабдуулар

Figure 2.4.1: Standard accessories included with the motherboard, typically a CPU fan bracket with screws and a SATA data cable.
3. Техникалык шарттар
| Өзгөчөлүк | Спецификация |
|---|---|
| Өндүрүүчү | МАШИНИСТ |
| Модель номери | ERY-100 |
| CPU розетка | LGA 2011-3 (Note: Product page lists LGA 1700, but title/description confirm LGA 2011-3 for Xeon E5 V3&V4) |
| Шайкеш процессорлор | Intel Xeon E5 V3&V4 Series |
| RAM эс технологиясы | DDR4 |
| RAM эс максималдуу өлчөмү | 64 ГБ |
| Эстутум Slots Жеткиликтүү | 4 (Four Channel) |
| Чипсет түрү | X99 (Note: Product page lists Intel B760, but title/description confirm X99) |
| Сактагыч интерфейси | SATA, NVME M.2 |
| USB порттору | USB 3.0, USB 2.0 |
4. Орнотуу нускамалары
4.1 Баштоодон мурун
- Ensure you have all necessary components: CPU, CPU cooler, RAM, storage devices (SSD/HDD), power supply, and a compatible PC case.
- Work on a clean, flat, and static-free surface. Use an anti-static wrist strap or frequently touch a grounded metal object to discharge static electricity.
- Refer to your PC case manual for specific mounting instructions.
4.2 Motherboard орнотуу
- Ишти даярдоо: Install the I/O shield into the rear opening of your PC case. Install standoffs in the case according to the motherboard's mounting holes.
- CPU орнотуу: Open the CPU socket retention lever. Carefully align the CPU with the socket, ensuring the golden triangle on the CPU matches the triangle on the socket. Gently place the CPU into the socket without forcing it. Close the retention lever to secure the CPU.
- CPU муздаткычын орнотуу: Apply thermal paste to the CPU if not pre-applied on the cooler. Mount the CPU cooler according to its instructions, ensuring it is securely fastened and makes good contact with the CPU. Connect the CPU fan cable to the 'CPU_FAN' header on the motherboard.
- RAM орнотуу: Open the clips on the DDR4 memory slots. Align the RAM module with the slot, ensuring the notch on the module matches the key in the slot. Press down firmly on both ends of the module until the clips snap into place. For optimal performance, install RAM in the recommended dual-channel or quad-channel configuration as per the motherboard's silkscreen or manual.
- Сактагыч түзмөктөрдү орнотуу:
- M.2 SSD: Insert the M.2 SSD into the appropriate M.2 slot (NVME M.2 or SATA M.2) at an angle, then gently push it down and secure it with the provided screw.
- SATA дисктери: SSD/HDD дисктериңизден SATA маалымат кабелдерин энелик платадагы SATA портторуна туташтырыңыз.
- Motherboard орнотуу: Carefully place the motherboard into the PC case, aligning the screw holes with the installed standoffs. Secure the motherboard with screws.
- Кубат булагына туташтыруу: Connect the 24-pin ATX power cable from your power supply to the main 24-pin power connector on the motherboard. Connect the 8-pin (or 4+4-pin) CPU power cable to the 8-pin CPU power connector. Connect SATA power cables to your storage drives.
- Алдыңкы панелдик кабелдерди туташтыруу: Connect the power button, reset button, HDD LED, power LED, and USB/audio headers from your PC case to the corresponding pins on the motherboard's front panel header. Refer to the motherboard layout diagram (Figure 2.2.1) for pin locations.
- Кеңейтүү карталарын орнотуу: Insert graphics cards or other PCIe expansion cards into the appropriate PCIe slots and secure them with the case's retention mechanism.
5. Аналык платаны иштетүү
5.1 Биринчи жүктөө жана BIOS/UEFI орнотуу
After completing the hardware installation, connect your monitor, keyboard, and mouse. Power on your system.
- Жүктөө процессинде баскычты кайра-кайра басыңыз DEL or F2 key (or as indicated on screen) to enter the BIOS/UEFI setup utility.
- In the BIOS/UEFI, you can configure boot order, system time, fan speeds, and other hardware settings. Ensure your storage drive is recognized and set as the primary boot device for OS installation.
- Өзгөртүүлөрдү сактап, BIOS/UEFIден чыгыңыз. Система кайра жүктөлөт.
5.2 Операциялык системаны жана драйверди орнотуу
- Операциялык тутумуңузду орнотуучу медианы (USB же DVD) салып, экрандагы көрсөтмөлөрдү аткарып, каалаган ОСти орнотуңуз.
- After OS installation, install the necessary drivers for your motherboard's components (chipset, LAN, audio, USB, etc.). These drivers are typically available on the manufacturer's website or included on a driver CD/USB drive with the motherboard.
- Regularly check the Machinist official website for the latest driver updates and BIOS/UEFI versions to ensure system stability and performance.
6. Техникалык тейлөө
Туура техникалык тейлөө энелик платаңыздын иштөө мөөнөтүн узартып, туруктуу иштешин камсыздай алат.
- Чаңды тазалоо: Мезгил-мезгили менен кысылган абаны колдонуп, энелик платадан жана компоненттерден чаңды тазалап туруңуз. Тазалоодон мурун системанын өчүрүлгөнүн жана розеткадан ажыратылганын текшериңиз.
- BIOS/UEFI жаңыртуулары: Update your BIOS/UEFI only when necessary, following the manufacturer's instructions carefully. Incorrect updates can damage the motherboard.
- Драйвер жаңыртуулары: Жаңы программалык камсыздоо жана аппараттык жабдыктар менен шайкештикти жана оптималдуу иштөөнү камсыз кылуу үчүн драйверлериңизди жаңыртыңыз.
- Кабелдик башкаруу: Ensure cables inside the case are neatly routed to improve airflow and prevent obstruction.
7. Кыйынчылыктарды
Бул бөлүмдө сиз кабылышы мүмкүн болгон жалпы маселелерди чечүү жолдору каралган.
| Көйгөй | Мүмкүн себеп | Чечим |
|---|---|---|
| Система күйбөйт. | Бошогон электр кабелдери, туура эмес электр энергиясы, алдыңкы панелдин туура эмес туташуулары. | Check 24-pin and 8-pin power connections. Ensure power supply switch is ON. Verify front panel power button connection. Test with a known good power supply if possible. |
| Монитордо дисплей жок. | Graphics card not seated properly, monitor cable loose, faulty RAM. | Reseat graphics card. Check monitor cable connections. Try reseating RAM modules or testing with one module at a time. |
| System powers on but no POST (Power-On Self-Test). | CPU not seated correctly, RAM issues, short circuit. | Reseat CPU and check for bent pins. Reseat RAM. Remove all non-essential components and test. Check for any loose screws or components touching the motherboard. |
| Иштетүү системасы табылган жок. | Incorrect boot order, faulty storage drive, loose SATA/M.2 cable. | Check BIOS/UEFI boot order. Ensure storage drive is properly connected. Test storage drive on another system if possible. |
| Система бузулат же катып калат. | Ашыкча ысып кетүү, туруксуз overclock, туура эмес оперативдүү эс, эскирген драйверлер. | Monitor temperatures. Reset BIOS/UEFI to default settings. Run memory diagnostic tests. Update drivers. |
8. Кепилдик жана колдоо
For specific warranty information regarding your Machinist MR9A PRO MAX X99 Motherboard, please refer to the warranty card included with your product or visit the official Machinist webсайт. Кепилдиктин шарттары аймакка жана сатуучуга жараша өзгөрүшү мүмкүн.
For technical support, driver downloads, and BIOS/UEFI updates, please visit the official Machinist support webсайт. Жардам алуу үчүн сатуучуга да кайрылсаңыз болот.


