1. Киришүү
This manual provides detailed instructions for the installation, setup, and operation of the NX3 PRO 3D GYRO Flight Controller. This device is designed to enhance the stability and control of RC fixed-wing aircraft, including airplanes, V-tail configurations, and FPV racing drones. Please read this manual thoroughly before use to ensure proper functionality and safety.
2. Өзгөчөлүктөрү
- 3D GYRO stabilization for improved flight performance.
- Autobalance function for stable flight.
- Supports various RC fixed-wing aircraft types, including V-tail.
- Компакт жана жеңил дизайн.
- Орнотуу жана конфигурациялоо оңой.
3. Пакеттин мазмуну
Пакетиңизде бардык буюмдар бар экенин текшериңиз:
- NX3 PRO 3D GYRO Flight Controller unit
- Connection cables (if included by manufacturer)
- Көрсөтмө (бул документ)
4. Продукт бүтүп калдыview
The NX3 PRO 3D GYRO Flight Controller features multiple input and output ports for connecting to your RC receiver and servos. It also includes adjustment potentiometers for fine-tuning control surfaces and mode selection jumpers.
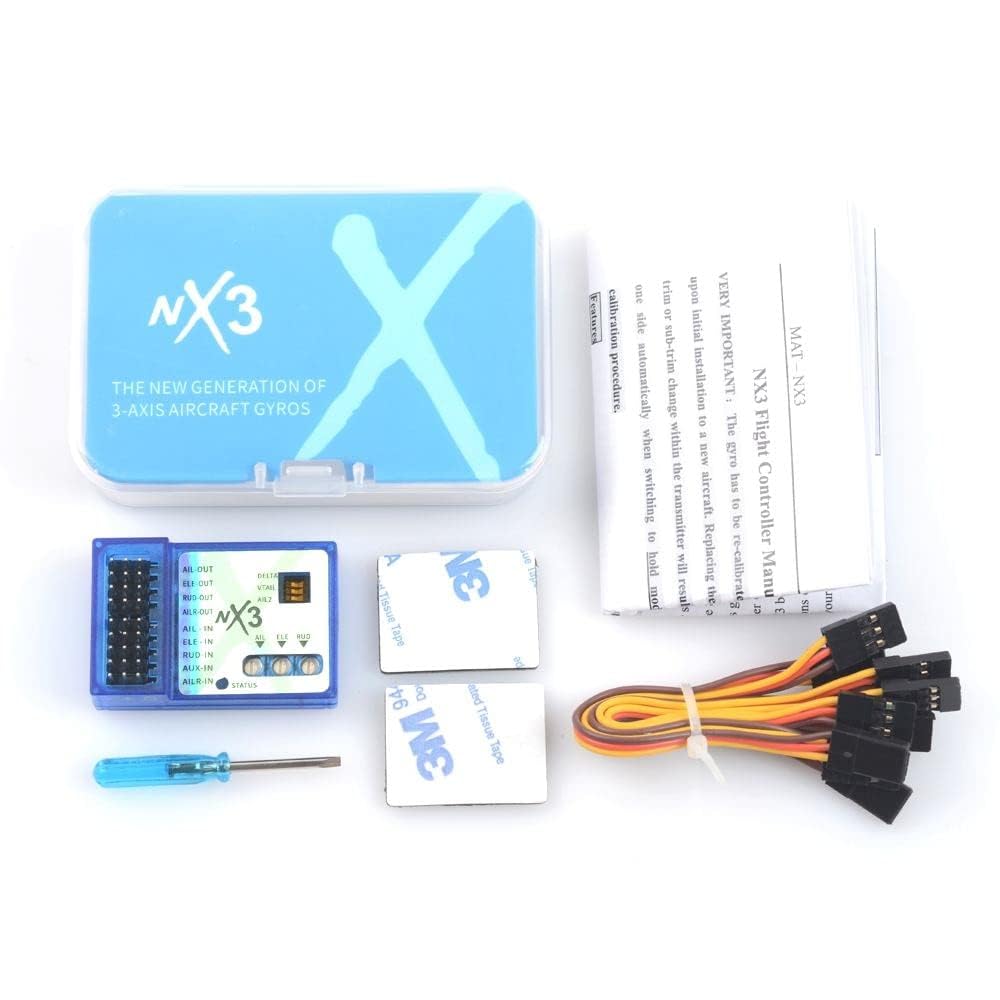
Figure 4.1: NX3 PRO 3D GYRO Flight Controller
This image displays the NX3 PRO 3D GYRO Flight Controller. Key labels visible include: AIL-OUT, ELE-OUT, RUD-OUT, AILR-OUT, AIL-IN, ELE-IN, RUD-IN, AUX-IN, AILR-IN, STATUS LED, and adjustment potentiometers for AIL, ELE, RUD. Jumpers for DELTA, VTAIL, and AIL2 are also present.
4.1. Порт сүрөттөмөлөрү
- AIL-OUT: Aileron Output
- ELE-OUT: Elevator Output
- RUD-OUT: Rudder Output
- AILR-OUT: Aileron Right Output (for dual aileron setups)
- AIL-IN: Aileron Input from Receiver
- ELE-IN: Elevator Input from Receiver
- RUD-IN: Rudder Input from Receiver
- Колдонуучу: Auxiliary Input from Receiver (for mode switching, if supported)
- AILR-IN: Aileron Right Input from Receiver (for dual aileron setups)
- АБАЛЫ: LED indicator for operational status.
4.2. Adjustment Potentiometers
- AIL: Aileron gain adjustment.
- ELE: Elevator gain adjustment.
- RUD: Rudder gain adjustment.
4.3. Mode Jumpers
- DELTA: Jumper setting for Delta wing aircraft.
- VTAIL: Jumper setting for V-tail aircraft.
- AIL2: Jumper setting for dual aileron configuration.
5. Орнотуу
5.1. Орнотуу
- Mount the NX3 PRO unit securely in your aircraft, ensuring it is level and oriented correctly. The arrow on the unit should point towards the front of the aircraft.
- Connect the receiver outputs (AIL, ELE, RUD, AUX, AILR) to the corresponding "IN" ports on the NX3 PRO.
- Connect the servo leads from your aircraft's control surfaces (Aileron, Elevator, Rudder) to the corresponding "OUT" ports on the NX3 PRO.
- Ensure all connections are firm and correctly polarized.
5.2. Баштапкы конфигурация
- Aircraft Type Selection: Set the DELTA, VTAIL, and AIL2 jumpers according to your aircraft's configuration. For standard fixed-wing aircraft, ensure these jumpers are removed.
- Күйгүзүү: Power on your RC receiver and the NX3 PRO. Observe the STATUS LED.
- Gyro Direction Test:
- With the aircraft powered on and the flight controller active, gently tilt the aircraft.
- Observe the control surfaces. They should move in the opposite direction of the tilt to counteract it. For example, if you tilt the left wing down, the left aileron should move up.
- If any control surface moves in the same direction as the tilt, reverse the corresponding channel on your RC transmitter or reverse the servo direction in the flight controller's settings (if applicable, consult advanced manual).
- Пайданы тууралоо: Start with the AIL, ELE, and RUD potentiometers set to their minimum positions. Gradually increase the gain during flight testing to achieve desired stability without oscillation.
6. Иштөө режимдери
The NX3 PRO typically offers different flight modes, which can often be switched via an auxiliary channel on your transmitter. Refer to the specific product documentation for detailed mode descriptions and switching procedures.
6.1. Flight Preparation
- Always perform a pre-flight check of all control surfaces and ensure they respond correctly to transmitter inputs and gyro corrections.
- Ensure batteries are fully charged for both the aircraft and the transmitter.
- Fly in an open area, away from obstacles and people.
6.2. In-Flight Adjustments
During initial flights, observe the aircraft's behavior. If the aircraft oscillates or feels overly sensitive, reduce the corresponding gain potentiometer (AIL, ELE, RUD). If it feels sluggish or unstable, increase the gain. Make small adjustments and re-test.
7. Техникалык тейлөө
- Keep the flight controller clean and free from dust and debris.
- Regularly inspect all wiring connections for looseness or damage.
- Аппаратты экстремалдык температурага же нымдуулукка дуушар кылуудан алыс болуңуз.
- Ensure the unit is securely mounted to prevent vibrations from affecting performance.
8. Кыйынчылыктарды
| Көйгөй | Мүмкүн себеп | Чечим |
|---|---|---|
| Control surfaces move in the wrong direction. | Incorrect gyro direction or servo reversal. | Reverse the channel on your transmitter or adjust gyro direction settings. |
| Aircraft oscillates or shakes in flight. | Gain settings are too high. | Reduce the corresponding AIL, ELE, or RUD gain potentiometer. |
| No response from control surfaces. | Loose connections, no power, or incorrect wiring. | Check all wiring, ensure power supply, and verify correct port connections. |
| STATUS LED not illuminating. | Аппаратка кубат жок. | Check power connection from receiver or ESC. |
9. Техникалык шарттар
- Модел: ABLFY_DUD_20761
- Түрү: 3D GYRO Flight Controller
- Шайкештик: RC Fixed-Wing Aircraft, Airplanes, V-Tail, FPV Racing Drones
- Киргизүү көлөмүtage: (Typically 5-6V from receiver, specific voltage not provided in source)
- Өлчөмдөрү: (Not provided in source)
- Салмагы: (Not provided in source)
10. Кепилдик жана колдоо
This product is typically covered by a limited manufacturer's warranty against defects in materials and workmanship. For specific warranty terms, duration, and support inquiries, please refer to the documentation provided with your purchase or contact the retailer/manufacturer directly. Keep your proof of purchase for warranty claims.
For technical support, please consult online forums or the manufacturer's official website for updated information and community assistance.