
1. Киришүү
This manual provides detailed instructions for the safe and efficient operation of your Jesverty SPS-3010C DC Power Supply. Please read this manual thoroughly before using the device to ensure proper functionality and to prevent damage or injury. This power supply is designed for various applications including laboratories, educational sites, factory manufacturing tests, maintenance repairs, battery charging, and electronic DIY projects.
2. Коопсуздук нускамалары
- Кубат булагын ар дайым жерге туташтырылган розеткага туташтырыңыз.
- Аппаратты нымдуу жерде иштетпеңиз же damp шарттар.
- Ensure proper ventilation around the unit to prevent overheating. Do not block the cooling fan vents.
- Before connecting or disconnecting any load, ensure the output is turned OFF.
- Do not attempt to open or modify the power supply. Refer all servicing to qualified personnel.
- AC киргизүү көлөмүн текшериңизtage selection (115V/230V) matches your local power supply before connecting.
- Тийиштүү сыноо өткөргүчтөрүн колдонуңуз жана алардын жакшы абалда экенине ынаныңыз.
3. Продукт бүтүп калдыview
The Jesverty SPS-3010C is a compact and versatile DC power supply featuring a 4-digit LED display, encoder knobs for precise adjustments, and multiple output options.

Figure 3.1: Front and Rear Panel Components of the SPS-3010C
Алдыңкы панелдин компоненттери:
- Тtage Дисплей: Орнотулган же чыныгы чыгаруу көлөмүн көрсөтөтtage.
- C.C. Mode Indicator: Түзмөк туруктуу ток режиминде иштеп жатканда күйөт.
- CHG Mode Indicator: Illuminates when the Intelligent Battery Charging function is active.
- C.V. Mode Indicator: Түзмөк туруктуу Көлөмдө иштеп жатканда күйөтtage режими.
- Учурдагы дисплей: Shows the set or actual output current.
- OCP Status LED: Ашыкча ток коргоосу иштетилгенде күйөт.
- OPN Status LED: Indicates the state of the Output Power ON function.
- Power Display: Shows the calculated output power in Watts.
- USB-C Quick-Charge Port: 20W fast charging output.
- USB-A Quick-Charge Port: 20W fast charging output.
- CHG Setting Button: Activates the Intelligent Battery Charging function.
- OCP Setting Button: Toggles Over-Current Protection.
- Output Control Button: Toggles the main DC output ON/OFF.
- Тtage Knob (Coarse): Томду тууралайтtage value before the decimal point.
- Тtage Knob (Fine): Томду тууралайтtage value after the decimal point.
- Current Knob (Coarse): Adjusts the current value before the decimal point.
- Current Knob (Fine): Adjusts the current value after the decimal point.
- Кубат которгучу: Main power ON/OFF for the unit.
- Output Terminal - (Black): Терс чыгуу терминалы.
- Grounding Terminal (Green): Chassis ground connection.
- Output Terminal + (Red): Оң чыгуу терминалы.
Арткы панелдин компоненттери:
- Муздатуу желдеткич: Activates automatically to regulate internal temperature.
- Input Selectable Switch: For selecting AC115V or AC230V input voltage.
- AC Power Inlet: Негизги электр шнуруна туташтырылат.
- Fuse Box (Spare Fuse Inside): Contains the main fuse for protection.
4. Орнотуу
- Пакеттен чыгаруу: Carefully remove the power supply from its packaging. Verify all accessories (power cord, test leads, instruction manual) are present.
- Тtage Тандоо: Locate the Input Selectable Switch on the rear panel. Ensure it is set to match your local AC mains voltage (115V же 230V). Туура эмес тандоо түзмөккө зыян келтириши мүмкүн.
- Кубат туташуу: Connect the provided AC power cord to the AC Power Inlet on the rear panel and then to a grounded electrical outlet.
- Баштапкы күйгүзүү: Press the Power Switch on the front panel. The LED display should illuminate.
5. Иштөө нускамалары
5.1. Setting Voltage жана Current
The SPS-3010C uses encoder knobs for precise digital adjustment of voltage жана ток.

Figure 5.1: Encoder Knob Adjustment for Voltage жана Current
- Тtage Тууралоо:
- басыңыз Тtage баскычы (орой) to select the digit before the decimal point. Rotate the knob to change the value.
- басыңыз Тtage баскычы (жакшы) to select the digit after the decimal point. Rotate the knob to change the value.
- The resolution for voltage жөндөө 0.01V.
- Учурдагы тууралоо:
- басыңыз Учурдагы баскыч (орой) to select the digit before the decimal point. Rotate the knob to change the value.
- басыңыз Учурдагы баскыч (жакшы) to select the digit after the decimal point. Rotate the knob to change the value.
- The resolution for current setting is 0.001A.
5.2. Output ON/OFF Control
Каалаган томду койгондон кийинtage and current, press the Output Control Button to enable or disable the main DC output. The display will show the actual output values when enabled.
5.3. Intelligent Battery Charging Mode
This function allows for safe and efficient charging of various battery types.
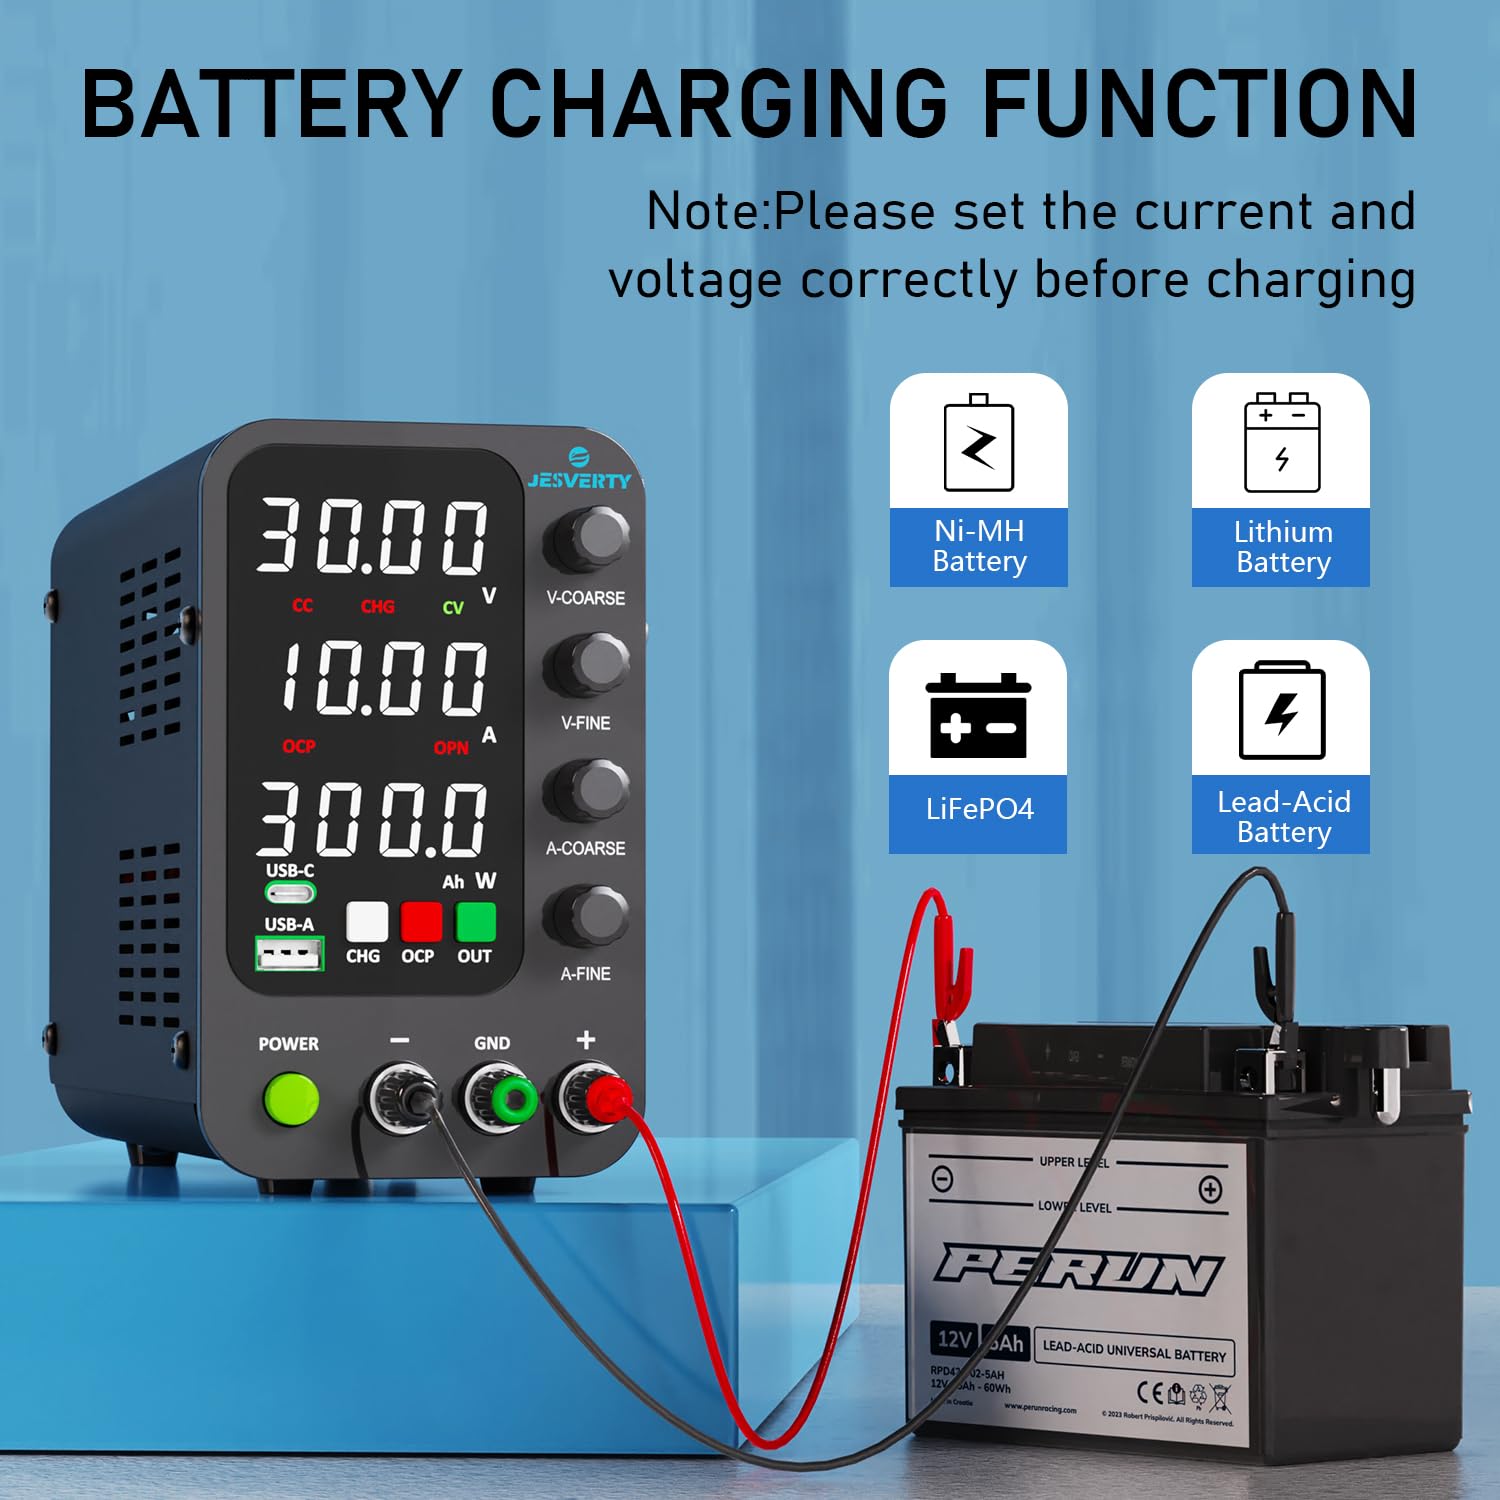
Figure 5.2: Intelligent Battery Charging Function
- Connect the battery to the output terminals, ensuring correct polarity (+ to + and - to -). The unit has built-in reverse connection protection.
- Set the desired charging voltage and current limit using the encoder knobs.
- басыңыз CHG Setting Button to activate the Intelligent Battery Charging function. The CHG indicator will illuminate.
- The display will show real-time charging power (Ah). The power supply will automatically stop charging when the battery reaches the set voltage.
5.4. USB-A & USB-C Quick-Charge Ports
The unit includes dedicated USB-A and USB-C ports for quick charging external devices.

5.3-сүрөт: USB кубаттоо функциясы
- Both USB-A and USB-C ports support 20W fast charging.
- These ports provide fixed voltage and current output and are independent of the main DC output settings.
- Simply connect your compatible device to the appropriate USB port for charging.
5.5. OPN (Output Power ON) Function
The OPN function determines the state of the main DC output when the unit is powered on.
- When OPN is enabled, the main DC output will automatically turn ON with the previously set voltage and current parameters as soon as the power switch is engaged.
- When OPN is disabled, the main DC output will remain OFF upon power-up, requiring a manual press of the Output Control Button иштетүү.
- Consult the full instruction manual for details on how to enable or disable the OPN function.
6. Коргоо өзгөчөлүктөрү
- OCP (Over-Current Protection): This feature protects the connected load from excessive current. When activated, if the output current exceeds the set OCP threshold, the output will be shut off, and the OCP Status LED will illuminate.
- Temperature-Regulated Cooling Fan: An internal fan automatically adjusts its speed based on the unit's temperature to prevent overheating during operation.
- Тескери туташуу коргоо: For battery charging, this feature prevents damage to the power supply and battery if the polarity is accidentally reversed.
Figure 6.1: Over-Current Protection in action
7. Техникалык тейлөө
- Тазалоо: Тазалоодон мурун электр кубатын электр тармагынан ажыратыңыз. Сыртын сүртүү үчүн жумшак, кургак чүпүрөктү колдонуңуз. Абразивдүү тазалоочу каражаттарды же эриткичтерди колдонбоңуз.
- Вентиляция: Regularly check that the cooling fan vents are clear of dust and debris to ensure proper airflow.
- Сактагыч: Агрегатты күн нурунан жана экстремалдык температурадан алыс салкын, кургак жерде сактаңыз.
8. Кыйынчылыктарды
- Кубат жок:
- Кубат шнуру түзмөккө да, розеткага да бекем туташтырылганын текшериңиз.
- Кубат баскычынын ON абалында экенин текшериңиз.
- Verify the AC Input Selectable Switch on the rear panel is set correctly (115V/230V).
- Check the fuse in the Fuse Box on the rear panel. Replace if blown with a fuse of the same rating.
- No Output Voltage/Current:
- камсыз кылуу Output Control Button is pressed and the output is enabled.
- Check if OCP is active (OCP Status LED illuminated). If so, clear the fault condition and reset OCP.
- тtage жана учурдагы жөндөөлөр нөлгө коюлган эмес.
- Inaccurate Current Display at Low Loads: At very low current settings (e.g., below 15mA), the displayed current may show a slight deviation (e.g., 2mA less than actual). This is a characteristic of some switching power supplies and typically does not affect performance for most applications.
- Тtage Transients During Load Changes: When connecting loads with large capacitance, especially if the power supply is already enabled at a high voltage, a brief current surge may occur as the output capacitance discharges into the load. It is recommended to connect the load with the output disabled, then enable the output.
9. Техникалык шарттар

Figure 9.1: Dimensions and Weight of the SPS-3010C
| Өзгөчөлүк | Спецификация |
|---|---|
| Модель номери | SPS-3010C |
| Бренд | Jesverty |
| Output Voltage Диапазон | 0-32V |
| Чыгуу токунун диапазону | 0-10A |
| Чыгуу Wattage (USB/Type-C) | 20 Ватт |
| Тtage Setting Resolution | 0.01V |
| Учурдагы жөндөө токтому | 0.001A |
| Дисплей | 4 цифралуу LED |
| Киргизүү көлөмүtage | AC115V/230V (Selectable) |
| Өлчөмдөрү (болжол менен) | 7.1(D) x 3.6(W) x 6.2(H) inches (18 x 9 x 16 cm) |
| Салмагы (болжол менен) | 2.5 фунт (1.14 кг) |
| UPC | 680306176946 |
10. Кепилдик жана Кардарларды колдоо
Jesverty provides professional technical support for its products. For any problems or questions regarding your Jesverty SPS-3010C DC Power Supply, please contact Jesverty Customer Service. Contact information can typically be found on the back of the instruction manual included with your product or through the Amazon message system.