
KORAD KA3005D-23
KORAD KA3005D-23 Тактык менен өзгөрүлмө жөнгө салынуучу 30V, 5A туруктуу токтун сызыктуу кубат булагы - колдонуучунун колдонмосу
Model: KA3005D-23
1. Киришүү
The KORAD KA3005D-23 is a heavy-duty, single-channel linear DC power supply designed for precision applications in labs, colleges, and production environments. It offers continuously adjustable voltage and current settings with low ripple and noise, high reliability, and high accuracy. This manual provides detailed instructions for the safe and efficient operation of your KA3005D-23 power supply.
This unit features a bright, easy-to-read 4-digit LED screen displaying voltage, current, and power values. It also includes four memory locations (M1-M4) for storing frequently used settings, and multiple protection features such as over-voltage and over-current protection.
2. Коопсуздук маалыматы
Please read all safety instructions carefully before operating the device. Failure to comply with these instructions may result in electric shock, fire, or damage to the device.
- Электр булагы жерге туташтырылган розеткага туташтырылганын текшериңиз.
- Аппаратты нымдуу жерде иштетпеңиз же damp шарттар.
- в ачпагылаasinг. Ичинде колдонуучу тейлей турган бөлүктөр жок. Бардык тейлөөлөрдү квалификациялуу кызматкерлерге тапшырыңыз.
- Киргизилген томду текшериңизtage selector switch on the rear panel is set correctly for your local power grid (110V or 220V) before connecting to AC power.
- Always turn off the output and disconnect power before making or changing connections to the output terminals.
- Avoid short-circuiting the output terminals for extended periods, even with protection features enabled.
- Use appropriate test leads rated for the voltage and current levels you will be working with.
3. Unit Features
The KORAD KA3005D-23 is equipped with several features to enhance its functionality and user experience.

Figure 3.1: Unit Features Overview. This image highlights the key features of the KORAD KA3005D-23 power supply, including its power and protection mechanisms, memory settings, bright 4-digit LED display, and switchable power input.
3.1 Power & Protection
- 30V/5A Benchtop Supply: Provides a stable and adjustable DC power source.
- Built-in Over-Current Protection (OCP): Automatically limits current to prevent damage to the connected circuit.
- Built-in Over-Voltage Коргоо (OVP): Чыгуу көлөмүн алдын алатtage from exceeding a set limit, protecting sensitive components.
- Dedicated On/Off Button: Controls the unit's output, allowing for safe connection and disconnection of loads.
3.2 Memory Settings (M1-M4)
- Four dedicated memory locations allow users to store and recall frequently used voltage and current settings, streamlining repetitive tasks.
3.3 Bright 4-Digit LED Display
- Provides a precise and legible readout of voltage, current, and active settings from various angles.
3.4 Switchable Power Input
- Easily switchable between 110V and 220V on the rear panel to accommodate different regional power standards.
4. Panel Overview
Familiarize yourself with the front and rear panels of the KORAD KA3005D-23 power supply.
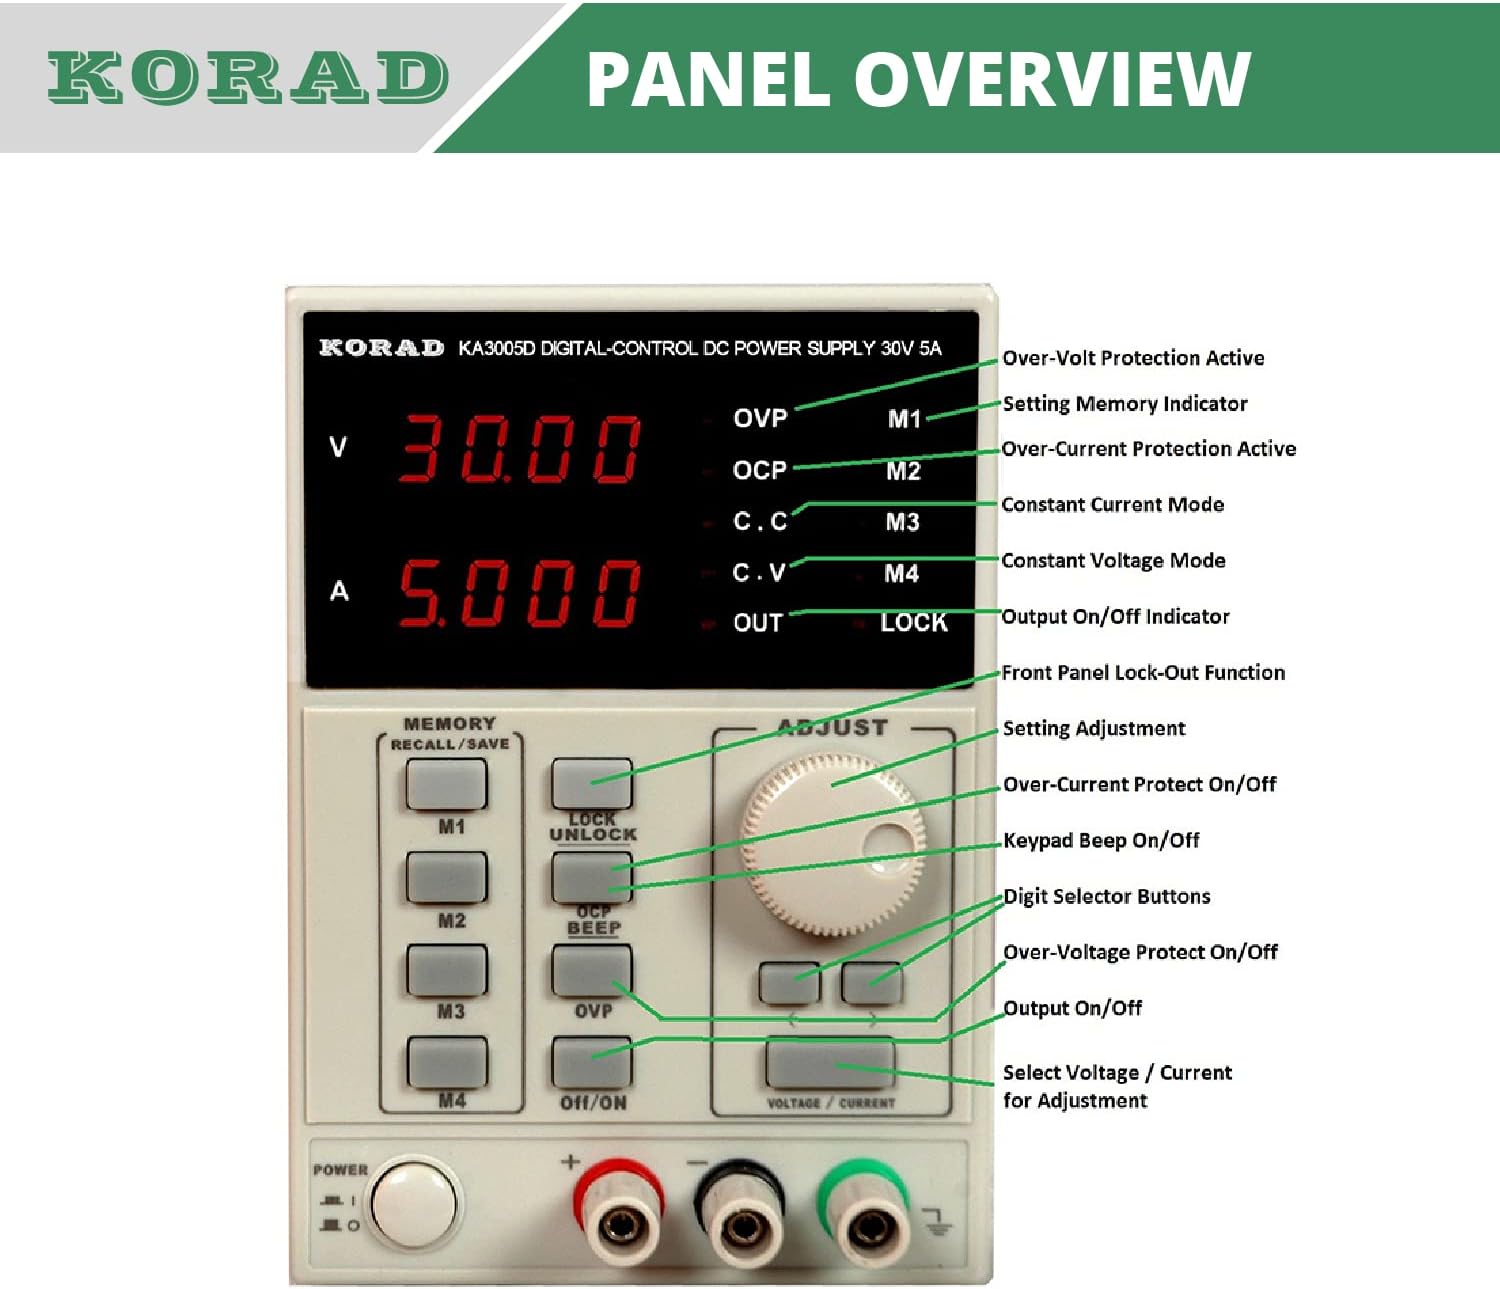
4.1-сүрөт: Алдыңкы панелдин жайгашуусу. Бул сүрөт майда-чүйдөсүнө чейин камсыз кылат view of the front panel, labeling all indicators, buttons, and controls for easy identification and understanding.
4.1 Алдыңкы панелдин башкаруу элементтери жана көрсөткүчтөрү
| Label/Indicator | Description |
|---|---|
| V Дисплей | 4-digit LED display for output voltage. |
| Дисплей | 4-digit LED display for output current. |
| OVP Indicator | Ашыкча үнүн чыгарганда күйөтtage коргоосу активдүү. |
| OCP Indicator | Ашыкча ток коргоосу иштетилгенде күйөт. |
| C.C Indicator | Түзмөк туруктуу ток режиминде иштеп жатканда күйөт. |
| C.V Indicator | Түзмөк туруктуу Көлөмдө иштеп жатканда күйөтtage режими. |
| OUT көрсөткүчү | Чыгаруу активдүү болгондо күйөт. |
| LOCK көрсөткүчү | Алдыңкы панелдин башкаруу элементтери кулпуланганда күйөт. |
| M1-M4 Buttons | Memory recall/save buttons for preset voltage жана учурдагы орнотуулар. |
| БҮЛҮП АЛУУ/АЧУУ баскычы | Press and hold to lock or unlock the front panel controls. |
| BEEP Button | Toggles the keypad beep sound on/off. |
| OCP Button | Toggles Over-Current Protection on/off. |
| OVP Button | Toggles Over-Voltage Protection on/off. |
| Күйгүзүү/Өчүрүү баскычы | Activates or deactivates the power output to the terminals. |
| Тууралоо баскычы | Үндү тууралоо үчүн айланма коддогучtage же учурдагы маанилер. |
| Left/Right Buttons (< / >) | Selects the digit to be adjusted by the Adjust Knob. |
| Тtage/Current Button | Toggles between voltage and current adjustment modes. |
| Чыгуу терминалдары | Positive (+), Negative (-), and Ground (GND) terminals for connecting loads. |
| Кубат баскычы | Агрегаттын негизги өчүргүч. |
4.2 Арткы панелдин үстүндөview

Figure 4.2: Rear Panel Input Voltage Selector. This image shows the rear panel of the power supply, highlighting the AC power input, the voltage selector switch (110V/220V), and the cooling fan vent.
- AC кубаттуулугун киргизүү: Standard IEC C14 inlet for connecting the power cord.
- Тtage Selector Switch: Allows selection between 110V and 220V AC input. Ensure this is set correctly before connecting to mains power.
- Муздатуу желдеткич: Intelligent temperature-controlled fan for efficient heat dissipation.
- USB порт: For PC connectivity and software control (if applicable).
5. Орнотуу
- Таңгактан чыгаруу жана текшерүү: Carefully remove the power supply from its packaging. Inspect the unit for any signs of physical damage. If damage is found, contact your supplier immediately.
- Киргизүү көлөмүtage Тандоо: Before connecting the power cord, locate the voltage selector switch on the rear panel (refer to Figure 4.2). Ensure it is set to match your local AC mains voltage (110V же 220V). Туура эмес жөндөө түзмөккө зыян келтириши мүмкүн.
- Кубат туташуу: Connect the provided AC power cord to the AC power input on the rear panel and then to a grounded wall outlet.
- Баштапкы күйгүзүү: Press the main Power button on the front panel. The display should illuminate.
- Output Terminal Connections: Connect your load to the output terminals (+, -, GND) using appropriate test leads. Ensure proper polarity.

Figure 5.1: Power Supply with Test Leads. This image shows the KORAD KA3005D-23 power supply along with the included test leads, demonstrating how they connect to the output terminals.
6. Иштөө нускамалары
6.1 Setting Voltage жана Current
- Select Adjustment Mode: басыңыз Тtage/Current button to toggle between voltage (V) and current (A) adjustment modes. The corresponding display will show the value to be set.
- Select Digit: колдонуу < жана > buttons to select the digit you wish to adjust. The selected digit will blink.
- Маани тууралоо: айлантыңыз Тууралоо баскычы clockwise to increase the value and counter-clockwise to decrease it.
- Чыгууну активдештирүү: Бир жолу каалаган томtage жана учурдагы чеги коюлгандан кийин, баскычын басыңыз On/Off button to activate the output. The OUT indicator will illuminate.
6.2 Эстутум функциялары (M1-M4)
- Сактоо орнотуулары: Каалаган томду коюңузtage and current. Press and hold one of the M1-M4 buttons for approximately 2 seconds until a beep confirms the setting is saved.
- Жөндөөлөрдү кайра чакыртуу: баскычтарынын бирин кыскача басыңыз M1-M4 buttons. The stored voltage and current values will be loaded. Note that recalling a setting does not automatically activate the output; you must press the On/Off баскычы.
6.3 Protection Features (OCP, OVP)
- Ашыкча ток коргоо (АЧК): басыңыз OCP button to enable or disable this feature. When enabled, if the output current exceeds the set limit, the output will shut down to protect the load and the power supply. The OCP indicator will illuminate. To reset, clear the fault condition and press the On/Off баскычы.
- Ашык-томtage Коргоо (OVP): басыңыз OVP button to enable or disable this feature. When enabled, if the output voltage exceeds the set limit, the output will shut down. The OVP indicator will illuminate. To reset, clear the fault condition and press the On/Off баскычы.
6.4 Keyboard Lock Function
- Жөндөөлөрдүн кокусунан өзгөрүп кетишинин алдын алуу үчүн, баскычын басып кармап туруңуз БҮЛҮП АЛУУ/АЧУУ button for approximately 2 seconds. The LOCK indicator will illuminate, and all front panel controls will be disabled.
- Кулпуну ачуу үчүн басып, кармап туруңуз БҮЛҮП АЛУУ/АЧУУ button again for 2 seconds. The LOCK indicator will turn off.
7. Техникалык тейлөө
- Тазалоо: Тазалоодон мурун электр кубатын электр тармагынан ажыратыңыз. Сыртын сүртүү үчүн жумшак, кургак чүпүрөктү колдонуңуз. Абразивдүү тазалоочу каражаттарды же эриткичтерди колдонбоңуз.
- Вентиляция: Ensure the cooling fan vents on the rear panel are clear of obstructions to allow for proper airflow.
- Сактагыч: Эгерде аппаратты көпкө чейин колдонбосоңуз, аны кургак, чаңсыз чөйрөдө сактаңыз.
- Сактагычты алмаштыруу: If the unit does not power on, check the fuse located near the AC input on the rear panel. Replace only with a fuse of the same type and rating (e.g., 5A 250V for 110V input, 3A 250V for 220V input). Refer to the fuse holder for specific ratings.
8. Кыйынчылыктарды
| Көйгөй | Мүмкүн себеп | Чечим |
|---|---|---|
| Түзмөк күйбөйт. | Айнымалы ток жок; Сактагыч күйүп кеткен; Үн туура эмесtage селектор орнотуу. | Электр шнурунун туташуусун жана дубалдагы розетканы текшериңиз. Эгерде сактагыч күйүп кетсе, аны алмаштырыңыз. Көлөмүн текшериңизtagтандоо которгучу туура коюлган. |
| Чыгаруунун көлөмү жокtagе/ток. | Output is off; OCP/OVP triggered; Incorrect settings. | басыңыз On/Off button to activate output. Check OCP/OVP indicators and clear fault. Verify voltage/учурдагы орнотуулар. |
| Чыгуу томtagэлектрондук/ток туруксуз. | Начар жүктөө туташуусу; Ысып кетүү; Сыноо өткөргүчтөрү бузулган. | Ensure secure connections. Check for proper ventilation. Replace test leads if damaged. |
| Front panel controls are unresponsive. | Keyboard lock is active. | басып, кармап туруңуз БҮЛҮП АЛУУ/АЧУУ button for 2 seconds to disable the lock. |
| Fan is noisy or constantly running. | Normal operation under load; Obstructed vents. | The fan is temperature-controlled and will run as needed. Ensure vents are clear. |
9. Техникалык шарттар

9.1-сүрөт: Техникалык мүнөздөмөлөрдүн таблицасы. This image provides a comprehensive table of the KORAD KA3005D-23's electrical specifications, including voltage and current ranges, load regulation, and ripple.

9.2-сүрөт: Бирдиктин өлчөмдөрү. This image illustrates the physical dimensions and weight of the KORAD KA3005D-23 power supply.
| Параметр | Нарк |
|---|---|
| Тtage Диапазон | 0-30V |
| Учурдагы диапазон | 0-5A |
| Жүктү жөнгө салуу (Көлөм)tage) | ≤0.01% + 2мВ |
| Жүктү жөнгө салуу (учурдагы) | ≤0.1% + 10мА |
| Сызыктык жөнгө салуу (том)tage) | ≤0.01% + 3мВ |
| Линияны жөнгө салуу (учурдагы) | ≤0.1% + 3мА |
| Орнотуу чечилиши (Көлөм)tage) | 10мВ |
| Орнотуу чечилиши (учурдагы) | 1мА |
| Орнотуу тактыгы (25°C ± 5°C) (Көлөмүtage) | ≤0.5% + 20мВ |
| Орнотуу тактыгы (25°C ± 5°C) (Ток) | ≤0.5% + 10мА |
| Толкун (20-20 м) (Көлөм)tage) | ≤2mVrms |
| Толкун (20-20M) (Учур) | ≤2mVrms |
| Температура коэффициенти (Тtage) | ≤150ppm |
| Температура коэффициенти (ток) | ≤150ppm |
| Арткы чечилишти окуу (том)tage) | 10мВ |
| Арткы чечилишти окуу (Учурдагы) | 1мА |
| Read Back Temp. Coefficient (Voltage) | ≤150ppm |
| Read Back Temp. Coefficient (Current) | ≤150ppm |
| Реакция убактысы (Көлөм)tage Rise) | ≤100mS |
| Реакция убактысы (Көлөм)tage Drop) | ≤100mS |
| Интерфейс | Non-Programmable Interface |
| Салмагы | 9.52 Lbs / 4.32 Кг |
| Өлчөмдөрү (W x Y x D) | 100мм (W) x 156mm (H) x 260mm (D) |
Note: Specifications are subject to change without notice. For the most up-to-date information, please refer to the manufacturer's official webсайт.
10. Кепилдик жана колдоо
Specific warranty terms and conditions for the KORAD KA3005D-23 power supply are typically provided with the product packaging or available on the manufacturer's official webсайт. Кепилдиктин мөөнөтү, мөөнөтү жана дооматтардын жол-жоболору боюнча толук маалымат алуу үчүн ушул ресурстарды караңыз.
For technical support, service, or inquiries about replacement parts, please contact KORAD customer service through their official channels. Keep your purchase receipt and product serial number handy when seeking support.
Ask a question about this manual
Ask about setup, troubleshooting, compatibility, parts, safety, or missing instructions. Manuals+ will review the question and use this page’s manual context to help answer it.