
Jesverty SPS-12003 & JDS210
User Manual
Jesverty DC Power Supply Variable 0-120V 0-3A & 100MHz Digital Oscilloscope - 2 Channel
Models: SPS-12003 & JDS210
1. Киришүү
This manual provides essential information for the safe and effective operation of your Jesverty DC Power Supply (SPS-12003) and Jesverty Digital Oscilloscope (JDS210). Please read this manual thoroughly before use and retain it for future reference.
2. Коопсуздук маалыматы
Жарааттарды же жабдууларды бузууну болтурбоо үчүн ар дайым төмөнкү коопсуздук чараларын сактаңыз:
- Ensure proper grounding for both devices.
- нымдуу же г менен иштетпеңизamp шарттар.
- Avoid exposing the devices to direct sunlight or extreme temperatures.
- в ачпагылаasing; ичинде колдонуучу тейлей турган тетиктер жок. Бардык тейлөө иштерин квалификациялуу адистерге тапшырыңыз.
- Кандайдыр бир туташтырууларды же ажыратууларды жасоодон мурун электр кубатынан ажыратыңыз.
- Use only specified power cords and accessories.
- жогорку том кабардар болtage and current when operating the power supply.
3. Пакеттин мазмуну
Пакетиңизде бардык буюмдар бар экенин текшериңиз:
- 1 x Jesverty SPS-12003 DC Power Supply
- 1 x Jesverty JDS210 Digital Oscilloscope
- 1 x Power Cord for DC Power Supply
- 1 x Power Cord for Oscilloscope
- 1 x Output Cable Set for DC Power Supply (Red/Black)
- 2 x Oscilloscope Probes (100MHz)
- 1 x USB Cable (for Oscilloscope data transfer)
- 1 х Колдонуучунун колдонмосу (бул документ)
4. Продукт бүтүп калдыview
4.1 Jesverty SPS-12003 DC Power Supply
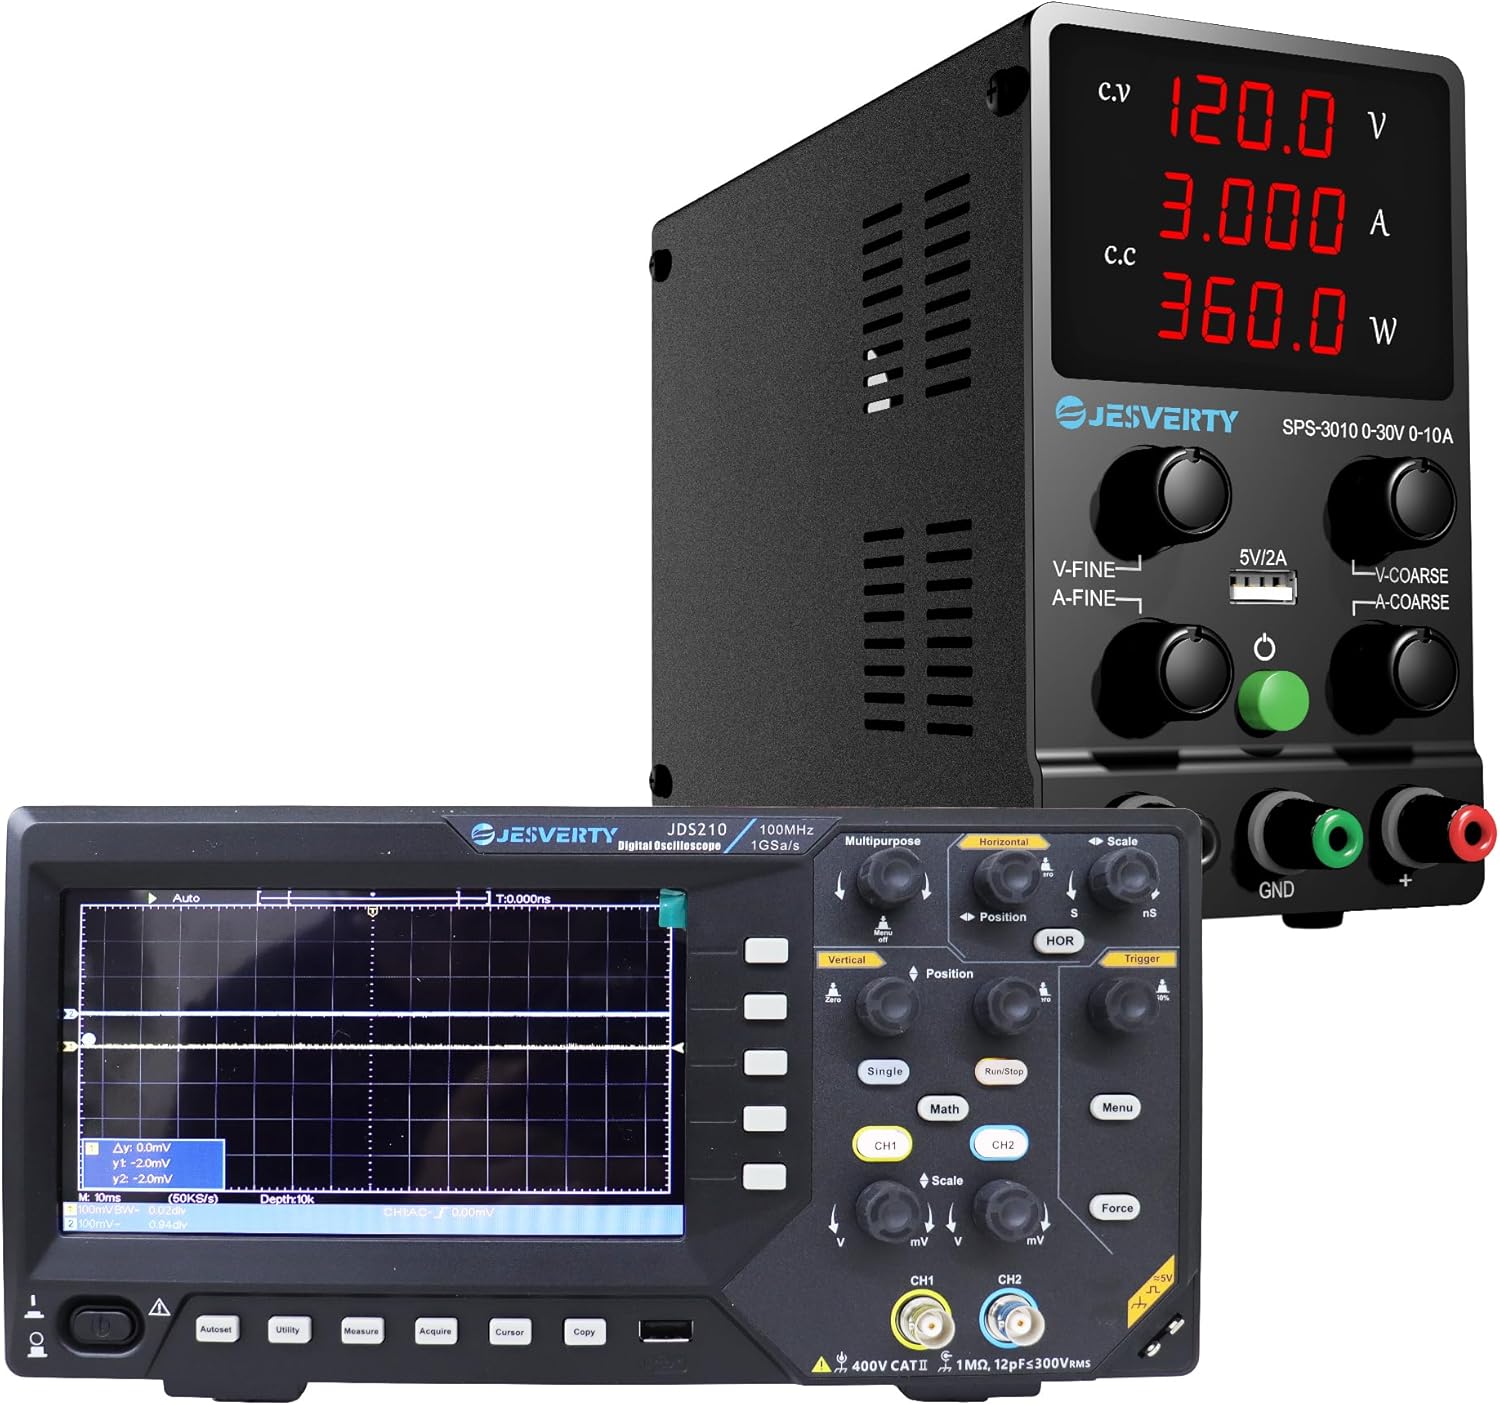
4.1-сүрөт: The Jesverty DC Power Supply (top) and Digital Oscilloscope (bottom) as a combined unit.

4.2-сүрөт: Фронт view of the Jesverty SPS-12003 DC Power Supply, showing the display and control knobs.

4.3-сүрөт: Ички view highlighting the intelligent temperature-controlled fans and radiators for extended product life and various protection features.

4.4-сүрөт: Detailed diagram of the Jesverty SPS-12003 DC Power Supply with numbered components and their names.
The Jesverty SPS-12003 is a variable DC power supply designed for precision applications. It features a 4-digit LED display for real-time voltage (V), current (A), and power (W) readings. It supports both Constant Voltage (C.V.) and Constant Current (C.C.) modes, automatically switching based on load changes. The unit includes coarse and fine adjustment knobs for precise control and a 5V/2A USB charging port.
Key Components (Refer to Figure 4.4):
- Тtage Дисплей
- Учурдагы дисплей
- Power Display
- CV режиминин көрсөткүчү
- CC режиминин көрсөткүчү
- Тtage Knob (Coarse Adjustment)
- Current Knob (Coarse Adjustment)
- Тtage Knob (Fine Adjustment)
- Current Knob (Fine Adjustment)
- USB заряддоо порту (5V/2A)
- Чыгуу терминалы + (кызыл)
- Grounding Terminal (Green)
- Output Terminal - (Black)
- Power Switch
- Муздатуу желдеткич
- AC Power Inlet
- Сақтандыргыч куту (запастык сактагычтын ичинде)
4.2 Jesverty JDS210 Digital Oscilloscope

4.5-сүрөт: Фронт view of the Jesverty JDS210 Digital Oscilloscope, showing the 7-inch TFT LCD and control panel.

4.6-сүрөт: Side view of the Jesverty JDS210 Digital Oscilloscope, illustrating its compact design.
The Jesverty JDS210 is a dual-channel digital oscilloscope with a 100MHz bandwidth and 500 MS/s real-time sampling rate. It features a 7-inch TFT LCD (800x480 resolution) for clear waveform display. The oscilloscope supports various cursor modes for accurate measurements and offers USB storage for data transfer. It is compatible with 1X/10X/100X/1000X probes and includes auto-ranging for simplified setup.
Негизги өзгөчөлүктөрү:
- 7-inch TFT LCD (800x480 resolution)
- 100MHz Bandwidth, 2 Channels
- 500 MS/s Real-Time Sampling Rate
- 2 ns/Div to 1000s/Div Time Base Range
- 20 mV/Div~5 V/Div Vertical Scaling
- USB Drive Storage for Waveforms
- 4 Cursor Modes (ΔV, ΔT, ΔV+ΔT, auto-tracking)
- Auto-Ranging for horizontal/vertical adjustments
5. Орнотуу
5.1 DC Power Supply (SPS-12003) Setup
- Place the power supply on a stable, level surface with adequate ventilation.
- Ensure the power switch (14) is in the OFF position.
- Connect the provided AC power cord to the AC Power Inlet (16) on the rear of the unit and then to a grounded wall outlet.
- Connect the red output cable to the Output Terminal + (11) and the black output cable to the Output Terminal - (13). If grounding is required, connect the green cable to the Grounding Terminal (12).
- Connect the other end of the output cables to your load or circuit, ensuring correct polarity.
5.2 Digital Oscilloscope (JDS210) Setup
- Place the oscilloscope on a stable, non-slip surface.
- Connect the provided AC power cord to the power input on the rear of the oscilloscope and then to a grounded wall outlet.
- Attach the oscilloscope probes to the BNC input connectors (CH1, CH2) on the front panel. Ensure the probe's ground clip is connected to the circuit's ground.
- Calibrate the probes if necessary, following the instructions in the oscilloscope's on-screen menu or a dedicated probe calibration section (not detailed here, refer to general oscilloscope usage guides).
6. Иштөө нускамалары
6.1 Operating the DC Power Supply (SPS-12003)
- Күйгүзүү: Flip the Power Switch (14) to the ON position. The LED display will illuminate.
- Setting Voltage: Томду колдонуңузtage Knob (Coarse) (6) for large adjustments and the Voltage Knob (Fine) (8) for precise adjustments. Observe the Voltage Display (1) to set the desired output voltage.
- Учурдагы чектөөнү коюу: Use the Current Knob (Coarse) (7) and Current Knob (Fine) (9) to set the maximum output current. This acts as a safety limit to protect your circuit. Observe the Current Display (2).
- C.V. and C.C. Modes:
- Качан чыгаруу томtage is stable and below the set current limit, the C.V. Mode Indicator (4) will light up, indicating Constant Voltage режими.
- If the load draws more current than the set limit, the power supply will automatically switch to Constant Current (C.C.) mode, and the C.C. Mode Indicator (5) will light up. The output voltage will drop to maintain the set current.
- USB кубаттоо порту: The 5V/2A USB Charging Port (10) can be used to charge compatible devices. This port operates independently of the main output voltage/учурдагы орнотуулар.
- Өчүрүү: Before disconnecting the load, turn the output voltage and current knobs to their minimum settings, then flip the Power Switch (14) to the OFF position.

6.1-сүрөт: Illustration of the 5V/2A USB charging port on the Jesverty SPS-12003 DC Power Supply, compatible with various devices.
6.2 Operating the Digital Oscilloscope (JDS210)
- Күйгүзүү: Press the power button on the front panel. The display will light up.
- Туташтыруучу зонддор: Connect the probe to the BNC input (CH1 or CH2) and attach the probe tip to the test point and the ground clip to the circuit ground.
- Автоматтык диапазон: Press the "Auto" button for automatic adjustment of vertical and horizontal settings to display a stable waveform.
- Вертикалдык башкаруу элементтери: Use the "Vertical" knobs (mV/Div, V/Div) to adjust the vertical scale (voltage per division) and "Position" to shift the waveform vertically.
- Горизонталдык башкаруу элементтери: Use the "Horizontal" knobs (ns/Div, s/Div) to adjust the horizontal scale (time per division) and "Position" to shift the waveform horizontally.
- Иштетүүдө: Adjust the "Trigger" level to stabilize the waveform display. The trigger ensures the waveform starts at a consistent point on the screen.
- Өлчөөлөр: Use the "Measure" button to access automatic measurements (e.g., Vpp, Vrms, Frequency, Period). Use the "Cursor" button to enable manual cursors for precise voltage (ΔV) and time (ΔT) measurements.
- USB сактагыч: Connect a USB drive to the USB port on the side of the oscilloscope to save waveform data or screenshots. Use the "Copy" or "Save" function from the menu.
- Канал тандоо: Use the CH1 and CH2 buttons to enable or disable channels and access their individual settings.
7. Техникалык тейлөө
- Тазалоо: Disconnect power before cleaning. Use a soft, dry cloth to wipe the exterior of both devices. Do not use abrasive cleaners or solvents.
- Вентиляция: Ensure the cooling vents on both devices remain clear of obstructions to prevent overheating.
- Сактагыч: Store the devices in a cool, dry place away from direct sunlight and excessive dust when not in use.
- Fuse Replacement (SPS-12003): If the power supply does not turn on, check the fuse located in the Fuse Box (17) at the rear. Replace with a fuse of the same type and rating only.
8. Кыйынчылыктарды
8.1 DC Power Supply (SPS-12003) Troubleshooting
| Көйгөй | Мүмкүн себеп | Чечим |
|---|---|---|
| Кубат/дисплей жок | Power cord disconnected, power switch off, blown fuse. | Check power cord connection, ensure switch is ON, replace fuse if blown. |
| Чыгаруунун көлөмү жокtage/Current | Output cables disconnected, voltage/current knobs set to zero, overload protection activated. | Check output cable connections, adjust knobs, reduce load or increase current limit. |
| Power supply switches to C.C. mode unexpectedly | Load current exceeds set current limit. | Increase the current limit setting or reduce the load. |
8.2 Digital Oscilloscope (JDS210) Troubleshooting
| Көйгөй | Мүмкүн себеп | Чечим |
|---|---|---|
| Толкун формасы көрсөтүлгөн жок | Probe not connected, signal too small/large, incorrect trigger settings, channel off. | Check probe connection, adjust vertical scale (mV/Div), adjust trigger level, ensure channel is enabled. |
| Туруксуз толкун формасы | Incorrect trigger source or level. | Adjust trigger level, select appropriate trigger source (CH1/CH2). Use "Auto" button. |
| Бурмаланган толкун формасы | Probe compensation incorrect, signal exceeding input limits. | Calibrate probe compensation, adjust vertical scale. |
9. Техникалык шарттар
9.1 Jesverty SPS-12003 DC Power Supply
| Параметр | Нарк |
|---|---|
| Output Voltage | 0-120V (жөнгө салынуучу) |
| Output Current | 0-3A (Жөнгө салынуучу) |
| Дисплей | 4-Digit LED (V/A/W) |
| Тtage Display Resolution | 0.01V |
| Current Display Resolution | 0.001A |
| Power дисплейинин чечилиши | 0.1 Вт |
| USB чыгышы | 5V/2A |
| Иштөө режимдери | Constant Voltage (C.V.), Constant Current (C.C.) |
9.2 Jesverty JDS210 Digital Oscilloscope
| Параметр | Нарк |
|---|---|
| өткөрүү жөндөмдүүлүгү | 100 МГц |
| Каналдар | 2 |
| реалдуу убакыт Сampling Rate | 500 MS/s |
| Дисплей | 7-inch TFT LCD (800x480 resolution) |
| Убакыт базалык диапазону | 2 ns/Div to 1000s/Div |
| Vertical Scaling | 20 mV/Div~5 V/Div |
| Сактагыч | USB Drive (Waveforms, Screenshots) |
| Пробдун шайкештиги | 1X/10X/100X/1000X |
10. Кепилдик жана колдоо
Jesverty products are designed and manufactured to the highest quality standards. For warranty information and technical support, please refer to the warranty card included with your product or visit the official Jesverty website. Please have your model number (SPS-12003 & JDS210) and purchase date ready when contacting support.
Кошумча жардам алуу үчүн, сиз иш сапары менен болот Jesverty Store on Amazon.
Тектеш документтер - SPS-12003 & JDS210
 |
JESVERTY SPS-3010X DC Power Supply User Manual JESVERTY SPS-3010X 300W DC Power Supply үчүн колдонуучунун колдонмосу, анын спецификациялары, панелдин нускамалары, коопсуздук чаралары жана иштөө функциялары, анын ичинде туруктуу көлөмtagд/учурдагы мүнөздөмөлөрү жана сактагычты алмаштыруу. |
 |
Jesverty SPS-1362 Adjustable DC Power Supply - User Manual and Specifications Comprehensive user manual and technical specifications for the Jesverty SPS-1362 60A adjustable DC power supply. Includes safety warnings, operational controls, detailed technical data, and troubleshooting guidance. |
Ask a question about this manual
Ask about setup, troubleshooting, compatibility, parts, safety, or missing instructions. Manuals+ will review the question and use this page’s manual context to help answer it.