
navycrest A2Pro
A2Pro 4K & 5G WiFi Dash Cam User Manual
Model: A2Pro
1. Киришүү
Thank you for choosing the navycrest A2Pro 4K & 5G WiFi Dash Cam. This device is designed to provide comprehensive front and rear vehicle recording, ensuring your safety and peace of mind on the road. Featuring 4K front recording, 5G WiFi connectivity, and 24/7 parking monitoring with the included hardwire kit, the A2Pro offers advanced functionality for reliable vehicle surveillance. Please read this manual thoroughly before operation to ensure proper installation and usage.
2. Кутуда эмне бар
Бардык компоненттерди кылдаттык менен таңгактан чыгарып, төмөндөгү тизме менен текшериңиз:
- A2Pro Front Dash Camera
- Арткы камера
- Hardwire Kit (Type C)
- Сорох кубогын таһыгар
- 64 ГБ эстутум картасы
- Installation Tools (Fuse Taps)

Image: All components included in the A2Pro Dash Cam bundle.
3. Продукт бүтүп калдыview
Familiarize yourself with the main parts of your A2Pro Dash Cam system:
- Front Camera Unit: Main recording unit with 4K lens, 3-inch IPS display, and control buttons.
- Арткы камера: Connects to the main unit for 2.5K rear recording.
- Сорулуучу чөйчөк орнотуу: For secure attachment of the front camera to the windshield.
- Hardwire комплекти: Enables 24/7 parking mode by connecting directly to your vehicle's fuse box.
- Эстутум картасынын слоту: Supports up to 64GB (included) for video storage.

Image: Front dash camera, rear camera, and a representation of the smartphone application interface.
4. Орнотуу жана орнотуу
4.1. Installing the Front Dash Camera
- Камераны орното турган алдыңкы айнекти тазалаңыз.
- Attach the suction cup mount to the front camera.
- Press the suction cup firmly against the windshield and lock it into place.
- Тунук болушу үчүн камеранын бурчун тууралаңыз view алдыдагы жолдун.
- Insert the 64GB memory card into the designated slot until it clicks.
4.2. Арткы камераны орнотуу
- Identify a suitable location on your rear windshield, ensuring a clear view.
- Монтаждоо бетин кылдат тазалаңыз.
- Attach the rear camera using its adhesive pad.
- Route the rear camera cable to the front dash camera, tucking it neatly along the vehicle's headliner and A-pillars.
- Connect the rear camera cable to the dedicated port on the front dash camera.
4.3. Hardwire Kit Installation for 24/7 Parking Mode
The included Type C Hardwire Kit is essential for enabling the 24/7 Parking Mode feature. This kit connects directly to your vehicle's fuse box to provide continuous power even when the engine is off.
- Унааңыздын сактандыргыч кутучасын табыңыз (унааңыздын колдонуучунун колдонмосун караңыз).
- Identify a constant power fuse (B+) and an ACC (Accessory) fuse that powers on/off with the ignition.
- Using the provided fuse taps, connect the red wire (B+) of the hardwire kit to the constant power fuse and the yellow wire (ACC) to the accessory fuse.
- Connect the black wire (GND) to a metal bolt or screw on the vehicle's chassis for grounding.
- Route the Type C connector cable from the hardwire kit to the front dash camera and plug it into the Type C power input port.
- Ensure all connections are secure and cables are neatly tucked away to avoid interference with driving.
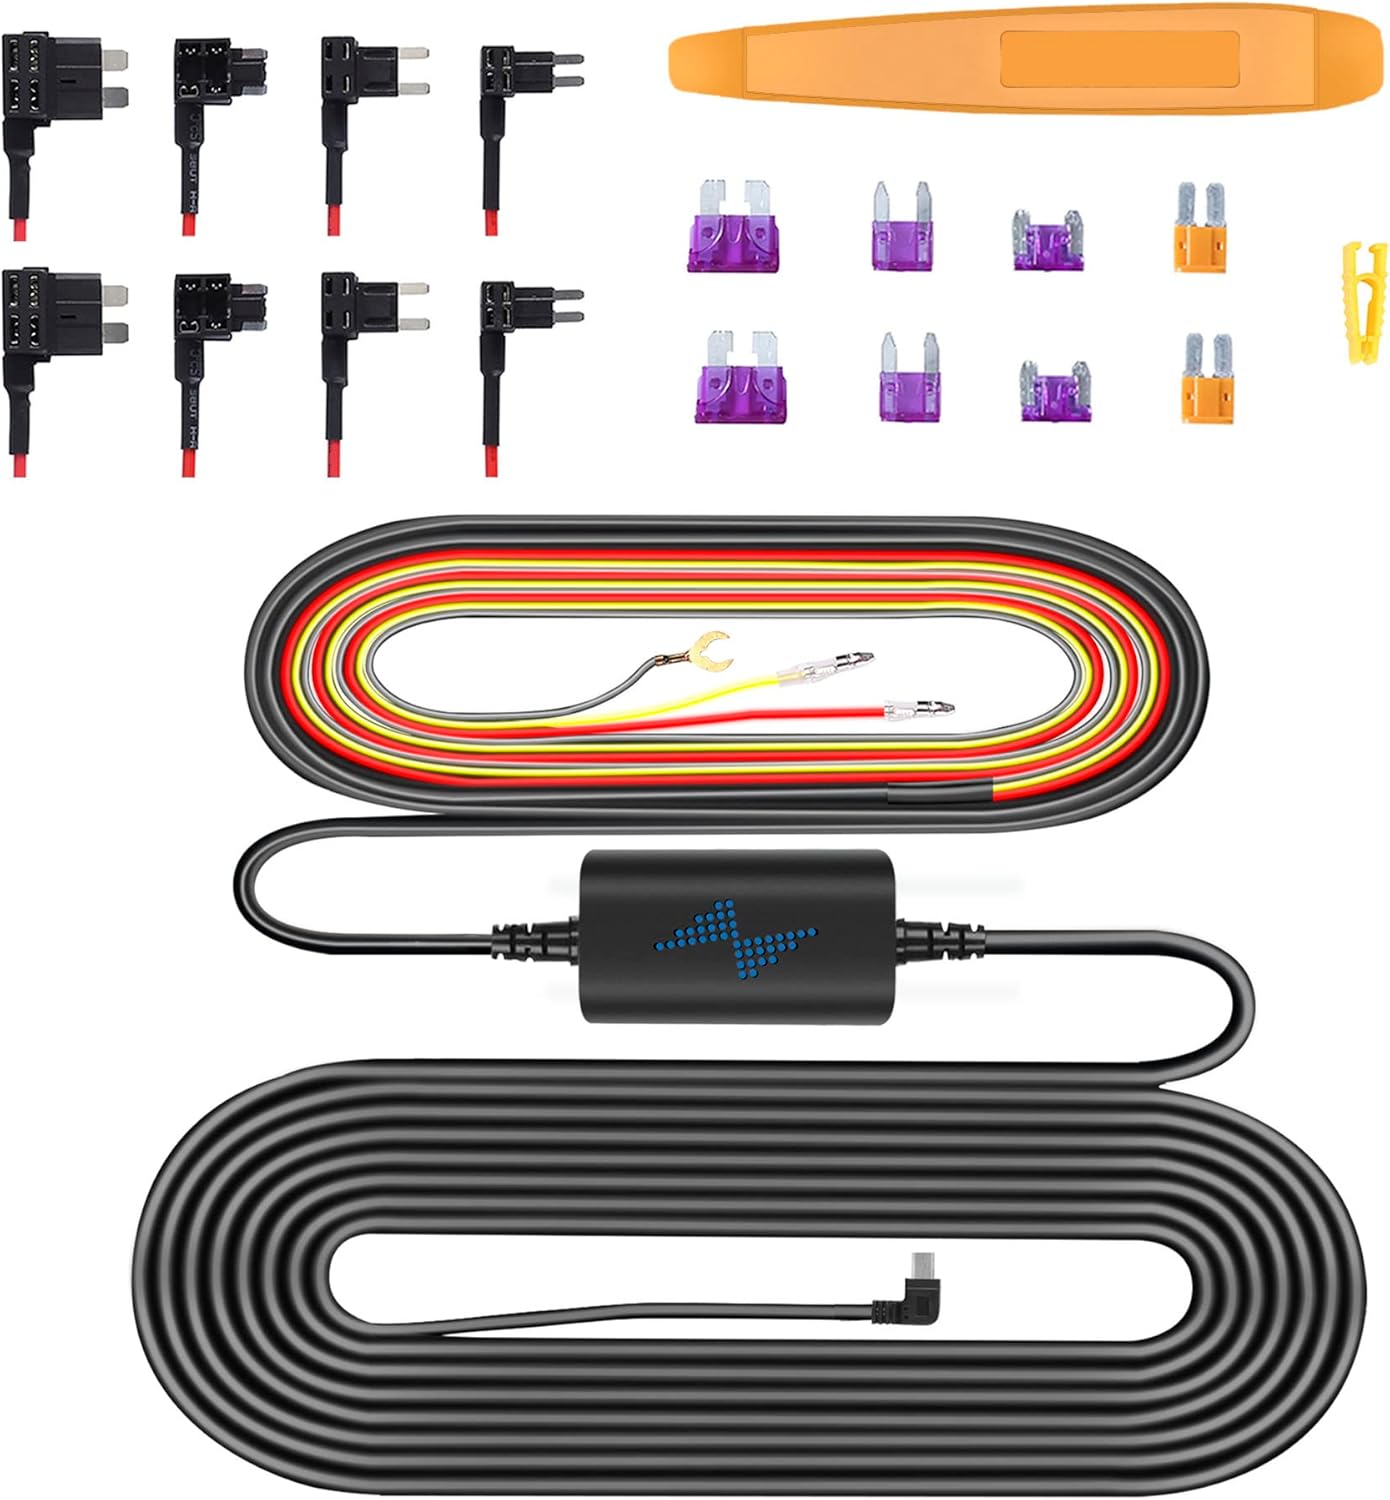
Image: Components of the Type C Hardwire Kit, including various fuse taps for different vehicle types.
5. Иштөө нускамалары
5.1. Күйгүзүү / Өчүрүү
- Күйгүзүү: Кубат булагына туташканда жана унаанын от алдыруу системасы күйгүзүлгөндө, видеорегистратор автоматтык түрдө күйүп, жаздыра баштайт.
- Өчүрүү: The dash cam will automatically power off shortly after the vehicle's ignition is turned off.
5.2. Негизги жаздыруу
- Цикл жаздыруу: Видеорегистратор тынымсыз кыска сегменттерде (мисалы, 1, 3 же 5 мүнөт) видео жаздырат. Эстутум картасы толгондо, ал автоматтык түрдө эң эски кулпусу ачылган картанын үстүнөн жазат.tage.
- Өзгөчө кырдаалдарда жаздыруу (G-сенсор): Капыстан сокку же кагылышуу болгон учурда, орнотулган G-сенсору окуяны автоматтык түрдө аныктайт жана учурдагы видео сегментти кулпулап, анын циклдик жазуу аркылуу кайра жазылышына жол бербейт.
5.3. Wi-Fi байланышы жана тиркемени колдонуу
The A2Pro features 5G WiFi for fast connection to your smartphone. Download the dedicated app (refer to the packaging or quick start guide for app name) from your app store.
- Enable Wi-Fi on your dash cam via the settings menu.
- Смартфонуңузда видеорегистратордун Wi-Fi тармагына туташыңыз (SSID жана сырсөз видеорегистратордун экранында көрсөтүлөт).
- колдонмону ачуу view жаша фооtage, жаздырылган видеолорду ойнотуу, жүктөп алуу fileс телефонуңузга жана камера жөндөөлөрүн тууралаңыз.
5.4. 24/7 Parking Mode
With the hardwire kit properly installed, the dash cam can monitor your vehicle even when parked. This mode activates when the vehicle's ignition is off.
- Кыймылды аныктоо: The camera will start recording if it detects motion around your vehicle.
- Таасирди аныктоо: If an impact is detected while parked, the camera will automatically record and lock the footage.
- Убактылуу жаздыруу: Some parking modes offer time-lapse recording, compressing long periods into short videos.

Image: Visual representation of the 24/7 Parking Mode feature, showing the dash cam monitoring a parked vehicle for suspicious events.
6. Техникалык тейлөө
- Эстутум картасын форматтоо: It is recommended to format the memory card regularly (e.g., once a month) to ensure optimal performance and prevent data corruption. This can be done through the dash cam's settings menu.
- Линзаларды жана экранды тазалоо: Use a soft, lint-free cloth to gently wipe the camera lenses and LCD screen. Avoid using abrasive cleaners or solvents.
- Программалык камсыздоонун жаңыртуулары: Өндүрүүчүнү текшериңиз webВидеорегистраторуңузда эң акыркы функциялар жана каталарды оңдоо бар экенине ынануу үчүн, мезгил-мезгили менен сайттын микропрограммалык камсыздоосун жаңыртып туруңуз.
7. Кыйынчылыктарды
| Көйгөй | Мүмкүн чечим |
|---|---|
| Dash камерасы күйбөйт. | Check power connection. Ensure the vehicle's ignition is on (if not using hardwire kit). Verify hardwire kit connections if applicable. |
| Жаздыруу токтойт же катып калат. | Format the memory card. Try a different, high-speed (Class 10 or U3) memory card. |
| Wi-Fi туташуу маселелери. | Ensure Wi-Fi is enabled on the dash cam. Restart both the dash cam and your smartphone. Check Wi-Fi password. |
| Унаа токтотуу режими иштебейт. | Verify hardwire kit installation and connections. Ensure parking mode is enabled in settings. |
| Видеонун сапаты начар. | Clean the camera lenses. Ensure the protective film is removed from the lenses. Check resolution settings. |
8. Техникалык шарттар
| Өзгөчөлүк | Деталь |
|---|---|
| Модель аты | A2Pro |
| Бренд | navycrest |
| Видео тартуунун резолюциясы | 4K (Алдыңкы) + 2.5K (Арткы) |
| Байланыш технологиясы | Wi-Fi (5G) |
| Дисплей түрү | LCD |
| Монтаж түрү | Башкаруу панелине орнотуу (соргуч чөйчөк) |
| Камтылган компоненттер | Memory Card, Suction Cup, Hardwire Kit |
| Унаа кызматынын түрү | Машина |
9. Кепилдик жана колдоо
For product support, technical assistance, or warranty inquiries, please contact navycrest customer service. Refer to the product packaging or the official navycrest webэң акыркы байланыш маалыматы үчүн сайт.
Кепилдик дооматтары үчүн сатып алганыңыздын далилин сактап коюңуз.
Ask a question about this manual
Ask about setup, troubleshooting, compatibility, parts, safety, or missing instructions. Manuals+ will review the question and use this page’s manual context to help answer it.