
1. Киришүү
The Radiomaster XR1 Nano Multi-Frequency ExpressLRS Receiver is a compact and versatile receiver designed for remote control applications. It utilizes the advanced Semtech LR1121 transceiver, supporting both 2.4GHz and Sub-G 900MHz frequency bands. This receiver offers exceptional range and sensitivity, making it suitable for various builds requiring reliable link quality with ExpressLRS systems.
This manual provides detailed instructions for the setup, operation, and maintenance of your XR1 receiver to ensure optimal performance and longevity.
2. Кутуда эмне бар

Image: Package contents including the XR1 receiver, T-Antenna, CRSF wire, and heat-shrinkable tubes.
- 1 x XR1 Nano Multi-Frequency ExpressLRS Receiver
- 1 x T Antenna (Either 2.4GHz, 900MHz, or Dual-band, depending on the selected package)
- 1 x CRSF зымы
- 3 x Heat-Shrinkable Tube
- 1 x Manual Card (This document)
3. Негизги өзгөчөлүктөрү
Сүрөт: бүттүview of the XR1 receiver's main features.
- Кош тилкелүү операция: Supports both 2.4GHz and Sub-G 900MHz frequency bands using the Semtech LR1121 transceiver.
- Компакт өлчөмү: Ultra-compact design, measuring 20mm x 13mm.
- Жогорку аткаруу: Equipped with an ESP32C3 high-performance MCU.
- Телеметрия: Provides 100mW telemetry RF power.
- Жөнөкөй конфигурация: Built-in Wi-Fi for effortless configuration and firmware updates via an intuitive WebUI.
- Ийкемдүү туташуу: Features a secondary UART port and castled pads for easy soldering.
- ExpressLRS Compatibility: Pre-installed with ExpressLRS v3.5.1 firmware.
4. Орнотуу нускамалары
4.1. Электр схемасы
Connect the XR1 receiver to your flight controller or compatible device using the provided CRSF wire. Ensure correct polarity for power (5V) and ground (GND), and proper connection for RX and TX data lines.

Сүрөт: деталдуу view of the XR1 receiver's connection pads.
- 5В: Power input (5 Volts DC)
- GND: Жер
- TX: Transmit data (connect to RX on flight controller)
- RX: Receive data (connect to TX on flight controller)
4.2. Антенна орнотуу
Attach the T-Antenna to the IPEX-1 connector on the receiver. Ensure the antenna is securely connected and positioned away from carbon fiber or other conductive materials for optimal signal reception.

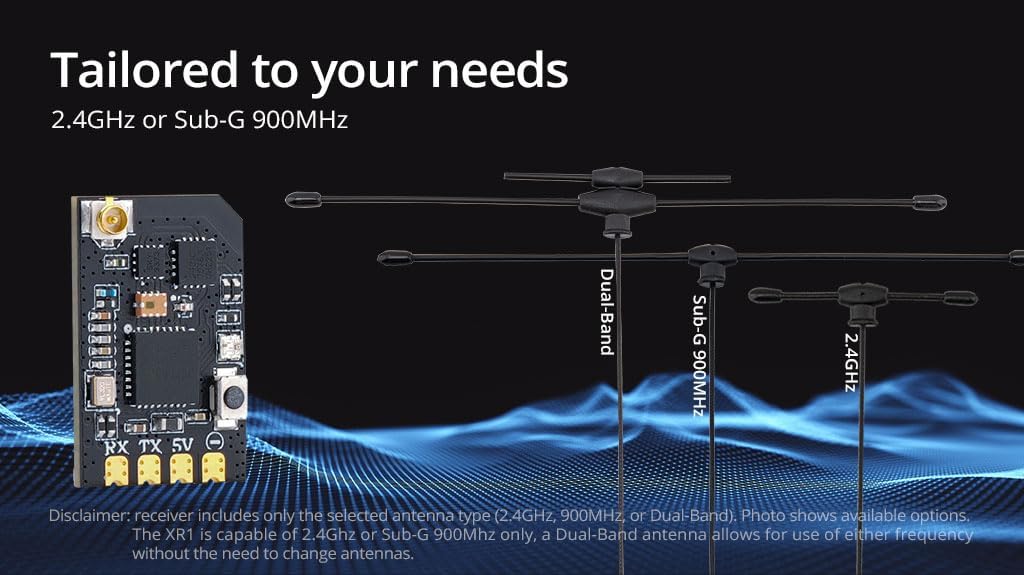
Image: Various antenna options for the XR1 receiver.
The XR1 receiver supports 2.4GHz or Sub-G 900MHz. If you have a Dual-Band antenna, it allows for use of either frequency without needing to change antennas.
4.3. Байлоо жол-жобосу
The XR1 receiver comes with ExpressLRS v3.5.1 pre-installed. To bind the receiver to your ExpressLRS transmitter:
- Power on the receiver three times, cycling power quickly between each power-on. The LED on the receiver should flash rapidly, indicating it is in binding mode.
- On your ExpressLRS compatible transmitter, navigate to the ExpressLRS LUA script or menu and select the "Bind" option.
- Once bound, the LED on the receiver will turn solid, indicating a successful connection.
For detailed binding instructions specific to your transmitter, refer to your transmitter's user manual or the official ExpressLRS documentation.
4.4. Firmware Updates and Configuration (Wi-Fi)
The XR1 features built-in Wi-Fi for convenient firmware updates and configuration. To access the WebUI:
- Алуучуну күйгүзүңүз.
- Connect to the Wi-Fi network broadcast by the receiver (usually named "ExpressLRS_RX" followed by a unique identifier).
- ачуу а web браузер жана багыттоо http://10.0.0.1.
- From WebUI, you can update firmware, change settings, and configure your receiver.
5. Иштөө нускамалары
5.1. Powering On and Initial Check
After successful setup and binding, power on your model. The receiver's LED should illuminate solid, indicating a stable connection to your transmitter. Perform a range check and verify all control surfaces respond correctly before flight.
5.2. Телеметрия
The XR1 receiver provides 100mW telemetry RF power, allowing your transmitter to receive real-time data from your model, such as RSSI (Received Signal Strength Indicator), link quality, and battery voltage (if configured). Refer to your flight controller and transmitter documentation for telemetry setup and display.
5.3. Шайкештик
The XR1 receiver is compatible with all existing Radiomaster ExpressLRS radios and modules. Ensure your transmitter module is also running a compatible ExpressLRS firmware version.

Image: Compatibility chart for Radiomaster ExpressLRS radios and modules.
6. Техникалык тейлөө
- Тазалыкты сактоо: Regularly inspect the receiver for dirt, dust, or debris. Use a soft, dry brush or compressed air to clean it.
- Нымдан коргоо: The XR1 is not water-resistant. Avoid exposure to moisture or extreme humidity. If exposed, ensure it is completely dry before powering on.
- Антеннаны текшерүү: Periodically check the antenna for any damage or loose connections. A damaged antenna can significantly reduce range and signal quality.
- Программалык камсыздоонун жаңыртуулары: Keep the receiver's firmware updated to the latest version to benefit from performance improvements and new features. Use the Wi-Fi WebUI for updates.
7. Кыйынчылыктарды
| Көйгөй | Мүмкүн себеп | Чечим |
|---|---|---|
| Байлоого аракет кылгандан кийин кабыл алгычтын светодиоду иштебей калды. | Not successfully bound; incorrect binding procedure; incompatible firmware. | Ensure correct binding steps (power cycle 3 times). Verify transmitter and receiver are on compatible ExpressLRS firmware versions. Try binding again. |
| No control response. | Receiver not powered; incorrect wiring; binding lost; flight controller not configured. | Check power connections to the receiver. Verify RX/TX wiring to the flight controller. Re-bind the receiver. Ensure flight controller UART and receiver protocol (CRSF) are correctly configured. |
| Начар аралык же сигналдын жоголушу. | Damaged or poorly positioned antenna; interference; low RF power setting. | Inspect antenna for damage and ensure it is positioned optimally, away from carbon fiber. Check for local interference sources. Verify RF power settings on your transmitter. |
| Cannot connect to Wi-Fi for updates. | Receiver not in Wi-Fi mode; incorrect Wi-Fi password (if set); network conflict. | Ensure the receiver is powered on and broadcasting its Wi-Fi network. Try restarting the receiver. If a password was set, ensure it is correct. |
8. Техникалык шарттар

Image: Physical dimensions of the XR1 receiver.

Image: Weight of the XR1 receiver.
| Өзгөчөлүк | Деталь |
|---|---|
| пункт | XR1 Nano Multi-Frequency ExpressLRS Receiver |
| Type | ISM2.4 or FCC915 |
| MCU | ESP32C3 |
| RF чип | Semtech LR1121 |
| RF туташтыргычы | IPEX-1 |
| Антенна | 1x T-Antenna (2.4GHz, 900MHz, or Dual-band) |
| Жыштык диапазону | 2.4GHz же Sub-G 900MHz |
| Telemetry Power | 100мВт |
| Maximum Packet Rate | DK500Hz / K1000Hz |
| Minimum Packet Refresh Rate | 50Hz |
| Working Voltage | 5V |
| Салмагы | 1.0г (антеннасыз) |
| Өлчөмдөр | 20мм x 13мм x 3мм |
| Орнотулган программанын версиясы | ExpressLRS v3.5.1 алдын ала орнотулган |
| FW Максаты | RadioMaster XR1 2.4/900 RX |
| Автобус интерфейси 1 | CRSF |
| Автобус интерфейси 2 | UART |

Image: LR1121 Receiver Frequency Compatibility Chart.
9. Колдоо жана кепилдик
For technical assistance, troubleshooting beyond this manual, or warranty inquiries, please contact Radiomaster customer support through their official webсайтка же продуктуну сатып алган сатуучуга.
Please retain your proof of purchase for any warranty claims. Warranty terms and conditions may vary by region and retailer.
Official Radiomaster Store: Radiomaster Store on Amazon