1. Киришүү
This manual provides detailed instructions for the safe installation, operation, and maintenance of your NARVI JAMAICA 8941 Ceiling Fan. Please read this manual thoroughly before installation and retain it for future reference. This ceiling fan features an efficient DC motor, adjustable LED lighting, and a convenient remote control for year-round comfort.

Image: The NARVI JAMAICA 8941 ceiling fan installed in a modern kitchen, highlighting its design and integrated LED light.
2. Коопсуздук нускамалары
- Орнотуудан же тейлөөдөн мурун ар дайым негизги өчүргүчтөн электр кубатын өчүрүңүз.
- Орнотуу жергиликтүү электр эрежелерине ылайык квалификациялуу электрик тарабынан аткарылышы керек.
- Орнотуучу конструкция желдеткичтин салмагын (болжол менен 7 кг) көтөрө алаарын текшериңиз.
- Do not connect the fan to a dimmer switch; use only the provided remote control.
- Иштеп жатканда колдоруңузду жана буюмдарды желдеткичтин калактарынан алыс кармаңыз.
- Бул желдеткич имараттын ичинде гана колдонуу үчүн иштелип чыккан.
3. Пакеттин мазмуну
Carefully unpack all components and check against the list below. If any items are missing or damaged, contact NARVI customer support.
- Ceiling Fan Motor Assembly with Retractable Blades
- LED Жарыктар Топтому
- Алыстан башкаруу
- Алыстан башкаруу үчүн кабыл алгыч
- Кронштейн орнотуу
- Downrods (10cm and 20cm)
- Canopy and Coupling Cover
- Аппараттык пакет (буроолор, шайбалар, зым гайкалар)
- Instruction Manual
4. Техникалык шарттар
| Өзгөчөлүк | Деталь |
|---|---|
| Бренд | NARVI |
| Модель аты | JAMAICA 8941 |
| Мотор түрү | DC Motor |
| Мотор күчү | 30 Вт |
| LED жарык күчү | 45W x 2 (Adjustable) |
| Түс температурасы | 3000K-6500K (жөнгө салынуучу) |
| Ылдамдыктын саны | 6 |
| Ызы-чуу деңгээли | 45 децибел |
| Макс RPM | 253 RPM |
| Материал | Acrylic, Polycarbonate, Metallic Frame |
| Өлчөмдөр (D x W x H) | 107 cm (diameter with blades extended) x 50 cm (width) x 37 cm (height) |
| Төмөнкү таякчанын узундугу | 10 см, 20 см |
| Коргоо рейтинги | IP20 |
| Башкаруу ыкмасы | Алыстан башкаруу |
| Өзгөчөлүктөр | Memory function, Timer, Winter/Summer mode |
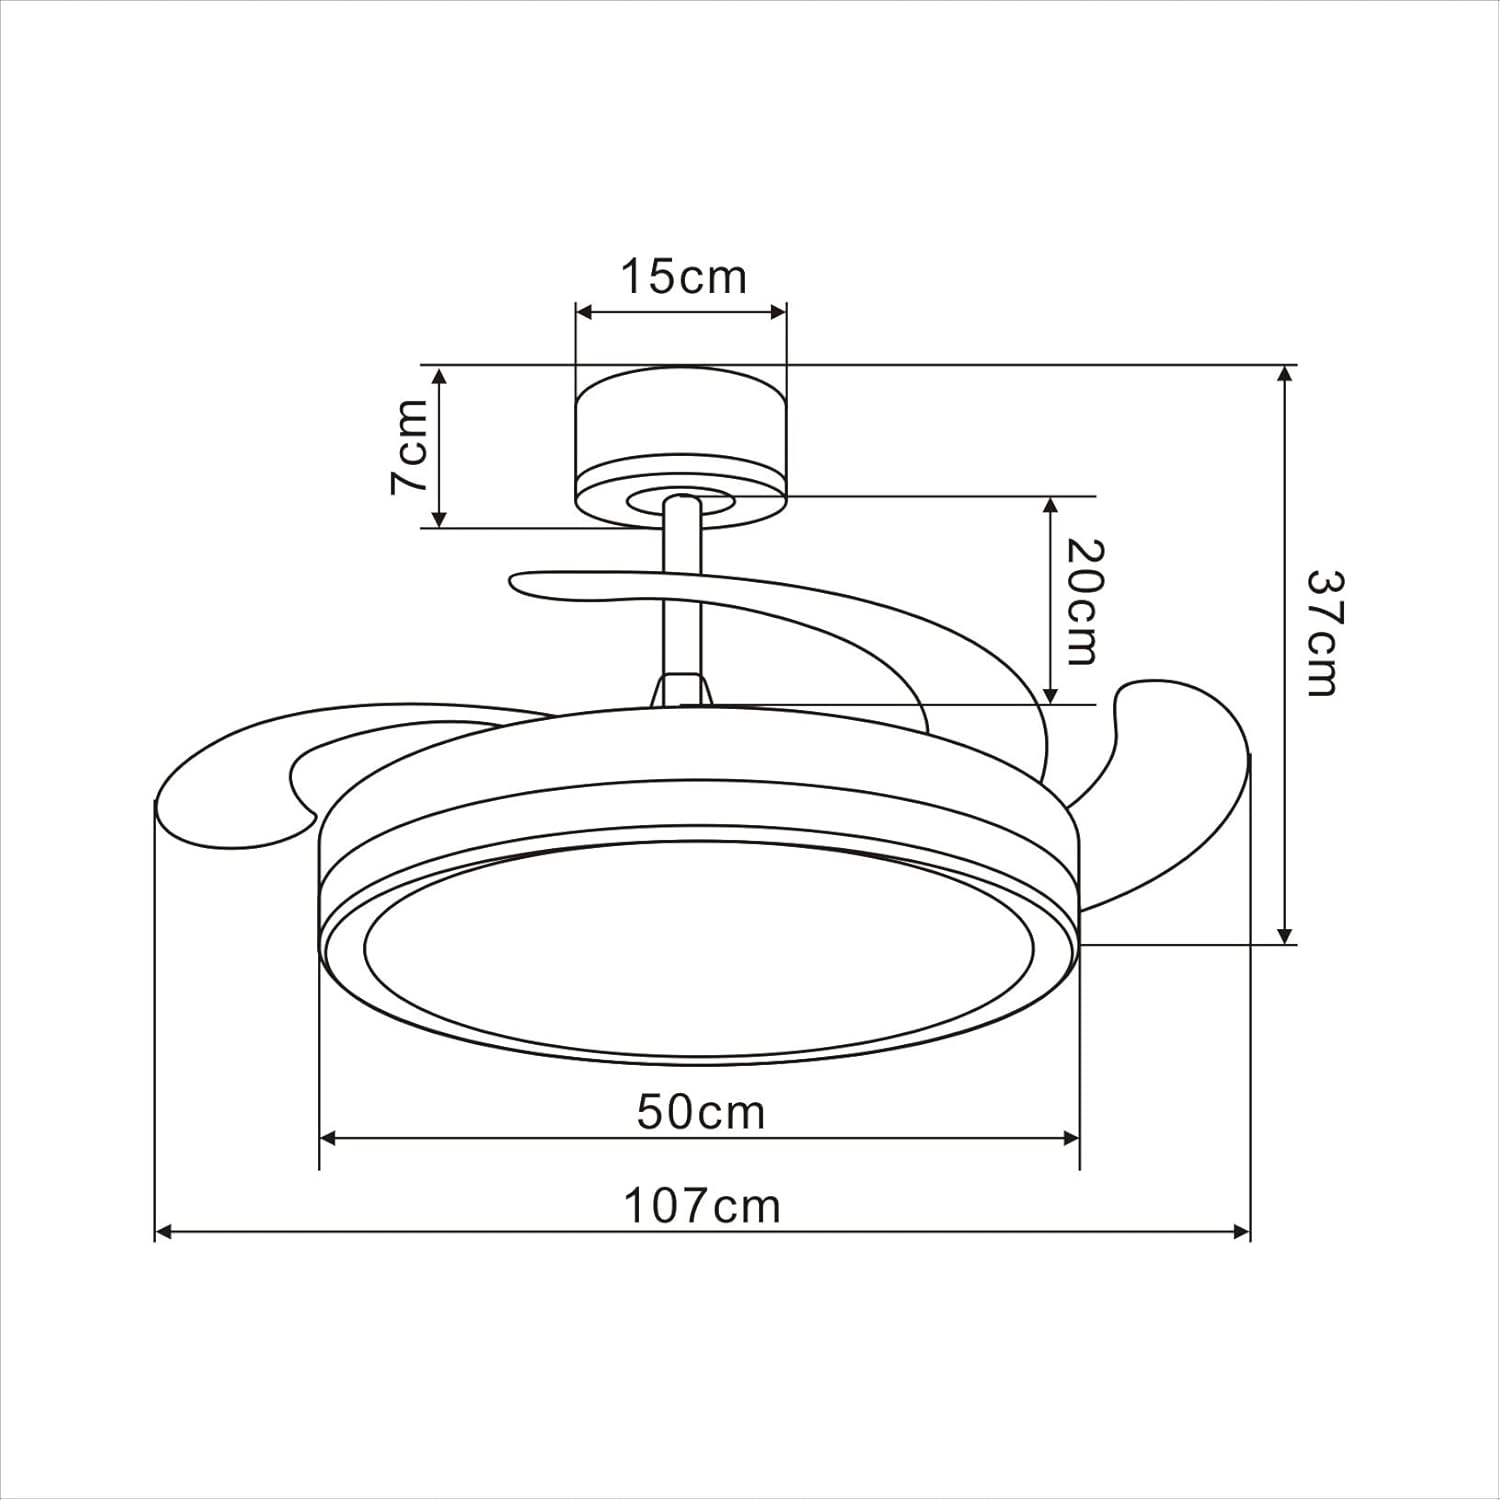
Image: Technical drawing illustrating the dimensions of the ceiling fan.
5. Орнотуу боюнча колдонмо
Follow these steps for proper installation. It is recommended to watch the installation video for visual guidance.
Video: Unboxing and initial assembly steps for the NARVI JAMAICA 8941 ceiling fan.
Этап-этабы менен орнотуу:
- Кутудан чыгаруу жана компоненттерди аныктоо: Carefully open the packaging and lay out all components. Identify the main fan body, downrods, mounting bracket, canopy, remote control, and hardware. Refer to the 'Package Contents' section to ensure all parts are present.
- Prepare the Downrod: Thread the electrical wires from the fan motor through the chosen downrod (10cm or 20cm). Secure the downrod to the fan motor assembly using the provided pin and screw. Ensure the pin is fully inserted and the screw is tightened to prevent movement.
- Чатырды тиркөө: Slide the canopy and coupling cover over the downrod. These will conceal the wiring and mounting bracket once the fan is installed on the ceiling.
- Монтаждык кронштейнди орнотуу: Secure the mounting bracket to a ceiling joist or a suitable electrical junction box capable of supporting the fan's weight. Use appropriate screws and anchors (not included) for your ceiling type.
- Желдеткичти илиңиз: Carefully lift the fan assembly and hang it onto the mounting bracket. Ensure the ball joint of the downrod is properly seated in the bracket.
- Электр байланыштары: Connect the fan's electrical wires to your household wiring. Typically, this involves connecting live (L), neutral (N), and ground (G) wires. Ensure all connections are secure using wire nuts.
- Алыскы кабылдагычты орнотуу: Insert the remote control receiver into the canopy. Connect the receiver's wires to the fan's wires and the household wiring as per the wiring diagram in the full manual.
- Чатырды камсыз кылуу: Slide the canopy up to the ceiling and secure it to the mounting bracket with the provided screws. Ensure all wires are tucked neatly inside the canopy.
- LED жарык топтомун орнотуу: Connect the LED light kit wires to the corresponding wires on the fan motor assembly. Secure the LED light panel to the bottom of the fan.
- Акыркы текшерүүлөр: Ensure all connections are tight and secure. Restore power at the circuit breaker and test the fan and light functions using the remote control.
6. Иштөө нускамалары
Алыстан башкаруу функциялары:

Image: The remote control for the NARVI ceiling fan, displaying its various function buttons.
- Кубат баскычы: Turns the fan and light ON/OFF.
- Вентилятордун ылдамдыгынын баскычтары (1-6): Желдеткичтин ылдамдыгын 1ден (эң төмөнкү) 6га (эң жогорку) чейин жөнгө салат.
- Жарыкты күйгүзүү/өчүрүү баскычы: Toggles the LED light on or off.
- Түс температурасын жөндөө: Changes the light color from warm white (3000K) to cool white (6500K). The fan remembers your last setting.
- Жарыктын жарыктыгын жөндөө: Dims or brightens the LED light.
- Timer Function (2H/4H/8H): Желдеткичти 2, 4 же 8 сааттан кийин автоматтык түрдө өчүрөт.
Кышкы/Жайкы функциясы:
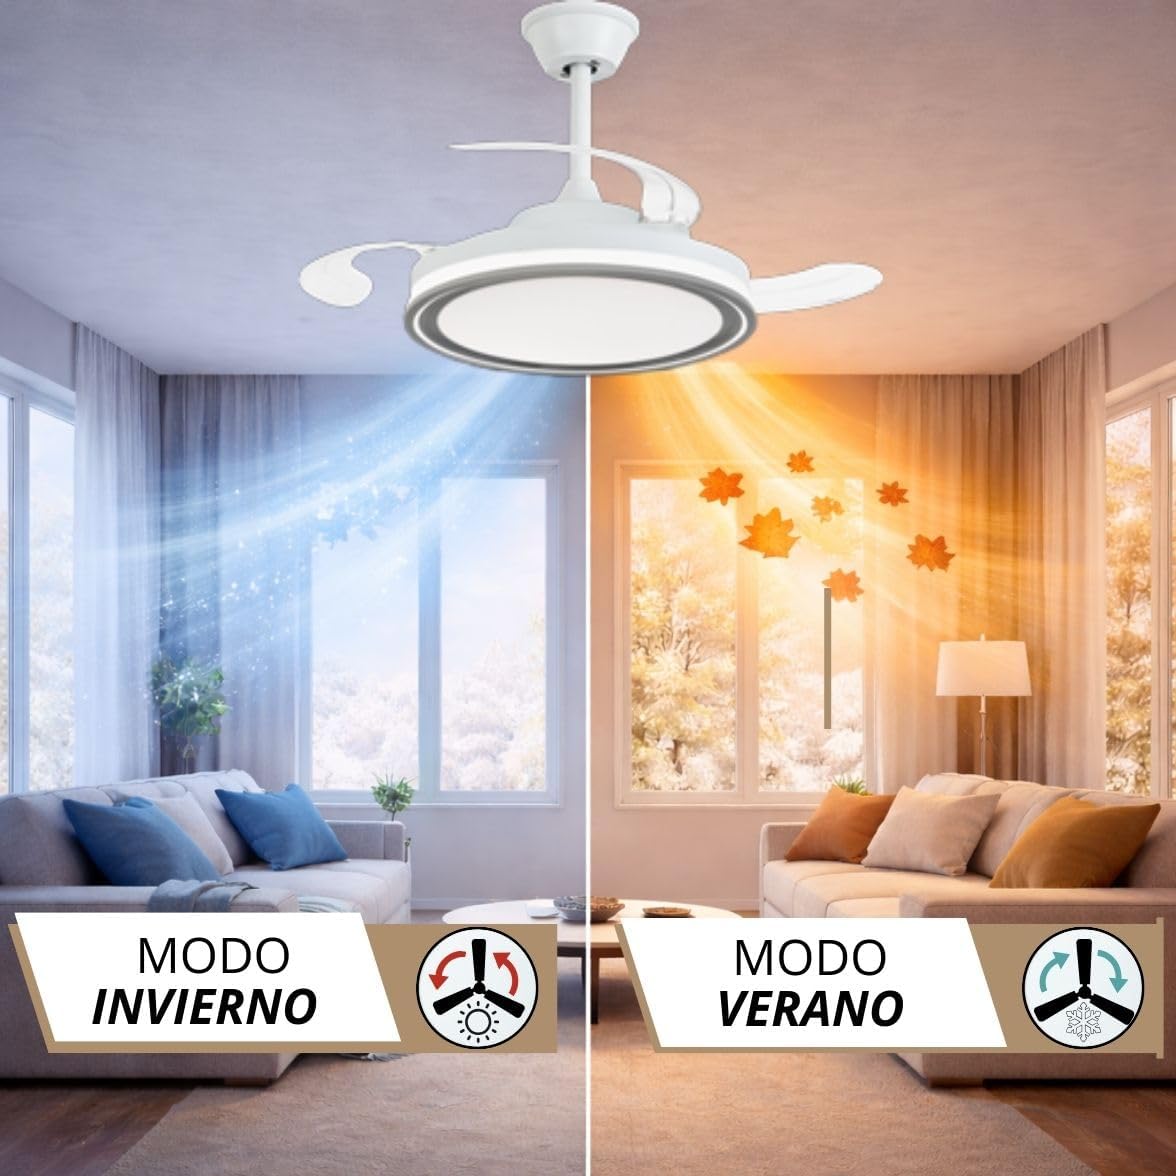
Image: Visual representation of the fan's winter and summer modes, showing air circulation patterns.
The fan features a reversible motor for year-round use. Use the dedicated button on the remote control to switch between modes:
- Жайкы режим (саат жебесине каршы айлануу): Муздатуу эффектин жаратып, ылдый карай аба агымын жаратат.
- Кышкы режим (саат жебеси боюнча айлануу): Creates an upward airflow, circulating warm air trapped near the ceiling, helping to distribute heat more evenly.
7. Техникалык тейлөө
- Тазалоо: Вентиляторду тазалоо үчүн, жумшак, d менен сүртүңүзamp кездеме. Абразивдүү тазалоочу каражаттарды же эриткичтерди колдонбоңуз. Тазалоодон мурун электр кубатынын өчүрүлгөнүн текшериңиз.
- Бычакты багуу: The transparent blades are designed to retract. Avoid applying excessive force to them.
- Майлоо: Туруктуу токтун кыймылдаткычы туруктуу майланган жана кошумча майлоону талап кылбайт.
- Катуулоо: Мезгил-мезгили менен бардык бурамалар менен байланыштардын бекемдигин текшерип туруңуз.
8. Кыйынчылыктарды
| Көйгөй | Мүмкүн себеп | Чечим |
|---|---|---|
| Күйөрман иштебейт | Электр менен камсыздоо жок; Зымдар бошоп калган; Пульттун батареясы түгөнгөн. | Автоматтык өчүргүчтү текшериңиз; Зымдардын туташуусун текшериңиз; Алыстан башкаруу пультунун батареясын алмаштырыңыз. |
| Жарык иштебейт | Loose wiring; LED driver issue. | Check light kit wiring; Contact customer support if LED driver is suspected. |
| Күйөрман солкулдайт | Бош монтаждоо бурамалар; Теңдешсиз бычактар. | Tighten all mounting screws; Ensure blades are securely attached and balanced. |
| Пульт иштебей жатат | Battery dead; Receiver not paired. | Replace battery; Refer to the full manual for remote pairing instructions. |
9. Кепилдик жана колдоо
Your NARVI ceiling fan comes with a manufacturer's warranty. Please refer to the warranty card included in your package for specific terms and conditions. For technical assistance, replacement parts, or any other inquiries, please contact NARVI customer support through the retailer where you purchased the product or visit the official NARVI webсайт.