
1. Киришүү
Thank you for choosing the COOSPO X1 Mini Electric Bicycle Pump. This compact and efficient pump is designed to provide quick and accurate tire inflation for various bicycles and sports equipment. Featuring a digital display, auto-stop function, and versatile valve compatibility, the X1 ensures a reliable and convenient inflation experience. Please read this manual thoroughly before use to ensure proper operation and maintenance.
2. Продукт бүтүп калдыview
2.1 Пакеттин мазмуну
- X1 Electric Bicycle Pump x1
- Presta Valve Adapter x1
- High-Pressure Flexible Hose (with Schrader Valve x1) x1
- USB Type-C заряддоо кабели x1
- Needle Valve Adapter (for balls) x1
2.2 Аппараттын компоненттери
The COOSPO X1 pump features a clear digital LCD display, control buttons for pressure adjustment and power, and a charging port. Refer to the image below for a visual guide to the pump's components.
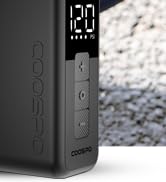
The digital display shows real-time pressure and battery level. Buttons allow for increasing/декретasing preset pressure and powering the pump on/off.
3. Орнотуу
3.1 Насосту кубаттоо
Before first use, fully charge the pump. Connect the provided USB Type-C cable to the pump's charging port and a compatible USB power source (e.g., wall adapter, power bank). The battery indicator on the display will show charging status. A full charge takes approximately 40 minutes.

A 15-minute charge can inflate one full road bike tire (700x23C, 0-110 PSI).
3.2 Attaching the Flexible Hose and Adapters
Screw the flexible high-pressure hose securely onto the pump's output port. Depending on your tire valve type, attach the appropriate adapter to the other end of the flexible hose.
- Schrader клапан: The flexible hose comes with a Schrader valve connector pre-installed.
- Presta клапан: Screw the Presta valve adapter onto the Schrader connector of the flexible hose.
- Ийне клапаны (шарлар үчүн): Screw the needle valve adapter onto the Schrader connector of the flexible hose.

4. Иштөө нускамалары
4.1 Күйгүзүү/өчүрүү
Press and hold the power button (usually the center button) to turn the pump on or off. The LCD screen will illuminate upon activation.
4.2 Каалаган басымды коюу
Once powered on, the display will show the current tire pressure. Use the '+' and '-' buttons to adjust the target pressure. The pump supports a maximum pressure of 120 PSI. The unique atmospheric pressure sensor automatically calibrates upon startup, ensuring accurate inflation at any altitude.

4.3 Connecting to the Valve and Inflating
- Ensure the correct valve adapter is attached to the flexible hose.
- Securely connect the adapter to your tire's valve stem. For Presta valves, ensure the valve core is unscrewed before attaching the adapter.
- Press the power button to start inflation. The pump will automatically stop once the preset pressure is reached.
- After inflation, quickly disconnect the adapter from the valve stem.

The pump's high-efficiency internal ventilation system prevents overheating, ensuring safe operation without the need for a silicone case. Advanced dynamic balancing technology reduces vibrations for smooth inflation.
4.4 Inflation Performance Reference
The following table provides approximate inflation times and capacities based on laboratory data. Actual performance may vary due to battery charge, environmental conditions, and other factors.
| Type | PSI диапазону | Inflation Quantity | Inflation Speed per Tire |
|---|---|---|---|
| Road Bike (700 x 23C) | 0~80 PSI | ≈5 tires | ≈50с |
| 0~90 PSI | ≈5 tires | ≈59с | |
| 0~100 PSI | ≈5 tires | ≈68с | |
| 0~110 PSI | ≈4 tires | ≈90с | |
| 0~120 PSI | ≈2 tires | ≈98с | |
| MTB (27.5 x 1.95) | 0~50 PSI | ≈3 tires | ≈80с |
| Топ | 0~7 PSI | ≈19 Pcs | ≈30с |

5. Техникалык тейлөө
- Тазалоо: Wipe the pump with a soft, dry cloth. Do not use harsh chemicals or immerse the device in water.
- Сактагыч: Store the pump in a cool, dry place away from direct sunlight and extreme temperatures. Ensure the battery is partially charged if storing for extended periods.
- Батареяга кам көрүү: To prolong battery life, avoid fully discharging the pump frequently. Recharge it when the battery level is low.
6. Кыйынчылыктарды
| Көйгөй | Мүмкүн себеп | Чечим |
|---|---|---|
| Насос иштебейт. | Батарея аз. | Charge the pump using the provided USB-C cable. |
| Насос толбойт. | Hose or adapter not securely connected. Incorrect valve adapter. Target pressure already reached. | Ensure all connections are tight. Use the correct adapter for your valve type. Check the current pressure reading. |
| Туура эмес басым окуу. | Loose connection. Sensor calibration issue. | Ensure the hose is tightly connected. Turn the pump off and on again to recalibrate the sensor. |
| Pump overheats during use. | Кеңейтилген үзгүлтүксүз иштөө. | Allow the pump to cool down before resuming operation. The internal ventilation system is designed to manage heat, but prolonged use can still cause warmth. |
7. Техникалык шарттар
- Бренд: CooSpo
- Модел: X1
- Материал: Пластик
- Элемент Салмагы: 200 грамм
- Продукциянын өлчөмдөрү: 5.3L x 3W x 7.2H см
- Кубат булагы: Батарея
- Максималдуу басым: 120 PSI
- Батарея түрү: Литий-ион (500 мАч)
- Туташтыргыч түрү: USB Type-C
- Камтылган компоненттер: X1 Electric Bicycle Pump, Presta Valve Adapter, High-Pressure Flexible Hose (with Schrader Valve), USB Type-C Cable, Needle Valve Adapter.
8. Кепилдик жана колдоо
The COOSPO X1 Mini Electric Bicycle Pump comes with a standard manufacturer's warranty. For detailed warranty information, product support, or service inquiries, please refer to the warranty card included in your package or visit the official CooSpo website. You can also contact the seller directly through your purchase platform for assistance.