1. Киришүү
This manual provides detailed instructions for the installation, operation, and maintenance of the Generic Iface301 multi-biometric identification time attendance and access control terminal. The Iface301 integrates advanced facial recognition, RFID card, and password identification methods, making it a versatile solution for employee time tracking and secure access management.
Please read this manual thoroughly before operating the device to ensure proper usage and to maximize its functionality and lifespan.
2. Продукт бүтүп калдыview
2.1 Негизги өзгөчөлүктөрү
- 4.3-inch TFT touch screen for intuitive user interaction.
- 6 user-defined function keys for quick access to common operations.
- Multi-biometric identification: Face, RFID Card, and Password.
- Integrated contact relays for door access control, compatible with third-party panels.
- Кошумча Web-server management software accessible via IE browser.
- Infrared optical system for reliable user identification in low-light conditions.
- Optional built-in 2000 mAh battery for approximately 4 hours of continuous operation during power outages.
- Multiple communication options: TCP/IP, RS232/485, and optional built-in Wi-Fi.
- Wiegand Output for integration with third-party access control systems.
2.2 Аппараттын компоненттери
The Iface301 terminal features a robust design with a user-friendly interface.

Сүрөт 2.2.1: Алдыңкы view of the Iface301 device. This image displays the main screen, the numeric keypad, and the integrated RFID card reader on the right side. The device has a silver and black finish.

2.2.2-сүрөт: бурчтуу тарап view of the Iface301. This perspective shows the device's depth and the power button located on the left side, indicating its compact design.

2.2.3-сүрөт: Арткы view of the Iface301. This image displays the integrated mounting bracket for wall installation and various connection ports for power, network, and external devices.
3. Орнотуу
3.1 Аппаратты орнотуу
- Select a suitable location for installation, ensuring it is at an appropriate height for facial recognition and card scanning.
- Use the provided mounting bracket (refer to Figure 2.2.3) as a template to mark drilling points on the wall.
- Тешиктерди бургула жана зарыл болсо, дубал тыгындарын салгыла.
- Монтаждык кронштейнди бурамалар менен дубалга бекитиңиз.
- Carefully attach the Iface301 device to the mounted bracket.
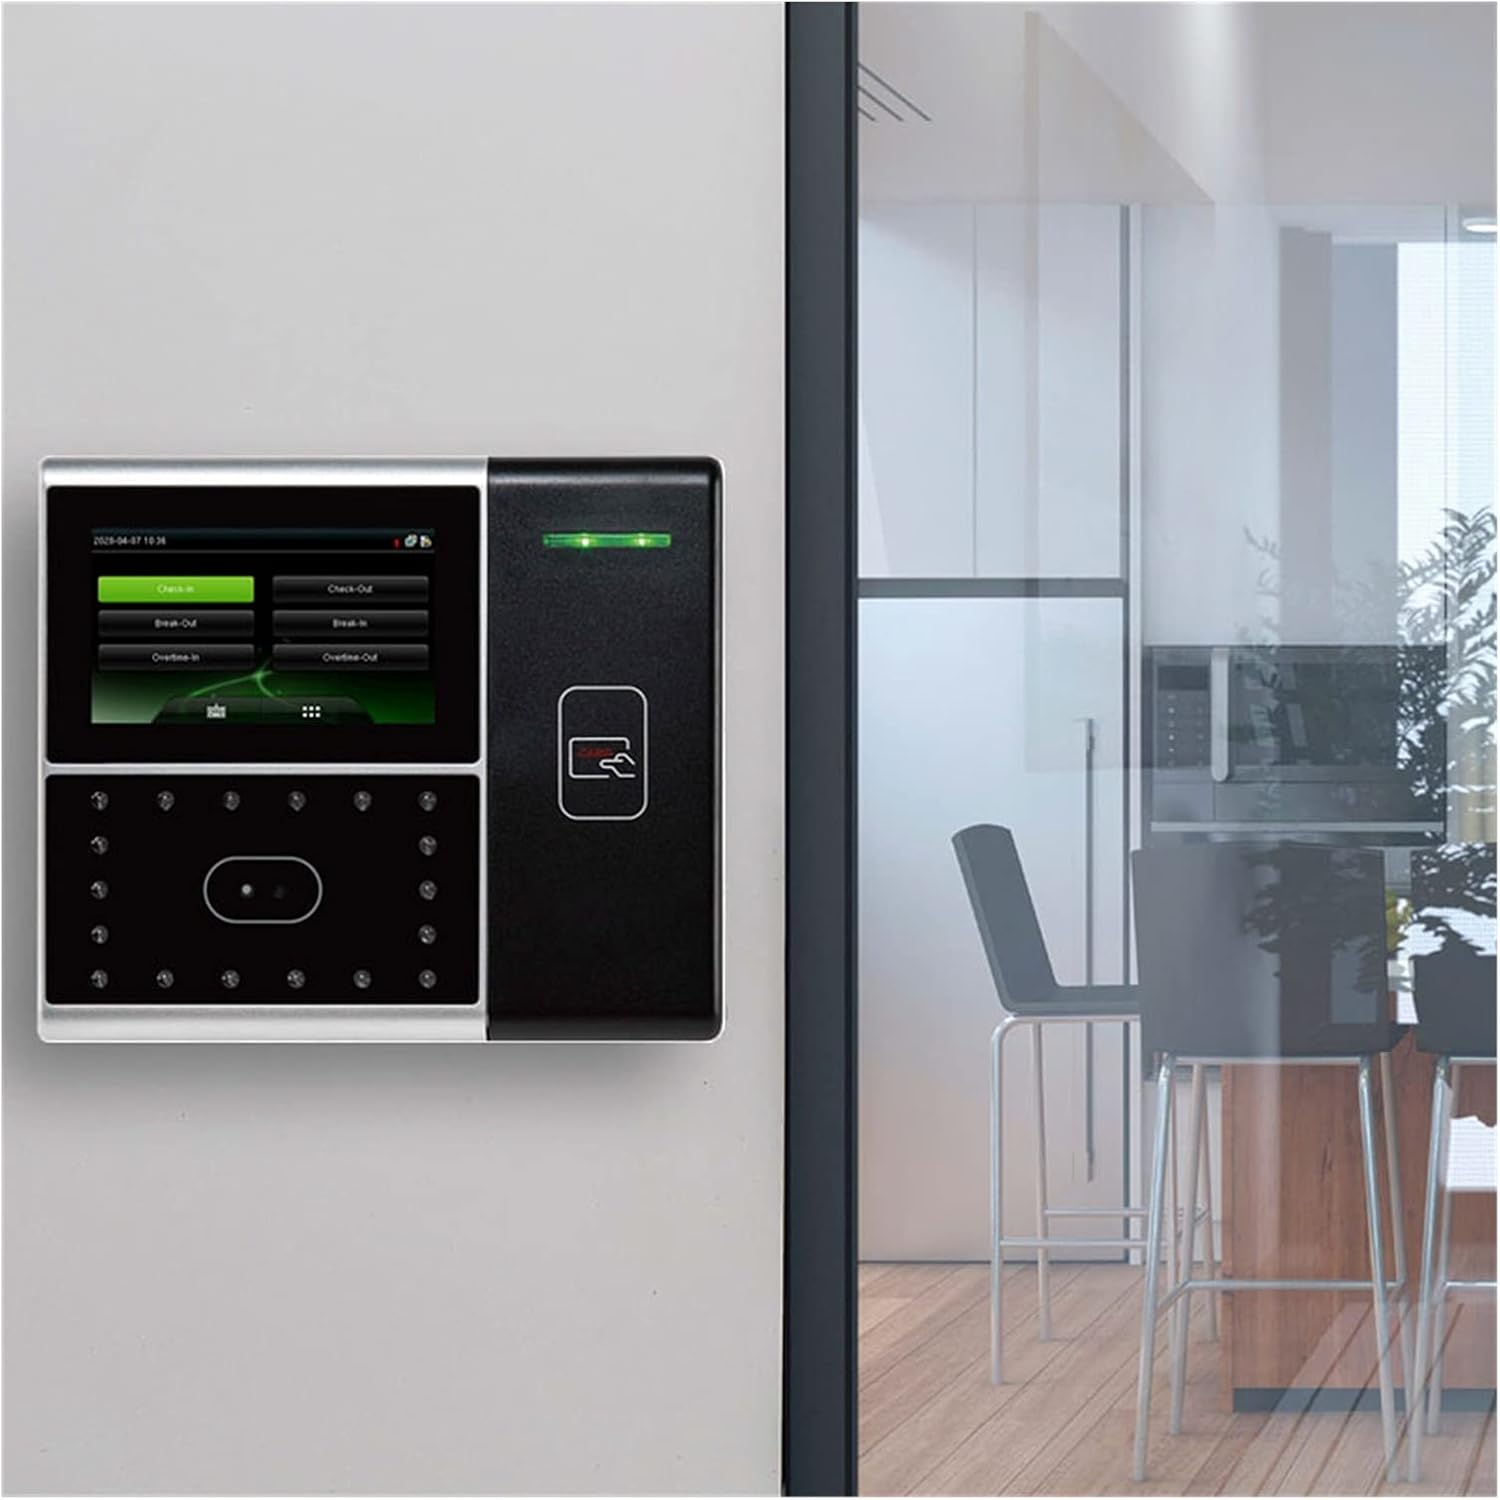
Figure 3.1.1: Iface301 installed on a wall. This image shows the device securely mounted, ready for operation in a typical office or entry point setting.
3.2 Кубат туташтыруу
- Connect the DC 12V 3A power adapter to the power input port on the back of the device.
- Кубат адаптерин стандарттуу электр розеткасына сайыңыз.
- Аппарат автоматтык түрдө күйөт.
3.3 Тармактын конфигурациясы
- TCP/IP (Wired): Connect an Ethernet cable from the device's LAN port to your network router or switch.
- Wi-Fi (Wireless, Optional): Navigate to the network settings on the device's touch screen, select your Wi-Fi network, and enter the password.
- RS232/485: For serial communication, connect the appropriate cables to the designated ports on the device and your host system.
3.4 Access Control Wiring
- For door access control, connect the device's contact relays to your door strike or a third-party access control panel. Refer to the wiring diagram in the full technical manual for specific connections.
- Utilize the Wiegand Output for integration with existing third-party access control systems.
4. Иштөө нускамалары
4.1 Колдонуучуну каттоо
Before users can utilize the system, they must be registered. This typically involves enrolling their face, RFID card, and/or setting a password.
- Access the main menu on the 4.3-inch TFT touch screen (refer to Figure 4.1.1).
- Select the 'User Management' or 'Enroll' option.
- Follow the on-screen prompts to register a new user, including capturing facial data, scanning an RFID card, or entering a password.
- Assign a unique 9-digit user ID and other relevant information.

Figure 4.1.1: Iface301 main menu screen. This image shows the graphical user interface with various icons for system functions like user management, settings, and record queries.
4.2 Time Attendance Operations
Users can perform check-in/check-out operations using their registered credentials.
- Approach the device.
- Present your face to the camera, scan your RFID card, or enter your password on the keypad.
- The device will automatically record the time and status (e.g., Check-In, Check-Out) based on the configured settings or user selection.
- The 6 user-defined function keys can be configured for specific attendance statuses like 'Break-In' or 'Overtime-Out'.

Figure 4.2.1: Iface301 attendance screen. This image shows the touch screen displaying options such as 'Check-In', 'Check-Out', 'Break-Out', 'Break-In', 'Overtime-In', and 'Overtime-Out', along with the current date and time.
4.3 Access Control Operations
For access control, successful identification will trigger the connected door lock to open.
- Present your registered face, RFID card, or password to the device.
- Upon successful verification, the door connected to the device will unlock for a pre-set duration.
4.4 Системаны башкаруу
- Automatic Status Switch: Configure the device to automatically switch between Check-In and Check-Out modes based on time.
- Self-Service Query: Колдонуучулар болот view their attendance records directly on the device.
- Work Code: Assign specific work codes for different tasks or departments.
- T9 Input: Use the T9 keypad for easier text entry.
- Web-server Management: Access the device's settings and retrieve data remotely via a web browser if the optional web-server software is enabled.
5. Техникалык тейлөө
5.1 Аппаратты тазалоо
- Regularly clean the touch screen and camera lens with a soft, dry, lint-free cloth.
- Do not use abrasive cleaners, solvents, or aerosol sprays, as these can damage the device's surface and internal components.
- Тазалоодон мурун аппараттын өчүрүлгөнүн текшериңиз.
5.2 Программалык камсыздоо жаңыртуулары
Periodically check for firmware updates from the manufacturer to ensure optimal performance and security. Follow the provided instructions for safe software updates.
5.3 Battery Maintenance (If Applicable)
If your Iface301 model includes the optional built-in battery, ensure it is regularly charged. Avoid fully discharging the battery for extended periods to prolong its lifespan.
6. Кыйынчылыктарды
- Түзмөк күйбөй жатат: Кубат адаптеринин туташуусун текшерип, розетканын иштеп турганын текшериңиз.
- Facial Recognition Failure: Ensure the user's face is clearly visible to the camera, free from obstructions (e.g., hats, masks). Verify lighting conditions are adequate. Re-enroll the user's face if issues persist.
- Карта таанылбайт: Ensure the RFID card is correctly presented to the card reader. Verify the card is registered in the system.
- Тармакка туташуу маселелери: Check Ethernet cable connections or Wi-Fi settings. Verify network configuration (IP address, gateway, DNS).
- Эшик ачылбай жатат: Check wiring to the door strike or access control panel. Verify user's access permissions in the system.
- Экран жооп бербейт: Түзмөктү өчүрүп-күйгүзүп көрүңүз. Эгерде көйгөй чечилбесе, техникалык колдоо кызматына кайрылыңыз.
7. Техникалык шарттар
| Өзгөчөлүк | Спецификация |
|---|---|
| CPU | Multi-Bio CPU 630 MHz |
| Эс | 256M Flash, 64M SDRAM |
| Аппараттык платформа | ZMM220 Multi-Medium Development Platform |
| Камера | High Resolution Infrared Camera |
| Дисплей | 4.3-inch TFT touch screen |
| Face Capacity (1:N) | 500 |
| Карта сыйымдуулугу | 10,000 |
| Logs Capacity | 100,000 |
| Алгоритмдин версиясы | Бет 7.0 |
| Байланыш | TCP/IP, RS232/485, Optional Wireless Wi-Fi |
| USB-HOST | Ооба |
| Батарея | Optional 2000mAh backup battery |
| Power Input | DC 12V 3A |
| Продукциянын өлчөмдөрү | 1"W x 1"H (Approximate, refer to actual product for precise measurements) |
| Элемент Салмагы | 1000 грамм (2.2 фунт) |
8. Кепилдик жана колдоо
For warranty information and technical support, please refer to the documentation provided with your purchase or contact the seller/manufacturer directly. Keep your purchase receipt as proof of purchase for warranty claims.


