1. Киришүү
This manual provides detailed instructions for the installation, operation, and maintenance of your UNITOPSCI A4196H1MI2 Android Car Stereo. Please read this manual thoroughly before using the product to ensure proper functionality and to prevent damage. This unit is designed for Chevrolet Cruze J300 models manufactured between 2009 and 2015.
2. Коопсуздук маалыматы
- Аппаратты ар дайым жоопкерчиликтүү жана жергиликтүү жол мыйзамдарына ылайык иштетиңиз. Айдоолорду алаксытуу кырсыкка алып келиши мүмкүн.
- Do not attempt to install or repair the unit if you are not qualified. Improper installation can cause damage to the vehicle's electrical system or the unit itself.
- Кыска туташуунун алдын алуу үчүн бардык зымдар туура туташтырылганын жана изоляцияланганын текшериңиз.
- Агрегатты суудан жана ашыкча нымдан алыс кармаңыз.
- Аппаратты экстремалдык температурага же түз күн нуруна узак убакытка калтыруудан сактаңыз.
- Экранды жумшак, кургак чүпүрөк менен тазалаңыз. Абразивдүү тазалоочу каражаттарды колдонбоңуз.
3. Пакеттин мазмуну
Төмөндө тизмеленген нерселердин баары пакетиңизге камтылганын текшериңиз:
- Android унаа стерео блогу
- Камера
- Электр кабели
- Small Horn
- RCA кабели
- Арткы камера киргизүү кабели
- Радио антенна
- Микрофон
- Canbus Box
- GPS антеннасы
- 4/6 Pin USB Cable
- Колдонуучунун Колдонмосу (бул документ)
- USB адаптер кабели
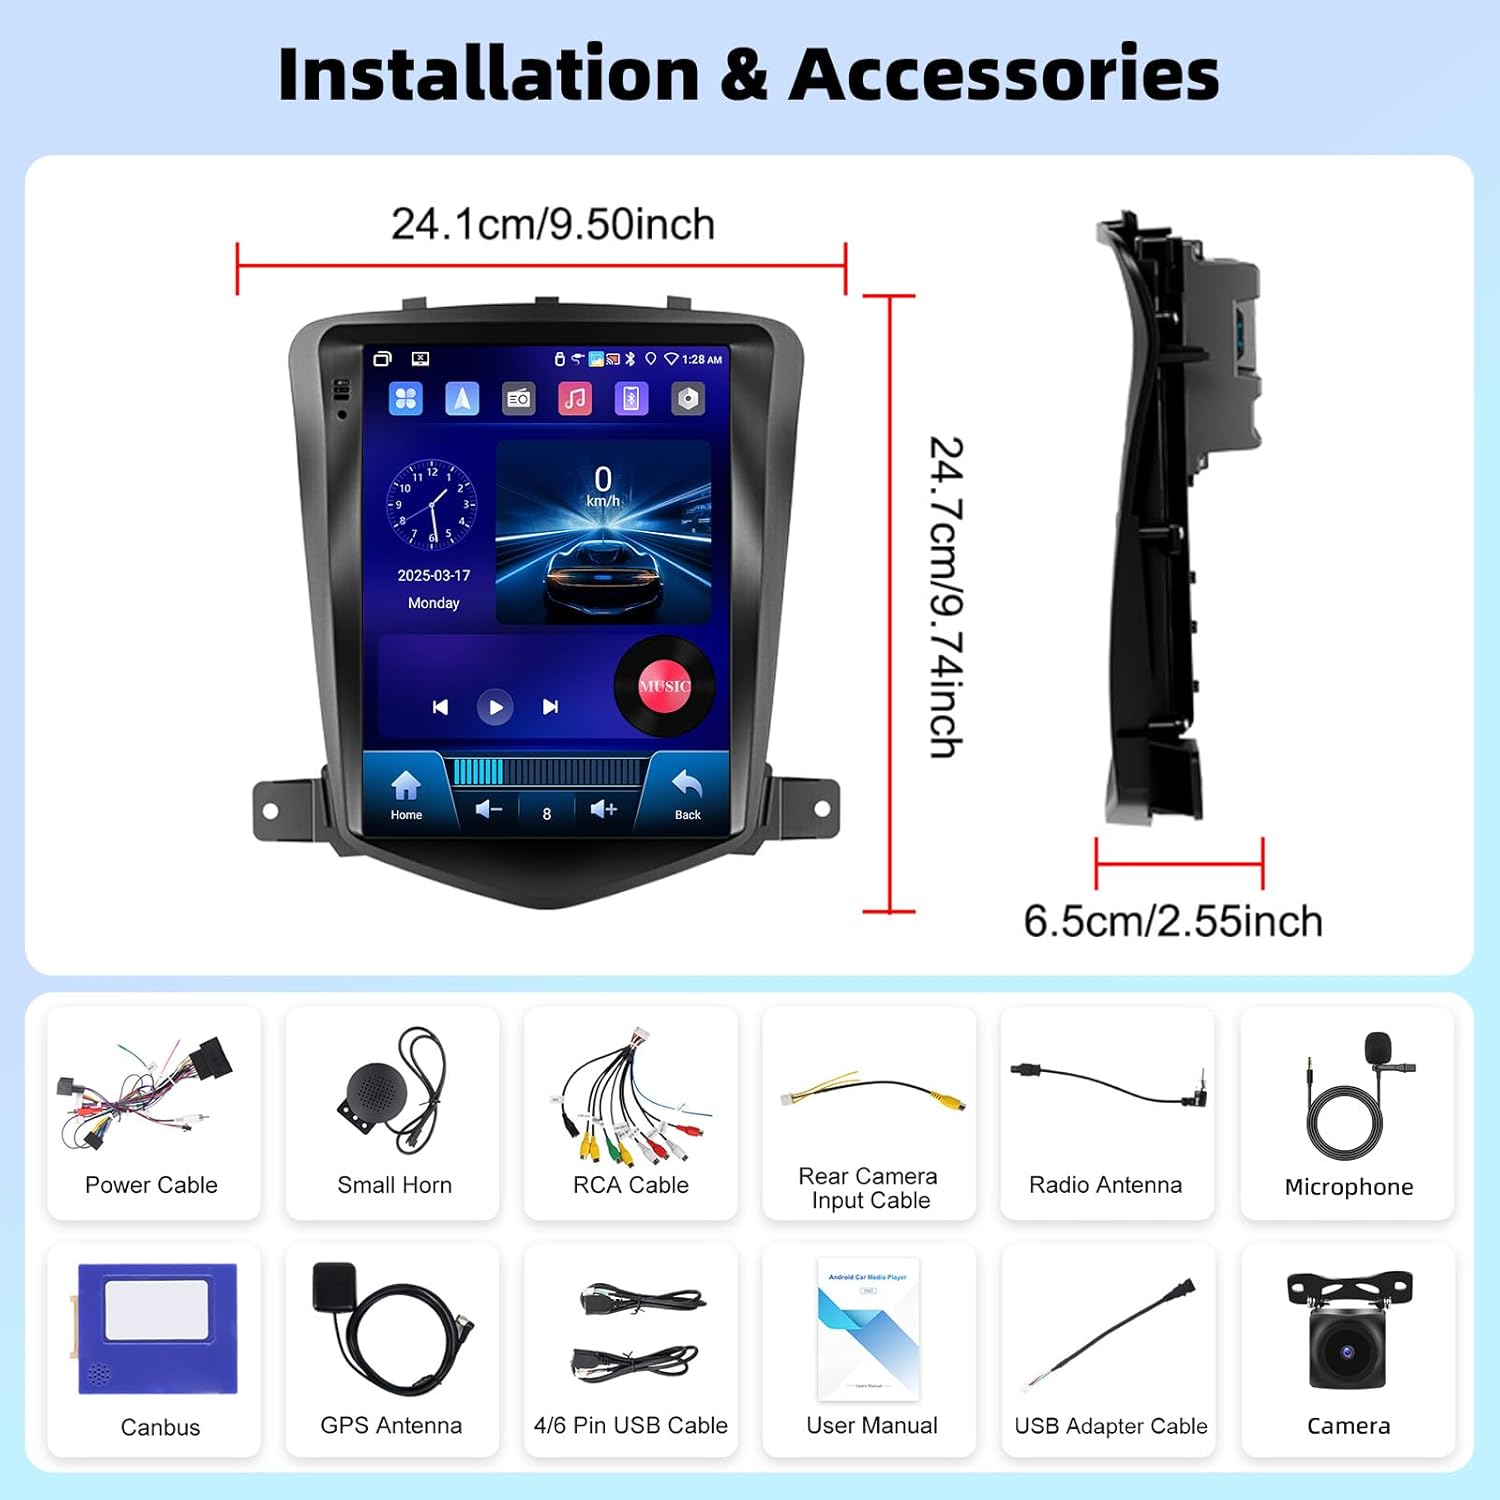
Сүрөт 3.1: Бүттүview of the UNITOPSCI A4196H1MI2 car stereo dimensions and included accessories, such as power cables, antennas, and the backup camera.
4. Орнотуу
4.1. Орнотууга чейинки текшерүүлөр
- Ensure your vehicle is a Chevrolet Cruze J300 model (2009-2015).
- Кандайдыр бир электр иштерин баштоодон мурун унаанын аккумуляторун ажыратыңыз.
- 3-бөлүмдө көрсөтүлгөн бардык компоненттердин бар экендигин текшериңиз.
4.2. Removing the Original Radio
Carefully remove the trim panels and screws securing the factory radio. Refer to your vehicle's service manual for specific instructions on dashboard disassembly.
4.3. Зымдарды туташтыруу
- Кубат кабели: Connect the provided power harness to the vehicle's wiring. Ensure correct polarity.
- RCA кабелдери: Connect for audio output (e.g., external amplifier) if applicable.
- GPS антеннасы: GPS антеннасын ачык жерге орнотуңуз view асмандын, адатта аспаптар тактасында же алдыңкы айнектин астында.
- Радио антенна: Унаанын радио антеннасын аппаратка туташтырыңыз.
- Микрофон: Connect the external microphone for improved call quality. Position it near the driver.
- Камдык камера: Connect the rear camera input cable to the unit and route the camera cable to the rear of the vehicle. Connect the camera's power to the reverse light circuit for automatic activation.
- USB кабелдери: Connect the USB extension cables for external storage or wired CarPlay/Android Auto.
- Канбус кутучасы: Connect the Canbus box as instructed to ensure proper communication with the vehicle's systems, including steering wheel controls.
4.4. Агрегатты монтаждоо
Secure the UNITOPSCI A4196H1MI2 unit into the dashboard opening using the provided brackets and screws. Reassemble the dashboard trim panels.

Image 4.1: Visual comparison of the Chevrolet Cruze J300 dashboard, illustrating the appearance before and after the UNITOPSCI A4196H1MI2 Android car stereo is installed.
5. Иштөө нускамалары
5.1. Күйгүзүү/өчүрүү
To power on the unit, start your vehicle. The unit will typically power on automatically. To power off, turn off your vehicle's ignition. The unit may have a soft power-off feature that allows it to resume quickly.
5.2. Сенсордук экран интерфейси
The unit features a 9.7-inch HD touchscreen with a resolution of 1024*600. Navigate through menus and applications by tapping, swiping, and pinching gestures, similar to a smartphone or tablet.
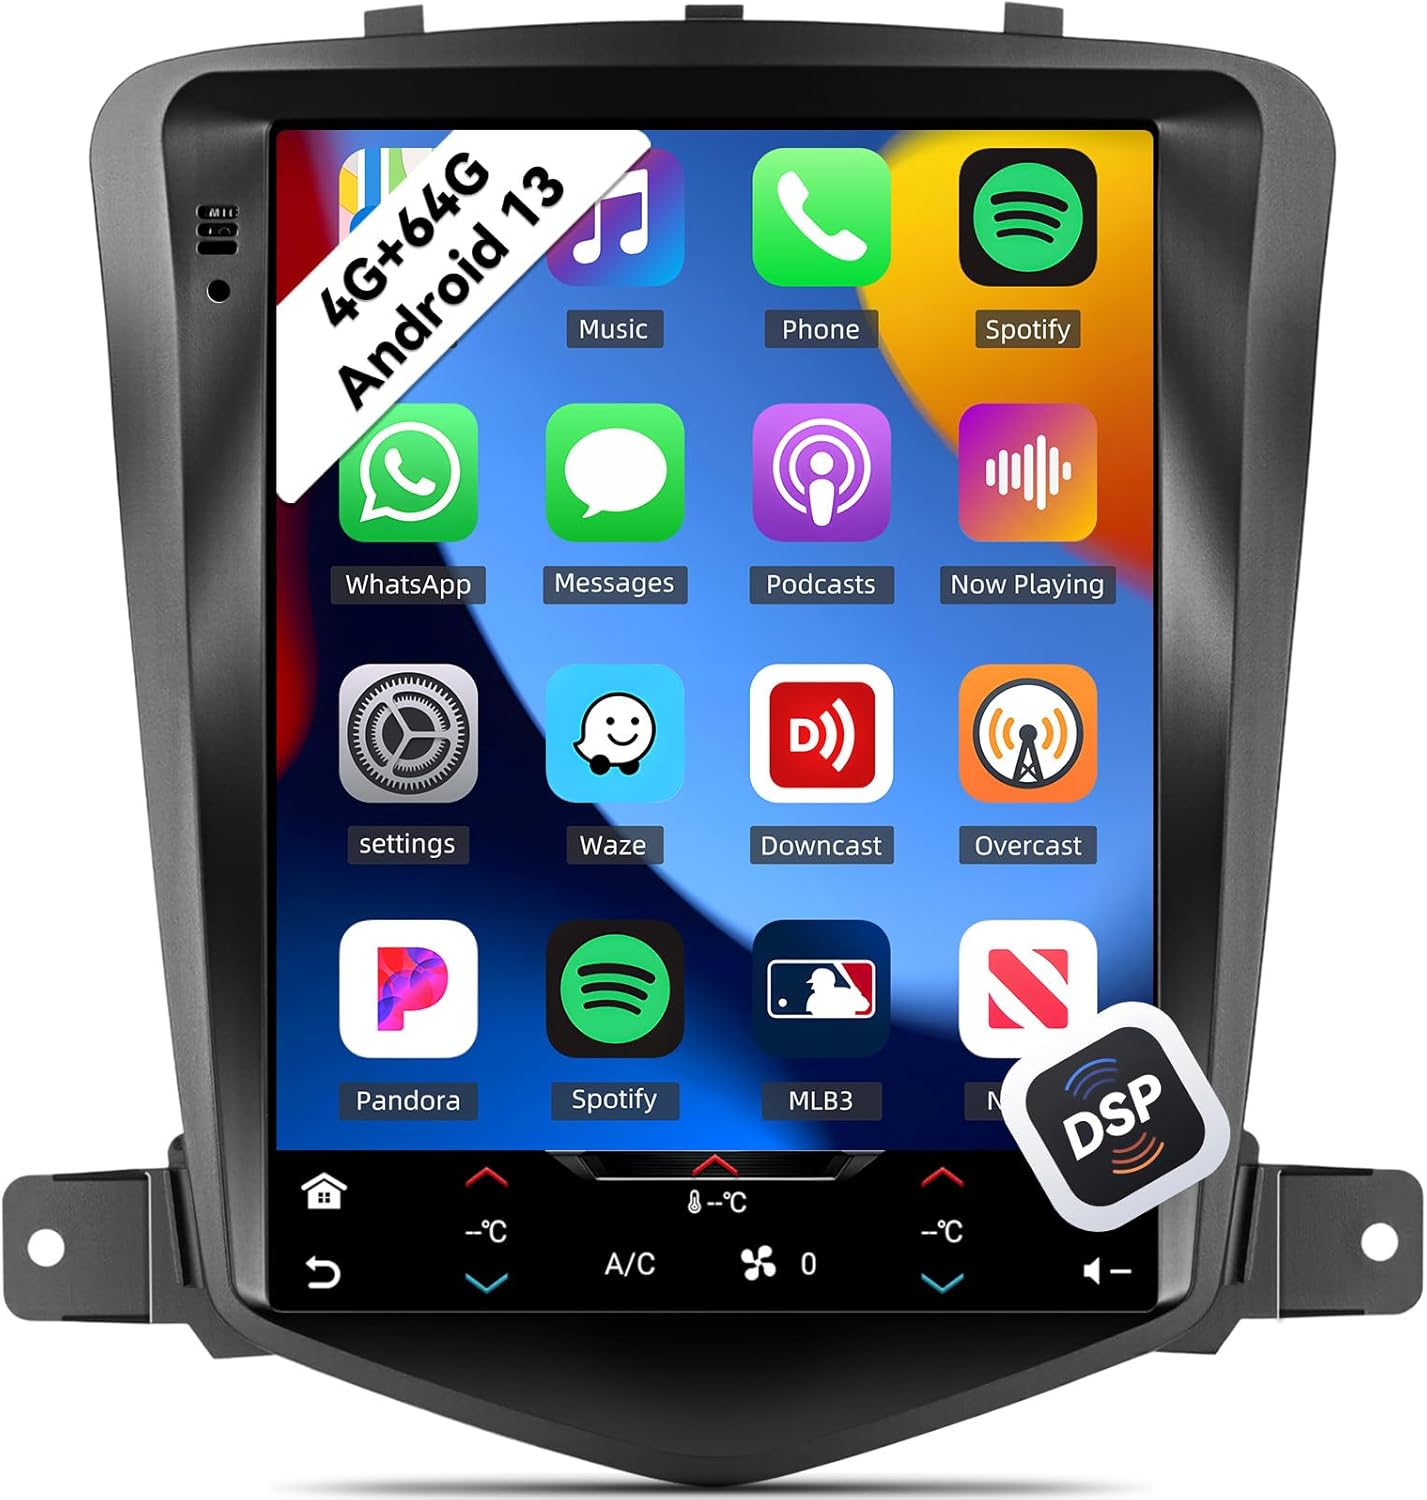
Image 5.1: The main interface of the UNITOPSCI A4196H1MI2 unit, displaying a grid of application icons for music, phone, Spotify, messages, and other functions.
5.3. Android 13 системасы
The stereo operates on the Android 13 operating system, featuring a quad-core processor, 4GB RAM, and 64GB ROM. This configuration provides a responsive user experience and ampколдонмолор жана медиа үчүн сактагыч.

Image 5.2: A visual representation of the Android 13 system's core components, highlighting the 4-core CPU, 4GB RAM, and 64GB ROM for enhanced performance.
5.4. Зымсыз CarPlay жана Android Auto
The unit supports both wireless Apple CarPlay and Android Auto. Connect your compatible smartphone wirelessly to access navigation, music, calls, and messages directly on the stereo's display.
- CarPlay үчүн: Ensure Wi-Fi and Bluetooth are enabled on your iPhone. Follow the on-screen prompts to pair.
- Android Auto үчүн: Ensure Wi-Fi and Bluetooth are enabled on your Android phone. Open the Android Auto app on your phone and follow the pairing instructions.
5.5. Mirror Link
Mirror Link allows you to display your smartphone's screen directly onto the car stereo. This feature is compatible with most Android and iOS phones, excluding some Samsung models.
- Access the Mirror Link application on the stereo.
- Телефонуңузду USB же Wi-Fi аркылуу туташтыруу үчүн көрсөтмөлөрдү аткарыңыз.

Image 5.3: The car stereo display demonstrating the integration of CarPlay, Android Auto, and Mirror Link functionalities, allowing seamless smartphone connectivity.
5.6. Bluetooth 5.0
The built-in Bluetooth 5.0 module enables hands-free calling and wireless audio streaming. An external microphone is included for clear voice transmission.
- Жупташтыруу: Стереодогу жана телефонуңуздагы Bluetooth жөндөөлөрүнө өтүңүз. Издөө available devices and select the stereo's name to pair.
- Hands Free Чалуу: Once paired, you can make and receive calls directly from the stereo interface. The phonebook can be automatically downloaded.
- Аудио агым: Play music from your phone through the car's speakers wirelessly.

Image 5.4: The stereo's display showing the Bluetooth 5.0 interface for hands-free calling and music playback, along with the Digital DSP processor's 32-band equalizer.
5.7. FM/RDS радиосу
Access local radio stations with the integrated FM/RDS tuner. You can save up to 18 preset stations.
- Navigate to the Radio application.
- Use the scan function to find stations or manually tune to a frequency.
- Press and hold a preset button to save the current station.
5.8. GPS багыттоо & WiFi
The unit supports GPS, GLONASS, and Beidou navigation systems. You can use pre-installed offline maps or connect to Wi-Fi/hotspot for online navigation apps like Google Maps or Waze.
- Оффлайн карталары: Access the navigation app and select your desired region.
- Онлайн карталар: Connect the unit to a Wi-Fi network or your phone's hotspot via the Wi-Fi settings. Then, open your preferred online navigation application.

Image 5.5: The stereo's capabilities for built-in Wi-Fi, allowing access to various online applications, and GPS navigation, supporting both online and offline maps.
5.9. DSP 32-Band EQ
Customize your audio experience with the Digital Sound Processor (DSP) and its 32-band equalizer. This allows for precise tuning of sound frequencies, time correction, and speed-compensated volume.
- Access the EQ settings from the main menu or audio settings.
- Adjust individual frequency bands to match your audio preferences.
- Explore preset equalizer modes or create custom profiles.
5.10. Бөлүнгөн экран функциясы
Бөлүнгөн экран функциясы 9.7 дюймдук дисплейде бир эле учурда эки тиркемени, мисалы, навигация жана музыка ойнотууну иштетүүгө мүмкүндүк берет.
- Биринчи тиркемени ачыңыз.
- Long-press the recent apps button or swipe from the bottom (depending on Android version) to activate split-screen mode.
- Биринчи тиркеменин жанында көрсөтүлүүчү экинчи тиркемени тандаңыз.

Image 5.6: The 9.7-inch HD screen showcasinанын кеңдиги viewing angle and the split-screen feature, allowing two applications to be viewбир эле учурда ed.
5.11. Рулду башкаруу (SWC)
The unit supports steering wheel controls, allowing you to manage volume, tracks, and calls without taking your hands off the wheel. This functionality is enabled via the Canbus box.
- Access the Steering Wheel Control settings in the unit's menu.
- Рулдагы ар бир баскычты керектүү функцияга программалоо үчүн экрандагы нускамаларды аткарыңыз.
5.12. Резервдик камера
камтылган AHD камдык камерасы ачык-айкын камсыз кылат view of the area behind your vehicle when reversing. The display automatically switches to the camera feed when the reverse gear is engaged.
- Ensure the backup camera is correctly installed and wired to the reverse light circuit.
- When shifting into reverse, the camera feed will appear on the screen.

Image 5.7: The AHD backup camera module and its clear display on the car stereo screen, alongside an illustration of the steering wheel control interface for programming functions.
6. Техникалык тейлөө
- Экранды тазалоо: Сенсордук экранды акырын сүртүү үчүн жумшак, түксүз чүпүрөктү колдонуңуз. өжөр тактар үчүн, бир аз гampчүпүрөккө суу же экранды тазалоочу каражат. Катуу химиялык заттардан алыс болуңуз.
- Программалык камсыздоо жаңыртуулары: Оптималдуу иштөөнү жана жаңы функцияларга жетүүнү камсыз кылуу үчүн өндүрүүчүнүн программалык камсыздоо жаңыртууларын мезгил-мезгили менен текшерип туруңуз.
- Жалпы кам көрүү: Агрегатты чаңдан жана таштандыдан алыс кармаңыз. Ашыкча ысып кетүүнүн алдын алуу үчүн аппараттын айланасында туура желдетүүнү камсыз кылыңыз.
7. Кыйынчылыктарды
7.1. Күч жок
- Страницаларды текшерүү: Inspect the vehicle's fuse box and the unit's inline fuse for any blown fuses.
- Зымдар: Ensure the power cable is securely connected and has proper voltage.
- От алдыруу: Унаанын от алдыруу системасы күйүк экенин текшериңиз.
7.2. Үн жок
- Көлөмү: Check if the volume is turned up and not muted.
- Динамик байланыштары: Ensure all speaker wires are correctly connected to the unit and not shorted.
- Аудио булагы: Verify the correct audio source (e.g., FM, Bluetooth, CarPlay) is selected.
7.3. GPS Not Working
- Антенна: GPS антеннасы туура туташтырылганын жана тунук жерге орнотулганын текшериңиз view асмандын.
- сигнал: Allow time for the unit to acquire a GPS signal, especially after initial installation or in areas with poor reception.
- Карталар: Verify that maps are installed or that the unit is connected to Wi-Fi for online navigation.
7.4. CarPlay/Android Auto Connection Issues
- Bluetooth/Wi-Fi: Bluetooth жана Wi-Fi стерео системаңызда да, смартфонуңузда да күйгүзүлгөнүн текшериңиз.
- Шайкештик: Confirm your phone model and operating system version are compatible.
- USB кабели: If using wired connection, try a different, high-quality USB cable.
7.5. Камдык камера көрсөтүлбөй жатат
- Зымдар: Check the camera's power and video signal connections. Ensure the trigger wire is correctly connected to the reverse light circuit.
- Орнотуулар: Verify that the camera input is enabled in the stereo's settings.
8. Техникалык шарттар
| Өзгөчөлүк | Спецификация |
|---|---|
| Модель номери | A4196H1MI2 |
| Операция системасы | Android 13 |
| Эстутум (RAM) | 4 ГБ |
| Сактагыч (ROM) | 64 ГБ |
| Дисплей өлчөмү | 9.7 дюйм |
| Screen Resolution | 1024*600 |
| Байланыш | Bluetooth 5.0, Wi-Fi |
| Навигация | GPS/GLONASS/Beidou (North America, Worldwide maps) |
| Аудио өзгөчөлүктөрү | DSP 32-Band EQ, Stereo Output |
| Өзгөчөлүктөр | Wireless Apple CarPlay, Android Auto, Mirror Link, Split Screen, Backup Camera Input, Steering Wheel Control |
| Продукциянын өлчөмдөрү | 2.55"L x 9.5"W x 9.74"H |
| Элемент Салмагы | 3.3 фунт |
9. Кепилдик жана колдоо
9.1. Өндүрүүчүнүн Кепилдиги
This UNITOPSCI A4196H1MI2 car stereo comes with a 1 жылдык Өндүрүүчүнүн Кепилдиги сатып алынган күндөн тартып. Бул кепилдик нормалдуу колдонуудагы материалдардагы жана жасалгадагы кемчиликтерди камтыйт. Кепилдик дооматтары үчүн сатып алганыңыздын далилин сактап коюңуз.
9.2. Кардарларды колдоо кызматы
For technical assistance, troubleshooting, or warranty inquiries, please contact UNITOPSCI customer support. You can reach them via email at UNITOPSCI@126.com. Please provide your model number (A4196H1MI2) and a detailed description of your issue for efficient service.
Additional protection plans may be available for purchase from your retailer, offering extended coverage beyond the manufacturer's warranty.