
STUDIOFINIX ST-HCS628BTX2-US
STUDIOFINIX 6.5 Inch Bluetooth Ceiling Speakers Instruction Manual
Model: ST-HCS628BTX2-US
1. Киришүү
This manual provides detailed instructions for the installation, operation, and maintenance of your STUDIOFINIX 6.5 Inch Bluetooth Ceiling Speaker System. Please read this manual thoroughly before using the product to ensure proper setup and optimal performance. Keep this manual for future reference.
2. Коопсуздук маалыматы
Өрт, электр шок же буюмдун бузулушуна жол бербөө үчүн төмөнкү коопсуздук чараларын сактаңыз:
- ачыкка чыгарбагыла amplifier or speakers to rain or moisture.
- үчүн туура желдетүүнү камсыз кылуу ampысып кетүүнүн алдын алуу үчүн көтөргүч.
- Берилген кубат адаптерин гана колдонуңуз. Туура эмес адаптерди колдонуу зыянга же өрткө алып келиши мүмкүн.
- Агрегатты өзүңүз оңдоого же өзгөртүүгө аракет кылбаңыз. Бардык тейлөөлөрдү квалификациялуу кызматкерлерге тапшырыңыз.
- Ensure all wiring connections are secure and correctly polarized before powering on the system.
- Avoid installing speakers in locations with excessive vibration or extreme temperatures.
3. Пакеттин мазмуну
Төмөндө тизмеленген нерселердин баары пакетиңизге камтылганын текшериңиз:
- 4 x 6.5 Inch Ceiling Speakers
- 4 x Speaker Wires
- 1 x 4 Channel Bluetooth Ampкөтөргүч куту
- 1 х кубат адаптери

This image displays all components included in the STUDIOFINIX 6.5 Inch Bluetooth Ceiling Speaker system: four 6.5-inch ceiling speakers, a 4-channel Bluetooth amplifier box, a power adapter, and four sets of speaker wires.
4. Техникалык шарттар
| Өзгөчөлүк | Спецификация |
|---|---|
| Модель аты | ST-HCS628BTX2-US |
| Динамик түрү | In-ceiling |
| Өзгөчө өзгөчөлүк | Суу өткөрбөйт |
| Сунушталган Колдонуулар | Indoor/Outdoor (Covered Patio) |
| Бирдик саны | 4 Баяндамачылар |
| Продукциянын өлчөмдөрү (ар бир баяндамачы) | 7.5"D x 7.5"W x 4"H (19cmx19cmx10.16cm) |
| Элемент Салмагы (жалпы) | 9.77 фунт (4.44 кг) |
| Максималдуу Bluetooth диапазону | 30.48 метр (100 фут) |
| Динамик өлчөмү | 6.5 дюйм |
| Өндүрүүчү | STUDIOFINIX |
| Динамиктин максималдуу чыгаруу күчү | 160 Ватт (ар бир динамик үчүн) |
| Байланыш технологиясы | Bluetooth |
| Монтаж түрү | Flush Mount (In-Ceiling) |
| Материал | Plastic Or Metal |
5. Орнотуу боюнча колдонмо
5.1 Planning and Preparation
- Choose appropriate locations for your speakers, ensuring they are evenly spaced for optimal sound distribution.
- Ensure there are no obstructions (e.g., electrical wires, plumbing, studs) behind the chosen mounting areas.
- Measure and mark the cutout diameter on the ceiling or wall. The recommended cutout diameter is 6.3 дюйм (16 см).

This diagram illustrates the necessary dimensions for installing the STUDIOFINIX 6.5 inch ceiling speaker. It shows a recommended cutout diameter of 6.3 inches (16 cm), a total speaker diameter of 7.5 inches (19 cm), and a mounting depth of 3.15 inches (8 cm).
5.2 Зымдарды туташтыруу
- Өчүрүү: Ensure the main power to the installation area is turned off before making any electrical connections.
- Зымдарды даярдоо: Strip approximately 0.5 inches (1.2 cm) of insulation from the ends of the speaker wires.
- Динамиктерге туташуу: Connect the speaker wires to the spring-loaded terminals on each speaker. Match the positive (+) wire (typically red or marked) to the red terminal and the negative (-) wire (typically black or unmarked) to the black terminal.
- туташуу Ampөмүр берүүчү: Connect the other ends of the speaker wires to the corresponding L+ (Left Positive), L- (Left Negative), R+ (Right Positive), and R- (Right Negative) terminals on the 4-channel Bluetooth amplifier box. Ensure correct polarity for each speaker.
- Кубаттуу адаптер: Берилген кубат адаптерин туташтырыңыз ampкөтөргүчтүн киргизүү кубаттуулугу.
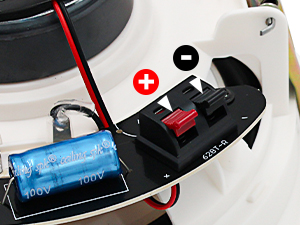
This image shows the spring-loaded terminals on the back of the ceiling speaker, clearly marked for positive (+) and negative (-) wire connections.

This diagram demonstrates the connection process for the STUDIOFINIX speaker system. It shows the 4-channel Bluetooth amplifier connected to mains power and four in-ceiling stereo speakers. A mobile device is depicted successfully paired via Bluetooth to control the ampөмүрлүү.
5.3 Mounting Speakers
- After cutting the appropriate holes, carefully insert each speaker into its cutout.
- The speakers feature non-slip clamps. Tighten the mounting screws (usually by turning them clockwise) to engage the clamps and secure the speaker firmly in place. Do not overtighten.
- Once the speaker is secured, attach the magnetic grille. The grille will snap into place.
6. Иштетүү үчүн колдонмо
6.1 Ampкөтөргүч Controls

This image provides a close-up of the STUDIOFINIX 4-channel Bluetooth amplifier box, highlighting its control buttons and their functions.
- 1. Кубат баскычы: Press and hold for 3 seconds to power on/off. Short press to play/pause audio.
- 2. Mode баскычы: Press and hold for 3 seconds to restore factory settings. Short press to switch between Bluetooth, USB, AUX, and MIC input modes.
- 3. VOL- / TWS Button: Press and hold for 3 seconds to turn on/off TWS (True Wireless Stereo) mode. Short press to decrease the volume.
- 4. VOL+ / MONO Button: Press and hold for 3 seconds to turn on/off Mono mode. Short press to increase the volume.
- 5. Previous Track Button: Press and hold for 3 seconds to fast rewind. Short press to go to the previous song.
- 6. Кийинки трек баскычы: Press and hold for 3 seconds to fast forward. Short press to go to the next song.
6.2 Bluetooth жупташтыруу
- камсыз кылуу amplifier is powered on and in Bluetooth mode (the 'BT' indicator light should be blinking).
- On your mobile device, navigate to Bluetooth settings and search for available devices.
- Select 'STUDIOFINIX' (or similar name) from the list to pair.
- Once connected, the 'BT' indicator light on the amplifier will become solid. You can now stream audio from your device.
6.3 Other Input Modes
- USB режими: Аудио камтыган USB дискти салыңыз fileUSB портуна салыңыз ampөмүрлүү. The amplifier will automatically switch to USB mode and begin playback.
- AUX режими: Connect an audio source (e.g., TV, CD player) to the AUX input using a 3.5mm audio cable. Press the 'MODE' button until the 'AUX' indicator light is on.
- MIC режими: Connect a microphone to the MIC input. Press the 'MODE' button until the 'MIC' indicator light is on.
7. Техникалык тейлөө
7.1 Тазалоо
- To clean the speaker grilles, gently remove them by pulling them away from the speaker frame.
- Wipe the grilles and speaker surfaces with a soft, dry cloth. For stubborn dirt, a slightly damp кездеме, андан кийин кургак чүпүрөк колдонсо болот.
- Катуу химиялык заттарды, эриткичтерди же абразивдүү тазалоочу каражаттарды колдонбоңуз, анткени алар жасалгасына же компоненттерине зыян келтириши мүмкүн.
- Ensure the grilles are completely dry before reattaching them.
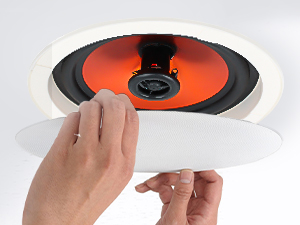
This image illustrates the process of removing the magnetic grille from the ceiling speaker, demonstrating its easy snap-on/snap-off mechanism for installation or maintenance.
7.2 Grille Painting (Optional)
The speaker grilles are paintable to match your room's decor. Use a fine-mist spray paint and apply thin, even coats. Avoid clogging the grille perforations, as this can affect sound quality.
8. Кыйынчылыктарды
| Көйгөй | Мүмкүн себеп | Чечим |
|---|---|---|
| Динамиктерден үн жок |
|
|
| Bluetooth байланышы көйгөйлөрү |
|
|
| Бурмаланган же начар үн сапаты |
|
|
| Amplifier not responding |
|
|
9. Кепилдик жана колдоо
STUDIOFINIX products are designed for reliability and performance. For warranty information or technical support, please refer to the contact details provided with your purchase or visit the official STUDIOFINIX website. Please have your model number (ST-HCS628BTX2-US) and purchase date available when contacting support.
Ask a question about this manual
Ask about setup, troubleshooting, compatibility, parts, safety, or missing instructions. Manuals+ will review the question and use this page’s manual context to help answer it.