
1. Киришүү
The FNIRSI DST-210 is a compact and versatile 3-in-1 handheld device designed for electronic testing and measurement. It integrates the functions of a digital oscilloscope, a true RMS multimeter, and a signal generator into a single portable unit. This manual provides detailed instructions to help you effectively use and maintain your device.
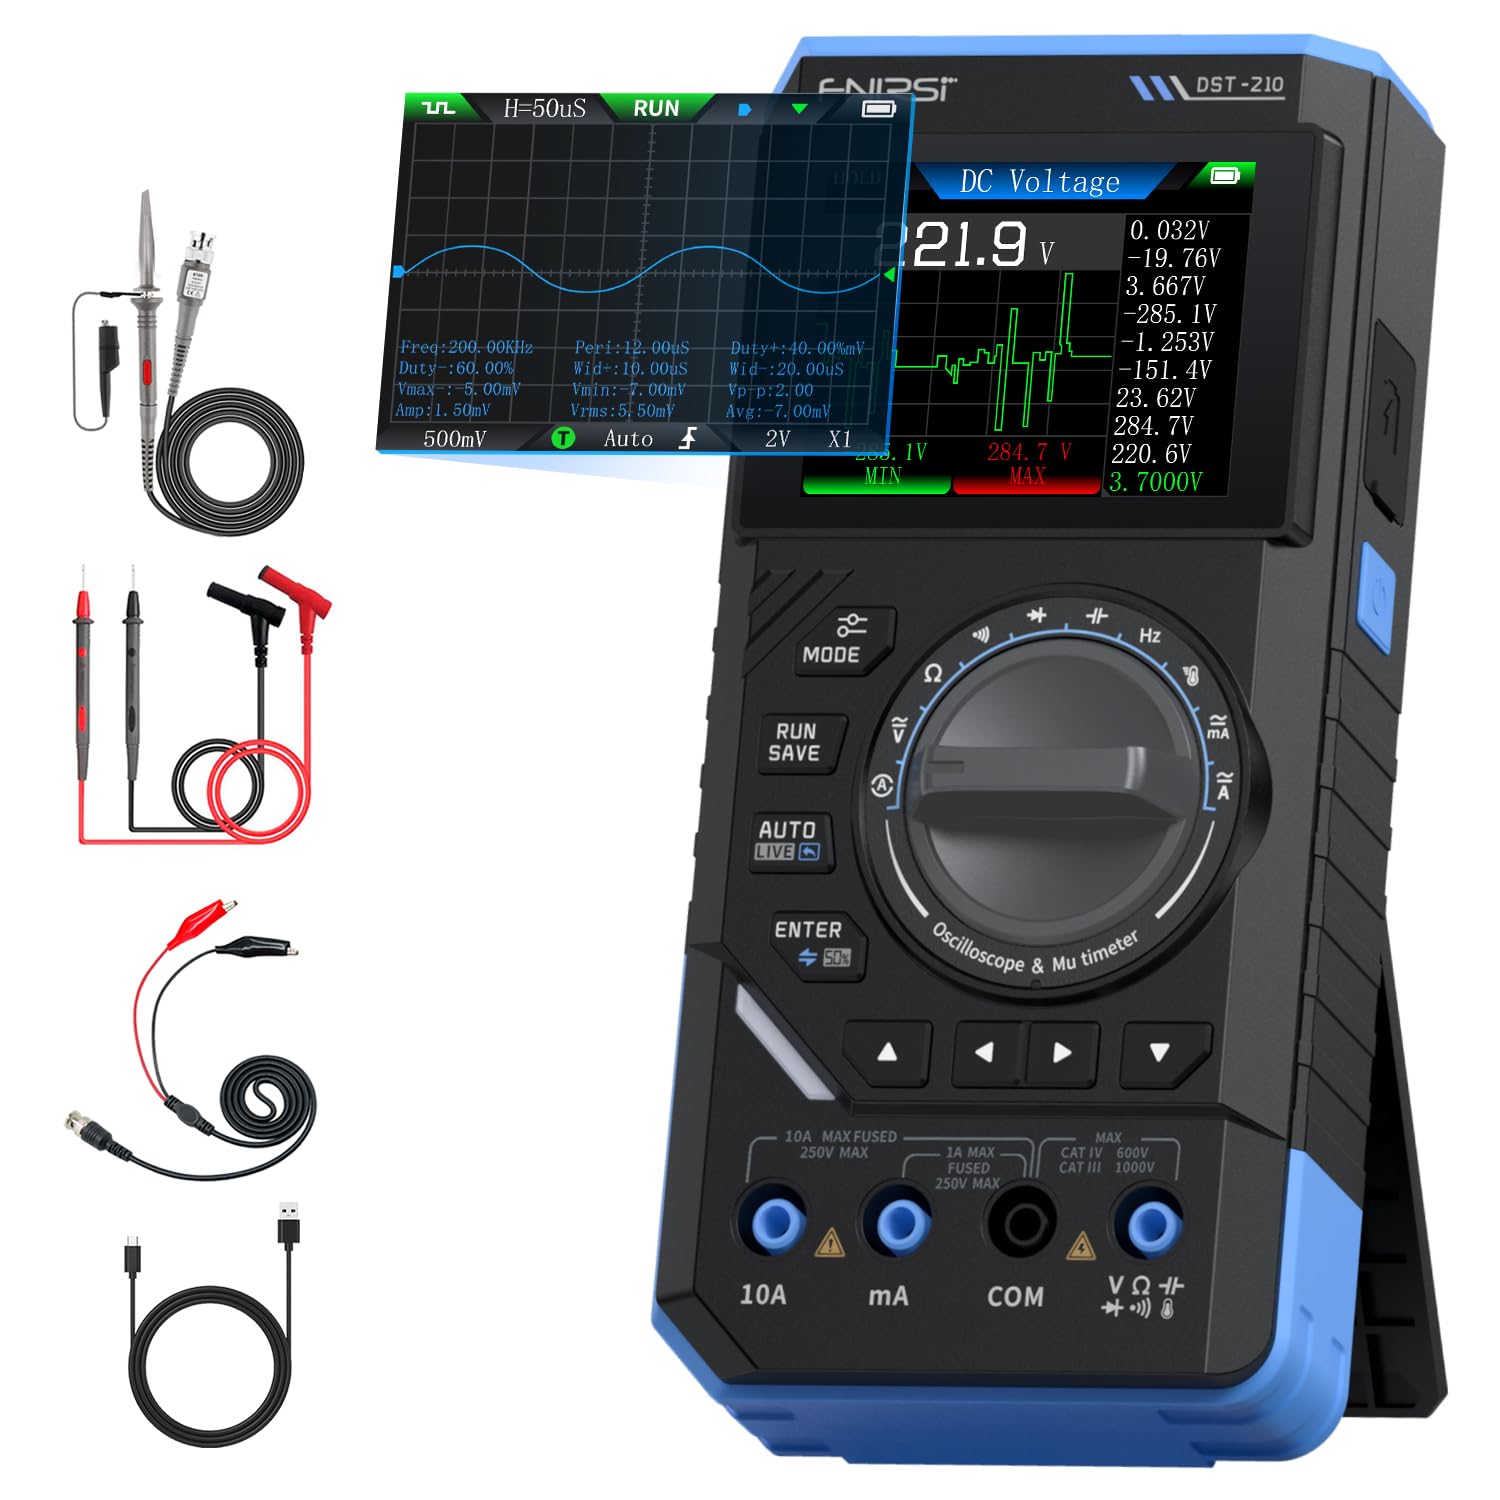
Figure 1: FNIRSI DST-210 3-in-1 Handheld Device
2. Продукт бүтүп калдыview
2.1 Негизги өзгөчөлүктөрү
- 3-ин-1 Функциясы: Combines a digital oscilloscope, a true RMS multimeter, and a signal generator.
- Дисплей: 2.8-inch TFT color LCD for clear data visualization.
- Осциллограф: 10MHz analog bandwidth, 48MSa/s real-time sampling rate, supports Auto/Normal/Single trigger modes, waveform image saving and display.
- Мультиметр: 19999-count true RMS measurement for DC/AC voltage, DC/AC current, resistance, capacitance, frequency, temperature, diode, and continuity. Features data hold, record mode with graphical display, and LIVE function for voltage presence detection.
- Сигнал генератору: Outputs 13 types of waveforms (Sine, Square, Sawtooth, Half-wave, Full-wave, Step, Reverse Step, Index Up/Down, DC, Multi-audio, Sink Pulse, Lorentz Wave) with adjustable frequency (0-50KHz), amplitude (0.1-3.0V), and duty cycle (0-100%).
- Көчүрүү мүмкүнчүлүгү: Compact design with an integrated stand, powered by a 3000mAh rechargeable lithium battery providing up to 10 hours of continuous use. Type-C charging supported.
2.2 Пакеттин мазмуну
Пакетте бардык буюмдар бар экенин текшериңиз:
- FNIRSI DST-210 Main Unit
- P6100 Жогорку вольтtage Зонд
- Сыноочу (Кызыл жана Кара)
- Alligator Clips
- C түрүндөгү кубаттоочу кабель
- Instruction Manual (PDF version available online)
- Пакет куту

Сүрөт 2: Камтылган аксессуарлар
3. Орнотуу
3.1 Аппаратты заряддоо
Before initial use, fully charge the DST-210. Connect the provided Type-C charging cable to the device's Type-C port and a compatible USB power adapter (5V/1A). The battery indicator on the display will show charging status.
3.2 Зонддорду туташтыруу
For accurate measurements, ensure probes are correctly connected:
- Multimeter Measurements: Insert the red test lead into the VΩHzmA or 10A jack (depending on the measurement) and the black test lead into the COM jack.
- Oscilloscope Measurements: Connect the P6100 high voltage probe to the oscilloscope input jack. Ensure the probe's attenuation setting (e.g., X1 or X10) matches the device's setting for accurate readings.
- Сигнал генераторунун чыгышы: Connect the output cable to the signal generator output port.

Figure 3: Input Jacks and Controls
4. Иштөө нускамалары
4.1 Күйгүзүү/өчүрүү
Press and hold the power button (located on the side) to turn the device on or off.
4.2 Режимди тандоо
Rotate the central knob to switch between Multimeter, Oscilloscope, and Signal Generator modes. Within each mode, further sub-functions can be selected using the knob or dedicated buttons.

Figure 4: Using the Oscilloscope Function
4.3 Мультиметрдин иштеши
In Multimeter mode, the device offers various measurement functions:
- Тtage/Current (DC/AC): Select the appropriate DC V, AC V, DC A, or AC A setting. Connect test leads to the circuit. The device supports a record mode that displays measurement trends graphically, and can store up to 10 sets of data.
- Каршылык (Ω): Select the resistance function. Connect test leads across the component.
- Сыйымдуулук (F): Select the capacitance function. Connect test leads across the capacitor.
- Жыштык (Гц): Select the frequency function. Connect test leads to the signal source.
- Диод сыноо: Select the diode function. Connect test leads across the diode to check its forward voltagд тамчы.
- Үзгүлтүксүздүк тести: Select the continuity function. Connect test leads across a conductor; a beep indicates continuity.
- Температура: Use a K-type thermocouple (not included) connected to the appropriate jacks for temperature measurement.
- LIVE Function: For single-probe voltage presence detection.

Figure 5: Multimeter Measurement Examples
4.4 Осциллографтын иштеши
In Oscilloscope mode, the device displays waveforms:
- Толкун формасын көрсөтүү: Connect the oscilloscope probe to the circuit. The device automatically adjusts settings for stable waveform display.
- Триггер режимдери: Select between Auto, Normal, and Single trigger modes to capture different types of signals.
- Толкун формасын сактоо: Press the 'RUN/SAVE' button to save the current waveform image. Saved images can be reviewред жана экспорттолот.

Figure 6: Oscilloscope Waveform Display
4.5 Signal Generator Operation
In Signal Generator mode, the device outputs various waveforms:
- Толкун формасын тандоо: Choose from 13 different waveform types using the menu options.
- Параметрди тууралоо: Adjust the frequency (0-50KHz), amplitude (0.1-3.0V), and duty cycle (0-100%) as required for your application.

Figure 7: Signal Generator Waveform Selection
4.6 PC Connection and Data Export
The DST-210 can connect to a PC via its Type-C USB port for data management and firmware updates.
- Waveform Screenshots: Long-press the 'RUN/SAVE' button to save waveform screenshots.
- Маалыматтарды экспорттоо: Connect the device to a computer to view, save, and export recorded waveform images and data.
- Программалык камсыздоонун жаңыртуулары: Periodically check the official FNIRSI webОптималдуу иштөөнү жана жаңы функцияларга жетүүнү камсыз кылуу үчүн микропрограммалык камсыздоону жаңыртуу сайты. Микропрограммалык камсыздоону жаңыртуу топтому менен берилген көрсөтмөлөрдү аткарыңыз.

Figure 8: PC Connection for Data Management
5. Техникалык тейлөө
- Тазалоо: Аппаратты тазалоо үчүн жумшак, кургак чүпүрөктү колдонуңуз. Абразивдүү тазалагычтарды же эриткичтерди колдонбоңуз.
- Сактагыч: Аппаратты түз күн нурунан жана экстремалдык температурадан алыс салкын, кургак жерде сактаңыз.
- Батареяга кам көрүү: Батареянын иштөө мөөнөтүн узартуу үчүн, бат-баттан батарейканы толук зарядсыздандырбаңыз. Аппаратты узак убакыт бою колдонбосо дагы, үзгүлтүксүз заряддаңыз.
- Пробка кам көрүү: Inspect test leads and probes for damage before each use. Replace any damaged accessories immediately.
6. Кыйынчылыктарды
| Көйгөй | Мүмкүн себеп | Чечим |
|---|---|---|
| Түзмөк күйбөйт. | Батареянын заряды аз же кубат баскычы бузук. | Charge the device fully. If the issue persists, contact support. |
| Unstable or inaccurate readings in Multimeter mode. | Poor probe connection, incorrect mode selection, or external interference. | Ensure probes are securely connected. Verify the correct measurement mode is selected. Minimize external electrical interference. |
| Oscilloscope waveform is not stable. | Incorrect trigger settings or probe attenuation. | Adjust trigger level and mode. Ensure probe attenuation (X1/X10) matches the device setting. |
| Signal generator output is incorrect. | Incorrect waveform type, frequency, amplitude, or duty cycle settings. | Verify all signal generator parameters are set as desired. |
| Cannot connect to PC or export data. | Faulty USB cable, incorrect PC driver, or software issue. | Try a different Type-C cable. Ensure necessary drivers are installed on your PC. Refer to the official website for software and driver downloads. |
7. Техникалык шарттар
7.1 Осциллографтын параметрлери
| Категория | Спецификация |
|---|---|
| Реалдуу убакытта С.ampling Rate | 48MSa / s |
| Аналогдук өткөрүү жөндөмдүүлүгү | 10 МГц |
| Киргизүү импедансы | 1МΩ |
| Кошуу ыкмасы | AC/DC |
| Measurement Voltage Диапазон | 1:1 Probe: ±80Vpp (±40V), 10:1 Probe: ±800Vpp (±400V) |
| Vertical Sensitivity | 10mV/div ~ 10V/div (at X1) |
| Vertical Offset | Adjustable (with indicator) |
| Horizontal Time Base Range | 50ns ~ 20s |
| Trigger Mode | Авто, Кадимки, Жалгыз |
| Edge Trigger | Rising/Falling Edge |
| Триггер деңгээли | Adjustable (with indicator) |
| Waveform Freeze | Supported (HOLD function) |
| Автоматтык өлчөө | Max, Min, Average, RMS, Peak-to-Peak, Frequency, Duty Cycle, etc. |
7.2 Мультиметрдин параметрлери
| Өлчөө функциясы | Диапазон | Тактык |
|---|---|---|
| DC Voltage | 1.9999V/19.999V/199.99V/1000V | ±(0.5%+3) |
| AC Voltage | 1.9999V/19.999V/199.99V/750V | ±(1.0%+3) |
| Туруктуу ток | 19.999mA/199.99mA/1.9999A/9.999A | ±(1.2%+3) |
| AC тогу | 19.999mA/199.99mA/1.9999A/9.999A | ±(1.5%+3) |
| Каршылык | 19.999MΩ/199.99kΩ/19.999kΩ | ±(2.0%+5) |
| Сыйымдуулук | 999.9uF/99.99uF/9.999uF/999.9nF/99.99nF, 9.999mF/99.99mF | ±(2.0%+5) |
| Жыштык | 9.999MHz/999.9kHz/99.99kHz/9.999kHz/999.9Hz/99.99Hz | ±(0.1%+2) |
| Температура | [-55~1300°C] / [-67~2372°F] | ±(2.5%+5) |
| Диод/Үзгүлтүксүздүк | Колдоого алынган | Жок |
| ТҮЗ ЭФИРДЕГИ ФУНКЦИЯ | Колдоого алынган | Жок |
7.3 Сигнал генераторунун параметрлери
| Категория | Спецификация |
|---|---|
| Чыгаруу толкун формалары | 13 түрү |
| Waveform Frequency | 0 ~ 50 кГц |
| Милдеттик цикл | 0 ~ 100% (adjustable) |
| Толкун формасы Ampжарыктык | 0.1 ~ 3.0V |
7.4 Жалпы спецификациялар
| Категория | Спецификация |
|---|---|
| Продукт модели | DST-210 |
| Дисплей | 2.8 дюймдук TFT түстүү дисплей |
| Арткы жарык | Жарыктык жөнгө салынуучу |
| Электр камсыздоо | Type-C (5V/1A) |
| Батарея | 3000mAh |
| Тилди колдоо | кытай, англис |
| Продукт өлчөмү | Болжол менен 177.43 мм x 87 мм x 35 мм |
| Продукт Салмагы | Болжол менен 300г |
8. Кепилдик жана колдоо
For any questions, issues, or support needs regarding your FNIRSI DST-210, please contact us through the following methods:
- Amazon билдирүүсү: If you purchased the product on Amazon, you can contact us via the Amazon messaging system. Go to your 'Order History', select the relevant order, and click 'Problem with order' or 'Contact Seller'.
- Электрондук почта колдоо: You can also reach our after-sales service center directly via email at support@fnirsi.com. Please include your order number and a detailed description of your issue for faster assistance.
When attaching large photos or videos, email support is recommended due to potential attachment size limits on Amazon's messaging system.
Video 1: Demonstration of FNIRSI DST-210's Multimeter, Oscilloscope, and Signal Generator Functions.


