
1. Киришүү
Thank you for choosing the VGR 119 Professional Cordless Hair Clippers. This manual provides essential information for the safe and effective use, maintenance, and care of your new hair clippers. Please read these instructions thoroughly before first use and keep them for future reference.
2. Продукт бүтүп калдыview
The VGR 119 hair clippers are designed for professional and home use, featuring a powerful BLDC motor and precision ceramic blades for consistent cutting performance.
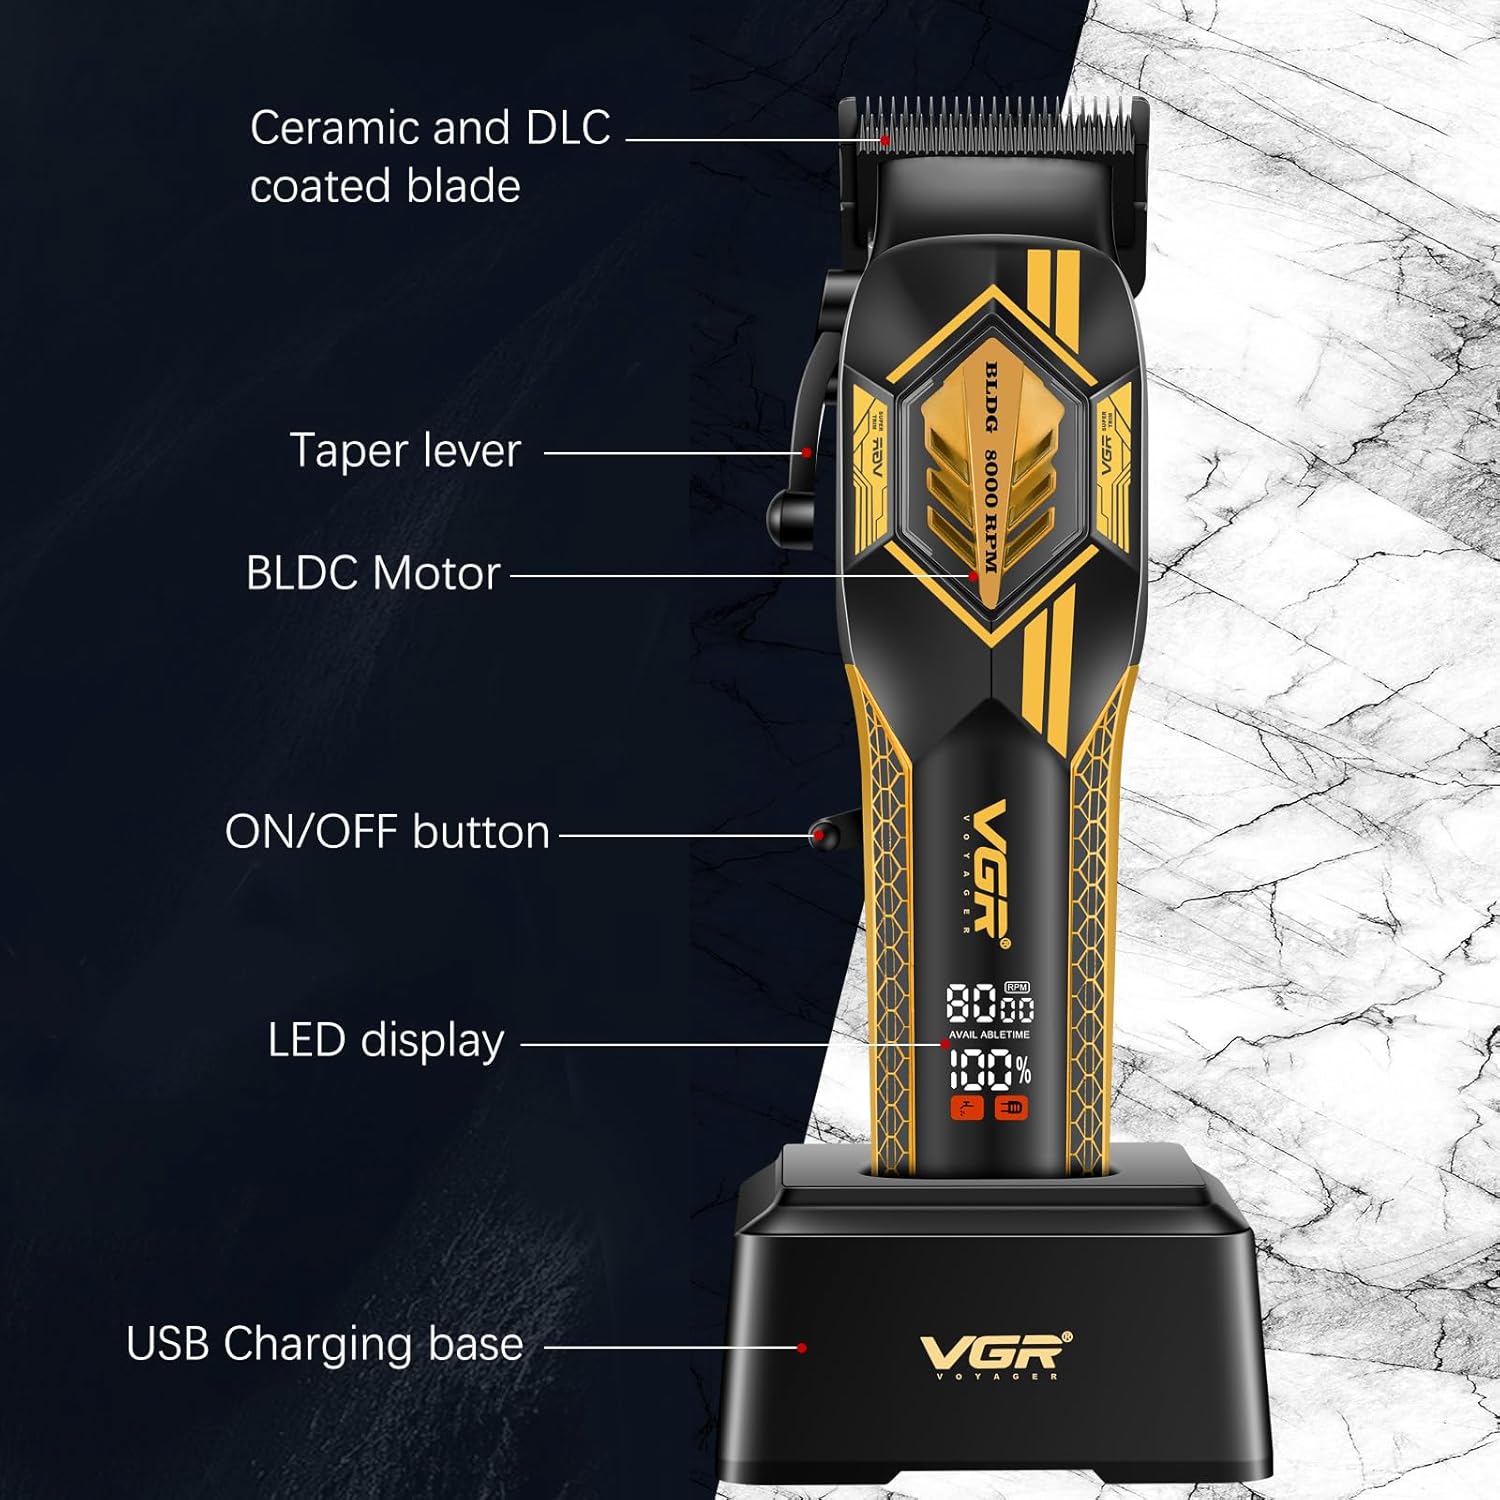
Figure 2.1: Clipper Components. This image shows the VGR 119 hair clipper resting on its charging base, highlighting key components such as the ceramic and DLC coated blade, taper lever, BLDC motor, ON/OFF button, LED display, and USB charging base.
Негизги өзгөчөлүктөрү:
- BLDC мотору: Equipped with an 8000 RPM brushless DC motor for stable, powerful, and quiet operation.
- Ceramic Blades with DLC Coating: Ensures durability, low heat generation, and precise cutting, suitable for all hair types and sensitive skin.
- Жөнгө салынуучу конус рычагы: Allows for 5-level precision cutting adjustments from 0.8mm to 2mm.
- Узак мөөнөттүү батарея: 2500mAh lithium battery provides up to 180 minutes of use after a 3.5-hour charge.
- Кош кубаттоо режимдери: Can be charged via USB cable or the included charging base.
- LED дисплей: Shows real-time battery status.
- Төмөн ызы-чуу операциясы: 70дБден азыраак иштейт.
Пакеттин мазмуну:
- VGR 119 Professional Cordless Hair Clipper
- 6 багыттоочу тарак (1.5 мм, 3 мм, 4.5 мм, 6 мм, 9 мм, 12 мм)
- Заряддоо док
- USB заряддоо кабели
- Blade майы
- Тазалоочу щетка
3. Орнотуу
3.1 Баштапкы төлөм
Before first use, fully charge the clipper. Connect the USB charging cable to the clipper or place the clipper in the charging dock. Connect the other end of the USB cable to a suitable USB power adapter (not included). The LED display will indicate charging status. A full charge takes approximately 3.5 hours.

Figure 3.1: Dual Charging Methods. The clipper can be charged using the included charging base or directly via the USB cable for portable charging.
3.2 Багыттоочу тарактарды бекитүү
To attach a guide comb, align the comb with the clipper blade and push it firmly until it clicks into place. To remove, gently pull the comb away from the blade.

Figure 3.2: Guide Combs. The kit includes six durable guide combs for various cutting lengths.
4. Иштөө нускамалары
4.1 Күйгүзүү/өчүрүү
Press the ON/OFF button located on the side of the clipper to turn it on or off.
4.2 Кесүү узундугун тууралоо (конус рычагы)
The taper lever on the side of the clipper allows for fine adjustments to the cutting length without a guide comb, ranging from 0.8mm to 2mm. Move the lever up or down to select the desired length.

Figure 4.1: Taper Lever Adjustment. The lever provides precise control over cutting length.
4.3 Using Guide Combs
For longer and consistent hair lengths, attach one of the six guide combs. The combs are labeled with their respective cutting lengths (1.5mm, 3mm, 4.5mm, 6mm, 9mm, 12mm). Select the appropriate comb for your desired style.
4.4 Чач кыркуу боюнча кеңештер
- Чачты кыркаардан мурун таза жана кургак экенин текшериңиз.
- Start with a longer guide comb and gradually reduce length if desired.
- Cut against the direction of hair growth for an even trim.
- Жылмакай, бири-бирине дал келген сызыктарды колдонуңуз.
5. Техникалык тейлөө
5.1 Бычактарды тазалоо
After each use, turn off the clipper and remove any attached guide comb. Use the included cleaning brush to remove loose hairs from the blades. For a more thorough cleaning, the blades can be carefully detached and rinsed under running water, ensuring the clipper body remains dry. Allow blades to air dry completely before reattaching.
5.2 Чачтарды майлоо
Regular oiling of the blades is crucial for optimal performance and longevity. After cleaning and drying, apply a few drops of the included blade oil to the teeth of the blades. Turn the clipper on for a few seconds to distribute the oil evenly. Wipe off any excess oil.
5.3 Сактоо
Store the clipper in a dry, cool place, away from direct sunlight and moisture. Keep out of reach of children.
6. Коопсуздук нускамалары
- Do not immerse the clipper body in water.
- Шайманды суу булактарынан алыс кармаңыз.
- Көзгө тийбеңиз.
- Ымыркайларга колдонбоңуз.
- Always ensure the clipper is turned off before cleaning or maintenance.
- Use only the provided charging cable and dock.
- Do not operate the clipper if it is damaged.
7. Кыйынчылыктарды
7.1 Клиппер иштетилбей жатат
- Check if the battery is charged. Recharge the clipper if necessary.
- Ensure the ON/OFF button is fully pressed.
7.2 Кесүү иштеринин начардыгы
- Clean the blades to remove any trapped hair.
- Тейлөө бөлүмүндө сүрөттөлгөндөй, бычактарды майлаңыз.
- Ensure the blades are properly aligned and not damaged.
7.3 Клиппердин ысып кетиши
- Turn off the clipper and allow it to cool down.
- Ensure blades are clean and oiled to reduce friction.
8. Техникалык шарттар
| Өзгөчөлүк | Деталь |
|---|---|
| Модель номери | YS-V119 |
| Мотор түрү | BLDC Motor |
| Мотор ылдамдыгы | 8000 RPM |
| Бычактын материалы | Ceramic with DLC Coating |
| Батарея түрү | Литий-ион |
| Батарея сыйымдуулугу | 2500mAh |
| Заряддоо убактысы | 3.5 саат |
| Иштөө убактысы | 180 мүнөткө чейин |
| Кесүү узундугун тууралоо | 0.8mm - 2mm (taper lever) |
| Гид тарактары камтылган | 1.5мм, 3мм, 4.5мм, 6мм, 9мм, 12мм |
| Ызы-чуу деңгээли | < 70дБ |
| Power Source | Батарея менен иштейт |
| Продукциянын өлчөмдөрү | 10.94 x 9.33 x 2.36 дюйм |
| Элемент Салмагы | 1.04 килограмм |
9. Кепилдик жана колдоо
VGR products are manufactured with quality and reliability in mind. This product comes with a 1-year warranty from the date of purchase. We also offer 24-hour customer support to assist with any inquiries or issues.

9.1-сүрөт: Кепилдик жана колдоо жөнүндө маалымат. Details on product guarantee and customer service availability.
For support, please contact VGR-DIRECT through our official channels. You can find more information and contact details on our webсайт же коомдук медиа платформалар.

Figure 9.2: VGR-DIRECT Social Media. Connect with us for updates and support.