1. Продукт бүтүп калдыview
The Generic V9 Prime is a digital satellite receiver designed for Free-to-Air (FTA) DVB-S/S2/S2X broadcasts. It supports H.265 HEVC 10-bit decoding, various multi-stream formats, and features built-in 2.4G WiFi for network connectivity. This receiver also includes a CA card slot for conditional access and supports advanced features like Biss Auto Roll and SAT2IP.
1.1 Негизги өзгөчөлүктөрү
- DVB-S/S2/S2X Support: Compatible with various satellite broadcast standards, including VCM/ACM/multi-stream/T2-MI.
- HEVC Main 10 Profile: Supports H.265 video decoding for high-efficiency video compression.
- Conditional Access (CA) Card Slot: Allows for the insertion of a CA card to access encrypted programs.
- Тармакка туташуу: Features built-in 2.4G WiFi and an Ethernet port. Supports 3G/4G USB dongles.
- Өркүндөтүлгөн декоддоо: Supports BISS auto roll, Full PowerVu, DRE, and Biss key.
- SAT2IP & DLNA: Stream satellite TV programs to mobile devices via GTShare APK and supports DLNA.
- Media Playback & PVR: USB 2.0 port for personal video recording (PVR), TimeShift, and playback of various media files.
- Онлайн кызматтар: Access to Online Movie, YouTube, and WebTV.
- Тармакты бөлүшүү: Supports Cccam, Newcam, and Mgcam protocols.
1.2 Пакеттин мазмуну
Пакетте бардык буюмдар бар экенин текшериңиз:
- 1x V9 Prime Satellite Receiver
- 1x Remote контроллер
- 1x Power Supply (DC12V/1.5A)
- 1x HDMI кабели
- 1x Колдонуучунун колдонмосу (бул документ)
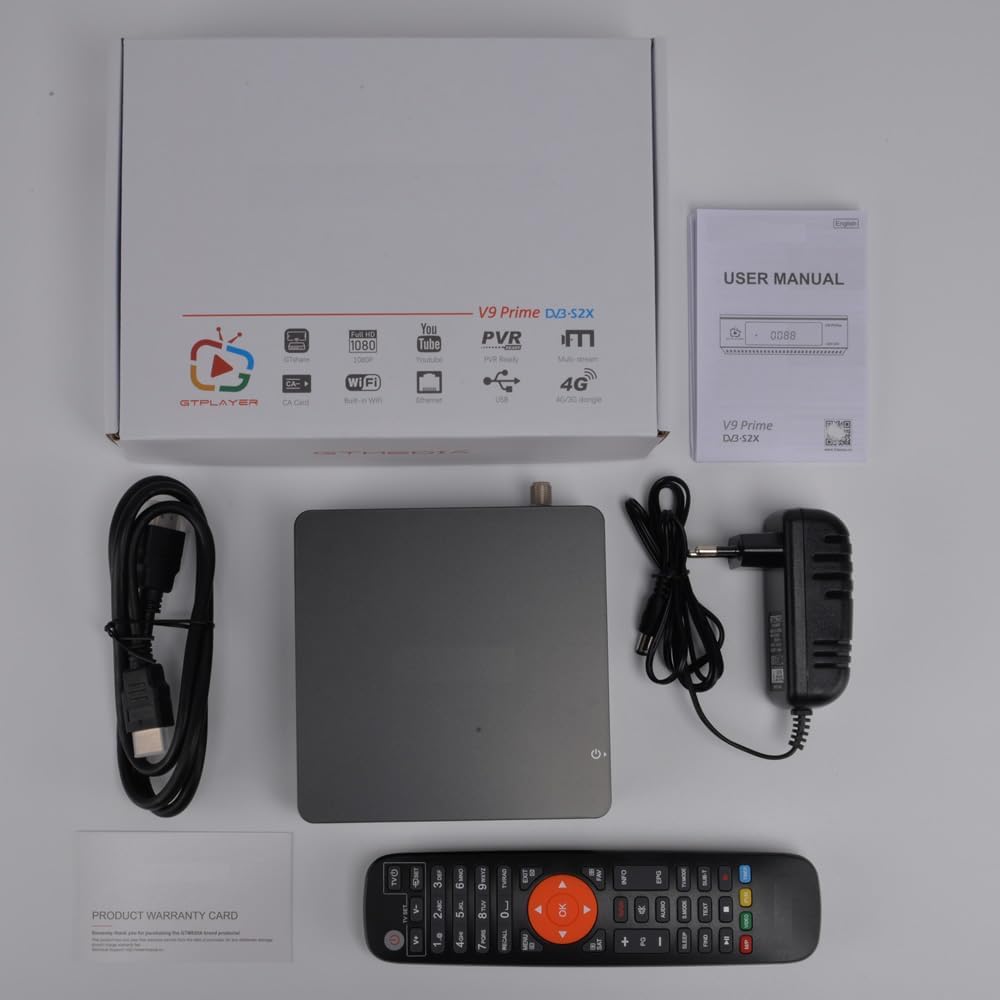
1.2.1-сүрөт: Пакеттин мазмуну
2. Орнотуу
2.1 Кабыл алгычты туташтыруу
Follow these steps to connect your V9 Prime Digital Satellite Receiver to your television and satellite dish:
- Connect the satellite LNB cable from your dish to the LNB IN port on the rear panel of the receiver.
- HDMI кабелинин бир учун туташтырыңыз HD OUT port on the receiver and the other end to an available HDMI input on your television. Alternatively, use the AV OUT port for older televisions.
- If using a wired network, connect an Ethernet cable to the RJ45 ресивердеги порт.
- Insert the power adapter into the DC IN (DC12V/1.5A) port and then plug it into a power outlet.
- If you have a CA card, gently insert it into the CA Card SLOT көрсөтүлгөндөй.
- Turn on your television and select the correct HDMI or AV input source.

2.1.1-сүрөт: Арткы панелдин интерфейстери

2.1.2-сүрөт: CA картасын киргизүү
2.2 Баштапкы күйгүзүү
Upon first power-on, the receiver may guide you through an initial setup wizard. Follow the on-screen prompts to configure language, time zone, and basic display settings. Ensure your TV Standard and Aspect Mode are correctly set in the AV Settings menu.
Video 2.2.1: Initial Setup and AV Settings Configuration
This video demonstrates navigating the receiver's menu to adjust AV settings, including TV Standard and Aspect Mode, ensuring optimal display on your television.
3. Иштөө нускамалары
3.1 Негизги навигация
Use the provided remote control to navigate the receiver's on-screen menus. The МЕНЮ button accesses the main menu, arrow keys navigate options, and OK confirms selections. The ЧЫГУУ button returns to the previous screen or live TV.
3.2 Каналды сканерлөө
To receive satellite channels, you must perform a channel scan:
- басыңыз МЕНЮ пультуңуздагы баскыч.
- багыттоо Орнотуу жана тандаңыз Антенна орнотуу.
- Select the desired satellite from the Спутник тизмеси. You may need to add a new satellite if yours is not listed by selecting кошуу and entering the satellite details (Name, Longitude, Direction).
- Конфигурациялоо LNB күчү (Күйүк), LNB жыштыгы (e.g., Universal1 9750/10600), and DiSEqC settings if applicable.
- багыттоо Издөөнү баштоо жана тандаңыз Сокур издөө for a comprehensive scan. Choose FTA гана if you only want free channels.
- Confirm the search to begin scanning for channels. The receiver will display progress and found channels.
Video 3.2.1: Satellite Setup and Blind Search Process
This video illustrates how to add a new satellite, configure LNB settings, and perform a blind search to find available channels on your V9 Prime receiver.
3.3 CA Card Functionality
If you have a valid Conditional Access (CA) card, insert it into the designated slot. The receiver will automatically detect the card and allow access to subscribed encrypted channels. Navigate to the CA menu option to view card status or settings.
3.4 Network Features (WiFi/Ethernet)
To use online features, connect your receiver to the internet:
- For WiFi: Go to Орнотуулар > Network > WiFiТармагыңызды тандап, сырсөздү киргизиңиз.
- For Ethernet: Ensure an Ethernet cable is connected to the RJ45 port. The receiver should automatically obtain an IP address via DHCP.
3.5 Медиа ойнотуу жана PVR
Connect a USB storage device (FAT/FAT32/NTFS) to the USB HOST port to access media files or record programs.
- Медиа ойнотуу: багыттоо Медиа борбору > File, андан кийин тандаңыз Video, Музыка, же Сүрөт to browse and play files from your USB device.
- PVR (жеке видео жазгыч): While watching a channel, press the Жаздыруу button on the remote to start recording. Press it again to stop. Recorded files can be accessed via Медиа борбору > Жаздыруу Files.
- Time Shift: Allows you to pause live TV. Connect a USB device, then press the TimeShift пульттагы баскыч.
3.6 YouTube and Online Services
Access YouTube and other online services through the main menu.
- Тандоо YouTube негизги менюдан.
- If prompted for an API key, go to Орнотуулар within the YouTube app, change API Key Source чейин Server, жана тандаңыз Update API Key.
- Browse or search for videos.
Video 3.6.1: YouTube API Key Update Process
This video demonstrates how to update the YouTube API key from the server, resolving potential issues with accessing YouTube content.
3.7 SAT2IP (DVB2IP) and MeeCast
The V9 Prime supports streaming satellite channels to mobile devices via SAT2IP (DVB2IP) and the MeeCast app.
- Ensure your receiver and mobile device are connected to the same local network.
- On the receiver, navigate to APP > DVB2IP Setting. Настройка DVB2IP Mode чейин On and configure other settings as desired. Press OK сактоо үчүн.
- Download and install the GTShare APK (for Android) or MeeCast app on your mobile device.
- Open the app, and it should detect your V9 Prime receiver on the network. Select the receiver.
- You can now browse and watch TV channels from your receiver on your mobile device. The app also offers remote control functionality and web video casting.
Note: DVB2IP functionality is primarily designed for Android devices and may not be fully supported on Apple iOS.
Video 3.7.1: DVB2IP Configuration and MeeCast App Usage
This video demonstrates how to enable DVB2IP on the receiver and use the MeeCast app on a mobile device to stream TV channels and cast web видеолор.
4. Техникалык тейлөө
4.1 Орнотулган программаны жаңыртуу
Firmware updates can improve performance and add new features. You can upgrade the firmware via USB or FTP.
- USB аркылуу: Акыркы микропрограмманы жүктөп алыңыз file өндүрүүчүдөн website to a USB drive. Insert the USB drive into the receiver's USB port. Navigate to Жаңыртуу in the main menu, select USB жаңыртуу, микропрограмманы тандаңыз file, жана экрандагы нускамаларды аткарыңыз.
- FTP аркылуу: Ensure the receiver is connected to the internet. Navigate to Жаңыртуу > FTP Upgrade and follow the prompts to download and install the latest firmware.
Caution: Do not power off the receiver during a firmware upgrade. This can cause permanent damage.
5. Кыйынчылыктарды
If you encounter issues with your V9 Prime receiver, refer to the following common problems and solutions:
| Көйгөй | Мүмкүн себеп | Чечим |
|---|---|---|
| Сигнал жок / Кара экран | Incorrect LNB connection, wrong satellite selected, dish misalignment. | Check LNB cable connection. Verify satellite selection and LNB frequency in Antenna Settings. Ensure dish is correctly aligned. |
| Аудио жок | TV volume too low, incorrect audio output settings, damaged HDMI/AV cable. | Increase TV volume. Check AV жөндөө > SPDIF/HDMI audio output. Try a different cable. |
| Пульт иштебейт | Dead batteries, obstructed IR sensor, remote not paired (if applicable). | Replace batteries. Ensure no obstructions between remote and receiver. Point remote directly at the receiver. |
| WiFi'га туташуу мүмкүн эмес | Incorrect password, out of range, router issues. | Double-check WiFi password. Move receiver closer to router. Restart router. Try wired Ethernet connection. |
| YouTube Not Working / API Key Error | Outdated API key. | Go to YouTube app Орнотуулар, change API Key Source чейин Server, жана тандаңыз Update API Key. |
6. Техникалык шарттар
Detailed technical specifications for the V9 Prime Digital Satellite Receiver:
- CPU: 770MHz кош ядролуу
- Flash эстутум: 64MB Элиза Flash
- DDR3 эс тутуму: 1 ГБ биттик RAM
- Panel Display: 4-digit white LED display (supports function display)
- LED көрсөткүчү: Power ON (Green); Standby (Red)
- IR: Exit IR for 38KHz, Infra Remote control
- LNB IN: Жыштык диапазону 950 МГцден 2150 МГцге чейин
- HD OUT: 1080P чейин
- AV OUT: 3-pin 3.5 mm jack
- USB HOST: 1x USB 2.0 port (supports FAT/FAT32/NTFS)
- RJ45: 1x Ethernet port
- CA Card SLOT: 1x
- DC IN: DC12V/1.5A
- Байланыш технологиясы: Ethernet, HDMI, USB, Wi-Fi (Built-in 2.4G)
- Аудио чыгаруу режими: Стерео
- Видео чыгаруунун чечилиши: 1080 пиксел
- Колдоого алынган стандарттар: DVB-S, DVB-S2, DVB-S2X, VCM, ACM, Multi-stream, T2-MI, HEVC, AVS+, BISS
- Аспект катышы: 16:9
- Продукциянын өлчөмдөрү: 4.92"D x 4.92"W x 1.49"H (125мм x 125мм x 38мм)
- Өндүрүүчү: YuanJin

Сүрөт 6.1.1: Продукциянын өлчөмдөрү
7. Кепилдик жана колдоо
The Generic V9 Prime Digital Satellite Receiver comes with a 6 айлык кепилдик сатып алынган күндөн тартып. Бул кепилдик өндүрүштүк кемчиликтерди жана нормалдуу колдонуудагы бузулууларды камтыйт.
For technical support, troubleshooting assistance, or warranty claims, please contact your retailer or the manufacturer, YuanJin. Refer to the contact information provided with your purchase documentation.
For firmware updates and additional resources, visit the official product support website (if available, check manufacturer documentation).


