1. Киришүү
The Rongta F81S Tattoo Stencil Printer is a portable, wireless thermal printer designed for creating high-definition tattoo stencils. It offers compatibility with Android, iOS, Windows, and macOS devices, providing a versatile solution for tattoo artists and beginners. This manual provides detailed instructions for setup, operation, and maintenance to ensure optimal performance.
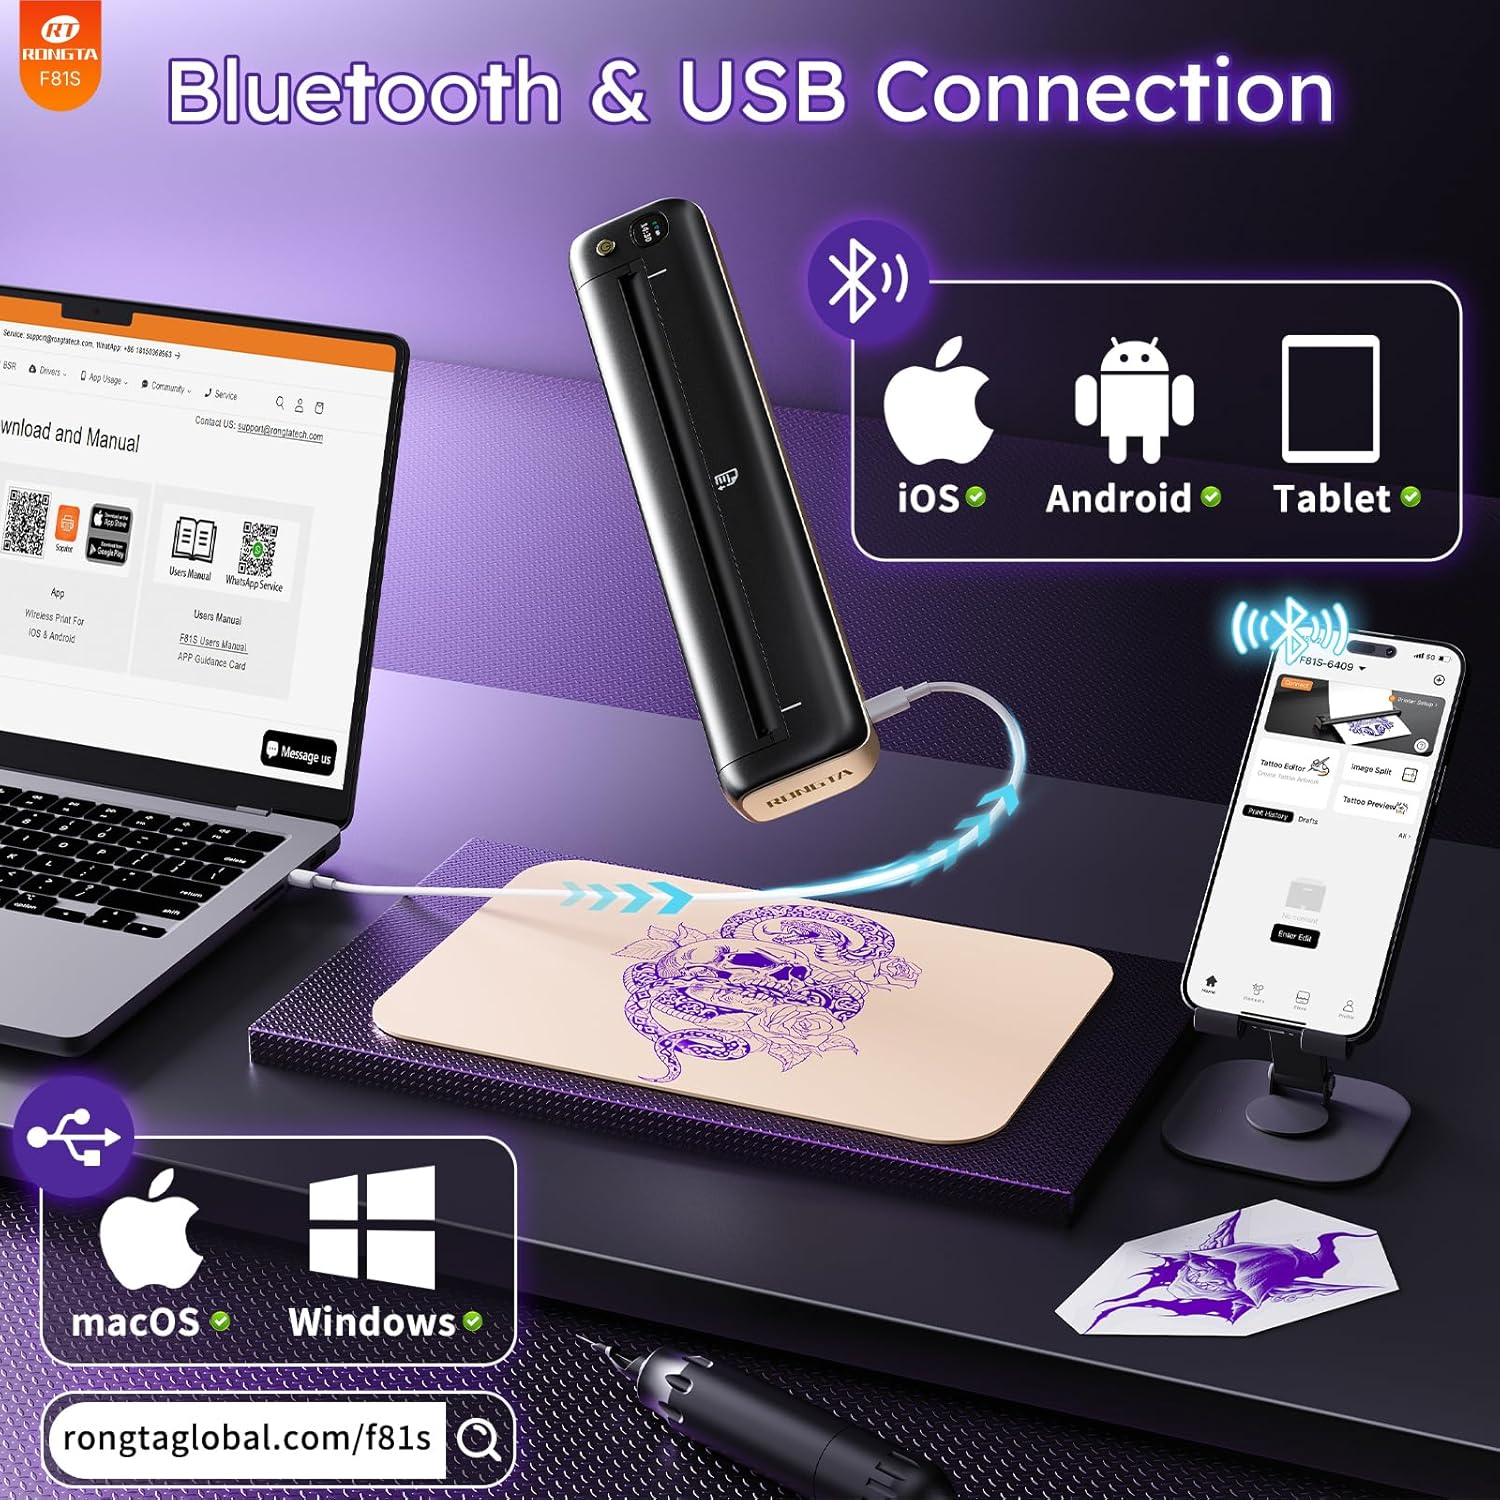
Image: The Rongta F81S Tattoo Stencil Printer, a compact and portable device.
2. Коопсуздук маалыматы
- Use only the original USB cable for charging.
- Принтер иштеп жатканда туруктуу, тегиз бетке коюлганын текшериңиз.
- Do not expose the printer to extreme temperatures, direct sunlight, or moisture.
- Балдар жетпеген жерде сактаңыз.
- Only use tattoo transfer paper with this device; thermal paper is not supported.
- If the print head overheats, the app will pause printing. Allow the device to cool down for at least ten minutes before resuming.
3. Пакеттин мазмуну
Пакетиңизде бардык буюмдар бар экенин текшериңиз:
- Rongta F81S Tattoo Stencil Printer
- USB Type-C кубаттоочу кабель
- 5pcs Tattoo Transfer Papers
- User Manual
- Сактоочу баштык

Image: Contents of the Rongta F81S Tattoo Stencil Printer package, including the printer, transfer paper, and cables.
4. Продукт бүтүп калдыview
Familiarize yourself with the main components of your Rongta F81S printer:
- Кубат баскычы: Принтерди күйгүзөт/өчүрөт.
- LCD панели: Displays status indicators (e.g., battery, Bluetooth connection).
- Paper Input Slot: Where tattoo transfer paper is inserted.
- Кагаз чыгаруу: Where printed stencils exit.
- Flip Cover: Protects the print head and paper path.
- Type-C заряддоо порту: USB заряддоо кабелин туташтыруу үчүн.
- Тешикти баштапкы абалга келтирүү: For factory reset if needed.
- Басма башчысы: The thermal component responsible for printing.
Видео: Бүттүview of the F81S tattoo printer's components and app download process.
5. Орнотуу
5.1. Принтерди заряддоо
- Connect the provided USB Type-C cable to the printer's charging port.
- Кабелдин экинчи учун ылайыктуу USB кубат адаптерине (кошулмада жок) же компьютердин USB портуна туташтырыңыз.
- The LCD panel will indicate charging status. Ensure the printer is fully charged before first use.
Video: Demonstrates how to charge the F81S tattoo printer using the Type-C charging port.
5.2. Loading Tattoo Transfer Paper
- Separate the tattoo transfer paper: remove the protective sheet and tear off the yellow backing sheet, leaving the white tracing sheet and blue carbon sheet.
- Insert the transfer paper into the paper input slot with the white paper facing up. The printer will automatically feed the paper into position.

Image: Step-by-step guide on how to prepare and load tattoo transfer paper into the printer.
5.3. App Download and Bluetooth Connection (iOS/Android)
- Download the "SoPrint" app from the Google Play Store (for Android) or the Apple App Store (for iOS).
- Мобилдик түзмөгүңүздө Bluetooth иштетилгенин текшериңиз.
- Open the SoPrint app and follow the on-screen instructions to connect to your F81S printer via Bluetooth. The printer's name will typically appear as "F81S-XXXX".

Image: Instructions for downloading the SoPrint app and connecting the printer via Bluetooth to a mobile device.
5.4. USB Connection and Driver Installation (Windows/macOS)
For PC (Windows) and Mac (macOS) devices, a wired USB connection is required. Bluetooth is not supported for PC connections.
- Connect the F81S printer to your computer using the provided USB cable.
- Download and install the appropriate drivers for your operating system (Windows or macOS) from the official Rongta webсайт: ронгtaglobal.com/f81s.
- Драйверди орнотууну аяктоо үчүн экрандагы нускамаларды аткарыңыз.

Image: Steps for connecting the F81S printer to a PC or laptop via USB and installing necessary drivers.
Video: Demonstrates the USB connection process for macOS devices.
Video: Demonstrates the USB connection process for Windows devices.
6. Принтерди иштетүү
6.1. Printing with the SoPrint App
- Open the SoPrint app and ensure your printer is connected via Bluetooth.
- Select "Tattoo Editor" or "Image Split" to import or create your tattoo design.
- Use the app's editing functions to zoom, rotate, adjust size, orientation, and layout of your design. The "Tattoo Preview" function allows you to see the actual effect before printing.
- Once satisfied with the design, tap the print icon. Adjust print density and number of copies if necessary.
- Tap "Print Immediately" to start printing your stencil.

Image: A user operating the Rongta F81S printer to create a tattoo stencil.
Video: A comprehensive guide on how to use the F81S Tattoo Printer with the mobile app.
6.2. Transferring Stencil to Skin
- Clean the skin area thoroughly with a wipe or alcohol.
- Apply a small, even amount of tattoo transfer gel to the cleaned skin area.
- Carefully place the printed tattoo stencil (white tracing sheet) onto the prepared skin.
- Press gently for 5-10 seconds, then slowly peel off the white tracing paper. The stencil should now be transferred to the skin.

Image: Visual steps for preparing the skin and transferring the tattoo stencil.
7. Техникалык тейлөө
- Regularly clean the exterior of the printer with a soft, dry cloth.
- Keep the paper input and output slots free from dust and debris.
- Avoid touching the print head directly to prevent damage.
- Принтерди колдонбогондо салкын, кургак жерде сактаңыз.
8. Кыйынчылыктарды
- Принтер туташпай жатат: Ensure Bluetooth is on (for mobile) or USB drivers are installed (for PC/Mac). Restart the printer and your device.
- Начар басып чыгаруу сапаты: Ensure you are using Rongta tattoo paper. Clean the print head if necessary. For best results, print monochrome and simple tattoo designs.
- Кагаз тыгылышы: Gently pull out any jammed paper from the input or output slots. Ensure paper is loaded correctly.
- Printer overheating: If the app indicates overheating, pause printing and allow the printer to cool down for at least 10 minutes.
9. Техникалык шарттар
| Өзгөчөлүк | Деталь |
|---|---|
| Модель аты | F81S |
| Бренд | Ронгта |
| Басма технологиясы | Термикалык |
| Байланыш технологиясы | Bluetooth, USB |
| Максималдуу кара жана ак басып чыгаруу чечими | 203 dpi |
| Максималдуу медиа өлчөмү | 216мм |
| Максималдуу киргизүү барагынын сыйымдуулугу | 210 sheets (on a full charge) |
| Продукциянын өлчөмдөрү | 10.43"D x 1.06"W x 2.17"H (болжол менен 10.55 x 1.18 x 2.28 дюйм) |
| Элемент Салмагы | 15.9 унция (болжол менен 450 грамм) |
| Батареялар | Internal rechargeable battery (1 AAA batteries required listed in specs is likely an error) |
| Өзгөчө өзгөчөлүк | Portable |
| Түс | Кара |
10. Кепилдик жана колдоо
For warranty information, technical support, or service inquiries, please contact Rongta customer support. Refer to the contact details provided on the official Rongta webсайтында же продуктунун таңгагында.
Расмий колдоо Webсайт: ронгtaglobal.com
Электрондук почта: support@rongtatech.com
Ватсап: +86 18150388963